
As a passionate crochet enthusiast, I know how inspiring a beautiful granny square can be for any project, whether you’re a beginner or a seasoned pro. In this listicle, I’ve gathered my top eight granny square patterns that not only showcase creativity but also offer practical tutorials and recipes to help you bring your vision to life. From the classic Diamond Granny Square to the whimsical Retro Daisy and Hexagon designs, you’ll discover a variety of styles that are perfect for everything from cozy blankets to vibrant accessories. Join me as we explore these delightful patterns together—I promise you’ll find just the inspiration you need to spark your next crochet adventure!
1. Diamond Granny Square Pattern

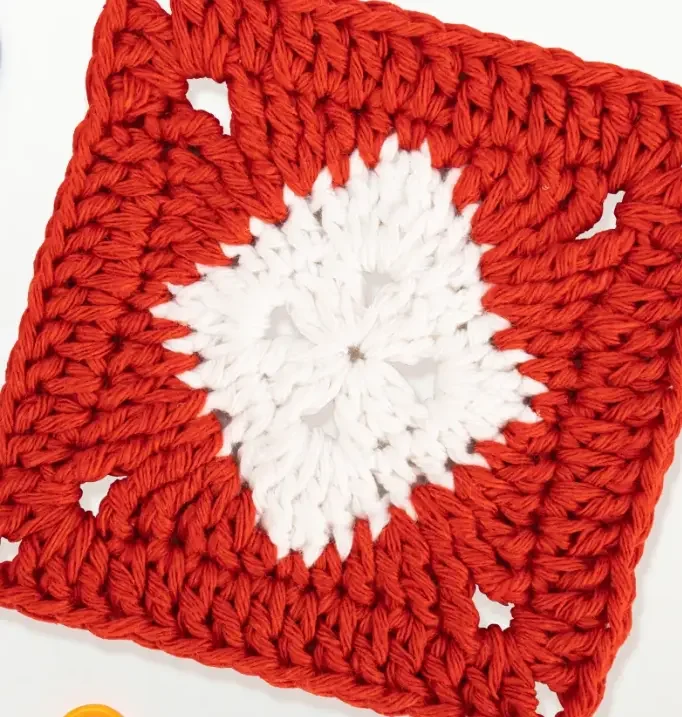
If you are looking to elevate your crochet projects with striking geometric shapes, the Diamond Granny Square is the perfect motif for you. Unlike traditional clustered granny squares, this pattern uses a brilliant combination of tall stitches and strategic skipping to create a mesmerizing raised diamond shape right in the center of the block.
This pattern is an fantastic adventure for intermediate crocheters who are comfortable with basic stitches but want to practice controlling tension across multiple stitch heights. The rhythmic progression from single crochets all the way up to double treble crochets creates a beautiful, textured relief that catches the light beautifully.
Because of its bold, geometric aesthetic, this square looks stunning when used in home decor pieces like patchwork crochet blankets. However, it also translates beautifully into wearable art, adding incredible visual interest to boho summer garments.
Materials Needed
When working with tall, textured stitches like trebles and double trebles, your material choices play a huge role in the final definition of your diamond shape.
- Yarn: A smooth, worsted weight (Size 4) or DK weight (Size 3) yarn is highly recommended. Avoid overly fluffy or halo yarns (like some mohairs or thick-and-thin art yarns), as they will blur the crisp, geometric lines of the diamond. High-quality acrylics, smooth wool blends, or cotton yarns will showcase the stitch definition perfectly.
- Crochet Hook: A hook sized appropriately for your chosen yarn (typically a 5.0mm for worsted or 4.0mm for DK). Since this pattern features tall stitches, if you are a tight crocheter, you may want to go up a half-size to prevent the fabric from becoming too stiff.
- Blocking Tools: Because this pattern features deep texture and skipped stitches, blocking is essential. You will need blocking mats, rust-proof T-pins, and a spray bottle or steamer to shape your square.
- Tapestry Needle: For seamlessly weaving in ends.
- Stitch Markers: Helpful for marking the center points of your sides in later rounds to ensure your stitch counts remain accurate.
Abbreviations Used
To successfully execute the varying heights in this geometric pattern, it is important to be completely comfortable with the stitches and special instructions used.
- K – Skip: This instruction tells you to completely bypass the next stitch or space, leaving an intentional gap that helps form the geometric points of the diamond.
- MR – Magic ring: The best way to start a granny square so you can pull the center completely tight without leaving a hole.
- Sl.st – Slip stitch: A low-profile stitch used to seamlessly join the end of a round to the beginning.
- Ch – Chain stitch: Used for creating height at the beginning of rounds and forming the corner spaces of the square.
- Sc – Single crochet: The shortest and tightest stitch in this pattern, used to anchor the fabric and create contrast against the taller stitches.
- Dc – Double crochet: A standard, medium-height stitch that forms the sturdy foundation and outer borders of the square.
- Tr – Treble crochet: A tall stitch that requires two yarn-overs before inserting your hook. It is used here to build the vertical slope of the diamond shape.
- Dtr – Double treble: A very tall stitch requiring three yarn-overs. This stitch creates the dramatic, peaked center point of your diamond.
This pattern uses USA crochet terminology
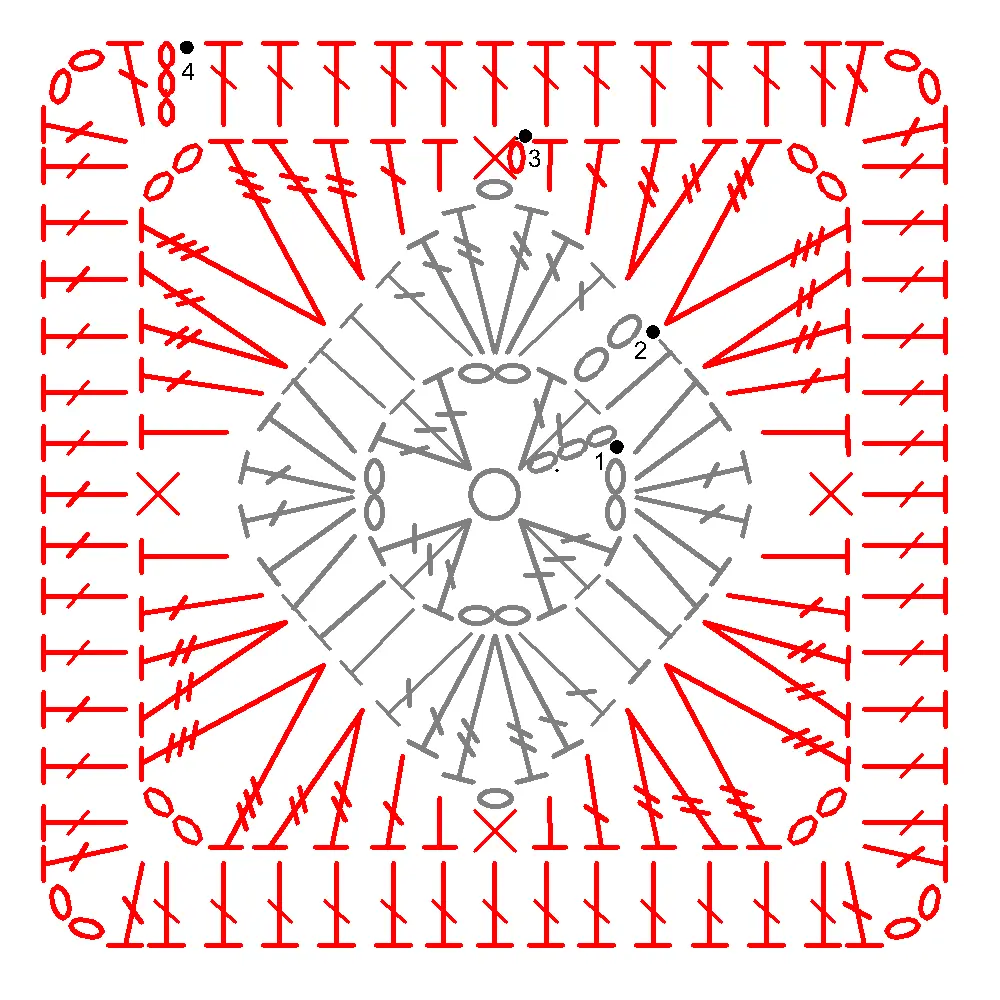
Pattern Instructions
Diamond Granny Square
Pay close attention to your yarn overs when working the taller stitches in Rounds 2 and 3 to ensure none are dropped, which would alter the height of your diamond.
Round 1: MR,Ch×3,Dc×2,Ch×2,[Dc×3,Ch×2,]×3,Sl.st[12]
Round 2: Ch×2,[(Dc×2,Tr,Ch,Tr,Dc×2,)k1,Hdc×2,(Hdc×2,Dc×2,Hdc×2,)k1,Hdc×2]×2,Sl.st
Round 3: [Sc,Hdc,Dc,(Tr×2),(Dtr,Ch×2,Dtr),(tr×2),Dc,Hdc]×4,Sl.st
Round 4: (Ch×3,Dc,Ch×2,Dc×2),Dc×11,[(Dc×2,Ch×2,Dc×2),Dc×11,]×3,Sl.st
Assembly
The most exciting part about geometric granny squares is how their secondary patterns emerge when they are joined together. Because this pattern features a distinct diamond in the center, you have a few layout options for your final project.
If you sew or crochet them together in a traditional grid alignment, you will get a repeating, evenly spaced diamond lattice. However, if you rotate every other square by 45 degrees, the diamonds will point toward each other, creating a completely different, interlocking geometric design that looks incredibly complex.
Before you begin joining, taking the time to block your squares is non-negotiable for geometric patterns. Pin your squares to their exact intended measurements, ensuring all four corners form perfect 90-degree right angles and the outer edges are perfectly straight. For a high-end, professional finish that won’t add bulky seams between your diamonds, check out our guide on how to create a seamless join for granny squares.
Tips
- Count Your Yarn Overs: The transition from double crochet to treble to double treble in Round 3 is where crocheters most often make mistakes. It is incredibly easy to accidentally yarn over only twice when making a Dtr. Count your loops on the hook before pulling through to ensure you have three loops for the Dtr and two loops for the Tr.
- Maintain Even Tension: Because this square utilizes stitches of vastly different heights in a single round (going from a tight Sc all the way up to a loose Dtr), your tension will naturally want to shift. Actively focus on keeping your stitches relaxed but consistent so the diamond pops outward without distorting the flat background of the square.
- Straight Edges: Working tall stitches into the chain spaces of previous rounds can sometimes cause the edges to ripple or bow. For more help maintaining perfectly straight edges on complex square patterns, review our tips on how to crochet a perfect granny square.
FAQ
How big is the finished Diamond Granny Square? The final size depends heavily on your yarn weight, hook size, and natural tension. Because this pattern only has four rounds, using a standard worsted weight yarn will likely yield a smaller square (around 4 to 5 inches). If you need a larger square for a butterfly crochet top or a blanket, you can easily continue the geometric growth by adding more rounds of double crochet.
Can I make this pattern larger? Absolutely. To make the square larger, you can continue adding rounds of double crochets to the outer edge. Simply place a (Dc×2, Ch×2, Dc×2) cluster in each corner chain-2 space, and fill the sides with an increasing number of double crochets until the sides lay flat.
What does the “K” mean in Round 2? The “K” stands for “skip.” In Round 2, you will see ,)k1, which means after completing the stitch cluster immediately preceding the K, you will skip over 1 stitch or space from the previous round before moving on to the next set of instructions. This skipping action is what pushes the stitches together to form the diamond points.
Do I have to block this square? While you don’t have to block any crochet project, blocking is highly recommended for this specific pattern. The double treble crochets in the center will naturally want to lean or twist. Blocking relaxes the yarn, sets the tall stitches upright, and ensures your square is perfectly flat and ready for joining.
Conclusion
Congratulations on completing your Diamond Granny Square! This highly textured, geometric motif brings a stunning, modern aesthetic to any crochet project. Share your finished square in the comments below!
2. Free Spade Granny Square Pattern
The world of crochet motifs is incredibly vast, but there is something undeniably captivating about squares that break away from the traditional clustered look. While standard granny squares are the foundation of many cozy blankets and garments, modern crocheters are constantly seeking out designs that offer a touch of elegance, a pop of dramatic texture, and a unique visual rhythm. If you want to elevate your next project from homemade to artisanal, incorporating unique stitch techniques is the perfect way to do it.
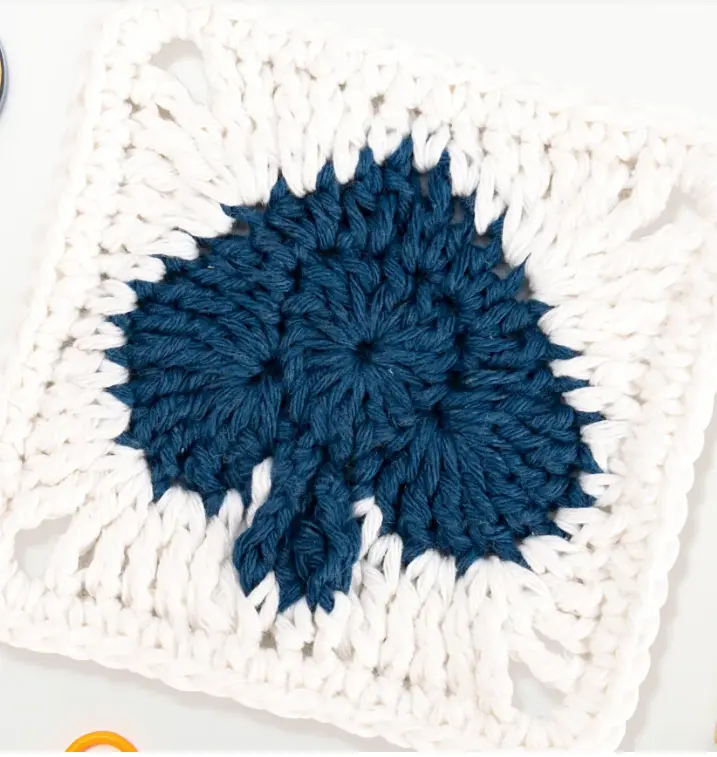
Enter the Spade Granny Square. Named for its sharp, elongated points that resemble the iconic spade shape, this pattern is a true showstopper. It utilizes a dramatic progression of stitch heights—climbing all the way up to double treble crochets—to create a stunning, three-dimensional peak right in the heart of the motif. This isn’t just a flat square; it is a highly textured piece of fiber art that catches the light and demands attention.
Because this pattern incorporates advanced stitches like double trebles, skipped stitches, and complex stitch combinations (like working stitches together to decrease), it is geared toward intermediate to advanced crocheters. If you are looking to push your boundaries, master your tension across extreme height differences, and create a square that will absolutely wow anyone who sees it, this is the perfect project for your hook.
Materials Needed
- Yarn of your choice: A smooth, worsted weight or DK weight yarn is highly recommended. Because this pattern relies heavily on extreme stitch height variations to create the spade points, a yarn with excellent stitch definition (like a smooth wool or high-quality acrylic) will make your sharp peaks really pop. Solid or tonal colors work best to show off the complex textures.
- Corresponding crochet hook: Match your hook size to your chosen yarn. Because double treble crochets can get loose, you may want to go down a half hook size to keep your tension tight and structured.
- Stitch markers: Absolutely essential for this pattern. Round 3 is incredibly complex with varying repeats. Place a locking stitch marker at the beginning of each side of the square to keep your place.
- Scissors: A sharp pair for cutting yarn tails.
- Tapestry needle: For seamlessly weaving in your ends.
- Blocking mats and T-pins: Crucial for this specific motif to shape the spade points.
Abbreviations Used
- K – Skip
- MR – Magic ring
- Sl.st – Slip stitch
- Ch – Chain stitch
- Dc – Double crochet
- Sc – Single crochet
- Tr – Treble crochet
- Dtr – double treble
This pattern uses USA crochet terminology
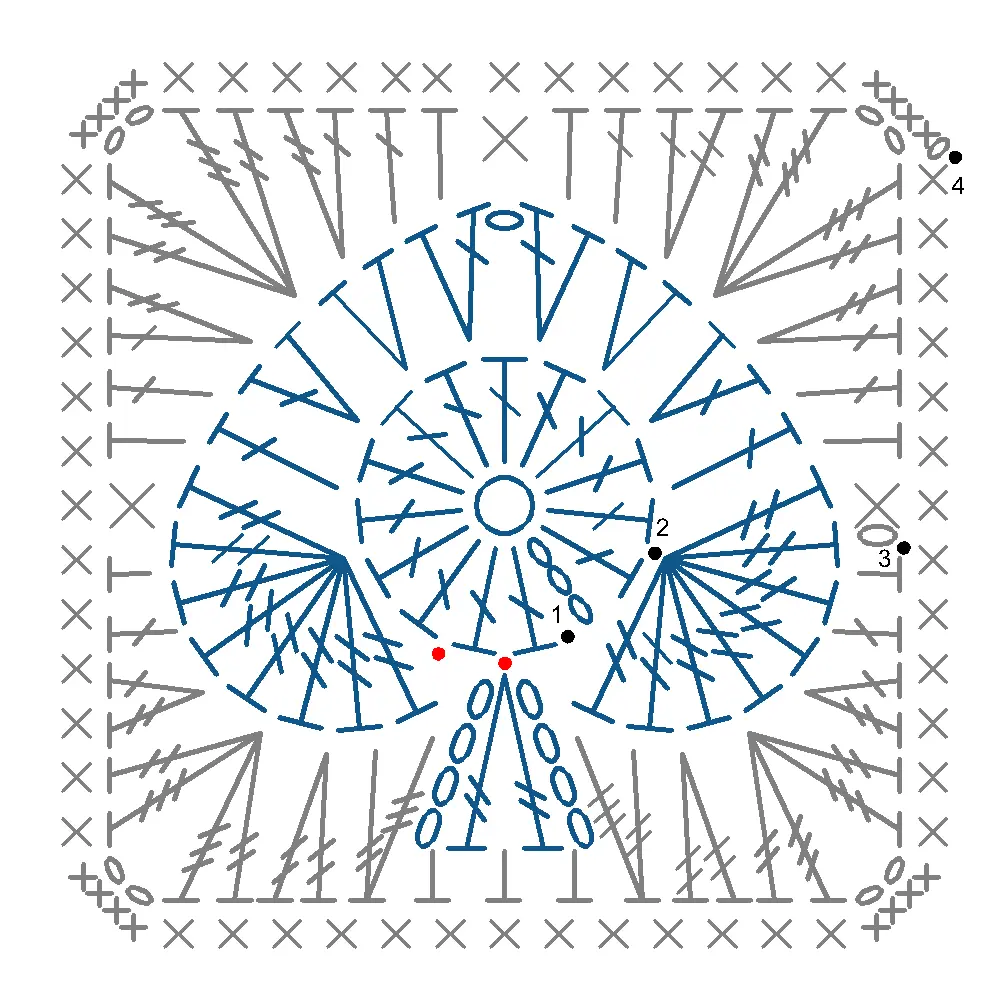
Pattern Instructions
Before you begin, take a moment to study the flow of this motif. Round 2 is where the magic happens, utilizing skipped stitches and massive peaks to form the spade points. Round 3 acts as a complex framing round that transitions those peaks back into the corners of the square, while Round 4 provides a sturdy, flat single crochet border.
The Spade Square
Round 1: MR,Ch×3,Dc×14,St.sl[15]
Round 2: K1,Tr×8,Dc,(Dc,Hdc),(Hdc×2),(Hdc,Dc),Ch,(Dc,Hdc),(Hdc×2),(Hdc,Dc),Dc,Tr×8,K1,Sl.st,(Ch×4,Tr×2,Ch×4),Sl.st
Round 3: Ch[Sc,Hdc,Dc,(Dc,Tr),(Tr,Dtr,Ch×2,Dtr,Tr),(Tr,Dc),Dc,Hdc]×2,Sc,Hdc,Dc,(Dc,Tr),(Tr,Dtr,Ch×2,Dtr,Tr),(Tr×2),[1Tr,1Dtr(together)],Hdc×3,[1DTr,1tr(together)]Tr×2,(Tr,Dtr,Ch×2,Dtr,Tr),(Tr,Dc),Dc,Hdc,Sl.st
Round 4: Ch,[Sc×4,Sc×13]×4,Sl.st
Assembly
Because this motif features a drastic change in stitch heights—specifically the towering double treble crochets that form the spade points—aggressive blocking is an absolute must before assembly. When you finish Round 3, your square will likely look more like a starburst or a chaotic pinwheel than a flat, joinable motif.
To fix this, you need to wet block or steam block your squares. Pin the center of the magic ring down firmly, then gently pull the double treble “spade” points outward until they form sharp, distinct peaks. Pin the corners of the single crochet border in Round 4 to create perfect 90-degree angles. Allow the square to dry completely; this will set the stitches, locking the spade shape in place while ensuring the square lies perfectly flat.
Once blocked, you can join these squares using your preferred method. Because Round 4 provides a solid, even edge of single crochets, the flat slip stitch join or a standard mattress stitch worked on the wrong side will give your finished blanket a highly professional, structured appearance.
Tips for Success
Tension is everything when working with extreme stitch heights. Going from a double crochet straight up to a double treble crochet in a single round can easily cause distortion. If your double treble stitches are too loose, your spade points will look floppy and lack definition. If they are too tight, the surrounding stitches will pucker. Pay close attention to your yarn overs and try to maintain a consistent tension even as the stitches grow taller.
Pay very close attention to the “K” (Skip) in Round 2. Skipping a stitch at the base of the spade points is what gives the motif its sharp, elongated look rather than a rounded hill. Additionally, Round 3 features stitches worked “together” (like a decrease). Make sure you are inserting your hook through both stitches as indicated before completing the final yarn over, as this helps pull the fabric inward and reform the square shape after the extreme points of Round 2.
FAQ
What does “K1” mean in this pattern? “K” stands for Skip. When you see K1, it means you completely skip the next stitch from the previous round and move directly into the following stitch. This creates a gap that allows the subsequent tall stitches to form a sharp, distinct point.
My square looks like a star and won’t lay flat. Did I do something wrong? Not at all! This is the natural shape of the motif before it is blocked. The double treble crochets naturally pull the fabric upward. You must use blocking mats and T-pins to stretch the spade points outward and pin the corners down firmly so the square dries in a perfect, flat shape.
Can I use this spade square to make a wearable garment? Yes, but keep the texture in mind. Because the double treble spade points create a high-relief, 3D texture, these squares are bulkier than traditional flat granny squares. They are absolutely stunning for winter cardigans, thick winter shawls, or tote bags, but they may be too heavy or stiff for lightweight summer tops.
More Granny Square Patterns to Try
- Enchanted Rose Granny Square: A Free 3D Crochet Pattern
- Tudor Rose Crochet Granny Square Free Pattern Tutorial
- Free Crochet Daffodil Granny Square Pattern Step by Step Tutorial
- Stunning Star Patchwork Crochet Blanket Pattern: A Step-by-Step Guide
- How to Crochet a Perfect Granny Square: 3 Secrets to Clean Edges
Conclusion
Congratulations on completing your Spade Granny Square! This highly textured, dramatic motif is a stunning way to showcase your advanced crochet skills and add incredible dimension to your projects. Share your finished spade square in the comments below!
3. Block Stitch Granny Square
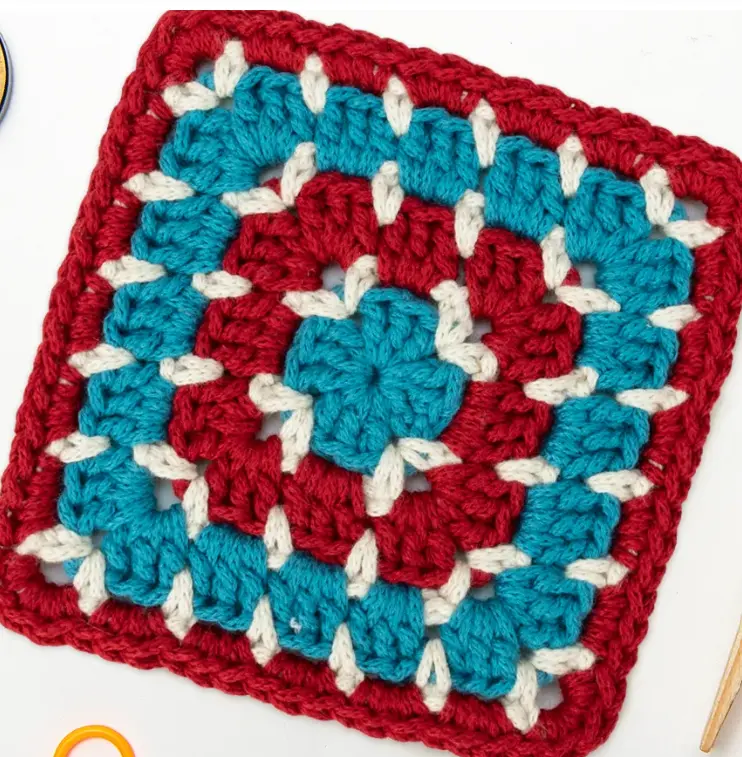
If you are looking for a crochet motif that perfectly bridges the gap between classic retro charm and crisp, modern geometry, the Block Stitch Granny Square is exactly what you need. Unlike traditional granny squares that feature open, lacy gaps, the block stitch—sometimes called the mosaic stitch—creates a solid, grid-like texture that is incredibly satisfying to both make and look at. It gives the illusion of tiny, interwoven colored blocks without the need for complex color-changing techniques within a single row.
This pattern is a fantastic adventure for confident beginners who have mastered the basic stitches and are ready to try something with a bit more visual punch. The rhythmic repetition of filling “windows” with double crochets and then creating new “windows” with single crochets and chains is deeply relaxing and highly addictive. Because of its dense, structured fabric, this square is uniquely suited for projects that need a bit more weight and warmth, like cozy winter afghans, sturdy tote bags, or structured pillow covers.
Materials Needed
To get the most defined “blocks” in your granny square, choosing the right materials is essential. The block stitch looks best when there is a high contrast between your colors.
- Yarn in two or more colors: Worsted weight (size 4) cotton or acrylic yarn is highly recommended. Cotton will give your square a crisp, structured feel that highlights the grid perfectly.
- Corresponding crochet hook: A 5.0mm hook is a great starting point for worsted weight yarn.
- Stitch markers: Helpful for marking the first stitch of your rounds, especially as the stitch count grows.
- Tapestry needle: Essential for weaving in the multiple tails created by changing colors.
- Scissors: For clean cuts.
Abbreviations Used
This pattern relies on a handful of fundamental crochet stitches to create its complex-looking design.
- MR – Magic ring: Used to start your square with a tightly closed center.
- Sl.st – Slip stitch: Used to seamlessly close each round.
- Ch – Chain stitch: Used to create height and the “window” spaces for the block effect.
- Dc – Double crochet: The primary stitch used to fill in the blocks with solid color.
- Sc – Single crochet: Used to frame the double crochet blocks and build the grid structure.
Pattern Instructions
This pattern uses USA crochet terminology
Understanding the Block Stitch Technique
Before diving into the pattern, it helps to understand the mechanics of how the block stitch actually works. The technique operates on a two-round system. In the first round (usually worked in a contrasting color), you create a grid of “windows” or gaps using single crochets and chain spaces. In the next round (worked in your block color), you work multiple double crochets into those chain spaces to fill the windows completely.
As you progress through this pattern, you will see this exact mechanic at play. The first round establishes the classic granny corner. Round two creates the windows. Round three fills them. Round four expands the windows to accommodate the growing size of the square, and round five fills those larger windows. Finally, the pattern finishes with a solid round of single crochets to create a beautifully neat, flat border.
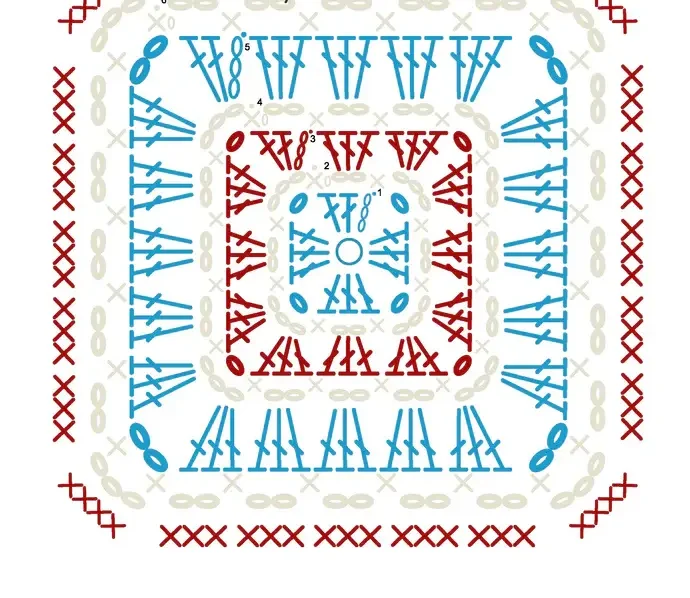
Block Stitch Granny Square
Rnd 1: MR,Ch×3,Dc×2,Ch,[Dc×3,Ch]×3,Sl.st [9]
Rnd 2: Ch×1,[Sc,Ch×3,Sc,Ch×2]×4,Sl.st
Rnd 3: Ch×3,Dc×2,[Ch,Dc×3,Dc×3,Dc×3]×3,Ch,Dc×3,Dc×3,Sl.st [36]
Rnd 4: Ch×1,[Sc,Ch×3,Sc,Ch×2,Sc,Ch×2,Sc,Ch×2]×4,Sl.st
Rnd 5: Ch×3,Dc×2,[Ch×2,Dc×3,Dc×3,Dc×3,Dc×3,Dc×3]×3,Ch,Dc×3,Dc×3,Dc×3,Dc×3,Sl.st [60]
Rnd 6: Ch×1,[Sc,Ch×3,Sc,Ch×2,Sc,Ch×2,Sc,Ch×2,Sc,Ch×2,Sc,Ch×2]×4,Sl.st
Rnd 7: Ch,[Sc×4,Sc×3,Sc×3,Sc×3,Sc×3,Sc×3]×4,Sl.st [76]
Assembly
When it comes time to join your Block Stitch Granny Squares, you have a distinct advantage: the solid, grid-like edges align perfectly with one another. Because there are no large, open gaps like a traditional granny square, you do not have to worry about visually matching up complex corners.
For a completely invisible and seamless finish, the mattress stitch or whip stitch worked through the back loops of the single crochet border is highly effective. If you prefer to join as you go, you can easily slip stitch the corners and edges of your current square directly to the finished border of the previous one. Because the final round is entirely single crochets, any standard joining method will yield a very clean, professional-looking seam that won’t interrupt the geometric block design.
Tips
To get that perfectly crisp “pixelated” look, color choice is everything. Use a dark, neutral color (like charcoal, navy, or cream) for your “grid” rounds (the single crochet and chain rounds), and bright, saturated colors for your “block” rounds (the double crochet rounds). This makes the background recede and forces the colored blocks to pop forward visually.
Tension is another crucial factor. If your chain spaces in the grid rounds are too tight, you will struggle to fit all the double crochets into the window on the next round, causing your square to pucker. Keep your chain stitches relaxed and loose. If you are planning a large project, check out our guide on How to Create a Seamless Join for Granny Squares, or learn How to Crochet a Perfect Granny Square to ensure your foundations are flawless.
If you love the look of this structured motif but want to try something a bit different, the Butterfly Granny Square is another fantastic textured option, or you could use your finished squares to whip up this Free Crochet Granny Square Scarf.
FAQ
Can I make this block stitch square larger? Absolutely! To make a larger square, simply repeat the two-round sequence: add another round of single crochets and chains to expand the grid windows, followed by a round of double crochets to fill those new windows. Just ensure you are increasing the number of chain spaces appropriately on each side as the square grows.
My square is turning into a diamond/rhombus shape. What am I doing wrong? This usually happens if you accidentally miss a chain space or a corner stitch. The block stitch relies on precise math to stay square. Double-check that you are placing the exact number of single crochets and chains in each segment, and use a stitch marker in the very first stitch of every round so you know exactly where your corners are.
Does this pattern use a lot of yarn? Yes, the block stitch is inherently a “yarn-heavy” technique because you are essentially double-layering your stitches by filling in gaps with dense double crochets. However, this is exactly what gives the blanket its beautiful weight, warmth, and structural integrity!
Conclusion
Congratulations on completing your Block Stitch Granny Square! This beautifully geometric, dense-textured motif is a stunning modern alternative to traditional lace squares. Share your colorful block stitch creations in the comments below!
4. Retro Daisy Granny Square Pattern
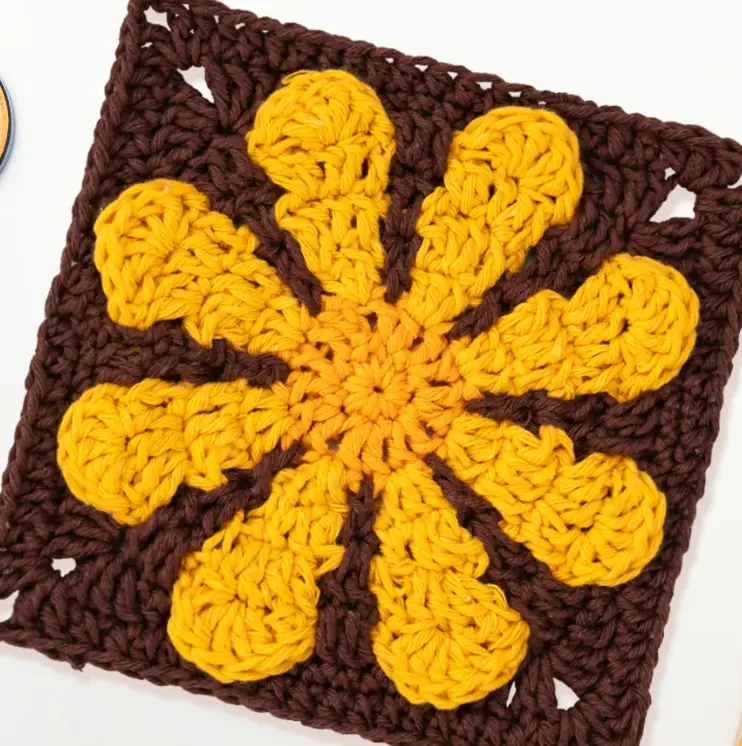
There is nothing quite like a 3D floral motif to bring a crochet project to life, and this Retro Daisy Granny Square does exactly that. By working stitches in front of and behind previous rounds, this pattern creates a stunning layered flower that pops right off the fabric. It is the ultimate blend of groovy 1970s nostalgia and modern crochet techniques.
Because this pattern requires you to manipulate loops and flip petals as you work, it is best suited for intermediate crocheters or adventurous beginners. The result is a highly textured, dimensional square that looks incredibly impressive.
These squares are highly addictive to make and serve as perfect statement pieces for summer crochet tops, cozy blanket panels, or trendy market bags. If you love floral granny squares, you will also adore the Enchanted Rose Granny Square and the Daffodil Granny Square.
Materials Needed
- Yarn: Weight-3 Light (DK) yarn in at least two contrasting colors (one for the daisy petals, one for the background/leaves)
- Crochet Hook: 3.00mm hook
- Tapestry Needle: For weaving in ends
- Marking Clips: Highly recommended to hold your active loops when dropping yarn to work over previous rounds
Abbreviations Used
- MR – Magic Ring
- SC – Single crochet
- DC – Double crochet
- Hdc – Half double crochet
- Ch – Chain stitch
- Sl.st – Slip stitch
- Sk – Skip stitch
- inc – Increase (2 stitches in one stitch)
This pattern uses USA crochet terminology
Pattern Instructions
Rounds 1-4
R1: Magic Ring, SCx8, sl.st [8]
R2: Chx3(Counts as 1DC), Dc, Dc incx7 [16]
R3: Change a new yarn color, Chx3(Counts as 1DC), Dc inc into the same ST, [Ch, Sk, Dcx3 into the next ST]x7, Ch, Sk, sl.st. [24]
R4: Change a new yarn color, Pull the yarn out of the loop with a slip stitch through the skipped stitches in the round2. Chx3 (Counts as 1DC), Chx4, Sk over to the next Sk St of round2, Dc, [Chx4, Sk over to the next Sk St of round2]x7, Sl.st [40]
Round 5
Round 5: Switching back to the round3 yarn color, Pull the loop from the round4 Ch space to place it in front of the round3, Chx3 (Counts as 1DC), [2 dc in next st (from Round 3), 1 dc in last st of cluster] while keeping Round 4 ch stitches pushed to the back.
Repeat: [Chx2, skip 1 dc from Round 4, 1 dc in next st, 2 dc in next st, 1 dc in next st] around.
End with Ch 2 and sl.st into the top of ch 3.
Round 6
Round 6: Switch back to the yarn color from Round 4. Pull up a loop to the front in any ch1 sp.
Ch 3 (counts as the first dc), 1 dc in the same st.
Repeat:[Ch 5, skip 4 dc, 2 dc in the next dc from Round 4] around.
End with ch 5 and sl.st into the top of the ch 3.
Round 7
Round 7: Switch back to the yarn color from Round 5. Pull up a loop to the front in any ch5 sp from Round 6.
Insert hook through the ch spaces of Round 6 and pull the loop from Round 5 to the front.
Chx3 (counts as the first dc). 2 dc in the next st of Round 5. 1 dc in the next 2 sts of the cluster.
Repeat:[Ch 2, skip the 2 dc from Round 6, 1 dc in the next st, 2 dc in the next st, 1 dc in the next 2 sts] around.
End with ch 2 and sl st into the top of the ch 3.
Round 8
Round 8: Continue with the same yarn. Ch 1 (does not count as a stitch).
Sc in the first st, sk 1 st, 5 dc in the next st (center dc of the cluster), sk 1 st, sc in the next st.
Repeat: [Ch 2, sk the ch-2 space from Round 7, sc in the first st of the next dc cluster, sk 1 st, 5 dc in the next st, sk 1 st, sc in the last st of the dc cluster] around.
End with ch 2 and sl.st into the first sc.
Round 9
Round 9: Switch back to the yarn color from Round 7. Pull the yarn to the front.
Chx3 (counts as the first dc).Work 2 dc in the next st from Round 7. Flip the flower petal (Round 8) downward and work 5 dc into the ch space from Round 7 behind the petal. Flip the petal back up. Work 1 dc in the first dc st and 2 dc in the next dc st in front of the petal (from Round 8).
Repeat: [*Flip the petal down, work 5 dc in the ch space from Round 7, flip the petal back up, work 1 dc in the first st and 2 dc in the next st in front of the petal] around.
End with a sl.st into the top of the starting ch-3.
Round 10
Round 10: Chx1 (does not count as a st),
Sc in the first st. Sc in the next 5 sts.
Hdc in the next st. Dc in the next st.
Corner: Work (2 dc, ch 2, 2 dc) in the next st.
Dc in the next st. Hdc in the next st.
Sc in the next 11 sts.
Hdc in the next st. Dc in the next st.
Corner: Work (2 dc, ch 2, 2 dc) in the next st.
Dc in the next st. Hdc in the next st.
Sc in the next 11 sts.
Hdc in the next st. Dc in the next st.
Corner: Work (2 dc, ch 2, 2 dc) in the next st.
Dc in the next st. Hdc in the next st.
Sc in the next 11 sts.
Hdc in the next st. Dc in the next st.
Corner: Work (2 dc, ch 2, 2 dc) in the next st.
Dc in the next st. Hdc in the next st.
Sc in the last 5 sts.
Sl st into the first sc to join.
Round 11
Round 11: CHx1 (does not count as a stitch)
Hdc into the next 9 sts
In the corner CH 2 sp, work (2 DC, CH 2, 2 DC)
Hdc into the next 19 sts
In the corner CH 2 sp, work (2 DC, CH 2, 2 DC)
Hdc into the next 19 sts
In the corner CH 2 sp, work (2 DC, CH 2, 2 DC)
Hdc into the next 19 sts
In the corner CH 2 sp, work (2 DC, CH 2, 2 DC)
Hdc into the next 9 sts
SL.ST into the first st
Fasten off, cut yarn leaving 6-10 inches, and pull yarn tail through the last loop.
Assembly
Because this square features 3D petals, assembling them into a larger project requires a gentle hand to avoid squashing your beautiful flowers. Lay your squares out in your desired color pattern before joining.
When you are ready to connect them, a seamless join is the best method to maintain the retro aesthetic without adding bulky, visible borders. Check out our guide on how to create a seamless join for granny squares for a professional finish.
Tips
- Manage Your Loops: The most challenging part of this pattern is Rounds 5 through 9, where you drop yarn and pick it up rounds later. Use locking stitch markers to secure your dropped loops so they don’t accidentally pull out while you are working the overlay rounds.
- Push Stitches Back: Pay close attention to the instructions in Round 5 and Round 7 that tell you to keep certain stitches pushed to the back. This is what creates the layered, 3D depth of the daisy petals.
- Keep Tension Relaxed: When working the 5 dc petals in Round 8, try to keep your tension slightly relaxed so the petals plump up naturally rather than laying flat against the fabric. For more help managing tension and edges, review our tips on how to crochet a perfect granny square.
FAQ
Can I make this square bigger? Absolutely! To make a larger square, simply add additional rounds of half double crochets (like Round 11) to the outer edges, making sure to place your (2 DC, CH 2, 2 DC) corners in each chain-2 corner space.
Why do I have to flip the petals down in Round 9? Flipping the petals down allows you to crochet behind them into the Round 7 chain spaces. This anchors the center of the flower and creates the distinct 3D lifted effect that makes this butterfly granny square alternative so unique.
What is the best yarn to use for this pattern? A Weight-3 (DK) yarn is perfect because it provides excellent stitch definition without making the square too heavy or stiff. Cotton blends are particularly great for holding the 3D petal shape.
Conclusion
Congratulations on completing your Retro Daisy Granny Square! This highly textured, 3D floral motif brings an unbeatable groovy aesthetic to any crochet project. Share your finished square in the comments below!
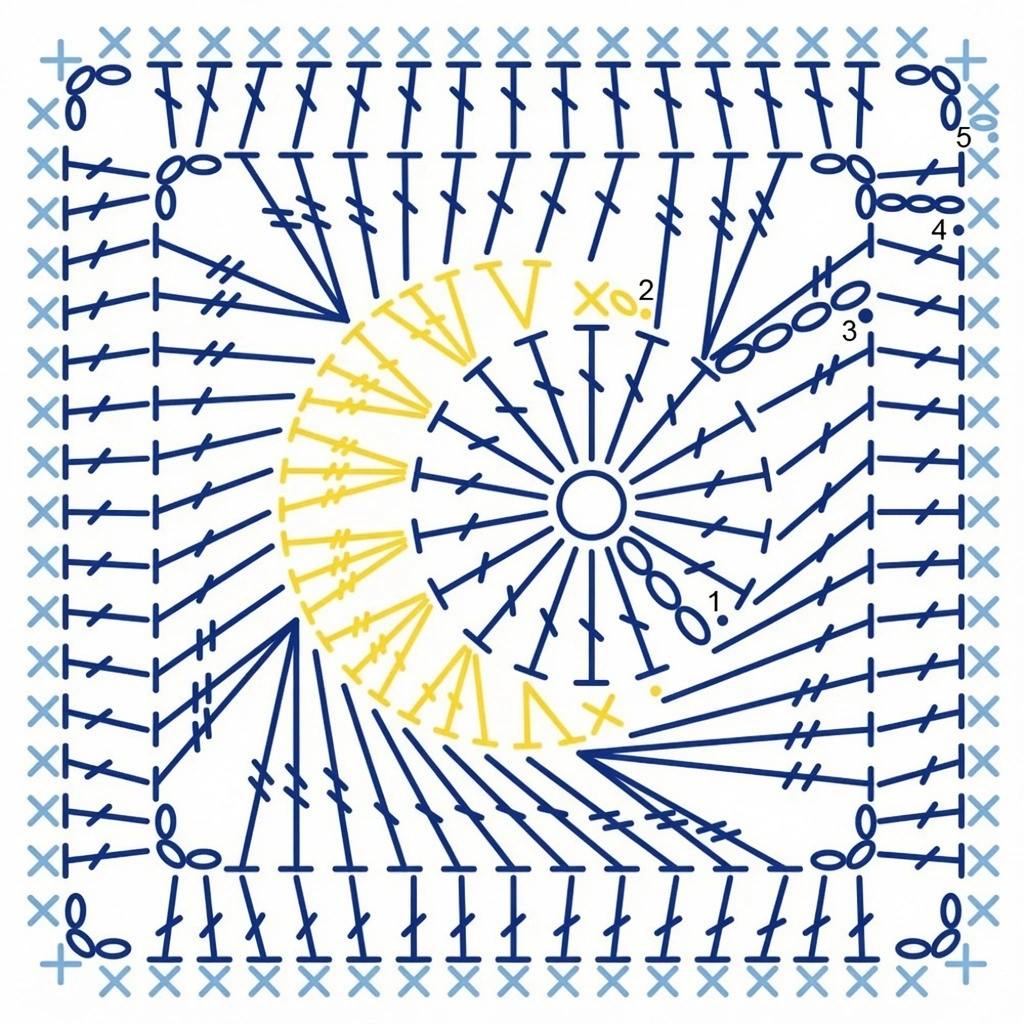
5. Free Moon Granny Square Pattern
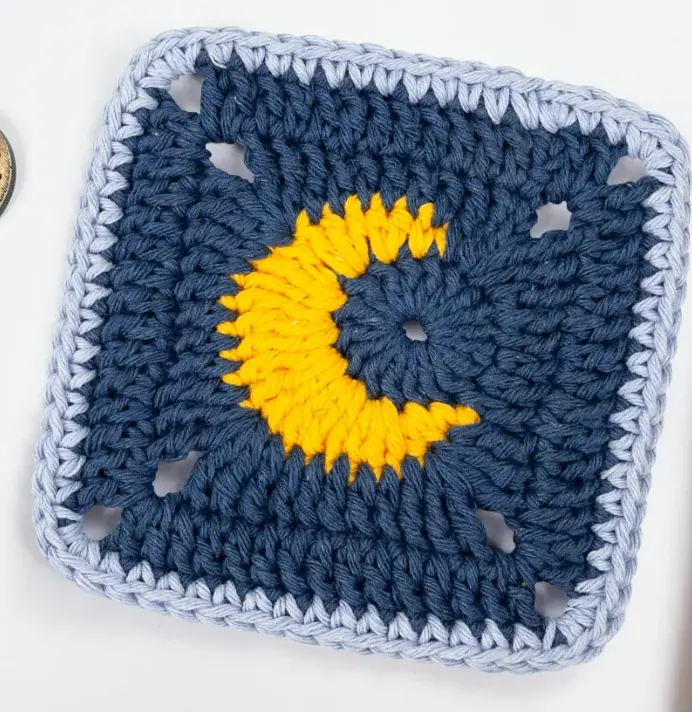
The night sky has always served as a limitless source of inspiration for crafters, and bringing celestial elements into your crochet work is a magical way to make your projects stand out. While standard geometric motifs are beautiful, sometimes you want a square that tells a story or evokes a specific mood. If you are ready to add a touch of nighttime whimsy to your next project, this unique motif is the perfect choice.
The Moon Granny Square breaks away from the traditional clustered look, using a beautiful, curved gradient of stitches to create a gentle, crescent-like shaping within the square. By skillfully transitioning from single crochets up to towering treble crochets, this pattern naturally forms a puffy, textured “moon” right in the center of the square before finishing with a solid, framing border.
Because this pattern requires you to smoothly shift between multiple different stitch heights while maintaining an even tension, it is best suited for intermediate crocheters. However, if you are an adventurous beginner who has mastered the basic stitches and is looking for a highly rewarding challenge, this pattern is a fantastic way to level up your skills.
Materials Needed
- Yarn of your choice: A smooth, worsted weight or DK weight yarn is highly recommended. Because this pattern relies heavily on stitch height variations to create the moon shape, a yarn with excellent stitch definition will make your celestial motif really pop.
- Corresponding crochet hook: Match your hook size to your chosen yarn (typically a 4.0mm or 5.0mm hook for DK/worsted weights).
- Stitch markers: Essential for this pattern! Place a marker in the first stitch of Rounds 3 and 4 to help you keep track of where your repeats begin and end.
- Scissors: A sharp pair for cutting yarn.
- Tapestry needle: For seamlessly weaving in your ends.
Abbreviations Used
- MR – Magic ring
- Sl.st – Slip stitch
- Ch – Chain stitch
- Dc – Double crochet
- Sc – Single crochet
- Hdc – half double crochet
- Tr – Treble crochet
This pattern uses USA crochet terminology
 Crochet a stunning 3D retro daisy granny square with this free pattern! Features layered flower petals and is perfect for blankets and summer tops.
Pattern Instructions
Before you begin, take a moment to look at the flow of the stitches. Round 2 is the “magic” round where the moon shape is created by stepping up in stitch height. Do not panic if your work looks curved or bowl-like after Round 2—this is exactly what is supposed to happen! Rounds 3 and 4 will work into those varying heights to pull the motif back into a flat square shape.
The Moon Square
R1: MR, Ch×3, Dc×17 [18]
R2: Sl.st, Ch, Sc, (Hdc×2), (Hdc,Dc×2),(Dc,Tr×2), (Tr×3), (Tr×3), (Tr×2,Dc),(Dc×2,Hdc),(Hdc×2), Sc, Sl.st.
R3: (Ch×4,Tr,Ch×3,Tr×2), Tr, [Dc×5,Tr,(Tr×2,Ch×3,Tr×2)Tr,]×3, Dc×5, Tr.
R4: (Ch×3,Dc,Ch×3,Dc×2), [Dc×11,(Dc×2,Ch×3,Dc×2)]×3, Dc×11.
R5: Ch,[(Sc×3),Sc×15]×4.
Assembly
Because this motif features a drastic change in stitch heights—going all the way up to treble crochets in the center and back down to single crochets on the edges—blocking is an absolute must. Before you join your squares, wet block or steam block them aggressively. This will flatten out the natural curling of the treble stitches and ensure that every single moon square measures the exact same width and height.
Once blocked, you can join these squares using your preferred method. The single crochet border in Round 5 provides a sturdy, even edge that is incredibly easy to work with. For a seamless look, the flat slip stitch join or a mattress stitch worked on the wrong side will give your finished blanket or garment a highly professional appearance.
Tips
Watch your tension in Round 2! Because you are rapidly increasing the height of your stitches from Sc to Hdc, Dc, and finally Tr, it is easy to inadvertently pull your shorter stitches too tight. Try to keep a relaxed, even tension across all the stitches in this round so the “moon” puffs out evenly rather than warping to one side.
Additionally, pay very close attention to the chain spaces in Rounds 3 and 4. These chain spaces form the corners of your square. If you accidentally skip a chain space or put stitches in the wrong one, your square will begin to twist. Counting your stitches at the end of every round is highly recommended until you get the rhythm of this pattern memorized.
FAQ
Why does my square look like a bowl after Round 2? This is completely normal! Round 2 is designed to build a 3D, curved texture by using very tall treble crochets in the center. As you work Rounds 3 and 4, you will be working stitches into the sides of those tall stitches, which will pull the curve down flat into a square shape.
Can I make this square larger? This specific pattern is written to create a singular, solid motif. If you want a larger square, the best approach is to treat this completed Moon Granny Square as the “center” and begin attaching traditional granny square clusters around the outer single crochet border.
What is the best yarn color for a moon motif? While you can use any color, a crisp white, cream, or pale yellow for the moon stitches against a dark navy, black, or dark grey background yarn will give you the most striking, realistic celestial contrast.
More Granny Square Patterns to Try
- Enchanted Rose Granny Square: A Free 3D Crochet Pattern
- Tudor Rose Crochet Granny Square Free Pattern Tutorial
- How to Crochet a Perfect Granny Square: 3 Secrets to Clean Edges
- Stunning Star Patchwork Crochet Blanket Pattern: A Step-by-Step Guide
- Free Crochet Daffodil Granny Square Pattern Step by Step Tutorial
Conclusion
Congratulations on completing your Moon Granny Square! This beautifully textured, celestial-inspired motif is a stunning way to add a touch of nighttime magic to your crochet projects. Share your finished moon square in the comments below!
6. Blossom Granny Square Pattern
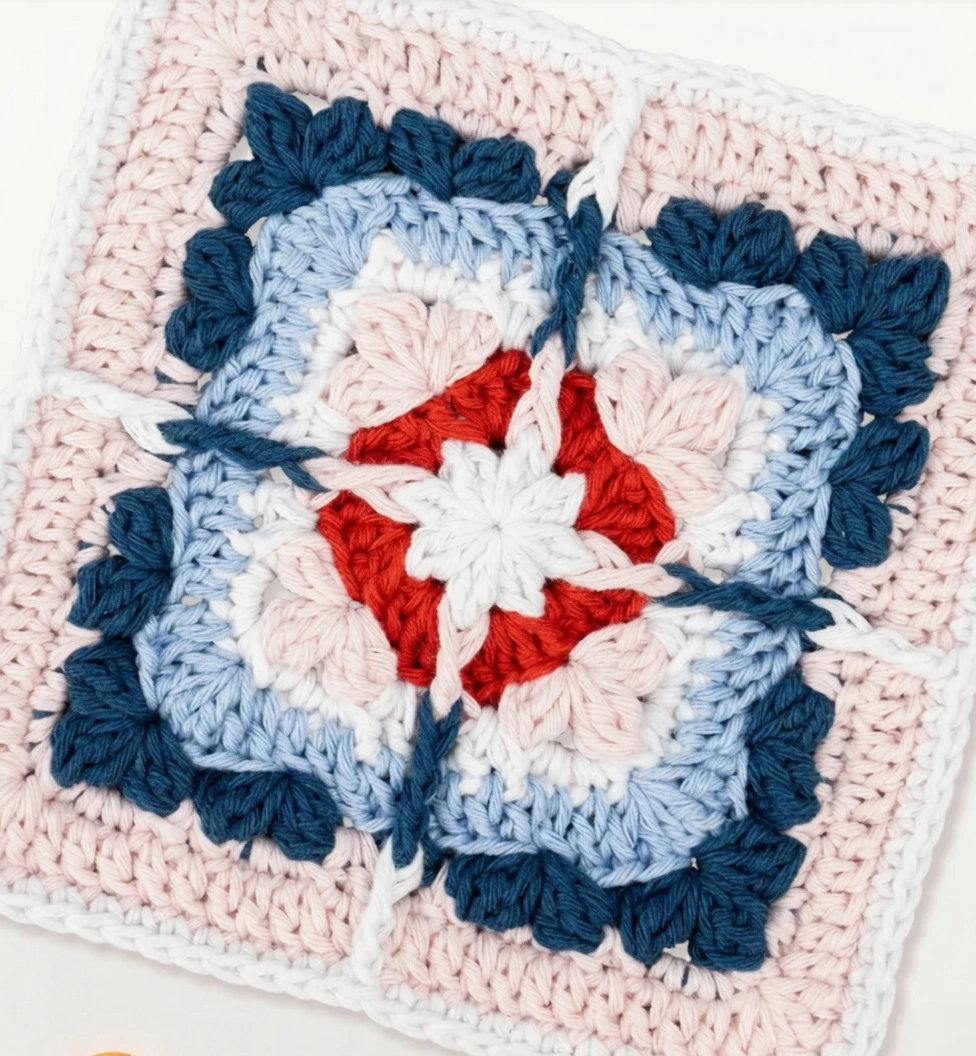
If you have ever wanted to capture the magic of a springtime garden in the palm of your hand, this Blossom Granny Square is your perfect pattern. It is a tiny crochet wonderland where soft pink edges beautifully frame a vibrant, multi-colored center. By strategically using red, blue, and white yarn, you can create the illusion of delicate “blooms” that seem to burst right off the fabric.
The true beauty of this square lies in its intricate stitch patterns and stunning color contrasts. It does not just look like a standard motif; it looks like a highly textured, three-dimensional garden in square form. Whether you are jazzing up a cozy afghan, creating a statement tote bag, or adding a cute, botanical touch to your home decor, this square is an absolute must-have for your pattern library. Please note that because of the post stitches and cluster combinations, this pattern is best suited for intermediate crocheters looking for a rewarding challenge.
Materials Needed
To bring this floral masterpiece to life, you will want to select yarns that provide excellent stitch definition so your textured “blooms” really pop.
- Yarn in 4 colors: A soft pink (for the outer border), a vibrant red (for primary blooms), a bright blue (for secondary blooms), and a crisp white (for accent blooms). Worsted weight yarn is highly recommended.
- Corresponding crochet hook: A 5.0mm hook usually pairs perfectly with worsted weight yarn.
- Tapestry needle: For seamlessly weaving in multiple color ends.
- Stitch markers: To help keep your place during the more complex cluster rounds.
- Scissors: For snipping yarn cleanly between color changes.
Abbreviations Used
Because this pattern features beautiful 3D texture, it utilizes several special stitches and cluster combinations. Here is a breakdown of the terminology you will need:
- MR – Magic ring
- Ch – Chain stitch
- Dc – Double crochet
- Dc2tog – Double crochet two together (a 2-stitch cluster)
- Dc3tog – Double crochet three together (a 3-stitch cluster used to form the petals)
- Bpdc – Back post double crochet (creates a raised, ridged texture)
- BpSc – Back post single crochet
- Bptr – Back post treble crochet (creates a tall, dramatic raised stitch)
- Sc – Single crochet
- Sl.st – Slip stitch
- Sk – Skip stitch/es
Pattern Instructions
This pattern uses USA crochet terminology
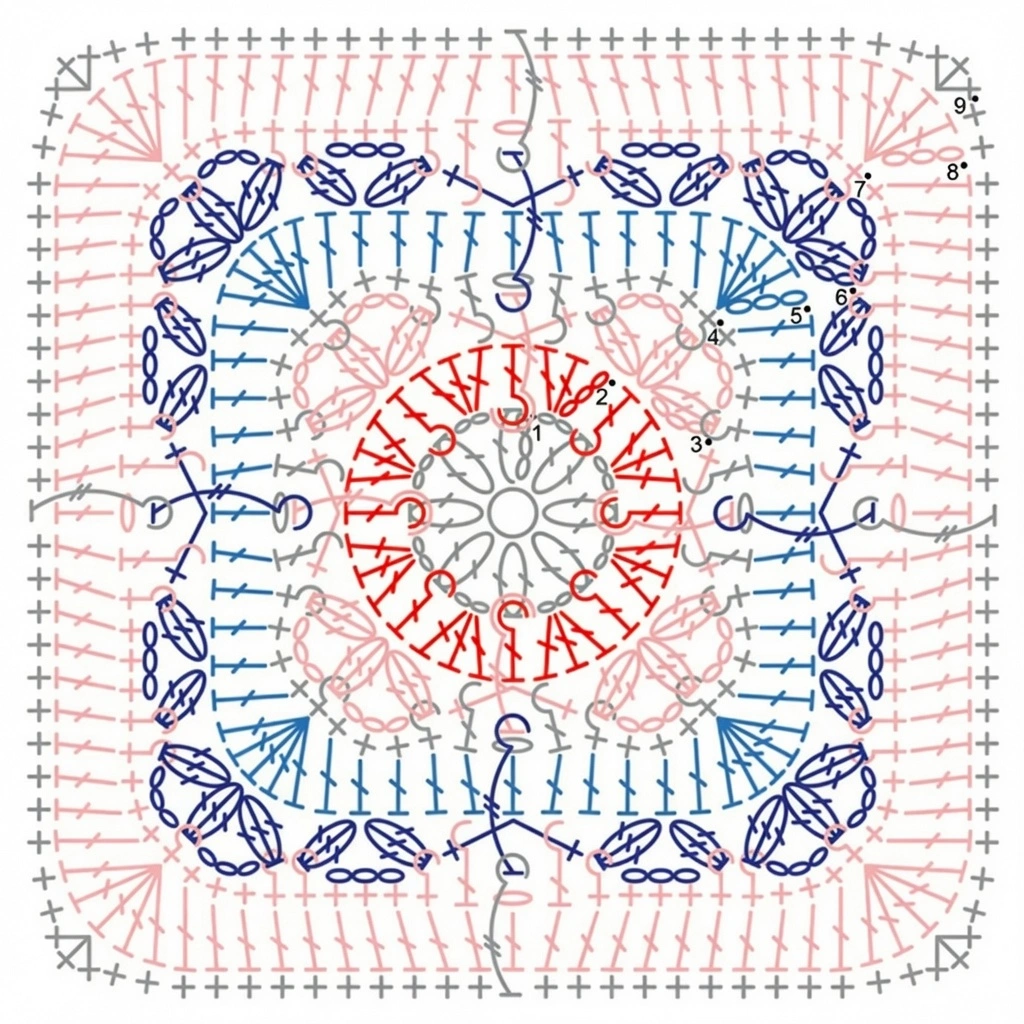
Understanding the Stitch Anatomy
Before you begin, it helps to know how this square constructs its flowers. The “blooms” are created using tight Dc3tog clusters that pull together to form pointed petals. Meanwhile, the back post stitches (Bpdc, BpSc, Bptr) are worked around the posts of previous stitches rather than into the top loops. This pushes the stitch forward, creating a raised, ribbed frame that makes the colorful petals look like they are actually popping out of the square.
Blossom Granny Square
Rnd 1: MR,Ch×3,Dc,Ch×2,[Dc2tog,Ch×2]×7,Sl.st
Rnd 2: Ch×3,Dc×2,Bpdc,[Dc×3,Bpdc]×7,Sl.st
Rnd 3: (Ch×3,Dc2tog,Ch×3,Dc3tog,Ch×3,Dc3tog),Sk×3,(Sc,Bpdc,Sc),Sk×3,[(Dc3tog,Ch×3,Dc3tog,Ch×3,Dc3tog),Sk×3,(Sc,Bpdc,Sc),Sk×3]×3,Sl.st
Rnd 4: [BpSc,Sc×3,BpSc,Bpdc,Ch,Bpdc,BpSc,Sc×3]×4,Sl.st
Rnd 5: (Ch×3,Dc×4),Dc×11,[(Dc×5),Dc×11,]×3,Sl.st
Rnd 6: (Ch×3,Dc2tog,Ch×3,Dc3tog,Ch×3,Dc3tog),Sk×3,(Dc3tog,Ch×3,Dc3tog),Sk×3,(Sc,Bptr,Sc),Sk×3,(Dc3tog,Ch×3,Dc3tog),Sk×3,[(Dc3tog,Ch×3,Dc3tog,Ch×3,Dc3tog),Sk×3,(Dc3tog,Ch×3,Dc3tog),Sk×3,(Sc,Bptr,Sc),Sk×3,(Dc3tog,Ch×3,Dc3tog),Sk×3]×3,Sl.st
Rnd 7: [BpSc,Sc×3,BpSc×2,Sc×3,BpSc,Bpdc,Ch,Bpdc,BpSc,Sc×3,BpSc×2,Sc×3]×4,Sl.st
Rnd 8: (Ch×3,Dc×4),Dc×21,[(Dc×5),Dc×21,]×3,Sl.st
Rnd 9: [(Sc×3),Sc×12,Bptr,Sc×12]×4,Sl.st
Assembly
Because this blossom square features highly textured, raised stitches, your assembly method matters. You want to avoid joining methods that require flattening the stitches, which would crush your beautiful 3D petals. The flat slip stitch join or the whip stitch method worked through the back loops only are the best choices here. These methods keep the seams relatively flat and invisible on the front while allowing the back post petals to retain their dimensional pop. When aligning squares, take a moment to ensure the petal directions flow cohesively from one square to the next for a professional finish.
Tips
Working around the back post can sometimes feel awkward if you are not used to it. A great tip is to keep your tension slightly relaxed when executing Bpdc and Bptr stitches; if you pull too tightly, the square will begin to cup and your petals will look cramped. Additionally, this pattern requires frequent color changes to achieve the red, blue, and white burst effect. Cut your yarn at the end of each color section and weave in tails as you go so you are not faced with a daunting pile of ends at the very end.
If you love incorporating floral elements into your crochet work, you will absolutely adore these other botanical patterns. Check out the Enchanted Rose Granny Square for another stunning 3D flower, or try the Daffodil Granny Square for a touch of spring sunshine. For even more floral inspiration, the Tudor Rose Granny Square is a must-try, and if you need help joining all these beautiful motifs, our guide on How to Crochet a Perfect Granny Square will walk you through it!
FAQ
My square is curling up. What did I do wrong? Curling usually happens if your back post stitches are worked too tightly, or if your chain spaces in the early rounds are too small. Try relaxing your grip slightly on the Bpdc and Bptr stitches, and ensure your hook fits easily through the chain spaces.
Can I make this in a single color? Absolutely! While the multi-color “blooms” are what give it the garden look, making this in a single solid color or a subtle ombre yarn will create a highly textured, elegant square that highlights the incredible stitch work.
How do I hide my color change tails neatly? Because you are changing colors frequently, carry the tails vertically up the back of the work as you crochet the next round, catching them under your stitches. This secures them perfectly without having to thread a tapestry needle every few minutes.
Conclusion
Congratulations on completing your Blossom Granny Square! This stunning 3D floral motif is a beautiful way to bring a touch of handmade garden magic to any project. Share your colorful blossoms in the comments below!
7. Free Hexagon Granny Square Pattern
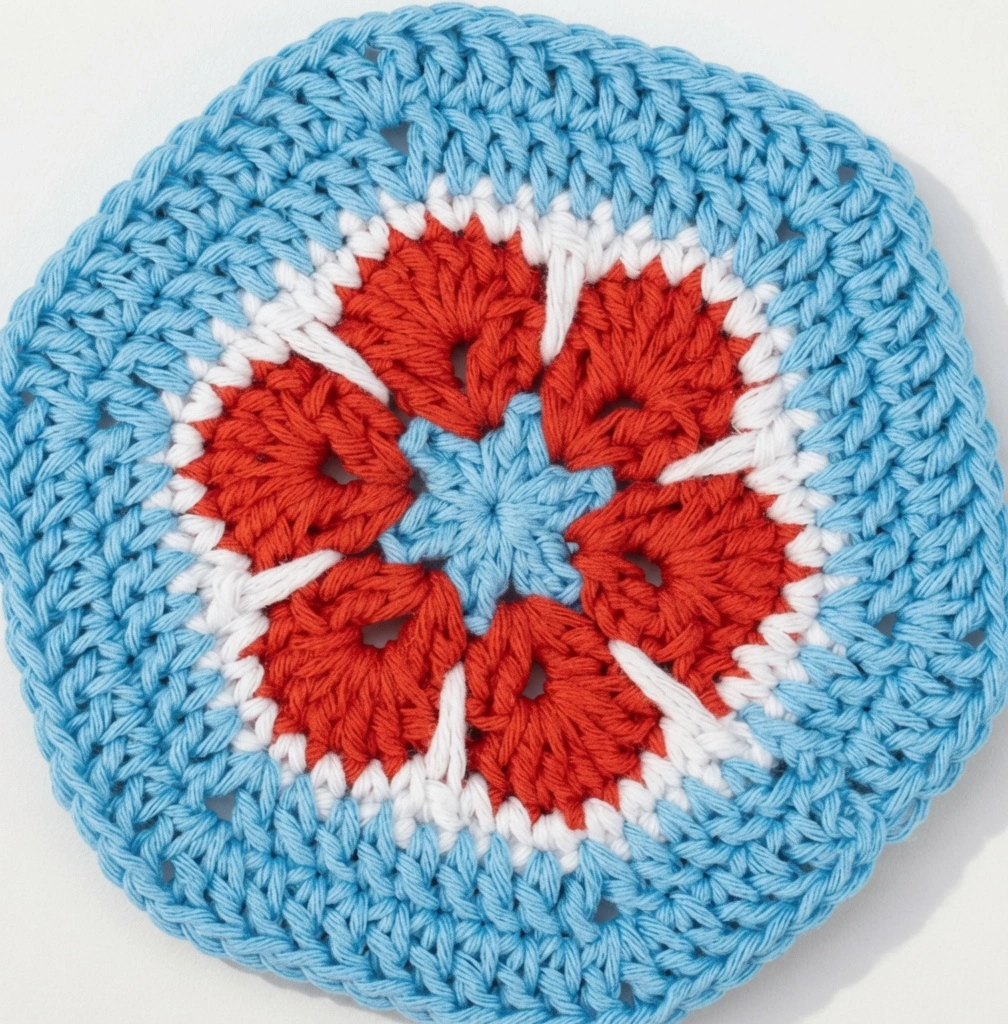
Granny squares are the beloved building blocks of the crochet world, offering endless possibilities for color play and design, but why stick to traditional squares when you can add a striking geometric twist? This Hexagon Granny Square pattern is a fantastic way to elevate your next blanket, tote bag, or home decor project from standard to extraordinary. The six-sided shape creates stunning visual interest that traditional squares simply cannot match.
When you join these hexagons together, they form gorgeous floral-like mandalas or a seamless, modern honeycomb texture that looks incredibly impressive. Because of the way the stitches are structured, the hexagon naturally creates pointed corners and flat edges that interlock beautifully with one another. Best of all, this is a highly approachable pattern that works up much faster than you might expect. Whether you are just starting your granny square journey or looking to expand your shape repertoire, this hexagon is an absolute joy to make.
Materials Needed
To get started on your hexagon granny squares, you will want to gather a few basic supplies. While you can use any yarn weight you prefer, worsted weight (size 4) yarn is highly recommended for beginners because it is easy to work with and shows stitch definition clearly.
- Yarn of your choice (Worsted weight recommended for the best balance of structure and drape)
- Corresponding crochet hook (a 5.0mm hook is perfect for worsted weight yarn)
- Yarn needle or tapestry needle for weaving in ends seamlessly
- Sharp pair of scissors for cutting your yarn cleanly
- Stitch markers (optional, but highly recommended to mark the first stitch of each round)
Abbreviations Used
Understanding the stitches used in this pattern is key to your success. Here is a quick breakdown of the terminology you will encounter:
- MR – Magic ring: A fantastic starting technique that allows you to pull the center hole completely closed, leaving no gaps—perfect for the center of granny motifs.
- Sl.st – Slip stitch: A very basic, low-profile stitch used primarily to join rounds seamlessly and move your yarn to a new position without adding height.
- Ch – Chain stitch: The foundation of almost all crochet work, used here to create the spaces between your stitch clusters and to raise your hook to the correct height for the next round.
- Dc – Double crochet: The primary stitch used to build the body and texture of this hexagon, creating those classic, plush granny clusters.
- Sc – Single crochet: A shorter, tighter stitch used in this pattern to create a distinct textural border and transition between the inner cluster rounds.
Pattern Instructions
This pattern uses USA crochet terminology
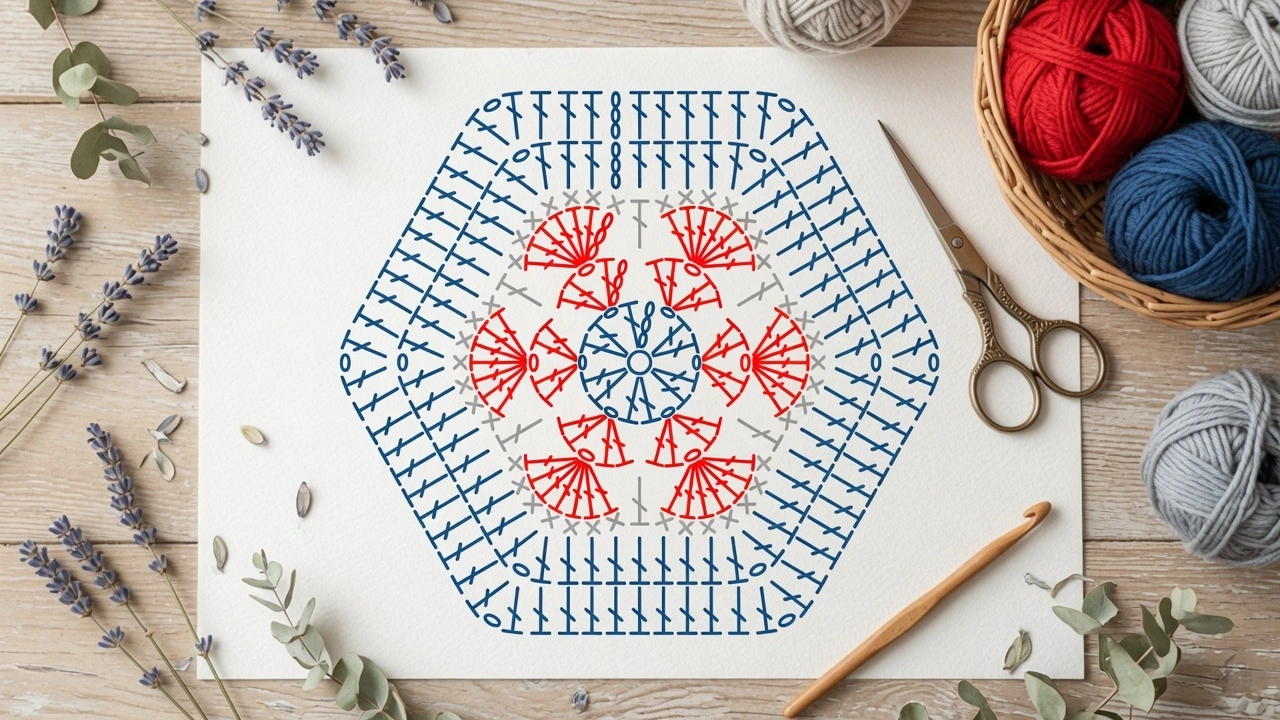
Understanding the Construction
Before diving into the stitches, it helps to visualize how this hexagon comes together. You will begin in the center with a magic ring, working your first double crochet clusters separated by chain spaces to form the six distinct points of the hexagon. As you progress through the rounds, you will fill in those chain spaces with more double crochets to expand the shape outward. In round four, a unique transition happens using single crochets to create a denser foundation, which then allows the final rounds to build out beautifully elongated, flat edges.
Hexagon Granny Square
Rnd 1: MR,Ch×3,Dc,Ch,[Dc×2,Ch]×5,Sl.st [12]
Rnd 2: Ch×3,Dc,Ch,Dc×2,[Dc×2,Ch,Dc×2]×5,Sl.st [24]
Rnd 3: Ch×3,Dc×6,[Dc×7]×5,Sl.st [42]
Rnd 4: Ch,[Sc×7,Dc]×6,Sl.st [48]
Rnd 5: Ch×3,Dc×2,[(Dc,Ch,Dc),Dc×7]×5,(Dc,Ch,Dc),Dc×4,Sl.st [54]
Rnd 6: Ch×3,Dc×3,[(Dc,Ch,Dc),Dc×9]×5,(Dc,Ch,Dc),Dc×5,Sl.st [66]
Assembly
Once you have crocheted a stack of these beautiful hexagons, it is time to join them into a usable piece. Hexagons can be joined using your preferred method, but the “zipper” join or a simple slip stitch join through the back loops works exceptionally well to create a nearly invisible seam. When aligning your hexagons, you will notice that one flat edge of a hexagon perfectly aligns with the flat edge of the next. Because of the chain-one corners created in the final rounds, your hexagons will naturally nestle together, creating beautiful little diamond-shaped gaps where three hexagons meet. You can leave these gaps open for a lacy, airy design, or you can fill them in with a small cluster of chains and double crochets when you are joining to create a solid fabric.
Tips
Achieving perfect hexagons comes down to a few simple habits. First, keep your tension consistent throughout all six rounds; if your tension fluctuates, your hexagons will not line up evenly during the assembly phase. Second, do not skip the blocking step! Spray blocking or wet blocking your finished motifs will flatten any curling edges, open up the stitchwork, and ensure every single hexagon is the exact same size before you sew them together.
If you are planning a color-changing project, changing colors at the very end of a slip stitch join creates the cleanest transition. Looking for more motif inspiration? Check out these related patterns: Butterfly Granny Square, Enchanted Rose Granny Square, Daffodil Granny Square, Tudor Rose Granny Square, and our guide on How to Crochet a Perfect Granny Square.
FAQ
How big is this finished hexagon? The exact size will depend entirely on the yarn weight and hook size you choose to use. As a general estimate, using standard worsted weight yarn and a 5.0mm hook, a single finished hexagon will measure approximately 5.5 to 6 inches across from flat edge to flat edge.
Can I make this larger? Absolutely! To make a larger hexagon, you can simply continue the pattern repeat established in Rounds 5 and 6. You would keep adding one more double crochet to the flat edge sections on each subsequent round while maintaining the (Dc, Ch, Dc) corners.
Why does Round 4 use single crochets instead of double crochets? Round 4 acts as a transitional round. By using shorter single crochets, it prevents the center of the hexagon from becoming too “puffy” or cupped. It creates a sturdy, flat foundation that allows the outer double crochet rounds to lay perfectly flat.
Conclusion
Congratulations on completing your Hexagon Granny Square! This versatile geometric motif is a beautiful way to add modern flair to any crochet project. Share your finished hexagons in the comments below!
8. Offset Granny Square Pattern
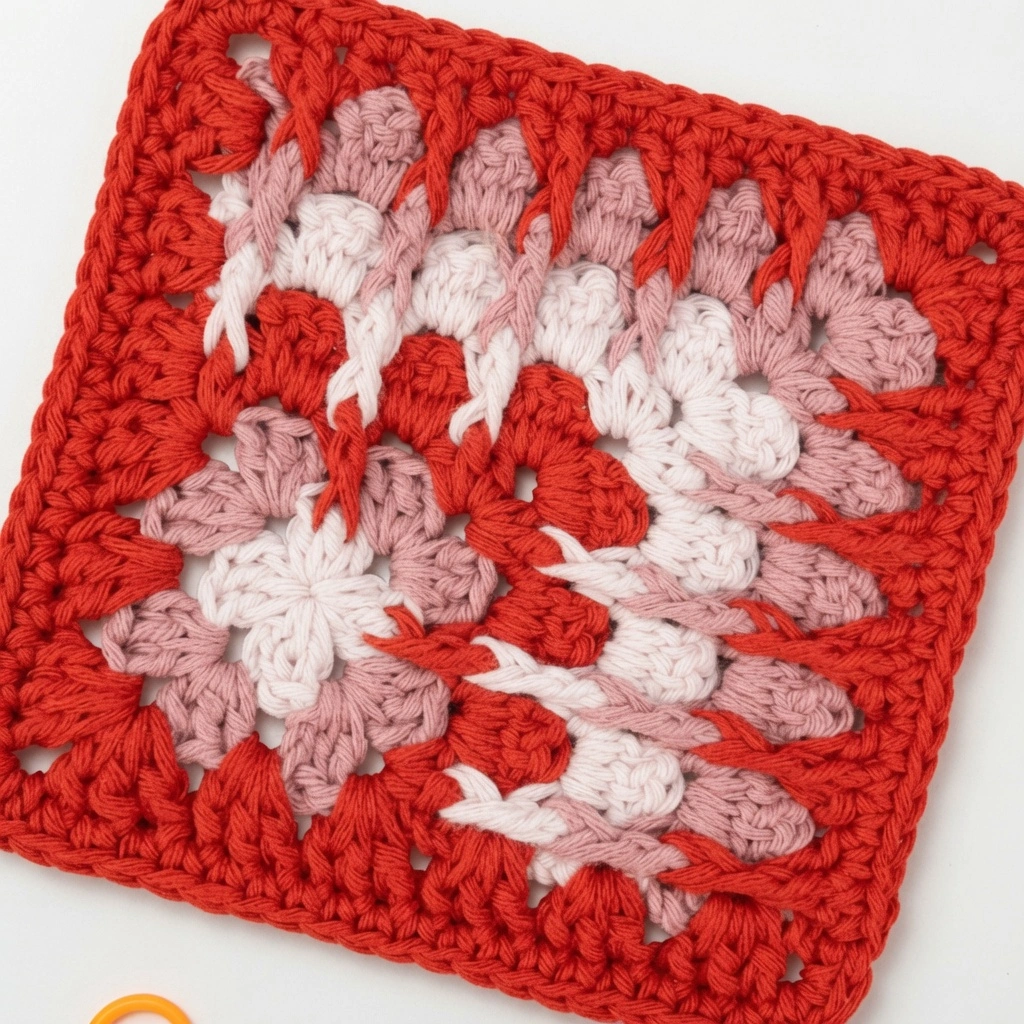
Granny squares have experienced a massive renaissance in the crafting world over the last few years, evolving far beyond their vintage roots into modern, highly textured works of art. While the traditional grid-style granny square will always hold a special place in our hearts, sometimes you want a motif that breaks the mold and offers something a little unexpected. If you are looking to elevate your next motif project with a contemporary twist, this unique pattern is exactly what you need.
The offset granny square introduces a clever use of back post stitches combined with an unusual turning method that creates a gorgeous, dimensional twisted effect. Instead of working continuously in the round from the right side, you will be turning your work to build out the corners. This technique pushes the stitches to one side, giving the square a rich, almost woven texture that really pops when using solid colors or highly contrasting yarns.
Because this pattern relies heavily on post stitches and non-traditional shaping, it is best suited for intermediate crocheters who are comfortable reading detailed patterns. However, if you are an adventurous beginner looking to level up your skills, this is an incredibly rewarding project to tackle. The finished squares are perfect for creating statement blankets, trendy market bags, or even eclectic summer garments.
Materials Needed
- Yarn of your choice: Worsted weight yarn is highly recommended for motifs as it provides excellent stitch definition, which is crucial for showing off the back post textures. You can use a solid color to highlight the twisted stitches or a lightly variegated yarn for a subtle effect.
- Corresponding crochet hook: Match your hook size to your chosen yarn weight (typically a 5.0mm or 5.5mm hook for worsted weight).
- Stitch markers: While not strictly required, placing a locking stitch marker in the first stitch of each round can help you keep track of your place, especially during the turning rounds.
- Scissors: A sharp, reliable pair for snipping yarn tails.
- Tapestry needle: Essential for weaving in those pesky ends securely.
Abbreviations Used
- MR – Magic ring
- Sl.st – Slip stitch
- Ch – Chain stitch
- Dc – Double crochet
- Sc – Single crochet
- Bpdc – Back post double crochet
This pattern uses USA crochet terminology
Pattern Instructions
Before beginning, take a moment to familiarize yourself with the rhythm of the pattern. The first two rounds set up a standard granny square foundation, while rounds three through six introduce the turning and post stitches that create the signature offset look.
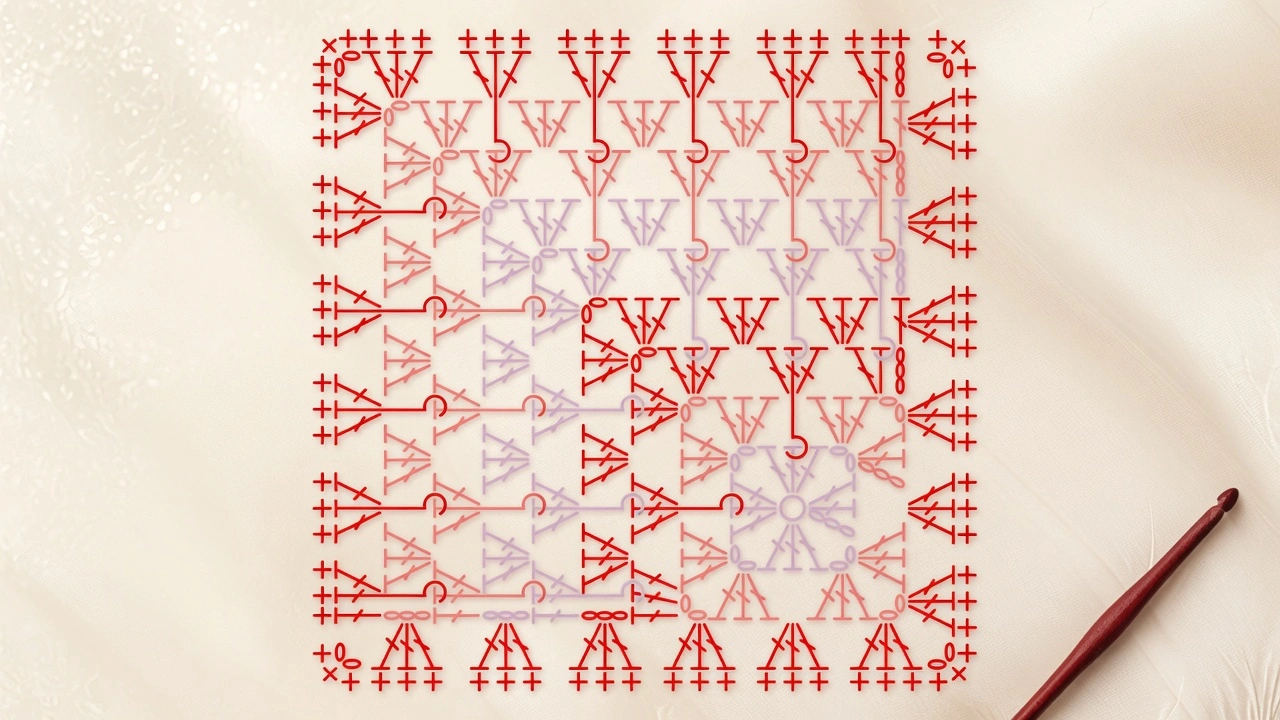
The Offset Square
R1: MR,Ch×3,Dc×2,Ch×2,[Dc×3,Ch×2]×3,Sl.st
R2: Ch×3,Dc×2,Ch×2,Dc×3,[Dc×3,Ch×2,Dc×3]×3,Sl.st
R3: (Ch×3,Dc×2),(Dc,Bpdc,Dc),(Dc×3,Ch×2,Dc×3),(Dc,Bpdc,Dc),Dc×3,Ch×3,turn,[Dc×3]×2,(Dc×3,Ch×2,Dc×3),[Dc×3]×2,Dc,Sl.st,turn
R4: (Ch×3,Bpdc,Dc),[Dc,Bpdc,Dc]×2,(Dc×3,Ch×2,Dc×3),[Dc,Bpdc,Dc]×3,Ch×3,turn,[Dc×3]×3,(Dc×3,Ch×2,Dc×3),[Dc×3]×3,Dc,Sl.st,turn
R5: (Ch×3,Bpdc,Dc),[Dc,Bpdc,Dc]×3,(Dc×3,Ch×2,Dc×3),[Dc,Bpdc,Dc]×4,Ch×3,turn,[Dc×3]×4,(Dc×3,Ch×2,Dc×3)[Dc×3]×4,Dc,Sl.st,turn
R6: (Ch×3,Bpdc,Dc),[Dc,Bpdc,Dc]×4,(Dc×3,Ch×2,Dc×3),[Dc,Bpdc,Dc]×5,Ch×2,[Dc×3]×5,(Dc×3,Ch×2,Dc×3),[Dc×3]×5,Ch×2,Sl.st
R7: Ch,[Sc×18,Sc×3]×4,Sl.st
Assembly
Once you have completed your offset granny squares, the finishing process is just as important as the stitching itself. Because of the twisted texture created by the post stitches, you will want to block your squares before joining them. Wet blocking or steam blocking will help relax the yarn, flatten out any curling edges, and open up the stitches so the offset design is clearly visible.
When you are ready to join your motifs, you have several options. A simple whip stitch or mattress stitch on the wrong side creates a nearly invisible seam. If you want to maintain a lacey aesthetic, the flat slip stitch join or a join-as-you-go method works beautifully. Just be sure to align the corners carefully, as the single crochet border in Round 7 makes finding the corner stitches incredibly easy.
Tips
Pay close attention to the turning chains in rounds 3 through 6! Unlike traditional granny squares worked continuously in the round, this pattern requires you to physically turn your work at the end of specific sections. This turning is what creates the beautiful, offset texture. If you forget to turn, the post stitches will not twist correctly.
When working your Back Post Double Crochets (Bpdc), make sure you are yarning over and inserting your hook from the back to the front around the post of the specified stitch. Keep your tension slightly relaxed during these stitches; if you pull too tightly, the square will begin to pucker and warp. Finally, keep a close eye on your stitch counts in the later rounds, as the sequences grow longer and it can be easy to miss a single double crochet in the repeat.
FAQ
Can I use a different border instead of single crochet? Absolutely! While Round 7 uses a single crochet border to create a neat, flat edge perfect for seaming, you can easily substitute this with a standard granny cluster round if you prefer a lacier look. Just remember that a lacier border might make the joining process a bit more intricate.
Why does my square look twisted or skewed? That is actually the design! The combination of the Bpdc stitches and physically turning your work pushes the stitches to one side, giving this square its signature modern, textured look. If it looks severely warped, check your gauge and ensure you aren’t pulling your post stitches too tight.
What size hook should I use? The hook size depends entirely on the yarn you choose. Always check your yarn label for the recommended hook size, and then adjust up or down a size depending on your personal tension. For a tighter, stiffer square (great for bags), go down a hook size. For a drapey square (great for garments), go up a hook size.
More Granny Square Patterns to Try
- How to Crochet a Perfect Granny Square: 3 Secrets to Clean Edges
- Tudor Rose Crochet Granny Square Free Pattern Tutorial
- Crochet Butterfly Granny Square Free Pattern Beginner Friendly Tutorial
- Hepatica Granny Top Crochet Pattern Free Easy Boho Summer Top
Conclusion
Congratulations on finishing your Offset Granny Square! This beautifully textured motif is a fantastic way to add a modern twist to classic blankets and garments. Share your finished square in the comments below!
