
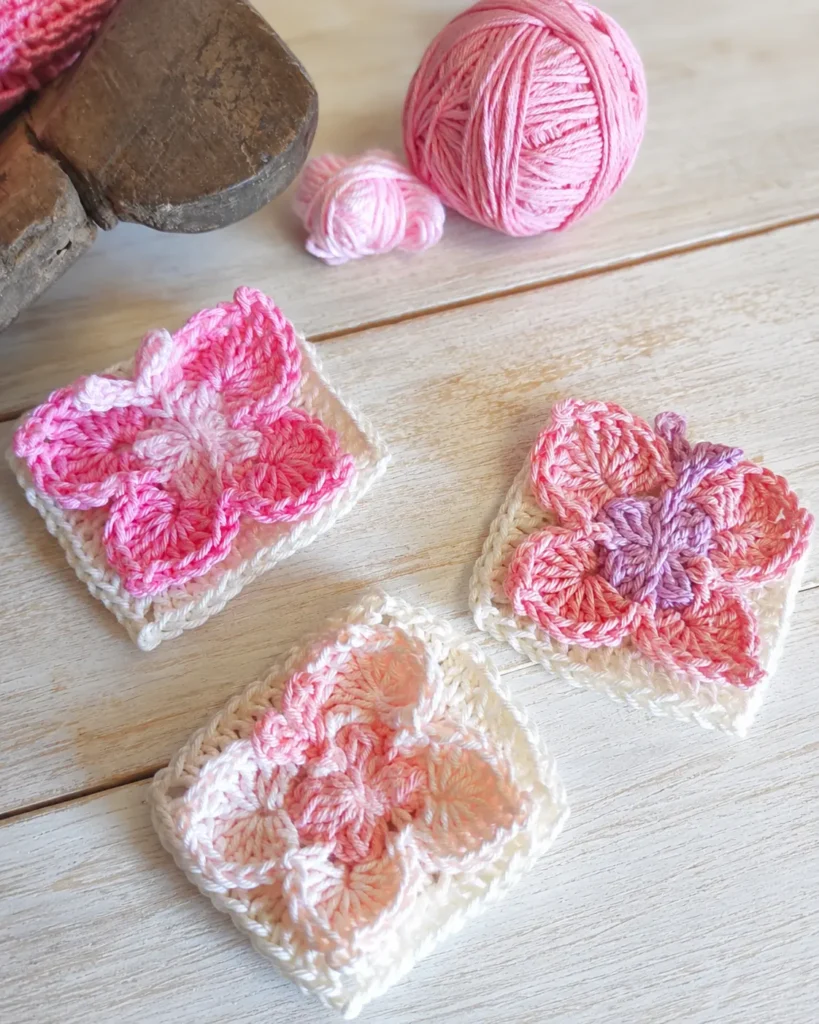
Butterflies and granny squares are two crochet favorites that never go out of style. This cheerful Crochet Butterfly Granny Square combines both into one beautiful textured motif that’s perfect for blankets, bags, pillows, wall hangings, and spring-inspired crochet projects.
If you enjoy creative granny square patterns, you may also love this Daisy Granny Square Free Crochet Pattern and this helpful guide to Mastering the Basic Granny Square.
This free butterfly granny square pattern is worked in rounds and features a sweet 3D butterfly sitting right in the center of the square. The butterfly is crocheted first, and the granny square is built around it afterward for a lovely layered effect.
Whether you’re making a colorful crochet blanket or adding whimsical touches to your accessories, this easy butterfly square is a fun project to try.
Why You’ll Love This Crochet Butterfly Granny Square
- Beginner-friendly with step-by-step instructions
- Beautiful textured 3D butterfly detail
- Great stash-busting project
- Perfect for spring and summer crochet projects
- Easy to customize with your favorite yarn colors
- Works beautifully for blankets, totes, scarves, and pillows
Materials Needed
To make one Crochet Butterfly Granny Square, you’ll need:
- Small amounts of 3 yarn colors
- Worsted weight cotton or acrylic yarn
- 3 mm crochet hook
- Scissors
- Yarn needle for weaving in ends
- Stitch marker (optional)
Suggested Yarn Colors
- Butterfly body color
- Contrasting wing color
- Neutral granny square border color
Crochet Abbreviations
This pattern uses standard US crochet terminology.
- ch = chain
- sc = single crochet
- dc = double crochet
- tr = treble crochet
- sl st = slip stitch
- st = stitch
- sp = space
- inc = increase
- FL = front loop
- BL = back loop
Finished Size
Your finished square should measure approximately:
3 to 3.5 inches (7.5–9 cm) depending on yarn and tension.

Pattern Notes
- The butterfly is worked first in the center.
- The granny square is added afterward using the back loops.
- Ch-3 at the beginning of rounds counts as a stitch unless noted otherwise.
- Read through the full pattern before beginning.
If you’re new to granny squares, this guide on Granny Square Crochet Pattern Diagrams may help you understand how rounds are constructed.
How to Crochet the Butterfly Center
Round 1 – Butterfly Base
Using your butterfly body color:
- Create a magic ring.
- (Ch 3, make 1 dc cluster into ring, ch 3, sc into ring).
- Repeat from * to * 3 more times.
- Join with a sl st.
- Pull magic ring tight and fasten off.
You should now have:
- 4 cluster sections
- 4 single crochet stitches
Round 2 – Butterfly Wings
Join contrasting yarn to any front loop single crochet.
Upper Wings
- Ch 1, sc in same front loop.
- In next cluster section work:
- 5 tr
- picot
- 5 tr
- Sc into next sc.
Repeat once more for the second upper wing.
Lower Wings
- In next cluster section work:
- 5 dc
- picot
- 5 dc
- Sc into next sc.
Repeat once more for the second lower wing.
Join with sl st and fasten off.
How to Make the Butterfly Body
Using the original body color:
- Surface slip stitch vertically through the center of the butterfly.
- Chain 4.
- Sc in second chain from hook.
- Sl st in remaining chains to form first antenna.
- Repeat for second antenna.
- Fasten off and weave in ends.
Your butterfly motif is now complete.
Crochet Granny Square Border
Attach border yarn to any back loop single crochet from Round 1.
Granny Square Round 1
- Sc in back loop.
- Ch 3.
- Skip to next cluster section.
Repeat around.
Join with sl st.
Granny Square Round 2
- Ch 3 (counts as dc).
- Dc in same stitch.
- Work 3 dc in next spaces.
- In each corner:
- dc increase
- ch 2
- dc increase
Repeat around and join.
Granny Square Round 3
- Ch 3.
- Dc across side stitches.
- In corners work:
- dc increase
- ch 2
- dc increase
Continue around until square shape forms.
Fasten off and weave in all ends.
Tips for a Neater Butterfly Granny Square
Keep Even Tension
Consistent tension helps your butterfly wings stay symmetrical.
Block Your Finished Squares
Blocking helps flatten the square and sharpen the corners.
Use Cotton Yarn for Definition
Cotton yarn gives the butterfly wings crisp stitch definition.
Creative Ways to Use Butterfly Granny Squares
These butterfly squares can be joined together for many fun crochet projects:
- Baby blankets
- Spring throws
- Tote bags
- Cushion covers
- Table runners
- Wall decor
- Bucket hats
- Cardigans
If you enjoy wearable crochet projects, you might also like this Simple Crochet Top Pattern for Women or this Summer Crochet Tee Top Pattern.
Beginner Crochet Tips
If you’re still learning crochet basics, these beginner-friendly tutorials may help:
- How to Crochet a Hat: Simple Steps for Beginners
- Beginner Crochet Wearables
- Easy Crochet Hat Pattern for a Cozy Look
Frequently Asked Questions
Is this butterfly granny square beginner-friendly?
Yes. If you already know basic stitches like single crochet and double crochet, you can make this pattern successfully.
What yarn works best?
Cotton yarn works especially well because it helps the butterfly details stand out clearly.
Can I make larger squares?
Absolutely. Simply continue adding granny square rounds until you reach your desired size.
Can I sew these into a blanket?
Yes. These butterfly squares look beautiful joined into colorful spring or baby blankets.
More Free Crochet Patterns You May Love
Explore more free crochet inspiration:
- Strawberry Granny Square Free Pattern
- Cluster Crochet Granny Square Pattern
- Easy Textured Crochet Baby Blanket
- Free Crochet Fairy Pattern
- Plush Axolotl Amigurumi Pattern
Final Thoughts
This Crochet Butterfly Granny Square is a delightful way to add texture, color, and personality to your crochet projects. The dimensional butterfly creates a playful focal point while the granny square frame keeps the design versatile and easy to combine with other motifs.
Experiment with bright spring colors, soft pastels, or even bold rainbow combinations to create your own unique butterfly garden in yarn form.
Happy crocheting! 🦋
