
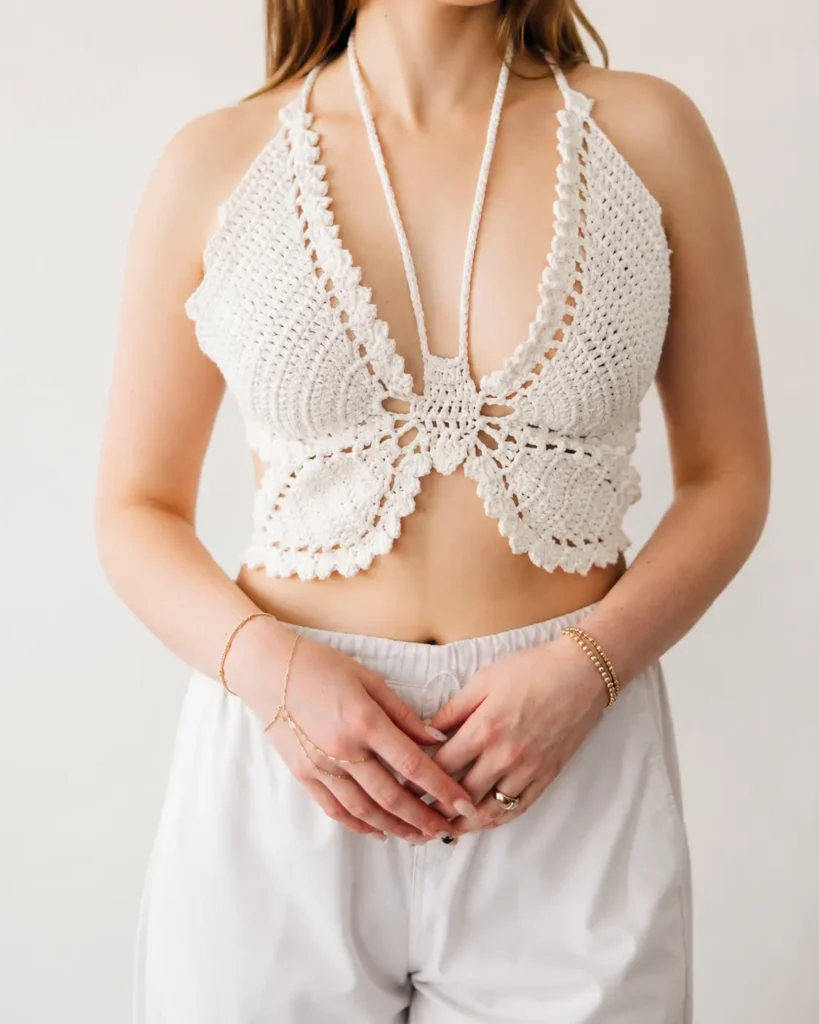
If you’ve been scrolling through summer crochet inspiration and dreaming of a boho halter top that looks impossibly intricate but is actually beginner-friendly, the crochet butterfly top is exactly what you need. With its distinctive winged silhouette, open lacework, and adjustable wrap-style straps, this top is one of those projects that turns heads and earns “did you make that?” compliments every single time.
This free written pattern covers sizes XS through 5X, so whether you’re crocheting for yourself or a friend, you’re covered. Read on for everything you need — materials, gauge, stitch breakdown, and row-by-row instructions — plus tips to fill in the gaps and make your finish look polished.
What Is the Butterfly Top?
The butterfly top is a crochet halter-style crop top shaped like a butterfly. The center panel forms the butterfly’s body, and from there, four wings fan out on either side — two upper wings and two lower wings. The construction method is unique: you start at the center and work outward, attaching the wings directly to the body panel. The result is a seamless, structured piece that drapes beautifully.
It’s a great first garment project. If you’ve already mastered basic stitches and maybe tried your hand at something flat like a granny square, this top is a natural next step.
Materials You’ll Need
Before casting on, gather the following:
- Crochet hook: Size F / 3.75mm
- Yarn: Weight 4 (worsted) cotton yarn
- XS: 140 yards
- S: 170 yards
- M: 200 yards
- L: 230 yards
- XL: 260 yards
- 2X: 320 yards
- 3X: 370 yards
- 4X: 410 yards
- 5X: 450 yards
- Scissors
- Yarn needle (for weaving in ends)
Best yarn choices: 100% cotton or cotton-blend yarns work best for this top. They hold their shape, have a light drape, and are breathable for warm weather. Lion Brand Pima Cotton and Sugar N’ Cream Cotton are both excellent, widely available options. Avoid acrylic for this project — it tends to stretch out and loses the crisp stitch definition that makes the lace pattern pop.
Pro tip: If you’re between yarn amounts or planning to add sleeves later, buy one size up in yardage. Running out mid-wing is not a fun experience.
Gauge
15 stitches × 9 rows = 4″ × 4″ (10cm × 10cm) in double crochet
Gauge matters a lot for wearables, especially tops. Even a half-stitch difference per inch can shift your finished size by an inch or more. Take 10 minutes to make a gauge swatch, wash it, and measure it flat before you start.
If your swatch is too small (too many stitches per inch), go up a hook size. If it’s too large, go down.
Finished Measurements
| Size | Upper Wing Width | Upper Wing Height |
|---|---|---|
| XS | 5.5″ | 5″ |
| S | 6.5″ | 5.5″ |
| M | 7.5″ | 6.25″ |
| L | 8.5″ | 7″ |
| XL | 9.5″ | 7.5″ |
| 2X | 10.5″ | 8.25″ |
| 3X | 11.5″ | 9″ |
| 4X | 12.5″ | 9.5″ |
| 5X | 13.5″ | 10.25″ |
These measurements refer to the upper wing coverage — the part that sits over the bust. To choose your size, measure your bust and compare it to the combined width of both wings (double the Upper Wing Coverage Width) against your desired coverage.
Abbreviations
| Abbreviation | Meaning |
|---|---|
| ch | chain |
| dc | double crochet |
| f/o | fasten off |
| inc | increase double crochet (2 dc in one stitch) |
| sk | skip |
| slst | slip stitch |
| st(s) | stitch(es) |
Special Stitch — Increase Double Crochet (inc): Simply place two double crochets into the same stitch. This is how the wings grow outward with each row.
Important Notes Before You Start
- Construction order: Body first, then wings. The butterfly’s wings are attached to the sides of the body, not worked separately and seamed.
- Stitch counts: The number in parentheses at the end of each row is the total dc stitch count you should have. Use this to double-check your work as you go.
- Turning chains: Turning ch’s do NOT count as a stitch in this pattern.
- Row ranges: When the instructions say “Row 4–7,” you repeat those instructions across all specified rows.
- US terminology: This pattern uses US crochet terms. UK crocheters note: US double crochet = UK treble crochet.
- Multiple sizes: Instructions are written as XS(S, M, L, XL)(2X, 3X, 4X, 5X). Always identify your size number before starting and stick to it throughout.
The Pattern
Part 1: Butterfly Body (Center Panel)
The body is a small rectangular panel with a slight taper — it’s the torso of the butterfly and anchors the entire top.
Row 1: Ch 4. Place 4 dc into the very first chain you made. (4 sts)
Rows 2–3: Ch 3, turn. Dc across. (4 sts)
Row 4: Ch 3, turn. Inc in the first stitch, dc across until 1 stitch remains, inc in the last stitch. (6 sts)
Row 5: Repeat Row 4. (8 sts)
Row 6: Turn. Slst into the 2nd stitch from your hook. Ch 3, dc in that same stitch (your first working stitch), dc across until 1 stitch remains — leave that last stitch unworked. (6 sts)
Row 7: Ch 3, turn. Dc across. (6 sts)
Neck Straps
Once your body panel is done, the neck straps are created directly from the top edge — no sewing required.
Ch 100 (or more if needed for your neck length). Turn. Starting in the 2nd chain from the hook, slip stitch back down the entire chain. Once you reach the top of the butterfly’s body, slip stitch across to the first stitch of Row 7. Chain 100 again (same length as the first strap), and slip stitch back down. When you meet the body again, slip stitch into it and fasten off.
Sizing tip: 100 chains is approximately 12–14 inches, which works for most necks when doubled. Try the body panel on before fastening off and adjust your chain count accordingly if needed.
Part 2: Butterfly Wings (Make 2 — one on each side)
The wings are the star of the show. Each side has an upper wing and a lower wing, and you work them both from the same attachment point on the body. You’ll repeat all wing instructions twice — once on each side of the body panel.
Attach yarn to the stitch at the top of Row 5 of the butterfly body — specifically the stitch that was slipped over in Row 6 and has no double crochet in it.
Upper Wing Setup
Row 1: Ch 5. Dc in the same stitch you attached to. Ch 5, dc between body rows 4 & 5. Ch 2, dc in that same stitch. Ch 3, dc between body rows 3 & 4. Ch 2, dc in that same stitch.
Row 2: Ch 3, turn. Place 4 dc in the first ch space, ch 1. Place 3 dc in the next ch space, ch 1 — repeat once more. Place 5 dc in the next ch space, ch 1. Place 3 dc in the last ch space. Place 1 more dc at the top of the ch 3 from the previous row. (19 sts)
Row 3: Turn. Slst in the 2nd st, slst in the 3rd st. Ch 3, inc twice (once in the ch 3 stitch, once in the next stitch). (4 sts) Ch 2, sk ch space, inc in the next 5 sts. (10) Ch 2, sk ch space, 3 dc in the middle stitch of the next three sts. (3) Ch 2, sk ch space, inc in the next 3 sts. (6) Ch 2, sk ch space, inc in the next 2 sts, leaving the last 2 sts unworked. (4) — Total: 27 sts
Row 4: Turn. Slst in the 2nd and 3rd sts. Ch 3, inc twice. (4) Ch 2, sk ch space. Inc, dc — repeat 2 more times. (9) Ch 2, sk ch space, 3 dc in the middle stitch of the next 3 sts. (3) Ch 2, sk ch space. Inc, dc — repeat 5 times. (15) Ch 2, inc in the next 2 sts, leaving the last 2 unworked. (4) — Total: 35 sts
Size Adjustments (S–5X only)
For sizes S through 5X, you need extra rows to reach the correct width before moving to the Upper Wing shaping.
Row 5 – (6, 6, 8, 8)(10, 12, 12, 14): Turn. Slst in the 2nd and 3rd sts. Ch 3, inc twice. (4) Ch 2, sk ch space, inc in the first stitch, dc across until 1 stitch remains before the next ch space, inc. Ch 2, sk ch space, 3 dc in the middle stitch of the next 3 sts. (3) Ch 2, sk ch space, inc, dc across until 1 stitch remains before the next ch space, inc. Ch 2, inc in the next 2 sts, leaving the last 2 unworked. (4)
Repeat this row the number of times indicated for your size.
Upper Wing (All Sizes)
Row 5(7,7,9,9)(11,13,13,15): Turn. Slst in the 2nd and 3rd sts. Ch 3, inc twice. (4) Ch 2, sk ch space, inc, dc across until 1 stitch before the next ch space, inc. Ch 2, sk ch space, 3 dc in the first stitch only — leave the remaining sts of that group unworked. (3) — Total: 24(28,28,32,32)(36,40,40,44) sts
Row 6(8,8,10,10)(12,14,14,16): Turn. Slst in the 2nd st only. Ch 3, inc twice. (4) Ch 2, sk ch space, inc, dc across until 1 stitch before the next ch space, inc. Ch 2, sk ch space, inc in the next 2 sts. (4) — Total: 27(31,31,35,35)(39,43,43,47) sts
From here, only increase once in the middle section (not twice).
Row 7(9,9,11,11)(13,15,15,17): Turn. Slst in the 2nd and 3rd sts. Ch 3, inc twice. (4) Ch 2, sk ch space, inc, dc across to the next ch space. Ch 2, sk ch space, inc in the next 2 sts. (4)
Row 8(10,10,12,12)(14,16,16,18): Turn. Slst in the 2nd and 3rd sts. Ch 3, inc twice. (4) Ch 2, sk ch space, dc across until 1 stitch before the next ch space, inc. Ch 2, sk ch space, inc in the next 2 sts. (4)
Continue alternating between the last two rows until you have a total of 9(11,13,15,17)(21,23,25,27) rows and 30(34,36,40,42)(48,52,54,58) sts.
Upper Wing Tapering
Row 10(12,14,16,18)(22,24,26,28): Turn. Slst 3 times starting in the 2nd st, then slst in the next ch space, then slst 2 more times (you should be in the second stitch after the first ch space). Ch 3, dc across until 1 stitch before the next ch space, inc. Ch 2, sk ch space, inc in the next 2 sts. (4) — Total: 26(30,32,36,38)(44,48,50,54) sts
Row 11(13,15,17,19)(23,25,27,29): Turn. Slst in the 2nd and 3rd sts. Ch 3, inc twice. (4) Ch 2, sk ch space, inc in the first stitch after the ch space, dc across until 5 sts remain — leave the rest unworked.
Row 12(14,16,18,20)(24,26,28,30): Turn. Slst across the next 5 sts starting in the 2nd stitch. Ch 3, dc across until 1 stitch before the ch space, inc. Ch 2, sk ch space, inc in the next 2 sts. (4)
Continue alternating between the last two rows until you have a total of 14(16,18,20,22)(26,28,30,32) rows.
Row 15(17,19,21,23)(27,29,31,33): Turn. Slst in the 2nd and 3rd sts. Ch 3, inc twice. (4 sts only — this is your final tip row)
Row 16(18,20,22,24)(28,30,32,34): Turn. Slst 3 times starting in the 2nd st, then slst in the top of the ch 3. Chain 170(190,200,220,240)(260,280,300,320) — this is your back strap. Slip stitch back down the entire chain. Slip stitch into the stitch where the chain started. Fasten off.
Back strap length note: The back straps cross over each other in the back and thread through the wing openings, so having extra length is better than not enough. If you’re tall or have a longer torso, add 20–30 chains.
Lower Wing
The lower wings are attached at Row 6 of the body, giving the butterfly its bottom half.
Attach yarn to the outer dc stitch in the middle 3 stitches from Row 6 of the butterfly body.
Row 5(7,7,9,9)(11,13,13,15): Ch 3, 3 dc in that same stitch. (3) Ch 2, sk ch space, dc across to the next ch space. Ch 2, sk ch space, inc in the next 2 sts. (4) — Total: 16(20,20,24,24)(28,32,32,34) sts
Rows 6(8,8,10,10)(12,14,14,16) through 9(13,13,17,17)(21,25,25,27): Turn. Slst in the 2nd and 3rd sts. Ch 3, inc twice. (4) Ch 2, sk ch space, skip the first st, dc across until 1 stitch before the next ch space. Ch 2, sk ch space, inc in the next 2 sts. (4)
Row 10(14,14,18,18)(22,26,26,28): You should have only 1 stitch remaining in the middle between the two ch spaces. Turn. Slst in the 2nd and 3rd sts. Ch 3, inc twice. (4) Ch 1, skip the next 2 ch spaces. Inc in the next 2 sts. (4) — Total: 8 sts
Row 11(15,15,19,19)(23,27,27,29): Turn. Slst 3 times starting in the 2nd st. Ch 3, dc in that same space. Ch 1, sk ch space, inc. (4 sts — the ch 3 counts as a stitch this row.) Fasten off.
Repeat all butterfly wing instructions on the other side of the butterfly body. Weave in all ends thoroughly.
How to Wear the Butterfly Top
This is where the magic happens, and getting the tie right makes a huge difference in how the top sits and fits.
- Neck straps: The two straps at the top of the body panel tie around your neck in a halter style. Adjust for your preferred coverage and comfort.
- Back straps (upper crossing): The long chain straps extending from the upper wings cross over each other in the back, then thread forward through the widest opening in the upper wing on the opposite side.
- Lower wing threading: Each strap then crosses again and threads through the widest opening in the lower wing on the opposite side.
- Final tie: The two strap ends meet at the front (or back, depending on your preference) and are tied in a bow or knot.
Fit tips:
- The more you thread and adjust the straps through the wing openings, the more coverage you create.
- If the top feels like it’s slipping, tie the neck straps a bit higher and tighten the back strap crossing.
- For a festival look, let the lower wings float free and only tie the neck straps.
- Block your finished top with cool water and lay it flat to dry — this evens out the stitches and gives a much more polished result with cotton yarn.
Finishing Touches
Once all wings are complete and your ends are woven in, give the top a light hand wash in cool water with a small amount of gentle soap. Lay flat to block, pinning the wing edges into shape if desired. This step is especially helpful if some wing edges look slightly wavy or uneven.
Cotton yarn relaxes and softens beautifully after washing, which actually improves the drape and wearability of the finished top.

Tips for Success
On yarn substitution: Stick with cotton or cotton-blend yarn for best results. Linen blends also work beautifully for a more textured, summery look. Avoid anything too stretchy (like jersey-style yarn) which will cause the wings to lose their shape.
On hook size: The pattern calls for a 3.75mm hook, but if your cotton yarn label recommends a 4mm or 4.5mm hook, you can go up slightly as long as your gauge still matches. A slightly looser fabric is fine for summer — it’s more breathable.
On sizing: This is a cropped, form-fitting garment. If you’re between sizes or prefer a bit more coverage, sizing up by one is a safe choice. The wing structure provides some flexibility, but going larger gives more room through the body.
On selling your finished piece: This is a free pattern, so you’re welcome to sell tops you make from it. Just note in your listing that the pattern is by Mae Crochets.
Extend Your Crochet Wardrobe
Once you’ve finished your butterfly top, why not build out a full crochet summer outfit? The same granny square technique used in classic crochet patterns translates beautifully into wearable pieces. Check out this crochet granny square pants pattern for a matching boho bottoms project, or try these crochet granny square shorts for a lighter warm-weather option. Both pair perfectly with the butterfly top for a coordinated handmade look.
Frequently Asked Questions
Can a beginner make this top? Yes! If you know how to chain, double crochet, slip stitch, and increase, you have all the skills you need. The construction is unusual (working outward from the center), which might feel unfamiliar at first, but the row-by-row instructions make it approachable. A beginner-friendly tutorial video is also available online to follow along visually.
How long does it take to make? Most crocheters complete this top in a weekend — roughly 8–12 hours depending on your speed and the size you’re making. Larger sizes naturally take longer due to the extra rows in the wings.
Can I use a different yarn weight? Weight 4 (worsted) cotton is strongly recommended. Using a lighter weight yarn (like DK or sport) will produce a smaller top; a heavier weight will produce a larger one. If you substitute, swatch carefully and adjust your size accordingly.
What if my wings look uneven? This is usually a tension issue. Make sure your slip stitches at the beginning of rows aren’t too tight, and that your turning chains are loose enough. Blocking the finished top will also even out a lot of minor inconsistencies.
Is there a sleeve add-on? Yes — a paid sleeve add-on pattern is available separately if you want to add full-length bell sleeves or straight sleeves to this top. If you plan to add them, add extra chains to your back straps when you make them.
Final Thoughts
The butterfly top is one of those rare crochet projects that’s genuinely impressive to look at but completely achievable even if you’re newer to garment construction. The multi-size range — from XS all the way to 5X — makes it one of the most inclusive free top patterns out there, and the cotton yarn keeps it practical and wearable for real summer heat.
Whether you’re making it for festival season, the beach, or just a warm afternoon out, this top delivers maximum impact for the effort involved. Cast on, enjoy the process, and get ready for compliments.
Happy crocheting! 🧶
