
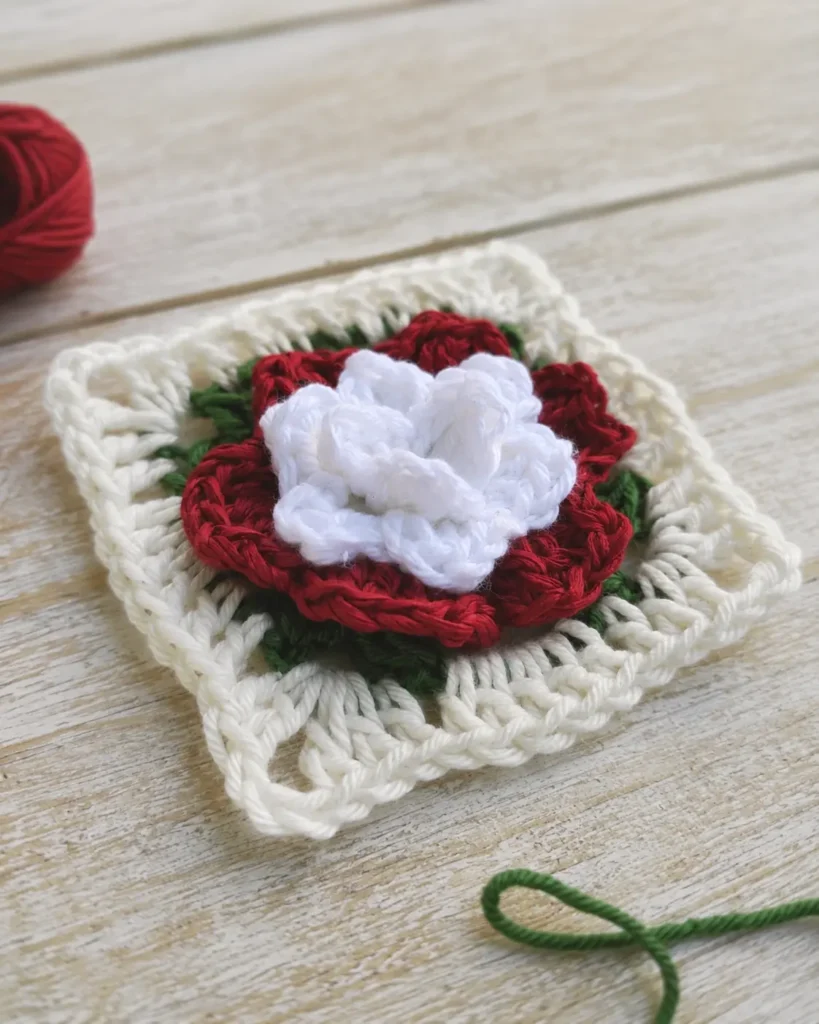
There’s something endlessly satisfying about crochet flowers, and the Tudor Rose sits at the top of that list. With its layered white-and-red petals, lush green leaves, and a crisp cream border, this motif is as rich in history as it is in texture. Whether you’re building a floral blanket, decorating a tote bag, or simply want a standalone piece for a pillow cover, this pattern delivers a stunning result.
In this post, you’ll find a complete, step-by-step pattern for a 10cm (4″) Tudor Rose granny square, plus helpful tips on yarn substitutions, blocking, and joining multiple squares into larger projects.
A Brief History of the Tudor Rose
Before we pick up our hooks, it’s worth appreciating the story behind this design. During the 15th century, two rival branches of the English royal family — the House of Lancaster (represented by a red rose) and the House of York (represented by a white rose) — fought a series of civil wars known as the Wars of the Roses. When Henry VII of Lancaster married Elizabeth of York, he united the two dynasties and created the Tudor Rose: a red rose enclosing a white center. It became the enduring floral emblem of England and remains one of the most recognizable heraldic symbols in the world.
Our crochet version captures that same layered beauty with two tiers of petals worked in the round, framed by leaf-like arcs and a classic granny square border.
Skill Level
This pattern is best suited for intermediate crocheters. You should be comfortable working in the round, stitching into front and back loops separately, and executing cluster stitches. If you’re newer to granny squares, you might want to brush up on the basics first with our guide to mastering the basic granny square.
Time Estimate: Approximately 30–45 minutes per square.
Materials
- White DK yarn — approximately 6 meters (for the inner petals)
- Red DK yarn — approximately 4 meters (for the outer petals)
- Green DK yarn — approximately 3 meters (for the leaf border)
- Cream DK yarn — approximately 5 meters (for the outer granny border)
- Crochet hook matching your yarn weight — a 3.5mm hook works well with DK
- Yarn needle for weaving in ends
- Scissors
- Blocking mat and pins (recommended for the best finish)
Yarn Substitutions
Don’t have DK weight on hand? You can easily adapt this pattern:
- Worsted/Aran yarn with a 4.0mm–4.5mm hook will produce a larger square, roughly 12cm.
- Sport weight yarn with a 3.0mm–3.25mm hook will give you a smaller square, around 8cm.
- Cotton DK gives excellent stitch definition and holds blocking beautifully — ideal for blankets and home décor.
- Acrylic DK is softer and more affordable — great for wearable projects like bags or cardigan panels.
The key is to match your hook size to your yarn so that the fabric feels firm but not stiff. You want those petals to hold their shape.
Gauge & Size
Gauge: 19 double crochet stitches × 10 rows = 10cm × 10cm square.
Finished Size: Approximately 10cm × 10cm per granny square.
If your square turns out significantly larger or smaller, adjust your hook size up or down accordingly.
Stitch Abbreviations (US Terms)
- ch — chain
- sc — single crochet
- hdc — half double crochet
- dc — double crochet
- sl st — slip stitch
- sc inc — single crochet increase (2 sc in the same stitch)
- dc inc — double crochet increase (2 dc in the same stitch)
- dc cluster — see special stitch below
- st(s) — stitch(es)
- sp — space
- FLO — front loop only
- BLO — back loop only
Special Stitch: Double Crochet Cluster (dc cluster)
Yarn over, insert hook into stitch, yarn over and pull up a loop, yarn over and pull through 2 loops (2 loops remain on hook). Repeat this sequence two more times in the same stitch, so you have 4 loops on your hook. Yarn over and pull through all 4 loops at once.
This stitch creates a dense, textured bobble-like effect that is perfect for flower centers and leaf shapes.

How the 3D Petal Technique Works
This pattern uses a clever technique: by working petals into the front loops only of one round, and then working the next increase round into the back loops only of that same round, the petals naturally stand up and away from the fabric. The back loops serve as a hidden foundation for the next layer, while the front loops become the base of each petal. Understanding this will help you see why the pattern alternates between FLO and BLO — it’s not arbitrary, it’s structural.
Pattern Instructions
Inner Petals (White Yarn)
Row 1: Make a magic circle. Ch 1 (does not count as a stitch). Work 6 sc into the center of the ring. Sl st into the front loop only of the first sc to join. — 6 sc
Row 2: Working in the front loops only of Row 1: (sc, hdc, dc) in the first st, (hdc, sc, sl st) all in the next st. Repeat from * to * 2 more times. — 3 petals
Row 3: Now working in the back loops only of Row 2 (these are the unworked loops sitting behind your petals). Work 6 sc increases (2 sc in each stitch around). Sl st into the front loop only of the first sc to join. — 12 sc
Outer Petals (Red Yarn)
Row 4: Working in the front loops only of Row 3: (sc, hdc, dc) in the first st, (hdc, sc, sl st) all in the next st. Repeat from * to * 5 more times. — 6 petals. Fasten off and weave in ends.
Row 5: Join red yarn and work in the back loops only of Row 4. Work 12 sc increases (2 sc in each stitch around). Sl st into the front loop only of the first sc to join. — 24 sc
Row 6: Working in the front loops only of Row 5: (sc, hdc) in the first st, dc inc in the next st, dc inc in the next st, (hdc, sc, sl st) all in the next st. Repeat from * to * 5 more times. — 6 larger petals. Fasten off and weave in ends.
Leaf Border (Green Yarn)
Row 7: Join green yarn into any back loop of Row 5. Ch 2 (this counts as the beginning of your first dc cluster). Complete the cluster in the same stitch (yarn over, insert hook, pull up a loop, pull through 2 loops — repeat twice more, then yarn over and pull through all loops). Ch 3. Work another full dc cluster (3 incomplete dc stitches closed together) in the same stitch. Ch 5, skip 5 stitches.
Repeat the following 3 times: (dc cluster, ch 3, dc cluster) all in the same stitch, ch 5, skip 5 stitches.
Sl st into the top of the first dc cluster to join. Fasten off and weave in ends. — 4 leaf-pair sections
Outer Border (Cream Yarn)
Row 8: Join cream yarn into any ch-3 space. Ch 3 (counts as 1 dc). Work (1 dc, ch 3, 2 dc) into the same ch-3 space. Work 1 dc into the next stitch. Work 5 dc into the ch-5 space. Work 1 dc into the next stitch.
Repeat the following 3 times: (2 dc, ch 3, 2 dc) into the ch-3 space, 1 dc into the next stitch, 5 dc into the ch-5 space, 1 dc into the next stitch.
Sl st into the top of the beginning ch-3 to join. Fasten off and weave in ends.
Blocking Your Square
Blocking is not optional here — it’s what transforms a slightly rumpled motif into a perfectly square, professionally finished piece.
- Pin your square to a blocking mat, aligning the corners and straightening the edges.
- Mist lightly with water or use a steam iron held slightly above the fabric (don’t press directly, especially with acrylic yarn).
- Let it dry completely before removing the pins.
For a deeper dive into why blocking matters, check out our post on crafting comfort through slow-living crochet.
Troubleshooting Common Issues
Petals are floppy instead of standing up. This usually means you accidentally worked into both loops instead of just the front loops on the petal rows. The BLO/FLO distinction is what creates the 3D lift. Rip back to the offending round and try again, paying close attention to which loop you’re inserting into.
Square is not lying flat. Check your stitch counts. Each increase round needs to double the stitch count precisely. If you missed an increase, the square will cup inward. If you added an extra stitch somewhere, it will ruffle.
Leaf border looks uneven. Make sure you’re skipping exactly 5 stitches between each leaf-pair section in Row 7. Even one stitch off will throw off the spacing for the entire round.
Colors are bleeding through. If you can see the white petals showing through the red layer, try using a slightly thicker yarn or going up a half hook size. The red petals need enough coverage to conceal the white beneath.
Ideas for Using Your Tudor Rose Squares
A single square is lovely on its own, but this pattern truly shines when you multiply it. Here are some project ideas:
- Floral granny square blanket — Make 20–30 squares and join them for a stunning throw.
- Cushion covers — Just 4 squares create a 20cm × 20cm pillow front.
- Tote bag panels — 2×3 squares make a perfectly sized bag.
- Wall art — Mount a single blocked square in an embroidery hoop or shadow box frame.
- Festival garland — String individual squares along cotton twine for bunting.
If you enjoy floral motifs, you’ll also love our daisy granny square pattern and our strawberry granny square. For a different textural approach, the cluster crochet granny square pairs beautifully with this rose design in a mixed-blanket project.
Alternative Colorways
While the classic Tudor Rose is red and white, this pattern works beautifully in many palettes:
- Pastel garden: Soft pink inner petals, lavender outer petals, sage green leaves, white border
- Sunset rose: Gold inner petals, deep orange outer petals, dark green leaves, cream border
- Frost rose: Ice blue inner petals, silver-grey outer petals, white leaves, pale blue border
- Desert rose: Blush pink inner petals, terracotta outer petals, olive green leaves, natural cream border
The Mindful Side of Crochet Flowers
There’s a reason flower patterns are so enduringly popular in the crochet community. Working through each petal requires just enough focus to keep your hands busy and your mind present — making it an excellent exercise in crochet mindfulness. Unlike larger garment projects that can feel like a marathon, a floral granny square is a satisfying sprint: you start with a circle and end with a complete, beautiful object in under an hour.
If you’re curious about the broader wellness benefits of this craft, our article on the joy and benefits of crochet for everyone covers the science behind why stitching makes us feel better.
Pin this pattern for later so you can come back to it whenever you’re ready to start your next floral project.
