
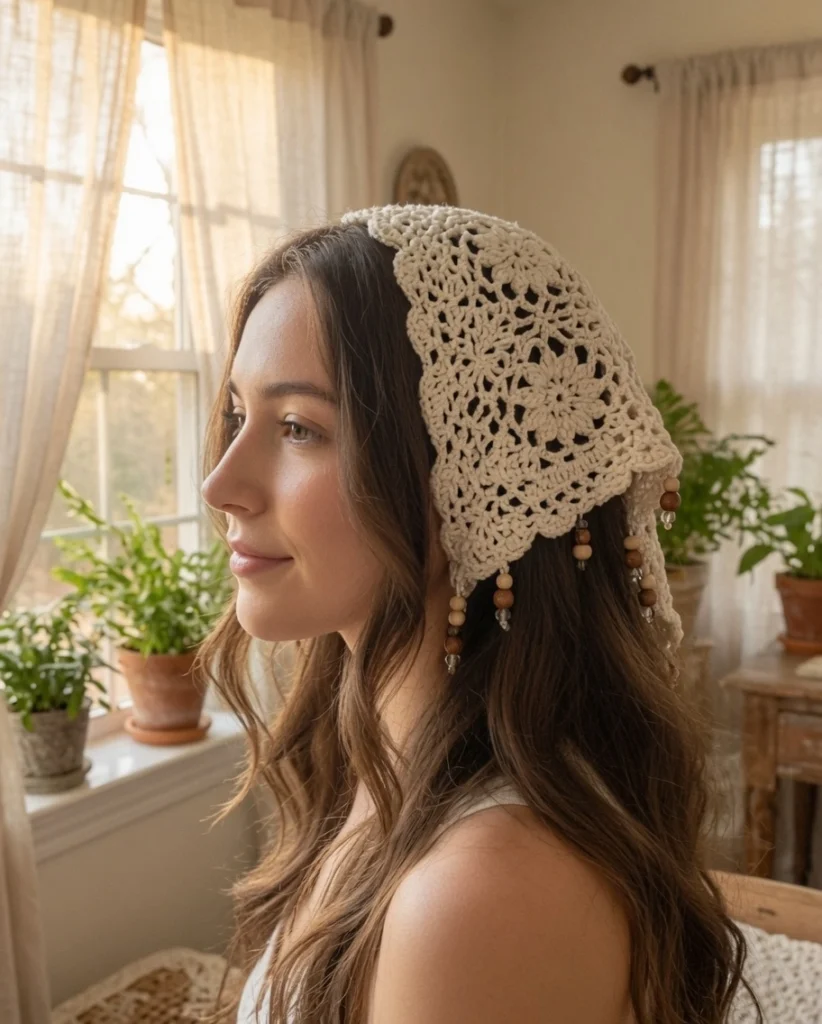
This triangular boho bandana works up from the top point downward, growing outward row by row into a clean isosceles triangle. At its heart sits a delicate floral mandala motif, surrounded by open lacework, a scalloped pointed edge, and a beaded fringe along the base. The finished piece drapes beautifully and works equally well as a headscarf, kerchief, or neck accessory, with corner ties you can adjust for a comfortable fit on almost anyone.
The shaping stays approachable throughout — simple increases paired with V-stitches, shells, and picots build the floral look naturally as the triangle grows, so you’re never fighting complicated shaping instructions.
If you liked our modern floral motif crochet bandana, this lacier boho version is a great next project to try.
Why This Pattern Is Worth Making
The open, airy lace structure keeps this bandana lightweight and breathable — ideal for warm-weather wear or layering over a summer outfit. Along the way you’ll practice building a central floral motif while keeping your triangle increases clean, then finish with a professional scalloped border and beaded fringe for that elevated boho look.
Because the V-stitches, shells, and picots repeat in a predictable rhythm as the piece grows, you can relax into the stitch pattern instead of tracking complex shaping. It stitches up fast in lightweight cotton, and there’s plenty of room to make it your own with size, bead, or fringe adjustments.
What You’ll Need
Yarn: 70–90 grams (220–280 yards) of fingering weight (#1) or DK weight (#3) cotton or cotton-blend yarn. Good options include a mercerized cotton like Scheepjes Catona (about 136 yards per 50g ball) or a budget-friendly cotton 8/4 in cream or off-white.
Hook: 3.5mm or 4.0mm — go with the larger size if you want an airier, more open drape.
Notions:
- 12–18 wooden beads (8–12mm)
- 24–36 small metallic or seed beads
- Tapestry needle
- Scissors
- Blocking pins and mat (strongly recommended)
Gauge: 18 dc and 9 rows = 4 inches (10cm) in the main lace pattern, measured after blocking. Gauge has some flexibility here since this is an accessory, not a fitted garment.
Choosing the Right Yarn
A smooth, lightweight cotton or cotton-blend yarn gives you the best drape and the crispest stitch definition for this lace design. Mercerized cotton in particular produces sharp stitches with a soft sheen while staying breathable — exactly what you want in a headscarf or kerchief.
Stick to smooth, lighter-weight cottons rather than fuzzy or heavily textured yarns, which tend to blur the floral motif and hide the scalloped edge detail. Whatever you choose, always swatch first — cotton has a tendency to stretch a little once it’s blocked, which actually works in this pattern’s favor by opening up the lace even more.
Size and Fit Details
Finished size:
- Base width: 48–55cm (19–22 inches)
- Point-to-base depth: 28–32cm (11–12.5 inches)
- Ties: 50–70cm each, and adjustable
This one-size design comfortably fits most adults as either a headscarf or a neckerchief. Because the triangle is built row by row, you can easily customize the depth — stop 4–5 rows earlier than written for a smaller version that works well as a teen size or a neck scarf.
Blocking is what really brings this pattern to life: the lace relaxes and opens up dramatically, revealing the scalloped edge and floral center in full. Wet blocking with pins gives the crispest, most polished result.
Before You Start
This bandana is worked flat, in rows, starting from the top center point and increasing outward into a triangle shape. The central floral motif isn’t a separate piece — it builds naturally out of the shell and picot placement as you work through the increase rows.
Keep your tension loose to preserve that open, lacy look; if your stitches feel tight or the fabric starts to pucker, size up your hook by half a millimeter. Every 5–6 rows, lay the piece flat and check that it’s widening evenly on both sides.
Don’t skip blocking — this is the step where the lace truly opens up and the floral center and scalloped edge come into focus. Pinning the damp piece into a precise triangle gives you the cleanest finished shape. If you like, place stitch markers along both increasing edges to help you track your increases as you go, and save the beaded fringe for last so you can fine-tune the spacing once your border is complete.
Most crocheters find the repeating lace sections easy to memorize after the first 8 rows or so. Take your time through the central floral section in particular — that’s where the mandala detail really shines.
Stitches and Abbreviations Used
US terms:
- ch – chain
- sl st – slip stitch
- sc – single crochet
- dc – double crochet
- tr – treble crochet
- sp – space
- st(s) – stitch(es)
Special stitches:
- V-st – (dc, ch 2, dc) worked in the same stitch or space
- Shell – (2 dc, ch 2, 2 dc) worked in the same stitch or space
- Picot – ch 3, sl st into the 3rd chain from the hook
- Floral Cluster – (3 dc, ch 3, 3 dc) worked in the same space, forming the petal shapes in the central motif
Repeats are marked with asterisks (**). Turning chains count as your first stitch unless the pattern says otherwise, and for the lightest lace, always work into chain spaces from the previous row rather than into the stitches themselves.
Step-by-Step Instructions
Work from the top point (which sits at the center back of the head) downward, increasing at both edges every row to build the triangle. Keep your tension relaxed throughout for the best lace effect.
Foundation and Central Floral Build
Row 1: Ch 5, work (dc, ch 2, dc) into the 5th chain from the hook — this is your first V-st. Turn. (1 V-st)
Row 2: Ch 3 (counts as dc), work a V-st into the ch-2 space, dc into the top of the turning chain. Turn. (2 V-sts)
Row 3: Ch 3, dc into the first dc, ch 1, work a Shell into the next ch-2 space, ch 1, dc into the last dc. Turn.
Row 4: Ch 3, dc into the first dc, ch 1, (dc, ch 1, dc) into the next ch-1 space, Shell into the ch-2 space of the previous Shell, ch 1, (dc, ch 1, dc) into the next ch-1 space, dc into the last dc. Turn.
Row 5: Ch 3, dc into the first dc, ch 1, dc into the next dc, ch 1 repeating out to the center. Work a Floral Cluster — (3 dc, ch 3, 3 dc) — into the center ch-2 space. Chain 1, then mirror the dc, ch 1 repeat back out to the end, finishing with a dc into the last dc. Turn.
Rows 6–10: Keep increasing at both edges with your ch 3, dc, ch 1 repeat pattern. In the central Floral Cluster space, build out the motif further by adding (3 dc, picot, 3 dc) groups on the odd-numbered rows — this is what creates the signature mandala look at the center. Check your width every few rows to make sure both sides are growing evenly.
Main Body Lace
Rows 11–22 (or until you reach your desired depth): Ch 3 (or ch 4 for a taller, airier lace), then work a V-st or (dc, ch 1) mesh pattern across the row, dropping in the occasional Shell or small Floral Cluster every 6–8 stitches for scattered floral accents. Increase at both edges each row by adding a dc plus ch 1 at the start and end. Stop once your base measures approximately 48–55cm across.
The fabric should feel light and drapey at this stage. If it starts to curl, your tension is likely too tight — move up to a larger hook.
Scalloped Border
Work this along both long sides and the base: sc into the next stitch or space, skip 2–3 stitches, work a Shell — (2 dc, ch 2, 2 dc, picot, 2 dc) — into the next space, skip 2–3 stitches, and repeat this sequence around all three sides. Adjust your skip counts slightly as needed to keep the scallop points evenly spaced.
Ties
At each top corner, attach your yarn and chain 55–70. Work one row of sc back along the chain for extra strength, or simply leave the ties as plain chains and thread beads near the ends instead.
Assembly and Finishing
Weave in every end securely with your tapestry needle.
Blocking: Wet the bandana thoroughly and gently squeeze out the excess water, then pin it into a precise triangle shape on your blocking mat and let it dry fully. This step is what transforms the lace and sharpens the scalloped edge.
Beaded fringe: Cut 15–20 lengths of yarn, each 20–25cm long. Thread one large wooden bead plus 2–3 small metallic beads onto each strand, fold the strand in half, and attach it at every scallop point (or every 2–3cm along the base) using a lark’s head knot. Trim the ends evenly once you’re done.
Your finished bandana should feel sturdy but delicate — and like most cotton pieces, it’ll only get softer and drapier with wear and washing.
If you enjoy triangle-shaped accessories like this one, our elegant winter scarf crochet pattern and easy fall crochet scarf pattern are worth adding to your queue too.

Easy Variations to Try
Smaller version: Work only 18–20 total rows before starting the border. This brings the base width down to roughly 38–42cm — a good fit for teens or as a compact neck scarf.
Larger, shawl-style piece: Keep working the main body lace until your base reaches 70–80cm (usually around 28–32 rows total), and add a few extra Floral Clusters through the body for a denser mandala effect.
Color ideas: Stick with a solid cream as written, or introduce subtle stripes by switching colors every 4–5 rows in the body. A variegated fingering-weight yarn also shows off beautifully in this stitch pattern for a rainbow boho effect.
Yarn weight swaps: A sport-weight yarn with a 4.5mm hook gives you a drapier, larger finished piece, while fingering weight with a 3.5mm hook produces a more delicate, refined lace.
Fringe variations: Skip the beads entirely for a simple tassel look, use longer 30cm strands for more dramatic movement, or bead only every other scallop for something lighter.
You can also turn the corner ties into a continuous lace tie by working the chain as a foundation row and adding picots along its length.
If you’re in the mood for more color-play projects after this one, take a look at our color block crochet super scarf pattern.
Troubleshooting Common Issues
Piece curling or feels too tight: Size up your hook by half a millimeter and consciously loosen your tension, especially on chain stitches. Blocking will also help relax the fabric afterward.
Stitch counts not matching: Double check your increases at the start and end of each row — both edges should be adding the same number of stitches. If they’ve drifted apart, unravel back to the last correct row and re-mark your edges before continuing.
Lace looking flat or dense: Make sure you’re working into the chain spaces rather than the stitches themselves. Using a longer turning chain (ch 4 instead of ch 3) on later rows also helps create taller, airier stitches.
Uneven scalloped border: Adjust how many stitches you skip between shells as you go — it’s completely normal to skip 2 in some spots and 3 in others to keep the scallop points looking even.
Beads sliding or fringe looking uneven: Tie a small knot just below each bead, or add a tiny dab of fabric glue to hold the knot in place. Trim all the fringe strands at once while the piece is still pinned flat for the most even length.
Finished piece smaller than expected: Cotton yarn grows noticeably during wet blocking, so always block the piece before you add the fringe to get an accurate final size.
Next-Level Tips
Once you’re comfortable with the triangle increases and the floral cluster technique, you can scale this same construction up into a full triangular shawl — just keep working the body rows and repeat the scalloped border along all three edges. The same central-motif approach also translates nicely into rectangular wraps or baby blankets when worked straight across in rows without edge increases.
Want to design your own spin on it? Swap the Floral Clusters in the center for granny squares or a different shell arrangement, or extend the scalloped border into a full edging you could use on other garments.
The main body’s lace repeat also works well in market bags or lightweight scarves — and that beaded fringe technique is an easy way to add boho detail to towels, blankets, or finished garment edges.
If you enjoy working with granny-style motifs and clusters, our sunburst granny square blanket pattern and chunky daisy blanket pattern use similar techniques on a bigger scale.
Caring for Your Bandana
Since it’s made from cotton, this bandana is low-maintenance. Hand wash in lukewarm water with a mild detergent, or machine wash on a gentle cycle inside a mesh bag. Lay it flat to dry so it holds its shape and doesn’t stretch out of proportion.
Skip the fabric softener — it tends to weigh down delicate lace. After washing, re-block the piece while it’s still damp to refresh the scalloped edges and floral detail, and store it folded flat or hanging to keep the beads and fringe from creasing.
Final Thoughts
This boho lace floral bandana pairs eye-catching openwork with genuine everyday wearability. The clear, repeating increases and motifs make it a satisfying project for building confidence with lace crochet techniques.
Take your time with the blocking and beaded fringe steps in particular — they’re what push this piece from simply handmade to polished and finished. Once complete, you’ll likely find yourself reaching for it all season long.
For more small wearable projects, check out our simple crochet scarf pattern and crochet cable scarf pattern — both make great companion pieces to this bandana.
