
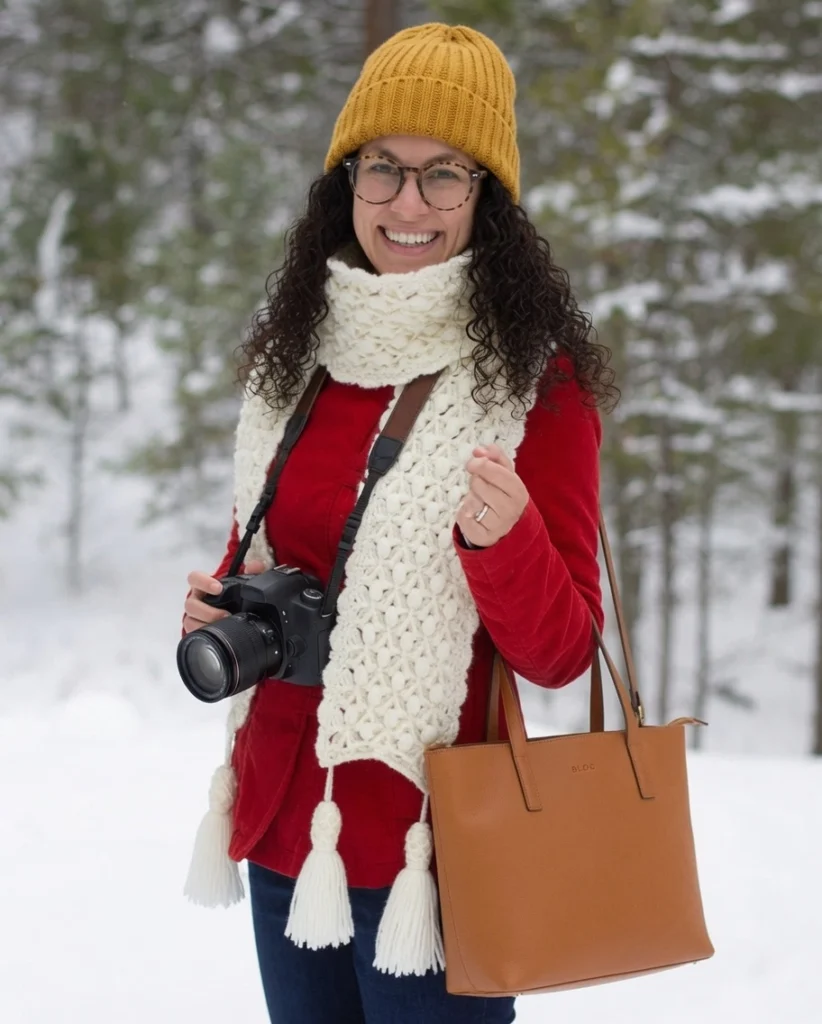
Embrace winter elegance with this beautifully textured scarf that combines puff stitches, delicate chains, and scalloped edges. The Snowberries scarf isn’t just a winter accessory – it’s a statement piece designed for special occasions when you want to stand out in the crowd.
This intermediate-level pattern creates a chunky texture despite using a lightweight yarn, keeping you warm without the bulk. The intricate design features geometric interest with delicate chains and finishes with elegant scallops, picots, and tassels that complete this designer piece.
Materials Needed
- 3.25mm (D) hook
- 3 balls (900 yards) Paintbox Yarns Simply DK in Champagne White, or color of your choice. This is a #3 lightweight yarn. This pattern will not have good drape if worked in anything heavier. You will only be using 650-700 yards for this scarf.
- Yarn needle
- Scissors
- Measuring stick
Abbreviations Used
- ch = chain
- sc = single crochet
- FPsc = front post single crochet
- dc = double crochet
- tr = treble crochet
- st/sts = stitch/stitches
- sp/sps = space/spaces
- sk = skip
Special Stitches
- 6 hdc puff: yo, pull up a loop 6 times in same st, yo, pull through 12 loops, yo, pull through final 2 loops
- Fan: (3 tr, ch 2, 3 tr) in same stitch
- Shell: 6 dc in same st
Pattern Instructions
This pattern uses USA crochet terminology
Measurements
6 1/2″ wide by 5′ long, excluding tassels
Gauge
Gauge is not particularly important. Your rows should be as close to 5 1/2″ wide as possible. Each pattern repeat adds about 2″ of length to your scarf.
Additional Notes
-Ch 1 at beginning of round does not count as stitch. -Stitch count totals are listed in parentheses ( ) at end of row/round. -Because this winter scarf pattern is so textured, keeping a tighter tension over all while crocheting this will help the design stay more flat which means it will catch on fewer things. It’s especially important when making the chains for the Vs, and the ch-6 at end of row 2/beginning of row 3 so they don’t get floppy. -This elegant winter scarf is a piece for special occasions, and not the scarf to wear if you will be hauling wood for the fire, romping with pets, or playing with little ones who want to drive their toy cars or plastic horses along your personage (as a mom of boys this was definitely a significant stage in my life!). No matter how nice and neat you make your stitches, they WILL get snagged by tiny toys/squishy baby fingers, and pet paws. -This scarf pattern was made shorter that most of my scarves on purpose to help keep then ends from dragging along surfaces and getting pulled or snagged. You may make this scarf another foot longer if you wish, but you may find it catching on things if you’re not careful. -The body of the pattern is based on a stitch pattern by MyPicot
Scarf Body
Ch 28,
Row 1: dc in 4th ch from hook, sk 3 sts, (3 tr, ch 2, 3 tr) in next st (fan created), sk 3 sts, *6 hdc puff in next, sk 3 sts, (3 tr, ch 2, 3 tr) in next st, sk 3 sts; repeat from * across. Work 2 dc in final ch, ch 1, turn. (3 fans, 2 puffs, 3 dc)
Row 2: sc in first dc, ch 1, *FPsc around each of next 3 tr sts, (you will now create a “V” behind your work) ch 5, bend work forward so you are looking at the back of the piece, sc in ch at bottom of fan (there should be a gap where those 6 tr sts were worked in the previous row), ch 5, FPsc around top of next 3 tr sts, ch 2; repeat from * across, end row by only chaining 1, sk dc st, sc in top of ch-3 from previous row, ch 6 (counts as first tr, + ch sp,).
Row 3: 3 tr in first sc, 6 hdc puff in ch-2 sp at center of fan from row 1, *(3 tr, ch 2, 3 tr) in ch-2 sp from previous row (above puff), 6 hdc puff in ch-2 sp at center of fan from row 1; repeat from * across ending with (3 tr, ch 1, tr) in final sc of row, ch 1, turn.
Row 4: sc in first tr, ch 1, *FPsc around each of next 3 tr sts, ch 2, FPsc around next 3 tr sts, ch 5, bend work forward so you are looking at the back of the piece, FPsc around top of puff from row 3 near bottom of fan, ch 5; repeat from * across. Ending with, FPsc around top of next 3 tr sts, ch 2, FPsc around next 3 tr, ch 1, sc in top of 5th ch from previous row, ch 3 (counts as first dc of next row), turn.
Row 5: dc in first sc, (3 tr, ch 2, 3 tr) in ch-2 sp from previous row (above puff), 6 hdc puff in ch-2 sp at center of fan from row 4, *(3 tr, ch 2, 3 tr) in ch-2 sp from previous row (above puff), 6 hdc puff in ch-2 sp at center of fan from row 4; repeat from * across, last repeat omits the puff and ends with 2 dc in final sc, ch 1, turn.
Row 6: sc in top of first dc, ch 1, *FPsc around next 3 tr sts, ch 5, bend work forward so you are looking at the back of the piece, FPsc around top of puff from row 3, ch 5, FPsc around top of next 3 tr sts, ch 2; repeat from * across, end row by only chaining 1, sk dc st, sc in top of ch-3 from previous row, ch 6 (counts as first tr, + ch sp).
Repeat rows 3-6 until your scarf measures 60″ long.
Scarf Edging
Round 1: ch 1, turn, sc evenly across end putting a sc in each FPsc and 2 sc in each ch-2 sp. sc in both the beginning and ending sc sts as well, at corner work (sc, ch 1, sc).
Continue working sc evenly down long side of scarf. You should work these in multiples of 6+1, or 301 sc along each long side if you made your scarf about 60″ long. This works out roughly to 1 sc in each sc row, 2 sc in ch-3, 3 sc in ch-6 (this is why keeping your chain tension tight is important in the body of the scarf). At corner work (sc, ch 1, sc), continue working evenly along other end, at corner work (sc, ch 1, sc), and work evenly down other long side working the same number of stitches as you did on your first long side, join with sl st to first sc.
Round 2: ch 1, sc along end, turn and work this sequence down long side: ch 3, sl st in same st, *sk 2 sts, shell in next st, sk 2 sts, (sl st, ch 3, sl st) in next; repeat from * along side, sc across end, repeat from * down other long side, join with sl st to first sc. (If you used a stitch count of 301 in round 1, you should have 50 shells and 51 picots per side edge.)
Fasten off weave in ends.
Tassel Instructions
Tassel Cap (Make 4)
Measures 2″ tall x 1 1/4″ wide Note: All chains in this section should be worked with tight tension.
Ch 5, join with sl st to first ch
Round 1: ch 1, 10 sc in ch-5 sp, Join with sl st to first sc. (10)
Round 2: *ch 5, sk st, sl st in next st; repeat from * around. Final sl st counts as join (5 ch-5 sp)
Rounds 3-5: sl st up ch 2 sts, *ch 5, sl st in next ch-5 sp; repeat from * around, final sl st will be worked in 2nd sl st at beginning of round. (5 ch-5 sp)
Round 6: sl st up 2 ch sts, ch 1, 1 sc in ch-5 sp, 2 sc in next ch-5 sp repeat * to * 3 times, sc in final ch-5 so where you placed your first sc of round, join with sl st to first sc. (10 sc)
Round 7: ch 1, sc in each sc stitch around, join with sl st to first sc. (10 sc)
Round 8: Loosely sl st around bottom of tassel between rounds 6 and 7.
Fasten off leaving 12″ tail for sewing cap to tassel.
Big Fluffy Tassels (Make 4–2 for each end)
Cut 50 12″ lengths of yarn, tie another 12″ length of yarn around the middle of the bundle.
Ch 20, do not fasten off, place ch around same center tie just made and pull both ends through top of tassel cap (you may need to remove the hook from your working loop, insert hook down through top of cap, reinsert into working loop and start of chain and pull both ends through tassel cap), and then through end of scarf. Join ends of chain with sl st.
Cut yarn, and tie ends together securely.
Push cap up off tassel and move the knotted ends to the underside of the tassel.
Gently pull cap back down over tassel and then sew it in place with 12″ tail from round 8.
Repeat for next 3 tassels.
Trim ends of tassels neatly.
Tips
- For best results, maintain a consistent, slightly tighter tension throughout the project, especially when working the chain stitches
- Practice the stitch pattern with a small swatch before beginning your scarf to get comfortable with the technique
- If you’d like to make a wider scarf, the starting chain is worked in multiples of 8+4
- This pattern works best with a lightweight (#3) yarn as specified – heavier yarns will not drape properly

FAQ
Can I use a different yarn weight? This pattern is specifically designed for #3 lightweight yarn. Using a heavier yarn will affect the drape and texture of the finished scarf.
Can I make this scarf longer? Yes, you can add another foot to the length if desired, but be aware that longer scarves may catch on things more easily.
Is this pattern suitable for beginners? This is an intermediate-level pattern due to the combination of special stitches and techniques. If you’re a beginner, consider practicing the stitch pattern in a small swatch first.
Conclusion
Congratulations on creating your stunning Snowberries winter scarf! This elegant design with its exquisite texture and delicate details makes a perfect statement piece for special winter occasions. Share your beautiful creation in the comments below!
Looking for more winter accessories? Check out these free patterns:
