
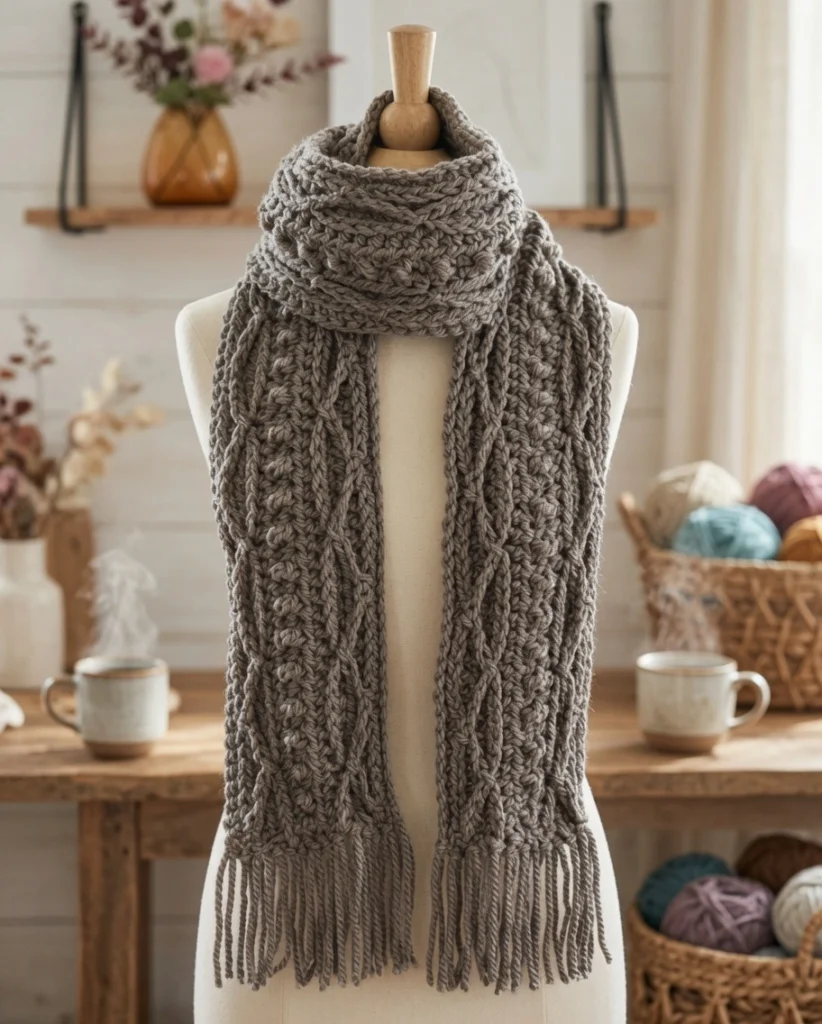
Have you ever admired the rich, dimensional look of crochet cables but felt intimidated by complex post stitches? You aren’t alone! This faux cable scarf achieves that stunning, highly textured look using a clever trick—simple chain stitches worked over ribbed lines.
Even the popcorn stitches are created using a breeze-friendly alternating method, making this a fantastic project for any advanced beginner looking to level up their skills. If you love making easy wearable designs like this free crochet scarf pattern easy for men or want to try your hand at more textured garments like this cabled peplum tee, this scarf is a perfect, cozy addition to your winter wardrobe.
Materials Needed
This pattern uses USA crochet terminology.
- Bernat Softee Chunky, a size 6 super chunky yarn (Color Taupe gray and Natural were used for the sample crochet cable scarves)
- An L (8mm) crochet hook
- Tapestry needle to weave in the ends
Abbreviations Used
- ch (chs): chain (chains)
- st (sts): stitch (stitches)
- sc: single crochet
- sl st: slip stitch
- hdc: half double crochet
Tips
Finished Size (Measurements given are before adding the tassels)
- 4 to 6 Years: 6″ wide and 53-1/2″ long
- 6 to 12 Years: 6″ wide and 60″ long
- Teen to Woman: 6″ wide and 70″ long
Yardage
- 4 to 6 Years: 210 yards
- 6 to 12 Years: 230 yards
- Teen to Woman: 270 yards
Gauge 8 hdc sts = 4 inches
Special Stitches
- BLO: Work your stitch by inserting your hook only into the back loop of the stitch.
- Third loop of a st: The third loop is a horizontal loop that runs behind your hdc stitch. Working into this loop pushes the top ‘V’ forward, creating a beautiful ribbed texture on the front of your fabric.
- Triple crochet (tr): YO twice, insert your hook into the next st, and pull up a loop, (YO, pull through 2 loops) 3 times.
- hdc2tog: A decrease worked across 2 sts. YO, insert your hook into the next st and pull up a loop (3 loops on hook), YO, insert your hook into the next st and pull up a loop. YO and pull through all 5 loops on your hook.
Pattern Notes
- The base of the scarf is first worked with ribbed lines and fake popcorn stitches. The cables are then added between the ribbed lines using chain stitches.
- Any tails left near the edge of the scarf will not have to be woven in as they will blend in with the tassels.
- The scarf pattern is given separately for the smaller sizes and the Teen to Woman’s size. The cable pattern is common for all sizes.
Pattern Instructions
4 to 6 Years (6 to 12 Years)
Note: Stitch count for 6 to 12 years is given in brackets. If there is only 1 number, it applies to both sizes.
Ch 107 (121). The initial ch is a multiple of 7 + 2.
Row 1: 1 hdc in 2nd ch from hook and each ch across to end, turn.——- 106 (120) sts
Note: In the next row, the 3rd loop will be in front of your work as seen in pic 2 above.
Row 2: Ch 1 ( does not count as a st here and throughout), 1 hdc in 3rd loop of 1st st and each st across to end, turn.—-106 (120) sts
Note: In the next row, you are working regular hdc sts and not into the 3rd loops.
Row 3: Ch 1, 1 hdc in the 1st st and each st across to end, turn.——106 (120) sts
Note: In the next row, we will add 1 increase to make the stitch count odd.
Row 4: Ch 1, 1 hdc in 3rd loop of 1st st and each st across until you reach the middle of the scarf, 2 hdc in 3rd loop of next st, 1 hdc in 3rd loop of each remaining st across to end, turn.—-107 (121)sts
Note: In the next row, if you find it hard to fold the triple to the front and then work a sc, work the sc as usual, and then pull the projection to the front.
Row 5: Ch 1, 1 sc in the first st, *( 1 tr in the next st, fold the tr to the front and 1 sc in the next st), repeat from * to end, fasten off, and do not turn.—-107 sts (121)sts
Row 6: This row is worked on the same side as Row 5, sl st to the 1st st of Row 5, 1 hdc in the first st and in each st across to the middle of the scarf, hdc2tog in the next 2 sts, 1 hdc in each st across to end, turn.——106 (120)sts
Row 7: Ch 1, 1 hdc in 3rd loop of 1st st and each st across to end, turn.—-106 (120)sts
Row 8: Ch 1, 1 hdc in the 1st st and each st across to end, turn.——106 (120) sts
Row 9: Ch 1, 1 sc in the 3rd loop of the 1st st and each st across to end, turn.——106 (120)sts
Jump to ‘Adding Cables to The Crochet Scarf’
Teen to Woman
Ch 142. The initial ch is a multiple of 7 + 2.
Row 1: 1 hdc in 2nd ch from hook and each ch across to end, turn.——- 141 sts
Note: In the next row, the 3rd loop will be in front of your work as seen in pic 2 above.
Row 2: Ch 1 ( does not count as a st here and throughout), 1 hdc in 3rd loop of 1st st and each st across to end, turn.—-141 sts
Note: In the next row, you are working regular hdc sts and not into the 3rd loops.
Row 3: Ch 1, 1 hdc in the 1st st and each st across to end, turn.——141 sts
Row 4: Ch 1, 1 hdc in 3rd loop of the 1st st and each st across to end, turn.—-141 sts
Note: In the next row, if you find it hard to fold the triple to the front and then work a sc, work the sc as usual, and then pull the projection to the front.
Row 5: Ch 1, 1 sc in the first st, *( 1 tr in the next st, fold the tr to the front and 1 sc in the next st), repeat from * to end, fasten off, and do not turn.—-141 sts
Row 6: This row is worked on the same side as Row 5, sl st to the 1st st of Row 5, 1 hdc in the first st and each st across to end, turn.—— 141 sts
Row 7: Ch 1, 1 hdc in 3rd loop of 1st st and each st across to end, turn.—-141 sts
Row 8: Ch 1, 1 hdc in the 1st st and each st across to end, turn.——141 sts
Row 9: Ch 1, 1 sc in the 3rd loop of the 1st st and each st across to end, turn.——141 sts
Continue to make crochet cables.
Adding Cables to The Crochet Scarf
Pattern Note: Take a good look at pics 3 and 4 above before you start making your cables. The cable is worked in a zig-zag shape between 2 ribbed lines formed by working in the third loops.
First Cable Sl st to the base of the first ribbed line near the edge, ch 3, sl st to the 4th st on the second ribbed line, *ch 3, sl st to the 7th st (counted from the previous sl st made on the same ribbed line) on the first ribbed line, ch 3, sl st to the 7th st on the second ribbed line) repeat from * until just 3 visible sts are left on the second ribbed line, ch 3 and sl to the last st of the first ribbed line. Cut the yarn leaving a 9″ tail, and pull the tail out.
Second Cable Rotate your scarf and work the second cable along the next long edge exactly like you worked your first cable. Cut the yarn leaving a 9″ tail, and pull the tail out.

Assembly
Adding Tassels to the Crochet Cable Scarf
Note: Before adding the tassels, use the tapestry needle to pull the yarn tails left by the cables to the back side, make a knot to secure it, and bring it out through the edge. We can later blend it in with the tassels.
I used a small book to make my tassel. You can also use a thick 5.75-inch wide cardboard to make your tassels.
Wrap the yarn multiple times around a small book or your cardboard. Cut along one side to get multiple strands of the same length.
Take one strand, fold at the middle of the strand, pull through the edge of the crochet scarf to form a loop, grab the 2 ends with your hook, and pull through the loop, if you find any stray single strand of yarn nearby, pull it through the loop as well. Now tug gently to tighten the loop.
Take care not to add too many tassels or your scarf will widen out at the edges. Add just enough to cover the edge.
Finishing
- Weave in any remaining tails on the back side of the crochet cable scarf.
- Lay the scarf flat, run your fingers through the tassels, and trim the edges to level it.
If you love this textured look, you might also enjoy this full of texture crochet beanie or explore more cozy crochet accessories for your winter wardrobe!
FAQ
Q: Can I use a different yarn weight? A: While this pattern is specifically designed for a size 6 super chunky yarn to achieve the intended drape and stitch definition, you can experiment with other weights. Just be sure to change your hook size accordingly and check your gauge!
Q: How do I keep my edges straight when adding tassels? A: The key is restraint! Add only enough tassels to naturally cover the edge without crowding them together, which prevents the scarf from flaring outward.
Conclusion
Congratulations on finishing your gorgeous faux cable scarf! This clever design offers all the classic beauty of textured cables without the complicated post stitches, making it a cozy staple for winter. Share your beautiful creation in the comments below!
