
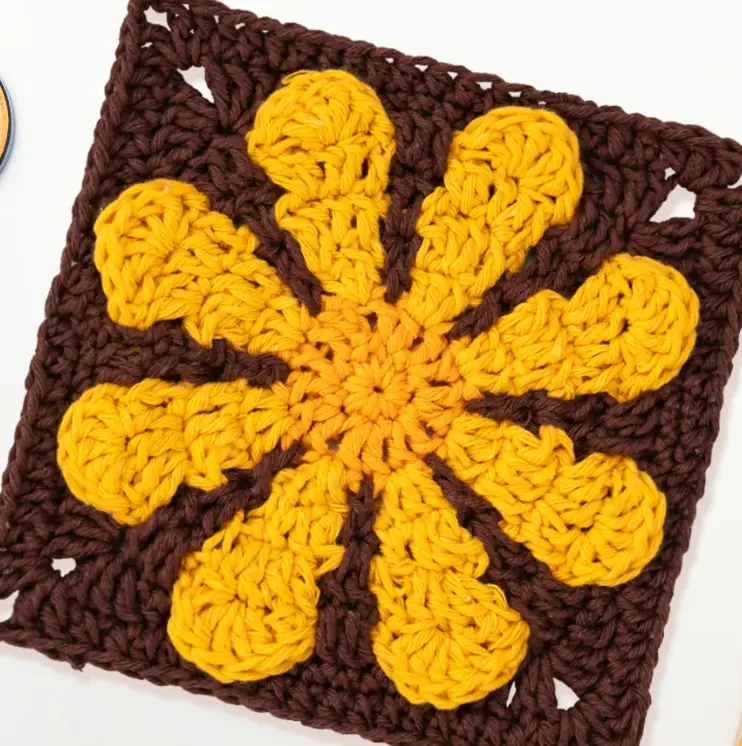
There is nothing quite like a 3D floral motif to bring a crochet project to life, and this Retro Daisy Granny Square does exactly that. By working stitches in front of and behind previous rounds, this pattern creates a stunning layered flower that pops right off the fabric. It is the ultimate blend of groovy 1970s nostalgia and modern crochet techniques.
Because this pattern requires you to manipulate loops and flip petals as you work, it is best suited for intermediate crocheters or adventurous beginners. The result is a highly textured, dimensional square that looks incredibly impressive.
These squares are highly addictive to make and serve as perfect statement pieces for summer crochet tops, cozy blanket panels, or trendy market bags. If you love floral granny squares, you will also adore the Enchanted Rose Granny Square and the Daffodil Granny Square.
Materials Needed
- Yarn: Weight-3 Light (DK) yarn in at least two contrasting colors (one for the daisy petals, one for the background/leaves)
- Crochet Hook: 3.00mm hook
- Tapestry Needle: For weaving in ends
- Marking Clips: Highly recommended to hold your active loops when dropping yarn to work over previous rounds
Abbreviations Used
- MR – Magic Ring
- SC – Single crochet
- DC – Double crochet
- Hdc – Half double crochet
- Ch – Chain stitch
- Sl.st – Slip stitch
- Sk – Skip stitch
- inc – Increase (2 stitches in one stitch)
This pattern uses USA crochet terminology
Pattern Instructions
Rounds 1-4
R1: Magic Ring, SCx8, sl.st [8]
R2: Chx3(Counts as 1DC), Dc, Dc incx7 [16]
R3: Change a new yarn color, Chx3(Counts as 1DC), Dc inc into the same ST, [Ch, Sk, Dcx3 into the next ST]x7, Ch, Sk, sl.st. [24]
R4: Change a new yarn color, Pull the yarn out of the loop with a slip stitch through the skipped stitches in the round2. Chx3 (Counts as 1DC), Chx4, Sk over to the next Sk St of round2, Dc, [Chx4, Sk over to the next Sk St of round2]x7, Sl.st [40]
Round 5
Round 5: Switching back to the round3 yarn color, Pull the loop from the round4 Ch space to place it in front of the round3, Chx3 (Counts as 1DC), [2 dc in next st (from Round 3), 1 dc in last st of cluster] while keeping Round 4 ch stitches pushed to the back.
Repeat: [Chx2, skip 1 dc from Round 4, 1 dc in next st, 2 dc in next st, 1 dc in next st] around.
End with Ch 2 and sl.st into the top of ch 3.
Round 6
Round 6: Switch back to the yarn color from Round 4. Pull up a loop to the front in any ch1 sp.
Ch 3 (counts as the first dc), 1 dc in the same st.
Repeat:[Ch 5, skip 4 dc, 2 dc in the next dc from Round 4] around.
End with ch 5 and sl.st into the top of the ch 3.
Round 7
Round 7: Switch back to the yarn color from Round 5. Pull up a loop to the front in any ch5 sp from Round 6.
Insert hook through the ch spaces of Round 6 and pull the loop from Round 5 to the front.
Chx3 (counts as the first dc). 2 dc in the next st of Round 5. 1 dc in the next 2 sts of the cluster.
Repeat:[Ch 2, skip the 2 dc from Round 6, 1 dc in the next st, 2 dc in the next st, 1 dc in the next 2 sts] around.
End with ch 2 and sl st into the top of the ch 3.
Round 8
Round 8: Continue with the same yarn. Ch 1 (does not count as a stitch).
Sc in the first st, sk 1 st, 5 dc in the next st (center dc of the cluster), sk 1 st, sc in the next st.
Repeat: [Ch 2, sk the ch-2 space from Round 7, sc in the first st of the next dc cluster, sk 1 st, 5 dc in the next st, sk 1 st, sc in the last st of the dc cluster] around.
End with ch 2 and sl.st into the first sc.
Round 9
Round 9: Switch back to the yarn color from Round 7. Pull the yarn to the front.
Chx3 (counts as the first dc).Work 2 dc in the next st from Round 7. Flip the flower petal (Round 8) downward and work 5 dc into the ch space from Round 7 behind the petal. Flip the petal back up. Work 1 dc in the first dc st and 2 dc in the next dc st in front of the petal (from Round 8).
Repeat: [*Flip the petal down, work 5 dc in the ch space from Round 7, flip the petal back up, work 1 dc in the first st and 2 dc in the next st in front of the petal] around.
End with a sl.st into the top of the starting ch-3.
Round 10
Round 10: Chx1 (does not count as a st),
Sc in the first st. Sc in the next 5 sts.
Hdc in the next st. Dc in the next st.
Corner: Work (2 dc, ch 2, 2 dc) in the next st.
Dc in the next st. Hdc in the next st.
Sc in the next 11 sts.
Hdc in the next st. Dc in the next st.
Corner: Work (2 dc, ch 2, 2 dc) in the next st.
Dc in the next st. Hdc in the next st.
Sc in the next 11 sts.
Hdc in the next st. Dc in the next st.
Corner: Work (2 dc, ch 2, 2 dc) in the next st.
Dc in the next st. Hdc in the next st.
Sc in the next 11 sts.
Hdc in the next st. Dc in the next st.
Corner: Work (2 dc, ch 2, 2 dc) in the next st.
Dc in the next st. Hdc in the next st.
Sc in the last 5 sts.
Sl st into the first sc to join.
Round 11
Round 11: CHx1 (does not count as a stitch)
Hdc into the next 9 sts
In the corner CH 2 sp, work (2 DC, CH 2, 2 DC)
Hdc into the next 19 sts
In the corner CH 2 sp, work (2 DC, CH 2, 2 DC)
Hdc into the next 19 sts
In the corner CH 2 sp, work (2 DC, CH 2, 2 DC)
Hdc into the next 19 sts
In the corner CH 2 sp, work (2 DC, CH 2, 2 DC)
Hdc into the next 9 sts
SL.ST into the first st
Fasten off, cut yarn leaving 6-10 inches, and pull yarn tail through the last loop.
Assembly
Because this square features 3D petals, assembling them into a larger project requires a gentle hand to avoid squashing your beautiful flowers. Lay your squares out in your desired color pattern before joining.
When you are ready to connect them, a seamless join is the best method to maintain the retro aesthetic without adding bulky, visible borders. Check out our guide on how to create a seamless join for granny squares for a professional finish.
Tips
- Manage Your Loops: The most challenging part of this pattern is Rounds 5 through 9, where you drop yarn and pick it up rounds later. Use locking stitch markers to secure your dropped loops so they don’t accidentally pull out while you are working the overlay rounds.
- Push Stitches Back: Pay close attention to the instructions in Round 5 and Round 7 that tell you to keep certain stitches pushed to the back. This is what creates the layered, 3D depth of the daisy petals.
- Keep Tension Relaxed: When working the 5 dc petals in Round 8, try to keep your tension slightly relaxed so the petals plump up naturally rather than laying flat against the fabric. For more help managing tension and edges, review our tips on how to crochet a perfect granny square.
FAQ
Can I make this square bigger? Absolutely! To make a larger square, simply add additional rounds of half double crochets (like Round 11) to the outer edges, making sure to place your (2 DC, CH 2, 2 DC) corners in each chain-2 corner space.
Why do I have to flip the petals down in Round 9? Flipping the petals down allows you to crochet behind them into the Round 7 chain spaces. This anchors the center of the flower and creates the distinct 3D lifted effect that makes this butterfly granny square alternative so unique.
What is the best yarn to use for this pattern? A Weight-3 (DK) yarn is perfect because it provides excellent stitch definition without making the square too heavy or stiff. Cotton blends are particularly great for holding the 3D petal shape.
Conclusion
Congratulations on completing your Retro Daisy Granny Square! This highly textured, 3D floral motif brings an unbeatable groovy aesthetic to any crochet project. Share your finished square in the comments below!
