
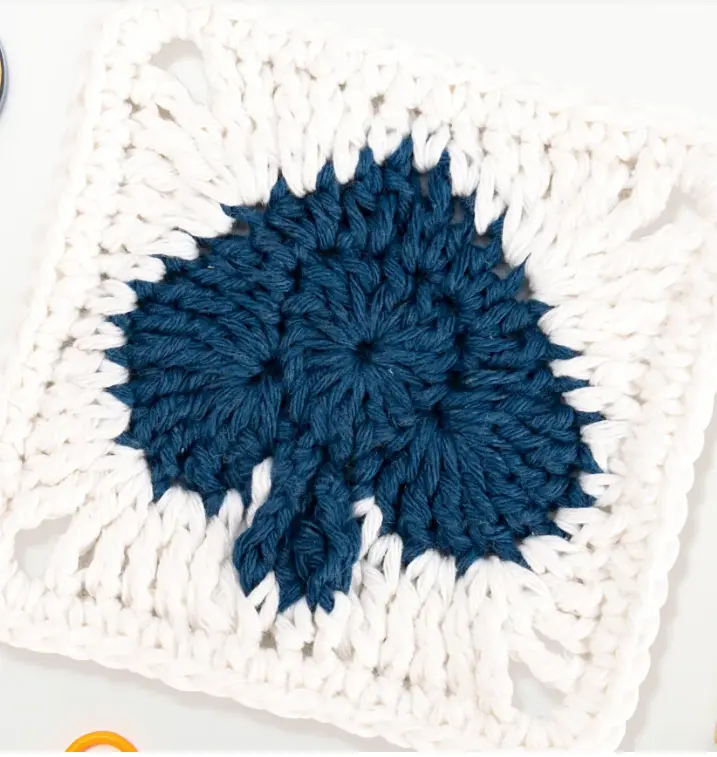
The world of crochet motifs is incredibly vast, but there is something undeniably captivating about squares that break away from the traditional clustered look. While standard granny squares are the foundation of many cozy blankets and garments, modern crocheters are constantly seeking out designs that offer a touch of elegance, a pop of dramatic texture, and a unique visual rhythm. If you want to elevate your next project from homemade to artisanal, incorporating unique stitch techniques is the perfect way to do it.
Enter the Spade Granny Square. Named for its sharp, elongated points that resemble the iconic spade shape, this pattern is a true showstopper. It utilizes a dramatic progression of stitch heights—climbing all the way up to double treble crochets—to create a stunning, three-dimensional peak right in the heart of the motif. This isn’t just a flat square; it is a highly textured piece of fiber art that catches the light and demands attention.
Because this pattern incorporates advanced stitches like double trebles, skipped stitches, and complex stitch combinations (like working stitches together to decrease), it is geared toward intermediate to advanced crocheters. If you are looking to push your boundaries, master your tension across extreme height differences, and create a square that will absolutely wow anyone who sees it, this is the perfect project for your hook.
Materials Needed
- Yarn of your choice: A smooth, worsted weight or DK weight yarn is highly recommended. Because this pattern relies heavily on extreme stitch height variations to create the spade points, a yarn with excellent stitch definition (like a smooth wool or high-quality acrylic) will make your sharp peaks really pop. Solid or tonal colors work best to show off the complex textures.
- Corresponding crochet hook: Match your hook size to your chosen yarn. Because double treble crochets can get loose, you may want to go down a half hook size to keep your tension tight and structured.
- Stitch markers: Absolutely essential for this pattern. Round 3 is incredibly complex with varying repeats. Place a locking stitch marker at the beginning of each side of the square to keep your place.
- Scissors: A sharp pair for cutting yarn tails.
- Tapestry needle: For seamlessly weaving in your ends.
- Blocking mats and T-pins: Crucial for this specific motif to shape the spade points.
Abbreviations Used
- K – Skip
- MR – Magic ring
- Sl.st – Slip stitch
- Ch – Chain stitch
- Dc – Double crochet
- Sc – Single crochet
- Tr – Treble crochet
- Dtr – double treble
This pattern uses USA crochet terminology

Pattern Instructions
Before you begin, take a moment to study the flow of this motif. Round 2 is where the magic happens, utilizing skipped stitches and massive peaks to form the spade points. Round 3 acts as a complex framing round that transitions those peaks back into the corners of the square, while Round 4 provides a sturdy, flat single crochet border.
The Spade Square
Round 1: MR,Ch×3,Dc×14,St.sl[15]
Round 2: K1,Tr×8,Dc,(Dc,Hdc),(Hdc×2),(Hdc,Dc),Ch,(Dc,Hdc),(Hdc×2),(Hdc,Dc),Dc,Tr×8,K1,Sl.st,(Ch×4,Tr×2,Ch×4),Sl.st
Round 3: Ch[Sc,Hdc,Dc,(Dc,Tr),(Tr,Dtr,Ch×2,Dtr,Tr),(Tr,Dc),Dc,Hdc]×2,Sc,Hdc,Dc,(Dc,Tr),(Tr,Dtr,Ch×2,Dtr,Tr),(Tr×2),[1Tr,1Dtr(together)],Hdc×3,[1DTr,1tr(together)]Tr×2,(Tr,Dtr,Ch×2,Dtr,Tr),(Tr,Dc),Dc,Hdc,Sl.st
Round 4: Ch,[Sc×4,Sc×13]×4,Sl.st
Assembly
Because this motif features a drastic change in stitch heights—specifically the towering double treble crochets that form the spade points—aggressive blocking is an absolute must before assembly. When you finish Round 3, your square will likely look more like a starburst or a chaotic pinwheel than a flat, joinable motif.
To fix this, you need to wet block or steam block your squares. Pin the center of the magic ring down firmly, then gently pull the double treble “spade” points outward until they form sharp, distinct peaks. Pin the corners of the single crochet border in Round 4 to create perfect 90-degree angles. Allow the square to dry completely; this will set the stitches, locking the spade shape in place while ensuring the square lies perfectly flat.
Once blocked, you can join these squares using your preferred method. Because Round 4 provides a solid, even edge of single crochets, the flat slip stitch join or a standard mattress stitch worked on the wrong side will give your finished blanket a highly professional, structured appearance.
Tips for Success
Tension is everything when working with extreme stitch heights. Going from a double crochet straight up to a double treble crochet in a single round can easily cause distortion. If your double treble stitches are too loose, your spade points will look floppy and lack definition. If they are too tight, the surrounding stitches will pucker. Pay close attention to your yarn overs and try to maintain a consistent tension even as the stitches grow taller.
Pay very close attention to the “K” (Skip) in Round 2. Skipping a stitch at the base of the spade points is what gives the motif its sharp, elongated look rather than a rounded hill. Additionally, Round 3 features stitches worked “together” (like a decrease). Make sure you are inserting your hook through both stitches as indicated before completing the final yarn over, as this helps pull the fabric inward and reform the square shape after the extreme points of Round 2.
FAQ
What does “K1” mean in this pattern? “K” stands for Skip. When you see K1, it means you completely skip the next stitch from the previous round and move directly into the following stitch. This creates a gap that allows the subsequent tall stitches to form a sharp, distinct point.
My square looks like a star and won’t lay flat. Did I do something wrong? Not at all! This is the natural shape of the motif before it is blocked. The double treble crochets naturally pull the fabric upward. You must use blocking mats and T-pins to stretch the spade points outward and pin the corners down firmly so the square dries in a perfect, flat shape.
Can I use this spade square to make a wearable garment? Yes, but keep the texture in mind. Because the double treble spade points create a high-relief, 3D texture, these squares are bulkier than traditional flat granny squares. They are absolutely stunning for winter cardigans, thick winter shawls, or tote bags, but they may be too heavy or stiff for lightweight summer tops.
More Granny Square Patterns to Try
- Enchanted Rose Granny Square: A Free 3D Crochet Pattern
- Tudor Rose Crochet Granny Square Free Pattern Tutorial
- Free Crochet Daffodil Granny Square Pattern Step by Step Tutorial
- Stunning Star Patchwork Crochet Blanket Pattern: A Step-by-Step Guide
- How to Crochet a Perfect Granny Square: 3 Secrets to Clean Edges
Conclusion
Congratulations on completing your Spade Granny Square! This highly textured, dramatic motif is a stunning way to showcase your advanced crochet skills and add incredible dimension to your projects. Share your finished spade square in the comments below!
