
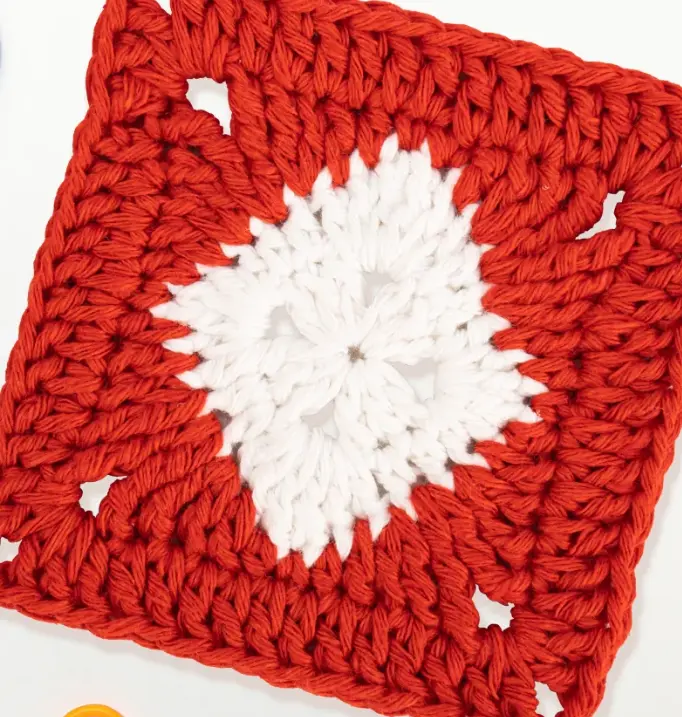
If you are looking to elevate your crochet projects with striking geometric shapes, the Diamond Granny Square is the perfect motif for you. Unlike traditional clustered granny squares, this pattern uses a brilliant combination of tall stitches and strategic skipping to create a mesmerizing raised diamond shape right in the center of the block.
This pattern is an fantastic adventure for intermediate crocheters who are comfortable with basic stitches but want to practice controlling tension across multiple stitch heights. The rhythmic progression from single crochets all the way up to double treble crochets creates a beautiful, textured relief that catches the light beautifully.
Because of its bold, geometric aesthetic, this square looks stunning when used in home decor pieces like patchwork crochet blankets. However, it also translates beautifully into wearable art, adding incredible visual interest to boho summer garments.
Materials Needed
When working with tall, textured stitches like trebles and double trebles, your material choices play a huge role in the final definition of your diamond shape.
- Yarn: A smooth, worsted weight (Size 4) or DK weight (Size 3) yarn is highly recommended. Avoid overly fluffy or halo yarns (like some mohairs or thick-and-thin art yarns), as they will blur the crisp, geometric lines of the diamond. High-quality acrylics, smooth wool blends, or cotton yarns will showcase the stitch definition perfectly.
- Crochet Hook: A hook sized appropriately for your chosen yarn (typically a 5.0mm for worsted or 4.0mm for DK). Since this pattern features tall stitches, if you are a tight crocheter, you may want to go up a half-size to prevent the fabric from becoming too stiff.
- Blocking Tools: Because this pattern features deep texture and skipped stitches, blocking is essential. You will need blocking mats, rust-proof T-pins, and a spray bottle or steamer to shape your square.
- Tapestry Needle: For seamlessly weaving in ends.
- Stitch Markers: Helpful for marking the center points of your sides in later rounds to ensure your stitch counts remain accurate.
Abbreviations Used
To successfully execute the varying heights in this geometric pattern, it is important to be completely comfortable with the stitches and special instructions used.
- K – Skip: This instruction tells you to completely bypass the next stitch or space, leaving an intentional gap that helps form the geometric points of the diamond.
- MR – Magic ring: The best way to start a granny square so you can pull the center completely tight without leaving a hole.
- Sl.st – Slip stitch: A low-profile stitch used to seamlessly join the end of a round to the beginning.
- Ch – Chain stitch: Used for creating height at the beginning of rounds and forming the corner spaces of the square.
- Sc – Single crochet: The shortest and tightest stitch in this pattern, used to anchor the fabric and create contrast against the taller stitches.
- Dc – Double crochet: A standard, medium-height stitch that forms the sturdy foundation and outer borders of the square.
- Tr – Treble crochet: A tall stitch that requires two yarn-overs before inserting your hook. It is used here to build the vertical slope of the diamond shape.
- Dtr – Double treble: A very tall stitch requiring three yarn-overs. This stitch creates the dramatic, peaked center point of your diamond.
This pattern uses USA crochet terminology

Pattern Instructions
Diamond Granny Square
Pay close attention to your yarn overs when working the taller stitches in Rounds 2 and 3 to ensure none are dropped, which would alter the height of your diamond.
Round 1: MR,Ch×3,Dc×2,Ch×2,[Dc×3,Ch×2,]×3,Sl.st[12]
Round 2: Ch×2,[(Dc×2,Tr,Ch,Tr,Dc×2,)k1,Hdc×2,(Hdc×2,Dc×2,Hdc×2,)k1,Hdc×2]×2,Sl.st
Round 3: [Sc,Hdc,Dc,(Tr×2),(Dtr,Ch×2,Dtr),(tr×2),Dc,Hdc]×4,Sl.st
Round 4: (Ch×3,Dc,Ch×2,Dc×2),Dc×11,[(Dc×2,Ch×2,Dc×2),Dc×11,]×3,Sl.st
Assembly
The most exciting part about geometric granny squares is how their secondary patterns emerge when they are joined together. Because this pattern features a distinct diamond in the center, you have a few layout options for your final project.
If you sew or crochet them together in a traditional grid alignment, you will get a repeating, evenly spaced diamond lattice. However, if you rotate every other square by 45 degrees, the diamonds will point toward each other, creating a completely different, interlocking geometric design that looks incredibly complex.
Before you begin joining, taking the time to block your squares is non-negotiable for geometric patterns. Pin your squares to their exact intended measurements, ensuring all four corners form perfect 90-degree right angles and the outer edges are perfectly straight. For a high-end, professional finish that won’t add bulky seams between your diamonds, check out our guide on how to create a seamless join for granny squares.
Tips
- Count Your Yarn Overs: The transition from double crochet to treble to double treble in Round 3 is where crocheters most often make mistakes. It is incredibly easy to accidentally yarn over only twice when making a Dtr. Count your loops on the hook before pulling through to ensure you have three loops for the Dtr and two loops for the Tr.
- Maintain Even Tension: Because this square utilizes stitches of vastly different heights in a single round (going from a tight Sc all the way up to a loose Dtr), your tension will naturally want to shift. Actively focus on keeping your stitches relaxed but consistent so the diamond pops outward without distorting the flat background of the square.
- Straight Edges: Working tall stitches into the chain spaces of previous rounds can sometimes cause the edges to ripple or bow. For more help maintaining perfectly straight edges on complex square patterns, review our tips on how to crochet a perfect granny square.
FAQ
How big is the finished Diamond Granny Square? The final size depends heavily on your yarn weight, hook size, and natural tension. Because this pattern only has four rounds, using a standard worsted weight yarn will likely yield a smaller square (around 4 to 5 inches). If you need a larger square for a butterfly crochet top or a blanket, you can easily continue the geometric growth by adding more rounds of double crochet.
Can I make this pattern larger? Absolutely. To make the square larger, you can continue adding rounds of double crochets to the outer edge. Simply place a (Dc×2, Ch×2, Dc×2) cluster in each corner chain-2 space, and fill the sides with an increasing number of double crochets until the sides lay flat.
What does the “K” mean in Round 2? The “K” stands for “skip.” In Round 2, you will see ,)k1, which means after completing the stitch cluster immediately preceding the K, you will skip over 1 stitch or space from the previous round before moving on to the next set of instructions. This skipping action is what pushes the stitches together to form the diamond points.
Do I have to block this square? While you don’t have to block any crochet project, blocking is highly recommended for this specific pattern. The double treble crochets in the center will naturally want to lean or twist. Blocking relaxes the yarn, sets the tall stitches upright, and ensures your square is perfectly flat and ready for joining.
Conclusion
Congratulations on completing your Diamond Granny Square! This highly textured, geometric motif brings a stunning, modern aesthetic to any crochet project. Share your finished square in the comments below!
