
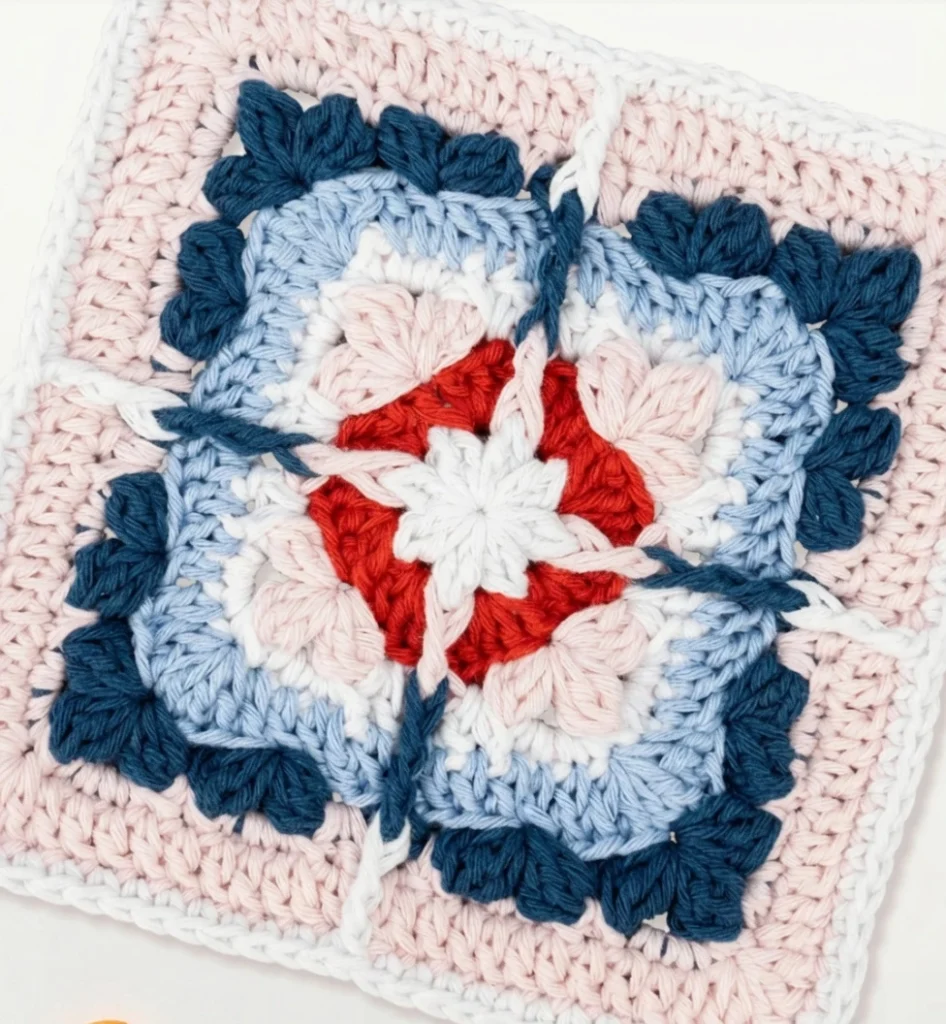
If you have ever wanted to capture the magic of a springtime garden in the palm of your hand, this Blossom Granny Square is your perfect pattern. It is a tiny crochet wonderland where soft pink edges beautifully frame a vibrant, multi-colored center. By strategically using red, blue, and white yarn, you can create the illusion of delicate “blooms” that seem to burst right off the fabric.
The true beauty of this square lies in its intricate stitch patterns and stunning color contrasts. It does not just look like a standard motif; it looks like a highly textured, three-dimensional garden in square form. Whether you are jazzing up a cozy afghan, creating a statement tote bag, or adding a cute, botanical touch to your home decor, this square is an absolute must-have for your pattern library. Please note that because of the post stitches and cluster combinations, this pattern is best suited for intermediate crocheters looking for a rewarding challenge.
Materials Needed
To bring this floral masterpiece to life, you will want to select yarns that provide excellent stitch definition so your textured “blooms” really pop.
- Yarn in 4 colors: A soft pink (for the outer border), a vibrant red (for primary blooms), a bright blue (for secondary blooms), and a crisp white (for accent blooms). Worsted weight yarn is highly recommended.
- Corresponding crochet hook: A 5.0mm hook usually pairs perfectly with worsted weight yarn.
- Tapestry needle: For seamlessly weaving in multiple color ends.
- Stitch markers: To help keep your place during the more complex cluster rounds.
- Scissors: For snipping yarn cleanly between color changes.
Abbreviations Used
Because this pattern features beautiful 3D texture, it utilizes several special stitches and cluster combinations. Here is a breakdown of the terminology you will need:
- MR – Magic ring
- Ch – Chain stitch
- Dc – Double crochet
- Dc2tog – Double crochet two together (a 2-stitch cluster)
- Dc3tog – Double crochet three together (a 3-stitch cluster used to form the petals)
- Bpdc – Back post double crochet (creates a raised, ridged texture)
- BpSc – Back post single crochet
- Bptr – Back post treble crochet (creates a tall, dramatic raised stitch)
- Sc – Single crochet
- Sl.st – Slip stitch
- Sk – Skip stitch/es
Pattern Instructions
This pattern uses USA crochet terminology

Understanding the Stitch Anatomy
Before you begin, it helps to know how this square constructs its flowers. The “blooms” are created using tight Dc3tog clusters that pull together to form pointed petals. Meanwhile, the back post stitches (Bpdc, BpSc, Bptr) are worked around the posts of previous stitches rather than into the top loops. This pushes the stitch forward, creating a raised, ribbed frame that makes the colorful petals look like they are actually popping out of the square.
Blossom Granny Square
Rnd 1: MR,Ch×3,Dc,Ch×2,[Dc2tog,Ch×2]×7,Sl.st
Rnd 2: Ch×3,Dc×2,Bpdc,[Dc×3,Bpdc]×7,Sl.st
Rnd 3: (Ch×3,Dc2tog,Ch×3,Dc3tog,Ch×3,Dc3tog),Sk×3,(Sc,Bpdc,Sc),Sk×3,[(Dc3tog,Ch×3,Dc3tog,Ch×3,Dc3tog),Sk×3,(Sc,Bpdc,Sc),Sk×3]×3,Sl.st
Rnd 4: [BpSc,Sc×3,BpSc,Bpdc,Ch,Bpdc,BpSc,Sc×3]×4,Sl.st
Rnd 5: (Ch×3,Dc×4),Dc×11,[(Dc×5),Dc×11,]×3,Sl.st
Rnd 6: (Ch×3,Dc2tog,Ch×3,Dc3tog,Ch×3,Dc3tog),Sk×3,(Dc3tog,Ch×3,Dc3tog),Sk×3,(Sc,Bptr,Sc),Sk×3,(Dc3tog,Ch×3,Dc3tog),Sk×3,[(Dc3tog,Ch×3,Dc3tog,Ch×3,Dc3tog),Sk×3,(Dc3tog,Ch×3,Dc3tog),Sk×3,(Sc,Bptr,Sc),Sk×3,(Dc3tog,Ch×3,Dc3tog),Sk×3]×3,Sl.st
Rnd 7: [BpSc,Sc×3,BpSc×2,Sc×3,BpSc,Bpdc,Ch,Bpdc,BpSc,Sc×3,BpSc×2,Sc×3]×4,Sl.st
Rnd 8: (Ch×3,Dc×4),Dc×21,[(Dc×5),Dc×21,]×3,Sl.st
Rnd 9: [(Sc×3),Sc×12,Bptr,Sc×12]×4,Sl.st
Assembly
Because this blossom square features highly textured, raised stitches, your assembly method matters. You want to avoid joining methods that require flattening the stitches, which would crush your beautiful 3D petals. The flat slip stitch join or the whip stitch method worked through the back loops only are the best choices here. These methods keep the seams relatively flat and invisible on the front while allowing the back post petals to retain their dimensional pop. When aligning squares, take a moment to ensure the petal directions flow cohesively from one square to the next for a professional finish.
Tips
Working around the back post can sometimes feel awkward if you are not used to it. A great tip is to keep your tension slightly relaxed when executing Bpdc and Bptr stitches; if you pull too tightly, the square will begin to cup and your petals will look cramped. Additionally, this pattern requires frequent color changes to achieve the red, blue, and white burst effect. Cut your yarn at the end of each color section and weave in tails as you go so you are not faced with a daunting pile of ends at the very end.
If you love incorporating floral elements into your crochet work, you will absolutely adore these other botanical patterns. Check out the Enchanted Rose Granny Square for another stunning 3D flower, or try the Daffodil Granny Square for a touch of spring sunshine. For even more floral inspiration, the Tudor Rose Granny Square is a must-try, and if you need help joining all these beautiful motifs, our guide on How to Crochet a Perfect Granny Square will walk you through it!
FAQ
My square is curling up. What did I do wrong? Curling usually happens if your back post stitches are worked too tightly, or if your chain spaces in the early rounds are too small. Try relaxing your grip slightly on the Bpdc and Bptr stitches, and ensure your hook fits easily through the chain spaces.
Can I make this in a single color? Absolutely! While the multi-color “blooms” are what give it the garden look, making this in a single solid color or a subtle ombre yarn will create a highly textured, elegant square that highlights the incredible stitch work.
How do I hide my color change tails neatly? Because you are changing colors frequently, carry the tails vertically up the back of the work as you crochet the next round, catching them under your stitches. This secures them perfectly without having to thread a tapestry needle every few minutes.
Conclusion
Congratulations on completing your Blossom Granny Square! This stunning 3D floral motif is a beautiful way to bring a touch of handmade garden magic to any project. Share your colorful blossoms in the comments below!
