
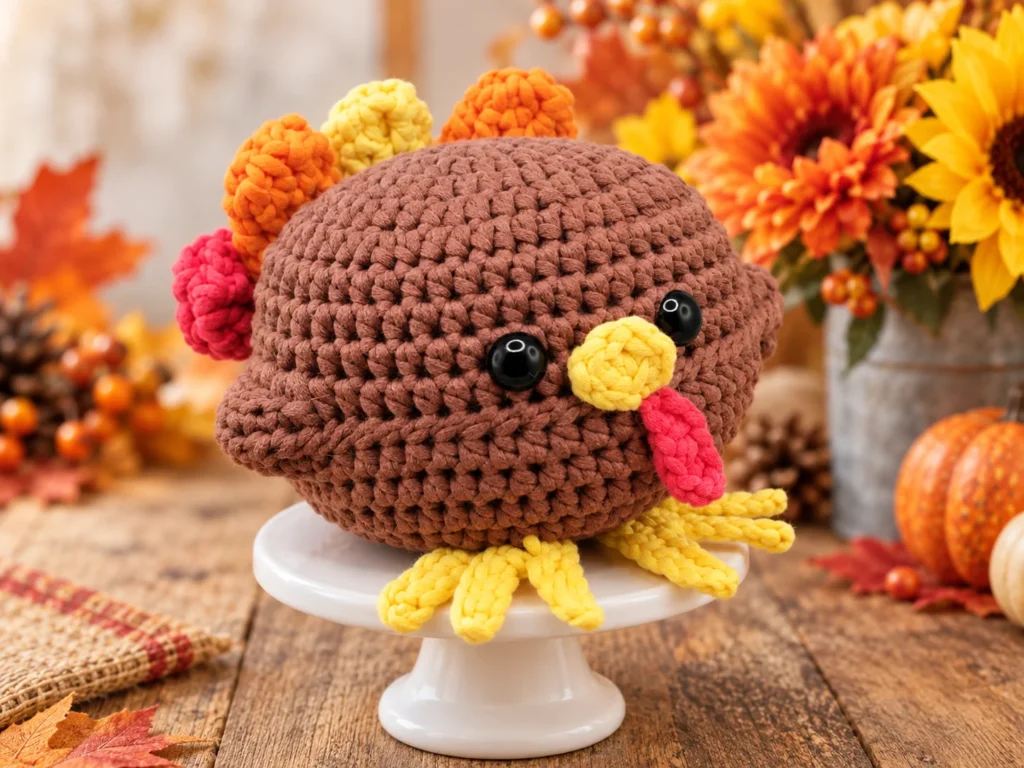
Looking for an adorable Thanksgiving crochet pattern that is small, colorful, and full of personality? This Mini Turkey Squish crochet pattern is a wonderful fall project for anyone who loves seasonal amigurumi and quick crochet makes.
With its round squishy body, tiny yellow feet, colorful tail feathers, cute beak, and classic turkey wattle, this little crochet turkey makes a charming addition to your Thanksgiving decorations.
Finished at approximately 4.5 inches tall and wide, excluding the feet and tail feathers, the Mini Turkey Squish is also a manageable project when you want something festive without committing to a large amigurumi.
It can be displayed on a mantel, Thanksgiving table, shelf, desk, or fall tiered tray. You could even crochet several in different color combinations and create your own little turkey family.
If you’re already planning your autumn crochet projects, you may also enjoy the Bobble Stitch Pumpkin Pattern for another cozy seasonal project.
About the Mini Turkey Squish Crochet Pattern
The Mini Turkey Squish is a smaller version of a traditional squishy crochet turkey design.
Instead of creating a tall amigurumi body with separate head and torso sections, the turkey is constructed using two rounded crochet pieces that are sewn together and stuffed.
The shaping creates a plump, almost pillow-like turkey.
The design includes:
- A brown squishy body
- Two small yellow feet
- A yellow crochet beak
- A red wattle
- Five colorful tail feathers
- Two safety eyes
- Lightly shaped side wings
- Soft fiberfill stuffing
The combination of brown, yellow, orange, and red gives the turkey a classic autumn look that works beautifully with Thanksgiving décor.
For even more seasonal decorating inspiration, take a look at this Fall Crochet Centerpiece Pattern.
Why You’ll Love This Crochet Turkey
There is something especially fun about small seasonal crochet projects.
They don’t require the same time commitment as a large blanket or garment, yet they still let you experiment with shaping, color changes, and amigurumi construction.
This little turkey is particularly appealing because the finished design looks detailed even though most of the body is constructed using basic crochet rounds.
It’s Small and Quick to Make
At around 4.5 inches across and tall before adding the feet and feathers, this is a relatively compact project.
That makes it ideal for:
- Weekend crochet projects
- Thanksgiving decorations
- Fall craft fairs
- Handmade gifts
- Scrap yarn projects
- Seasonal desk décor
- Crochet gift baskets
It Uses Classic Fall Colors
Brown forms the main body while yellow, orange, and red create the details.
These warm colors instantly give the turkey a Thanksgiving feel.
You can follow the traditional color palette or create your own variation using mustard, rust, burgundy, cream, or even muted farmhouse shades.
The Tail Feathers Add Plenty of Character
The five dimensional tail feathers are one of the standout features of this design.
Instead of flat feather shapes, they are crocheted into small dimensional pieces and positioned in a fan across the back of the turkey.
The center feather stands upright while the surrounding feathers gradually angle outward.
This gives the Mini Turkey Squish its recognizable turkey silhouette.
Mini Turkey Squish Materials

Before beginning your turkey, gather all the necessary crochet supplies.
Yarn
The original project uses approximately 105 yards of bulky weight yarn.
A cotton and nylon blend works particularly well because it provides excellent stitch definition while still creating a soft finished toy.
You’ll need approximately:
Brown
About 60 yards
Brown is used for the main body and will require the largest amount of yarn.
Yellow
About 15 yards
Yellow is used for:
- The beak
- Feet
- One tail feather
Orange
About 15 yards
Orange is used for two tail feathers.
Red
About 15 yards
Red is used for:
- The wattle
- Two tail feathers
You don’t necessarily need to use exactly these colors.
A deeper fall palette using rust, mustard, cranberry, and chocolate brown would also look beautiful.
Crochet Hook
Use a:
US H/8 – 5.0 mm crochet hook
The hook should create fabric that is firm enough to hold the stuffing without creating large gaps between stitches.
Amigurumi often benefits from slightly tighter tension than regular crochet projects.
Additional Supplies
You’ll also need:
- Fiberfill stuffing
- Two 14 mm safety eyes
- Stitch markers
- Yarn needle
- Scissors
- Pins for assembly
A stitch marker is especially helpful because much of the turkey’s body is crocheted continuously in a spiral.
Finished Size
The finished Mini Turkey Squish measures approximately:
4.5 inches across and 4.5 inches tall
This measurement does not include the feet or tail feathers.
Because crochet tension varies, your finished turkey may be slightly larger or smaller.
Crochet Gauge
After completing Round 3 of the body, the circle should measure approximately:
2.75 inches across
Gauge isn’t quite as critical for amigurumi as it is for fitted garments, but it can still affect the final size and the amount of yarn required.
If your piece is significantly larger than the suggested measurement, consider using a smaller hook.
If it is considerably smaller, you may need a slightly larger hook or looser tension.
Crochet Skill Level
The Mini Turkey Squish is best suited to an advanced beginner or intermediate crocheter.
Most of the body uses familiar stitches, but several techniques may be less familiar to beginners.
It helps if you already know how to:
- Crochet in the round
- Make a magic circle
- Single crochet
- Half double crochet
- Double crochet
- Slip stitch
- Increase stitches
- Decrease stitches
- Seam crochet pieces together
- Sew amigurumi parts securely
The project also uses linked crochet stitches and a standing double crochet technique for some of the shaping.
Don’t worry if these stitches are new to you. Practice them with scrap yarn before starting the final project.
US Crochet Abbreviations
This pattern uses US crochet terminology.
Common abbreviations include:
ch – chain
sc – single crochet
hdc – half double crochet
dc – double crochet
sl st – slip stitch
st/sts – stitch/stitches
rnd – round
rep – repeat
dc2tog – double crochet two together
ldc – linked double crochet
ltr – linked treble crochet
CSDC – chainless starting double crochet
Knowing these abbreviations before starting makes the project much easier to follow.
How the Mini Turkey Squish Is Constructed
The turkey can be divided into several small sections.
You’ll crochet:
- The bottom half of the body
- The top half of the body
- One beak
- One wattle
- Two feet
- Five tail feathers
Everything is then assembled before the turkey is stuffed and completely closed.
Crochet the Bottom Half of the Turkey Body
The turkey begins with the brown body.
Start with a magic circle and gradually increase the number of stitches during each round.
The early rounds create a flat circular shape.
Additional rounds without increases begin giving the body more depth.
Toward the outer portion of the body, taller linked stitches are strategically worked into opposite sections.
These stitches create subtle raised areas that form the turkey’s side shaping.
When the bottom section is complete, finish the round neatly and weave in the yarn end.
Set the piece aside while making the top section.
Crochet Tip
Because these rounds are worked continuously, place a stitch marker in the first stitch of every round.
Move the marker upward each time you reach it.
This simple habit can prevent a lot of counting mistakes.
Crochet the Top Half of the Turkey
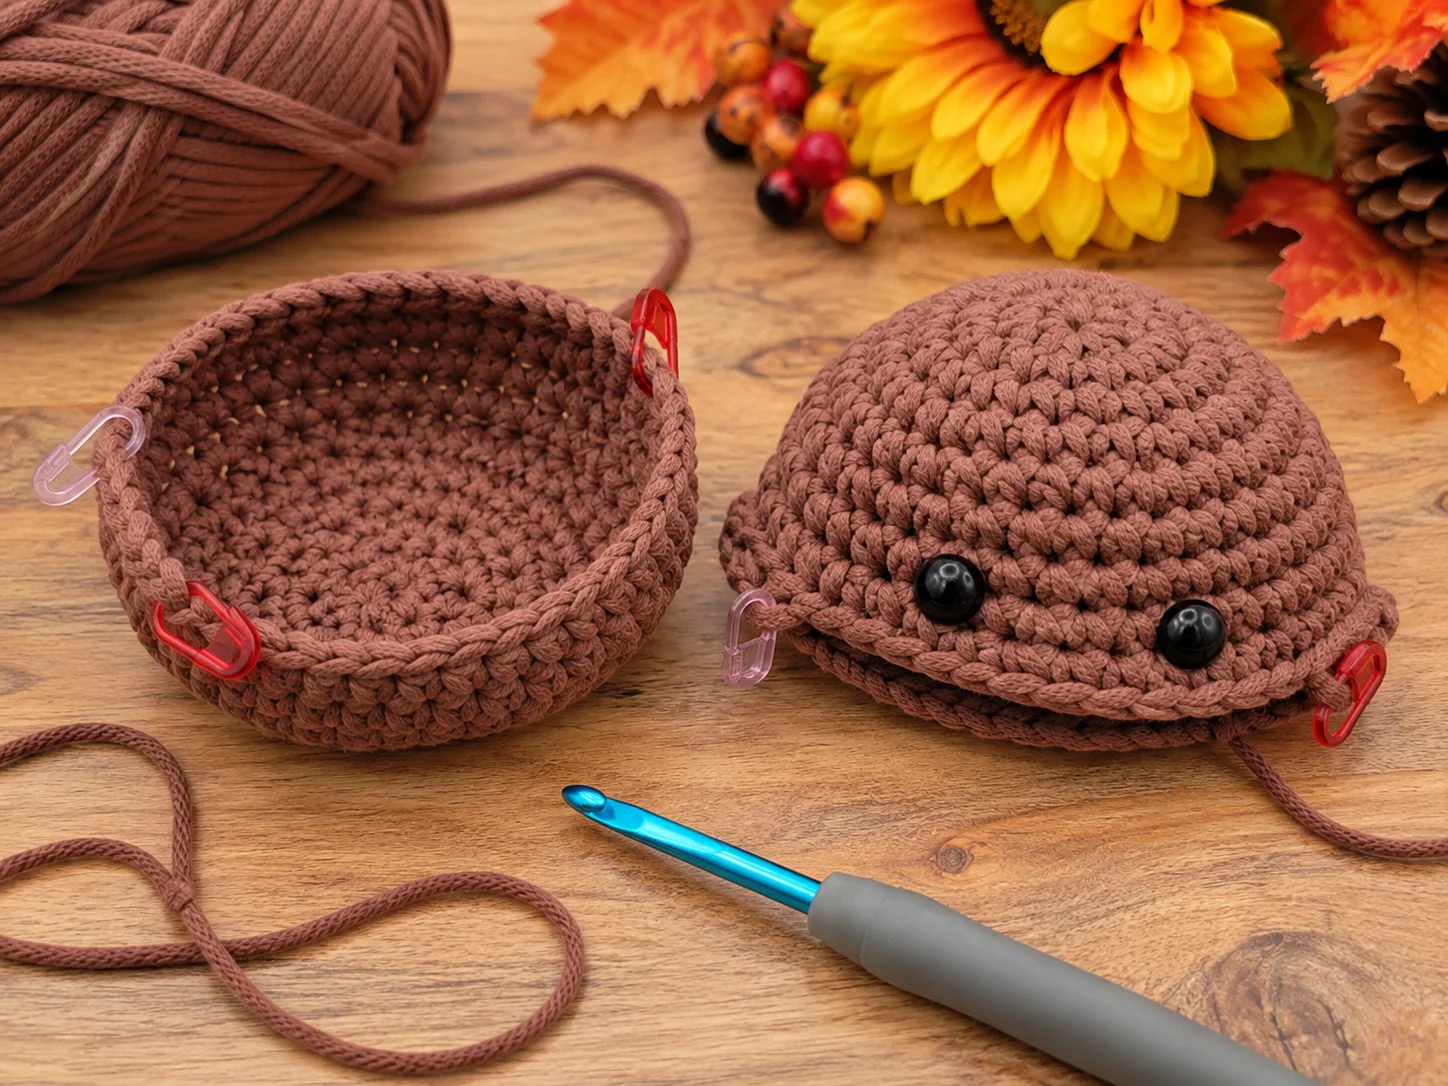
The top half starts almost exactly like the bottom.
Begin with another brown magic circle and work the same expanding rounds.
After reaching the correct diameter, continue working even rounds before adding the side shaping.
This second section becomes the turkey’s face and upper body.
Leave a long yarn tail when finishing because this yarn will later be used to sew the two body sections together.
Don’t join the body halves yet.
The eyes, feathers, feet, wattle, and beak need to be positioned first.
Crochet the Turkey Beak
The tiny beak requires only a small amount of yellow yarn.
It is created with a short chain and several stitches worked into the same chain space.
The resulting shape forms a small pointed beak.
Leave a generous yarn tail after finishing.
You’ll use this tail to attach the beak securely between the eyes during assembly.
Crochet the Turkey Wattle
No Thanksgiving turkey would be complete without its distinctive red wattle.
The wattle is made with a short foundation chain followed by progressively shorter stitches.
Using different stitch heights naturally creates the tapered shape.
Leave another long sewing tail when finishing.
The wattle sits slightly below and beside the beak on the finished turkey.
Crochet the Turkey Feet
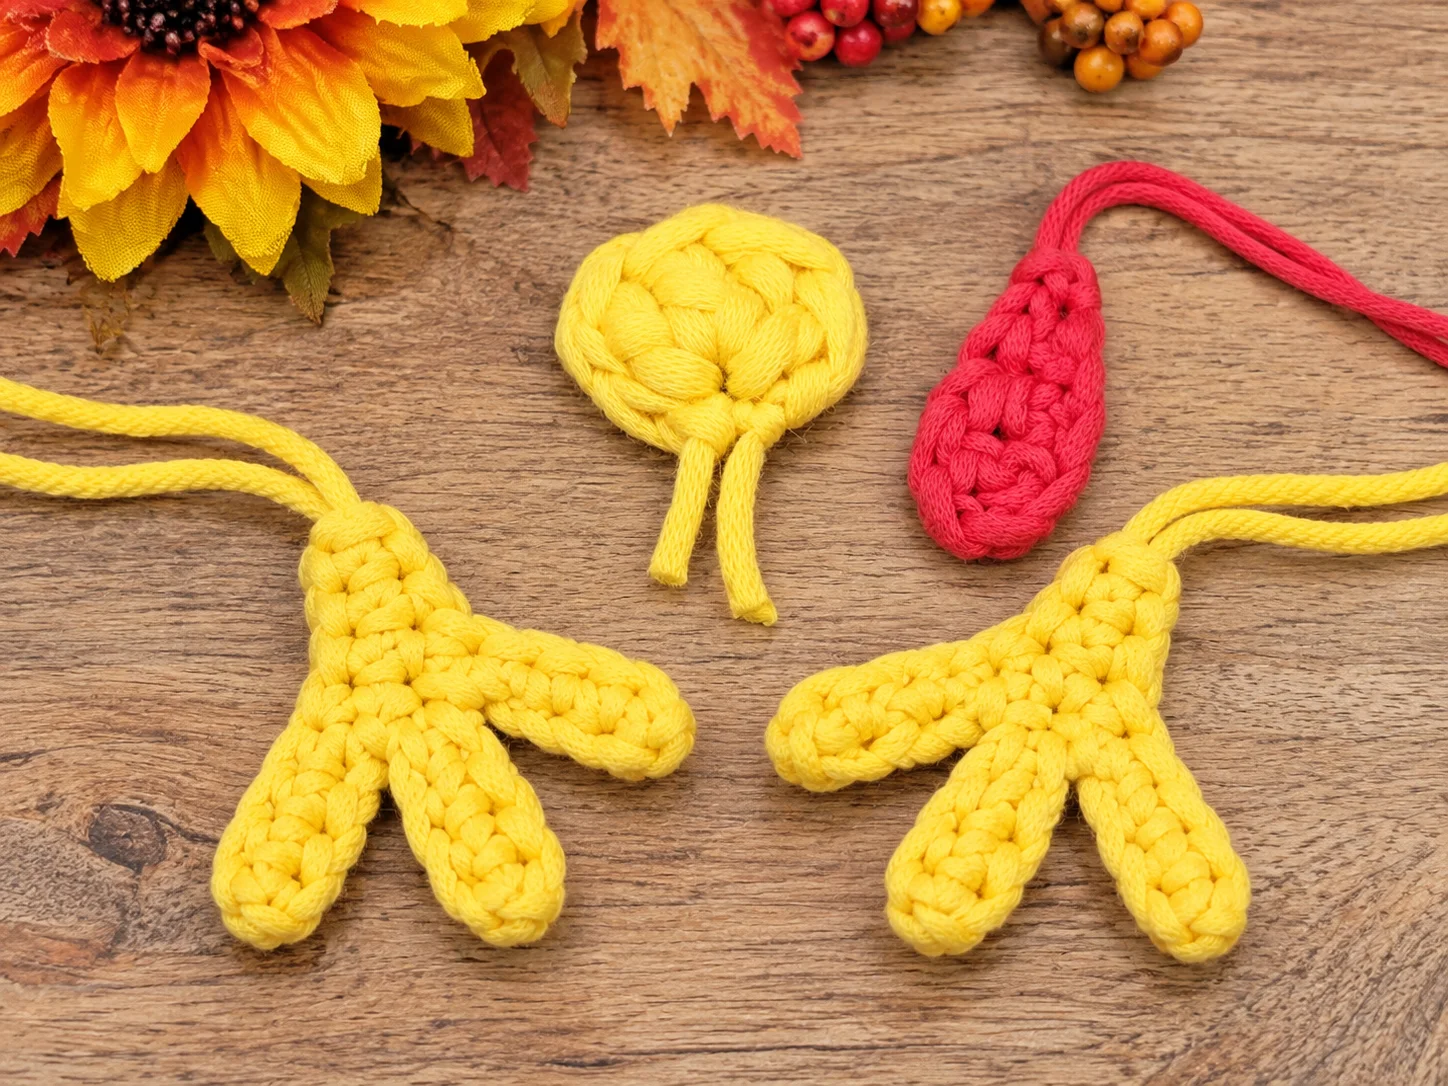
Make two yellow feet.
The feet begin with chains that form the legs.
Additional chains and stitches create the little toes.
Although the construction may feel unusual when you’re making the first foot, the shape becomes much clearer once it is attached to the body.
Remember that the two feet should mirror one another.
Before sewing, flip one foot so the toes naturally point in corresponding directions.
Crochet the Turkey Tail Feathers
Now comes one of the most enjoyable parts of this Thanksgiving crochet pattern: the colorful turkey feathers.
You’ll make five feathers total:
- 1 yellow feather
- 2 orange feathers
- 2 red feathers
Each feather begins with a small circular base.
The rounds are then worked upward to create a slightly tubular, rounded feather.
Decreases near the top narrow the shape.
Finally, the remaining stitches are cinched closed.
Leave yarn tails for sewing each feather onto the body.
Arranging the Tail Feathers
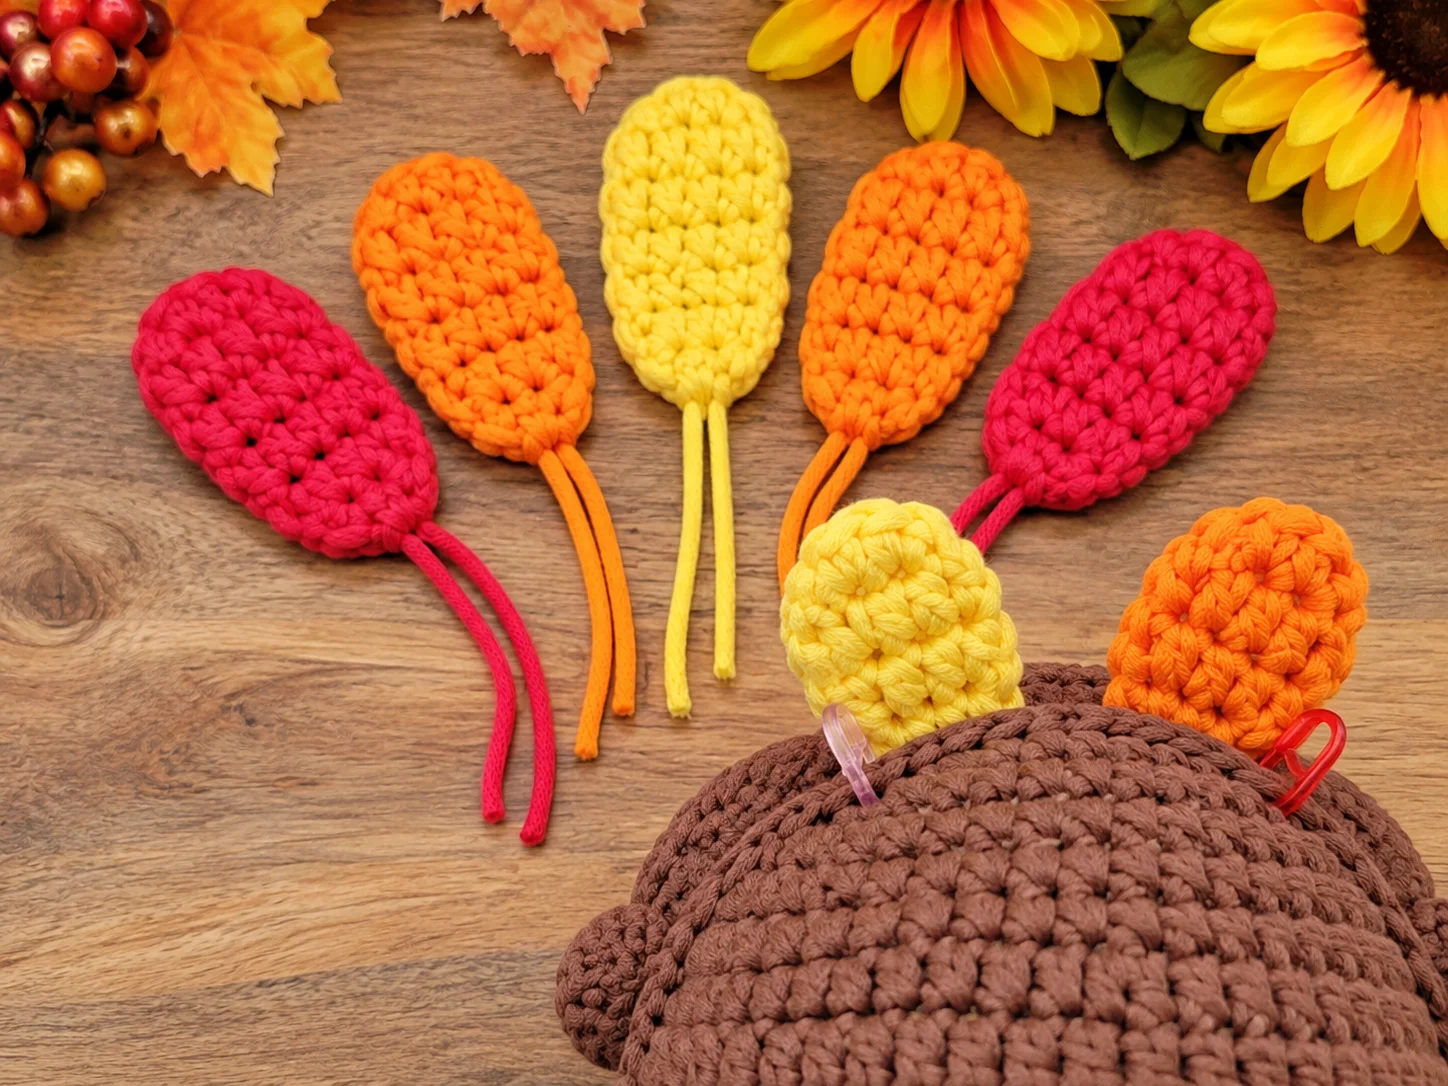
The feather arrangement is important because it creates the recognizable fan-shaped turkey tail.
Place the yellow feather vertically in the center.
Position one orange feather on either side.
Finally, place the two red feathers toward the outside edges.
Your arrangement should look roughly like this:
Red – Orange – Yellow – Orange – Red
Angle the outside feathers slightly farther outward.
Before sewing, pin all five feathers into place.
Look at the turkey from both the front and back to make sure the feather fan looks balanced.
Then sew each feather securely.
Adding the Safety Eyes
Position the two safety eyes on the front half of the turkey.
They should sit evenly between the side shaping.
Before attaching the washers permanently, check:
- Eye spacing
- Beak placement
- Wattle position
- Overall facial balance
Once you’re happy with the face, secure the safety eye backs.
Safety Note
Safety eyes contain small pieces and may not be appropriate for toys intended for babies or children under three.
If making the turkey for a young child, embroidered eyes can be a safer alternative.
Mini Turkey Squish Assembly
Assembly is where all those little crochet pieces finally begin looking like a turkey.
Take your time during this stage.
Step 1: Position the Eyes
Attach the safety eyes to the top body section.
Make sure they are evenly spaced and centered on the front.
Step 2: Add the Feet
Sew the two yellow feet onto the bottom body section.
Allow the toes to remain loose so they extend naturally from the body.
Step 3: Attach the Wattle
Position the red wattle near the center front of the turkey.
It should sit underneath the area where the beak will eventually be attached.
Step 4: Sew on the Tail Feathers
Attach all five tail feathers to the back of the top body section.
Keep the yellow feather centered and distribute the orange and red feathers evenly on either side.
Step 5: Join the Body Pieces
Place the top and bottom body sections together.
Use the long yarn tail to whip stitch around the edge.
Sew a little more than halfway around before stopping.
Leave enough room to add stuffing.
Step 6: Attach the Beak
Sew the yellow beak between the eyes.
Position it just above the wattle.
Check that the face looks centered before fastening the yarn securely.
Step 7: Stuff the Turkey
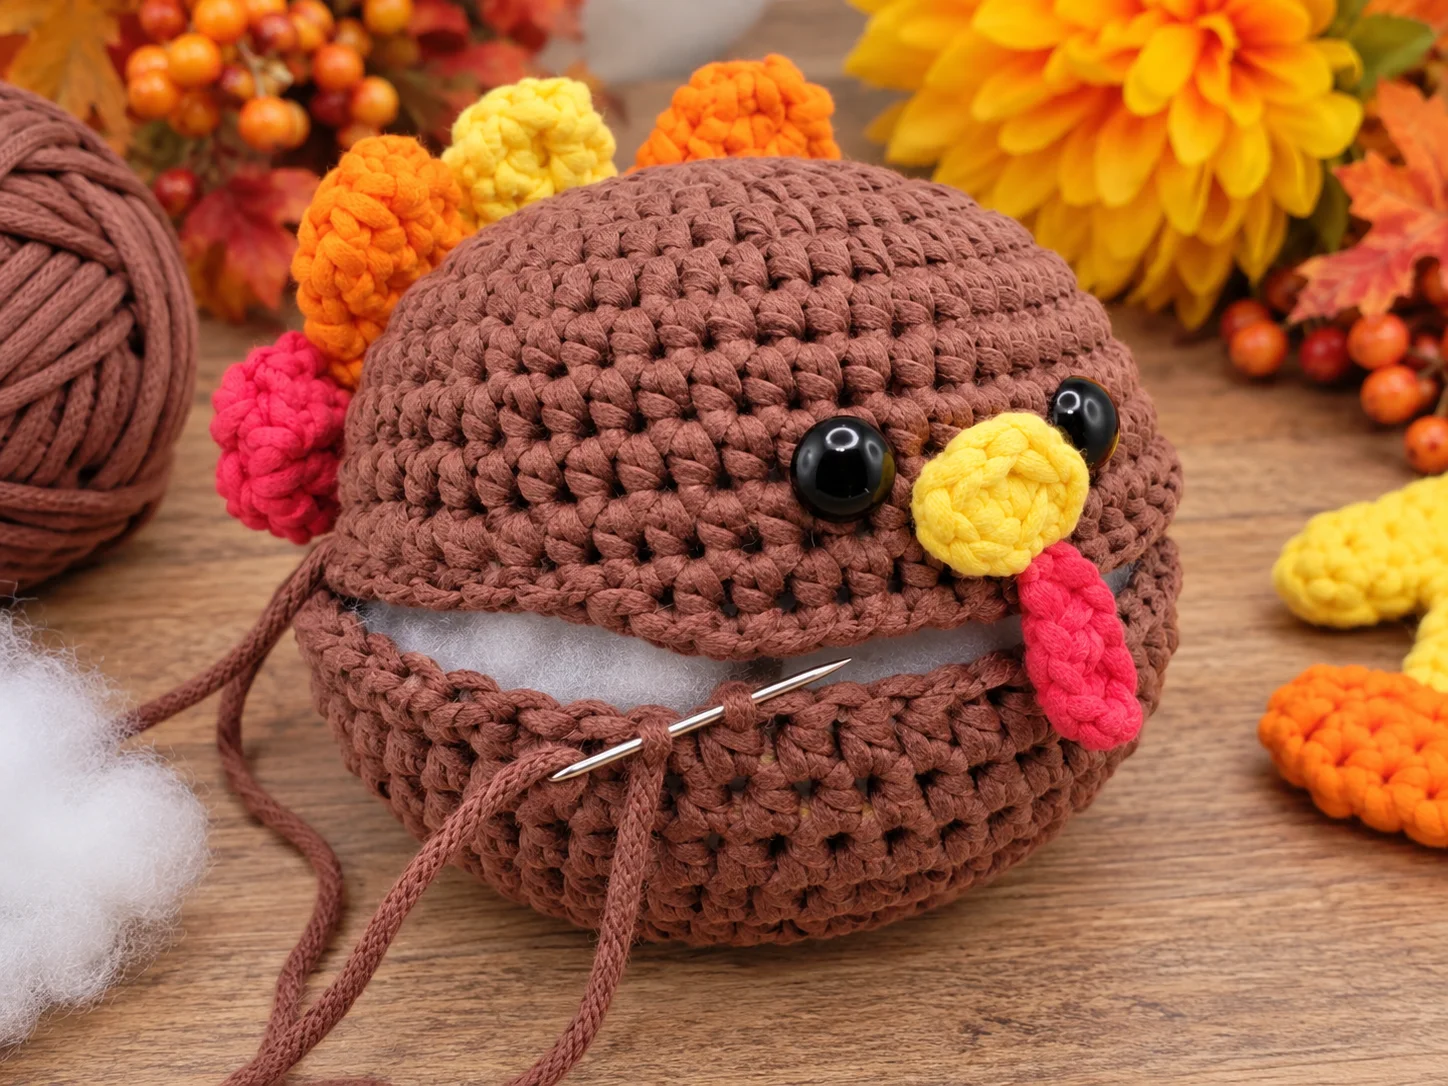
Add fiberfill gradually.
Don’t push one large handful into the body at once.
Instead, add small amounts and distribute the stuffing evenly.
This helps maintain the turkey’s rounded shape.
Step 8: Finish Closing
Continue whip stitching around the remaining opening.
Before closing the last few stitches, adjust the stuffing if necessary.
Fasten securely and weave the remaining yarn tail into the body.
Your Mini Turkey Squish is complete!
Tips for a Neater Crochet Turkey
Small details can make a big difference when making amigurumi.
Keep Your Tension Consistent
The body should be crocheted firmly enough that the stuffing isn’t visible between stitches.
Don’t Overstuff
Too much fiberfill can stretch the stitches and distort the round turkey shape.
Add enough stuffing to make the turkey plump while keeping the crochet fabric smooth.
Pin Everything Before Sewing
Before permanently attaching the beak, feathers, feet, or wattle, pin them into position.
Look at the turkey from several angles.
Small placement adjustments can dramatically improve the finished appearance.
Leave Long Sewing Tails
When finishing small pieces, resist the temptation to cut the yarn short.
Long tails make assembly much easier.
Secure the Feathers Well
The feathers are dimensional pieces that may receive more handling than flat appliqués.
Sew around the base several times so they remain firmly attached.
Color Ideas for Your Crochet Turkey
Traditional Thanksgiving colors look wonderful, but there is no reason every turkey has to look the same.
Try one of these palettes.
Traditional Thanksgiving Turkey
- Chocolate brown
- Mustard yellow
- Pumpkin orange
- Cranberry red
Farmhouse Turkey
- Taupe
- Cream
- Muted mustard
- Terracotta
Pastel Turkey
- Beige
- Dusty pink
- Peach
- Soft yellow
Woodland Turkey
- Dark brown
- Olive green
- Rust
- Gold
Colorful Turkey
Use leftover yarn and make every feather a different color.
This is an especially fun option for scrap yarn projects.
How to Use Your Mini Crochet Turkey
Once finished, there are plenty of ways to display your little turkey.
Thanksgiving Table Decoration
Place one at each end of your Thanksgiving table or make several for a larger centerpiece.
For a complete handmade display, pair your turkey with this Fall Crochet Centerpiece Pattern.
Fall Shelf Décor
Add your turkey to a seasonal shelf alongside pumpkins, leaves, and other crochet decorations.
The Bobble Stitch Pumpkin Pattern makes a natural companion project.
Handmade Thanksgiving Gift
A tiny crochet turkey makes a thoughtful seasonal gift for friends, teachers, hosts, or family members.
Craft Fair Item
Small seasonal amigurumi projects can also make eye-catching additions to autumn craft displays.
Kids’ Thanksgiving Décor
Embroider the eyes instead of using safety eyes when making decorations intended for younger children.
More Fall Crochet Patterns
If you’re building your autumn crochet collection, don’t stop with the turkey.
Bobble Stitch Pumpkin
Nothing says autumn quite like crochet pumpkins.
Try the Bobble Stitch Pumpkin Pattern for a textured pumpkin that pairs beautifully with the turkey.
Fall Crochet Centerpiece
Create an entire handmade seasonal display with this Fall Crochet Centerpiece Pattern.
It’s a great project to combine with your crochet pumpkins and turkey for Thanksgiving decorating.
Crochet Pumpkin Bear
If cute amigurumi is your favorite type of project, you’ll also love the Crochet Pumpkin Bear Pattern.
The pumpkin theme makes it ideal for your fall crochet project list.
Crochet Pumpkin Beanie
Looking for something wearable?
Try this adorable Crochet Pumpkin Beanie Pattern for another fun autumn project.
Mini Turkey Squish Crochet Pattern FAQ
What size is the Mini Turkey Squish?
The finished turkey measures approximately 4.5 inches across and 4.5 inches tall, not including the tail feathers and feet.
What yarn weight works best?
The original design uses bulky weight #5 yarn.
Using a different yarn weight will change the finished size.
What crochet hook size should I use?
A 5.0 mm US H crochet hook is recommended.
You can adjust the hook size slightly depending on your natural tension and chosen yarn.
Is this crochet turkey beginner friendly?
An adventurous beginner who is comfortable crocheting in the round may be able to make it, but some construction methods and special stitches make the pattern better suited to an advanced beginner or intermediate crocheter.
Can I use leftover yarn?
Absolutely.
The beak, feet, wattle, and individual feathers use relatively small amounts of yarn, making this an excellent project for using leftover autumn-colored yarn.
Can I make the turkey larger?
Yes.
Using thicker yarn and a larger crochet hook will naturally produce a larger turkey.
Just remember that you’ll also need more stuffing and yarn.
Can I use embroidered eyes instead of safety eyes?
Yes.
Embroidered eyes are an excellent alternative, particularly if you’re making the turkey for a baby or toddler.
How many tail feathers does the turkey have?
The Mini Turkey Squish uses five crochet tail feathers.
The suggested layout is one center yellow feather, two orange feathers, and two red outer feathers.
A Fun Thanksgiving Crochet Project
The Mini Turkey Squish crochet pattern combines everything that makes seasonal amigurumi fun: warm fall colors, an adorable expression, dimensional details, and a relatively small finished size.
The plump body makes the turkey wonderfully squishy, while the colorful feather fan gives it plenty of Thanksgiving character.
Whether you’re making one for your own autumn décor, adding handmade pieces to your Thanksgiving table, preparing small seasonal gifts, or simply looking for your next cute crochet project, this tiny turkey is a fun way to celebrate fall with yarn and a crochet hook.
And if you’re planning a full collection of autumn projects, pair your turkey with the Bobble Stitch Pumpkin, Crochet Pumpkin Bear, or Fall Crochet Centerpiece for a coordinated handmade fall display.
Happy crocheting and enjoy creating your own little Thanksgiving turkey!
