
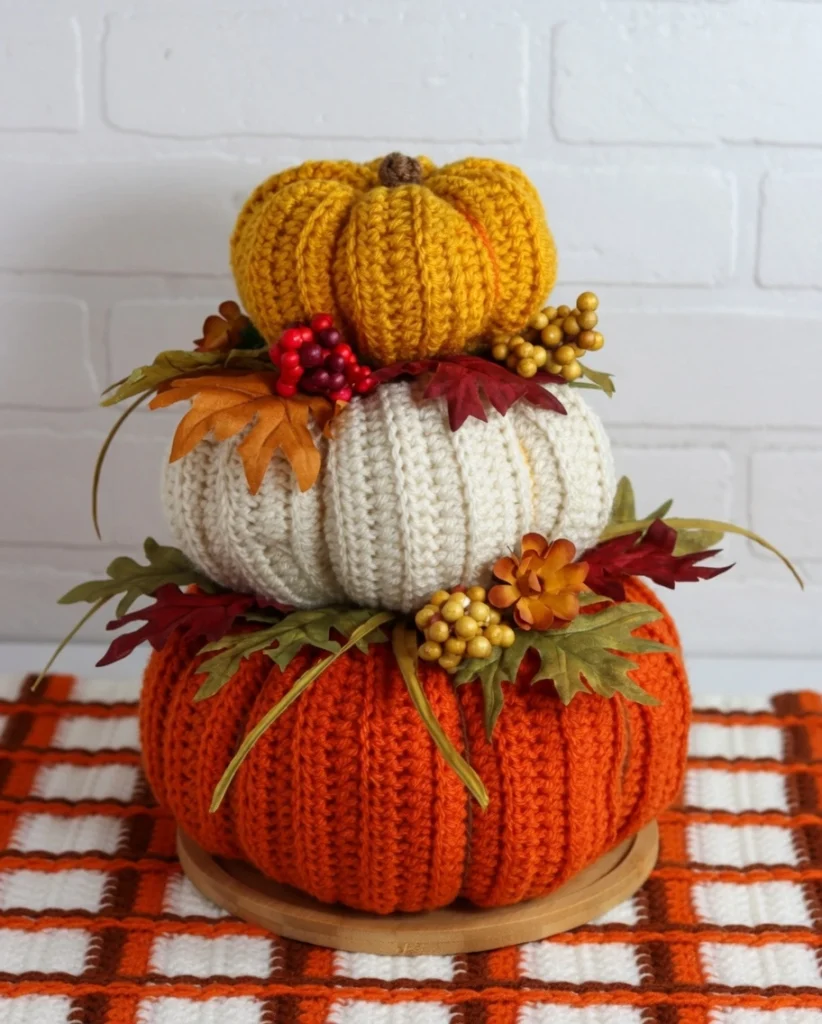
Crocheting for the seasons brings a special kind of joy to any crafting space. If you are looking for a high-end, farmhouse-style addition to your autumn decor, this fall crochet centerpiece is exactly what you need. Reminiscent of something you might find at a high-end boutique, this design is surprisingly simple to create.
This project is incredibly beginner-friendly. Rather than working in the round with complex increases, you will simply crochet basic flat rectangles and then gather and sew them into beautiful, dimensional pumpkin shapes. Stacking them together creates a stunning statement piece that will instantly elevate your home for the season.
Materials Needed
- 3.7 oz or 193 yds of Red Heart Super Saver, Carrot (Large Pumpkin)
- 2.1 oz or 110 yds of Red Heart Super Saver, Aran (Medium Pumpkin)
- 1 oz or 52 yds of Red Heart Super Saver, Gold (Small Pumpkin)
- 1 yd of Red Heart Super Saver, Cafe Latte (Stem)
- Size H 5mm Crochet Hook
- Yarn Needle
- Scissors
- Polyfil
- Hot Glue (Optional)
- Faux Floral Picks of Fall Leaves, Berries, Flowers, etc.
Abbreviations Used
- CH – Chain
- SC – Single Crochet
- DC – Double Crochet
- BLOHDC – Back Loop Only Half Double Crochet
- SLST – Slip Stitch
- ST(s) – Stitch(es)
- MC – Magic Circle
This pattern uses USA crochet terminology
Gauge and Size
Gauge: 8 HDC X 5 Rows = 2 inches
- Large Pumpkin: 9 inches wide and 4.5 inches tall.
- Medium Pumpkin: 7.5 inches wide and 3.5 inches tall.
- Small Pumpkin: 5.5 inches wide and 2.5 inches tall.
- Final Centerpiece: 9 inches wide and 10.5 inches tall.
Pattern Instructions
Notes: I do not count my CH1, turning chain, as a stitch. I use a loose CH1 as my turning chain to have a straight edge. Leave an 18-inch yarn end at the beginning of your starting chain to use for sewing and gathering the pumpkin.
Large Crochet Pumpkin
Row 1: Work a HDC in 2nd CH from hook. HDC in next 39 CH (40)
Row 2-54: CH1, turn, BLOHDC in each ST across. (40)
Fasten off leaving a 24-inch yarn end to use for sewing and gathering the pumpkin.
Medium Crochet Pumpkin
Row 1: Work a HDC in 2nd CH from hook. HDC in next 29 CH (30)
Row 2-42: CH1, turn, BLOHDC in each ST across. (30)
Fasten off leaving a 20-inch yarn end to use for sewing and gathering the pumpkin.
Medium Crochet Pumpkin
Row 1: Work a HDC in 2nd CH from hook. HDC in next 29 CH (30)
Row 2-42: CH1, turn, BLOHDC in each ST across. (30)
Fasten off leaving a 20-inch yarn end to use for sewing and gathering the pumpkin.
Small Pumpkin Stem
Note: Pattern is worked in continuous rounds.
Row 1: Work 6 SC into a Magic Circle. Alternate Row 1: CH2, Work 6 SC into 2nd CH from hook.
Row 2-5: SC in next 6 STs.
Fasten off. Do not weave in the ends, they will be stuffed into the center of the pumpkin.
Gathering and Finishing Your Pumpkins
Once the pumpkin pieces are created, you have two options for finishing them. The fall crochet centerpiece in the photos features the segmented option.
Step 1: Sew a gathering stitch along the bottom of the squash and pull tight. Step 2: Make 2 stitches to secure the gather. Step 3: Use a whip stitch to sew the two sides of the squash together. Step 4: When you reach the top of your squash, knot your two yarn ends together to secure. Step 5: Sew a gathering stitch around the top of the pumpkin. Step 6: Stuff the pumpkin and tuck your stem into the top of the pumpkin. Pull the gathering stitch tight to close the top. Step 7: Knot the two yarn ends together to secure the gather. Make a few stitches to secure the stem and knot the yarn ends together again.
Pumpkin Option 1: Cinched Pumpkin
For this pumpkin, we will simply use the yarn ends to cinch down the center of the pumpkin.
Step 9: Use a yarn needle to thread your yarn ends from the top to the bottom of the pumpkin. Step 10: Pull the yarn ends tight and knot them together. Step 11: Clip your yarn ends and hide them inside the pumpkin.
Now your cinched pumpkin is complete.
Pumpkin Option 2: Segmented Pumpkin
For this pumpkin, we will hide our current yarn ends and use a new strand of yarn to segment our pumpkin into 6 sections for the small and medium pumpkin and 8 sections for the large pumpkin.
Step 9: Use an 18-24 inch piece of yarn and needle to thread the yarn from the bottom to the top of the center of the pumpkin. Leave about 6 inches hanging out the bottom of the pumpkin. Step 10: Wrap the yarn around the side of the pumpkin and reinsert the needle from the bottom to the top of the pumpkin. Step 11: Wrap the yarn around the side of the pumpkin once more directly across from the other yarn. The two strands of yarn will cut the pumpkin in half. Step 12: Pull both yarn ends tight to create a ridge in the sides of the pumpkin. This will segment the pumpkin into two halves. Knot the two yarn ends together at the bottom of the pumpkin. Step 13: Using the same piece of yarn, repeat steps 9-12 to create a total of 6 segmented sections. Step 14: Repeat steps 1-11 or 1-14 for each pumpkin. Stack your pumpkins.
Decorating the Centerpiece
This part is optional, but it really takes the fall centerpiece to the next level. You will either need some type of glue (hot glue works well) or a needle and yarn to sew the floral pieces in place.
Step 1: Take the floral picks and cut off the leaves, flowers, and berries that will be used. Sometimes these can just be pulled off. Other times they have a wire center and you may need to use wire cutters. Step 2: Arrange the floral pieces on top of the largest pumpkin. Occasionally place the medium size pumpkin on top of the large pumpkin to make sure the floral pieces are spread out far enough. Step 3: Glue or sew the floral pieces in place. Step 4: Repeat steps 2 and 3 for the medium size pumpkin. Step 5: Stack the pumpkins up and the centerpiece is complete. Step 6 (optional): If desired, sew or glue the three pumpkins together. (I did not do this. I thought they would be easier to store and rearrange later if not glued together.)

Tips
Any yarn can be used for this pattern, making it incredibly versatile. Larger yarns will naturally create larger pumpkins, while smaller yarns will make mini versions. You will just want to make sure you use the same size yarn for all three pumpkins in the set so they look proportional.
Feel free to get highly creative with your colors! Classic orange is always beautiful, but making pumpkins in dark teal, cream, and white creates a chic, modern farmhouse look. You can even glue felt Jack-o-lantern faces to the front of the pumpkins if you want to transition this piece from general fall decor straight into a Halloween theme.
FAQ
Do I have to segment my pumpkins? No, the pattern includes two finishing options. You can simply cinch the center of the pumpkin with your yarn tails for a smooth, rounded look, or take the extra time to segment them into slices for that classic pumpkin ribbing.
Will my pumpkins fall over when stacked? Because the pumpkins are stuffed firmly with Polyfil and have flat tops and bottoms from the gathering method, they stack very securely. However, if you have curious pets or small children, you can easily apply a small dot of hot glue between the layers to keep them permanently anchored together.
More Home Decor Patterns to Try
- Stunning Star Patchwork Crochet Blanket Pattern: A Step-by-Step Guide
- Free Crochet Daffodil Granny Square Pattern Step by Step Tutorial
- Crochet Bunting Pattern Free Granny Triangle Bunting Tutorial for Beginners
- How to Crochet a Pincushion Free Easy Granny Square Pattern
Conclusion
Congratulations on creating your stunning fall crochet centerpiece! This elegant, farmhouse-inspired decoration brings a beautiful, high-end touch to your seasonal table. Share your finished centerpiece in the comments below!
