
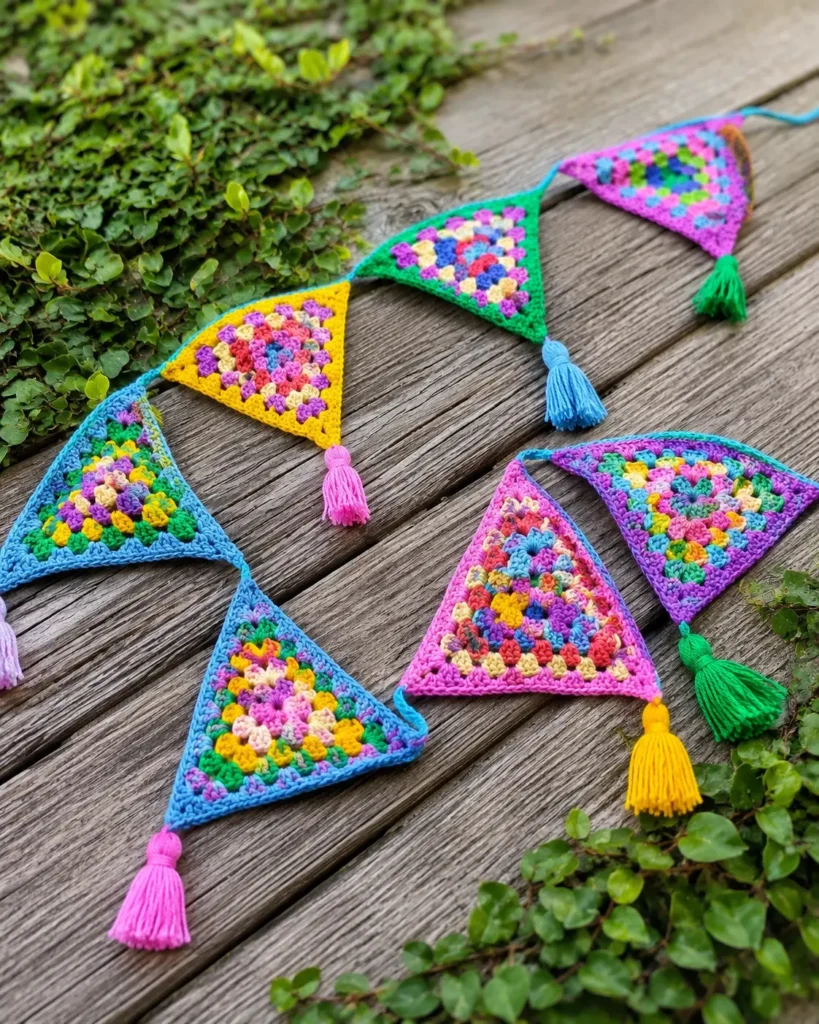
There’s something magical about handmade bunting fluttering across a garden party, a child’s bedroom, or a craft fair stall. It transforms an ordinary space into somewhere intentional, warm, and cared for. This free crochet bunting pattern uses the classic granny triangle motif to create cheerful, reusable decorations that you can dust off year after year for birthdays, baby showers, weddings, harvest celebrations, or simply to bring a pop of colour to a quiet corner of your home.
If you can chain, slip stitch, single crochet, and double crochet, you can make this bunting. Even better – it’s the perfect stash-busting project, letting you finally use up those leftover odds and ends of yarn from past makes.
Why You’ll Love This Crochet Bunting Pattern
Before we dive into stitches and yarn, here’s why this project deserves a spot on your hook:
- Beginner friendly – it uses only the most basic stitches and builds slowly so you can practise your tension as you go.
- Stash busting – each triangle uses tiny amounts of yarn, perfect for those colourful leftovers.
- Portable – one motif fits in a pocket, making it ideal for travel, café crochet, or evenings in front of the TV.
- Endlessly customisable – swap colours to match any theme, season, or room.
- Reusable for years – unlike paper bunting, crochet bunting holds up to repeated use, washing, and storage.
If you enjoy granny-style projects, you might also love my classic granny square crochet pattern with diagram and my step-by-step beginner’s guide to the basic granny square – both pair beautifully with the techniques in this pattern.
A Little Inspiration Behind the Pattern
I first designed this bunting after falling in love with the colourful decorations strung across town squares during traditional summer harvest festivals. There’s a joyful, hand-stitched feel to them – the kind of warmth you can’t replicate with shop-bought decorations. I wanted a version I could pack away each year and bring out again, full of memories from past celebrations.
You can absolutely lean into a seasonal palette (think mustards, terracottas, and forest greens for autumn) or go bright and rainbow for a child’s birthday. The pattern stays the same; only the personality changes with your colour choices.
Materials You’ll Need
You don’t need much to get started, which is part of the charm of this project.
- Yarn: A collection of DK weight yarn in 6 different colours per triangle (you can repeat colours across triangles or vary them for a scrappy look). 100% cotton DK gives the crispest stitch definition and holds its shape beautifully, but acrylic or a cotton blend works perfectly well.
- Crochet hook: 3 mm (US D/3) – or whichever hook your yarn band recommends. A slightly smaller hook keeps the triangles tidy and stiff.
- Yarn needle for weaving in ends.
- Sharp scissors.
- A piece of cardboard (around 10 cm tall) is optional but handy for making consistent tassels.
Gauge: Not critical for this project, but if you’d like every triangle to come out the same size, work a sample first and stick to the same hook and yarn throughout.
Finished size: With DK cotton and a 3 mm hook, each finished triangle measures approximately 20 cm × 20 cm.
Abbreviations and Stitches Used (UK/US Notes)
This pattern is written in US crochet terms. If you’re more comfortable with UK terms, swap as follows:
- sl st – slip stitch
- ch – chain
- sc (US) = dc (UK) – single crochet
- dc (US) = tr (UK) – double crochet
- ch-sp – chain space
- st(s) – stitch(es)
- triple sc inc. – three single crochets worked into the same stitch (used at the points of the triangle)
Quick Stitch Refresher
Slip Stitch (sl st): Insert hook into the indicated stitch, yarn over, pull a loop through both the stitch and the loop on the hook.
Single Crochet (sc): Insert hook into the stitch, yarn over, pull up a loop (2 loops on hook), yarn over, pull through both loops.
Double Crochet (dc): Yarn over, insert hook into the stitch, yarn over, pull up a loop (3 loops on hook), yarn over, pull through 2 loops, yarn over, pull through the remaining 2 loops.
Pattern Notes Before You Start
Read these once before you pick up your hook – they’ll save you a lot of head scratching later.
- The bunting motif is worked in the round, starting from a central magic ring (or a small chain ring if you prefer).
- Each round is worked in a new colour. Fasten off and weave in the ends after every round – it’s tedious, but it gives the cleanest finish on both sides of the triangle, which matters when bunting is on display.
- The chain-3 corner spaces form the three points of the triangle. Always work the (3 dc, ch 3, 3 dc) corner cluster into these spaces.
- The chain-1 spaces along each side simply separate the granny clusters.
- The starting chain 6 at the beginning of each round counts as one dc plus a chain-3 corner space.
- The final single crochet edging (Round 7) gives the triangle a clean, defined border and makes joining easier later.

How to Crochet the Granny Triangle Bunting Motif
You’ll repeat this 7-round motif for each flag of bunting. I usually make 5–8 triangles for a generous string, but you can make as many as you need to span your chosen space.
Round 1 (Colour A – the centre)
Chain 4 and slip stitch into the first chain to form a foundation ring (or use a magic ring if you prefer a tighter centre).
Chain 6 (counts as 1 dc + ch 3).
Working into the centre of the ring:
- 3 dc, ch 3 – repeat from * one more time
- 2 dc into the ring
- Sl st into the 3rd chain of the starting ch-6 to close the round.
You should now have three groups of 3 dc separated by three ch-3 spaces (your corners). Fasten off and weave in the ends.
Round 2 (Colour B)
Join your new yarn into any ch-3 corner space.
Chain 6 (counts as 1 dc + ch 3), then in the same ch-3 space work (3 dc, ch 1). Skip the next 3 sts.
In the next ch-3 corner space: (3 dc, ch 3, 3 dc, ch 1). Skip the next 3 sts. Repeat from * once more.
Work 2 dc into the first ch-3 space (where you began), sl st into the 3rd chain of the starting ch-6 to close. Fasten off and weave in the ends.
You should now see your triangle starting to take shape, with one granny cluster on each side and three defined points.
Round 3 (Colour C)
Join your new yarn into any ch-3 corner space.
Chain 6 (counts as 1 dc + ch 3), then in the same ch-3 space work (3 dc, ch 1). Skip the next 3 sts.
3 dc into the next ch-1 space, ch 1, skip 3 sts.
In the next ch-3 corner space: (3 dc, ch 3, 3 dc, ch 1). Skip 3 sts. 3 dc into the next ch-1 space, ch 1, skip 3 sts. Repeat from * once more.
Work 2 dc into the first ch-3 space, sl st to close. Fasten off and weave in the ends.
Each side now has two granny clusters.
Round 4 (Colour D)
Join your new yarn into any ch-3 corner space.
Chain 6 (counts as 1 dc + ch 3), then in the same ch-3 space work (3 dc, ch 1). Skip the next 3 sts.
3 dc into the next ch-1 space, ch 1, skip 3 sts. Repeat from * one more time, so you have worked two granny clusters along the side.
In the next ch-3 corner: (3 dc, ch 3, 3 dc, ch 1), skip 3 sts. Then work 3 dc, ch 1, skip 3 sts – twice along the next side. Repeat the bracketed instructions once more.
Work 2 dc into the first ch-3 space, sl st to close. Fasten off and weave in the ends.
Each side now has three granny clusters.
Round 5 (Colour E)
Same principle as Round 4, but now you’ll be working three granny clusters between each corner, then adding the corner cluster, and continuing all the way around.
Join in a ch-3 corner. Ch 6, (3 dc, ch 1) into the same space. Skip 3 sts.
Work (3 dc, ch 1, skip 3 sts) three times along the side. Then in the corner ch-3 space, work (3 dc, ch 3, 3 dc, ch 1), skip 3 sts. Repeat from * around the triangle.
End with 2 dc into the first corner space and sl st to close. Fasten off and weave in the ends.
Each side now has four granny clusters.
Round 6 (Colour F)
Same principle, but now you’ll work four granny clusters between each corner.
Join in a ch-3 corner. Ch 6, (3 dc, ch 1) into the same space. Skip 3 sts.
Work (3 dc, ch 1, skip 3 sts) four times along the side. Then in the corner ch-3 space, work (3 dc, ch 3, 3 dc, ch 1), skip 3 sts. Repeat from * around the triangle.
End with 2 dc into the first corner space and sl st to close. Do not fasten off – you’ll continue straight into Round 7 with the same colour, or you can change colour here if you prefer a contrasting border.
💡 Pro tip: If you’d like to learn how to hide your colour changes and joins so they’re nearly invisible, I share my favourite technique in my tutorial on how to crochet a perfect granny square with 3 easy tips. It works beautifully on triangles too.
Round 7 – The Single Crochet Border
This final round neatens the edges and gives you a firm base for joining.
Chain 1. Sc into the same stitch. Continue working sc evenly along the side until you reach the next corner ch-3 space.
In each corner, work a triple sc increase (3 sc into the corner ch-3 space) to keep the point sharp.
Continue: sc evenly along each side, triple sc inc. into each corner. The stitch count for each side will be approximately 26 sc, but don’t stress over exact numbers – what matters is that the work lies flat and the points stay crisp.
Sl st into the first sc to close. Fasten off and weave in the ends.
🎉 Your first bunting triangle is complete! Repeat Rounds 1–7 to make as many triangles as you need.
How to Make a Yarn Tassel for the Bunting Points
A tassel hanging from the bottom point of each triangle adds a beautiful, finished touch. Here’s how to make one.
You’ll need: a small piece of cardboard about 10 cm tall (or just use your hand), yarn in your chosen colour, scissors, and a yarn needle.
Step 1: Cut a 20 cm length of yarn and lay it flat across your fingers (or across the top of your piece of cardboard).
Step 2: Wrap your working yarn around your fingers (or the cardboard) approximately 30 times. More wraps = a chunkier tassel; fewer wraps = a daintier one.
Step 3: Slide the bundle off your fingers and use the 20 cm length you laid down first to tie a tight double knot around the centre top of the bundle.
Step 4: Cut the working yarn, leaving a 50 cm tail. Use this tail to wrap firmly around the tassel about 2 cm down from the top knot – 7 wraps creates a neat “neck.”
Step 5: Bring the tail back up above the wraps. Insert your crochet hook down through the wraps, catch the tail, and pull it down through – this hides the end inside the tassel.
Step 6: Use the tails from the very first tie to attach the tassel to the central sc of the bottom corner of any triangle. Knot it on securely, then bury the tails inside the tassel as in Step 5.
Step 7: Trim the loops at the bottom of the tassel evenly to your preferred length.
💡 If you want all your tassels to match, line them up flat on a table and trim along a ruler.
How to Join the Crochet Bunting Together
Now for the satisfying part – stringing your triangles into a finished garland.
- Choose a yarn colour that complements all your triangles (cream, soft grey, or natural cotton tend to disappear nicely; a bold contrast colour makes the bunting look intentional and graphic).
- Make a slip knot on your hook and chain 20 – this is the tie at the start of your bunting.
- Hold your first triangle with the top edge facing you (point downward). Work single crochets evenly across the top edge of the triangle – roughly 31 sc per top edge, but match what looks even on your work.
- Chain 3 between triangles (or chain more if you’d like the triangles to hang further apart).
- Continue across the top edge of the next triangle in the same way.
- Repeat until all your triangles are joined.
- After the final triangle, chain 20 to make the matching tie at the other end.
- Fasten off and weave in your ends.
The chains at each end are your ties – use them to attach the bunting to hooks, branches, picture rails, or wherever you’d like to display it.
Tips for the Best-Looking Crochet Bunting
Little touches make a big difference between bunting that looks homemade and bunting that looks handmade (the good kind).
- Block your triangles. Pin each finished triangle to a foam mat, spritz with water, and leave to dry. This pulls the points crisp and makes the granny clusters sit beautifully.
- Vary your colour combinations. Rather than making every triangle the same, mix up the order of your six colours across triangles. The bunting will feel more lively and less uniform.
- Use a magic ring for Round 1 if you don’t like the small hole that a chain ring creates.
- Weave ends as you go. It’s tempting to leave all the ends until the end, but you’ll thank yourself later if you do them after each round.
- Stiffen for extra structure. If you want your bunting to hold its shape really firmly (especially for outdoor or photographic use), a light spray of fabric stiffener after blocking works wonders.
Display Ideas for Your Finished Bunting
Bunting isn’t just for parties. Here are some of my favourite ways to use it year-round:
- Across a child’s nursery shelf or above a bed for a soft pop of colour.
- Strung along a fireplace mantel for autumn and winter cosiness.
- Hung in a craft room or sewing nook above the work area.
- Wound around a banister or stair rail for holidays and celebrations.
- Used as a photo backdrop for birthday cakes and milestone shots.
- Looped around a Christmas tree as a handmade alternative to garland.
For more cosy, character-filled handmade home ideas, you might enjoy my round-up of charming crochet decor patterns to brighten your space and cosy crochet home decor patterns.
Caring for Your Crochet Bunting
If you’ve used cotton or a washable acrylic, your bunting can be hand-washed gently in cool water with a wool-friendly detergent. Squeeze out excess water (don’t wring), reshape the triangles, and dry flat.
When storing, fold loosely or roll around a cardboard tube to avoid sharp creases in the chain ties. A cotton drawstring bag keeps dust and moths away between uses.
Frequently Asked Questions
How many triangles do I need? Each finished triangle is around 20 cm wide. With a small chain space between each one, plan on roughly 22–23 cm of bunting length per triangle. For a 2-metre length, you’ll want around 8–9 triangles plus your end ties.
Can I use a different yarn weight? Absolutely. Worsted or aran yarn with a 4 mm or 5 mm hook will give you larger, chunkier triangles – great for outdoor festival vibes. Lighter yarns like 4 ply give a delicate, doily-like result perfect for nurseries.
Do I have to fasten off after every round? Not technically – you can carry the yarn up the back if you’re using two alternating colours. But fastening off and rejoining gives you total freedom to use six totally different colours, and the back of the bunting stays as tidy as the front, which matters if both sides are visible.
Can I make this without the tassels? Of course. The triangles look lovely on their own, and you can swap the tassels for small pom poms, beads, or little crochet flowers instead. Speaking of which, the free crochet rose and flower patterns on the blog look gorgeous dangling from each point.
Is this pattern good for total beginners? Yes – as long as you’re comfortable with chain, slip stitch, single crochet, and double crochet, you’ll be fine. The repetition actually makes it a great pattern to practise these stitches on, because each round is a slightly extended version of the last.
Share Your Bunting
If you make this bunting, I’d love to see it. Take a photo of your finished garland strung up somewhere it makes you smile and share it on Instagram – it never stops being lovely to see other crocheters’ colour choices bringing the same pattern to life in completely different ways.
Happy hooking, and may your bunting bring colour wherever you hang it.

1 thought on “Crochet Bunting Pattern – Free Granny Triangle Bunting Tutorial for Beginners”