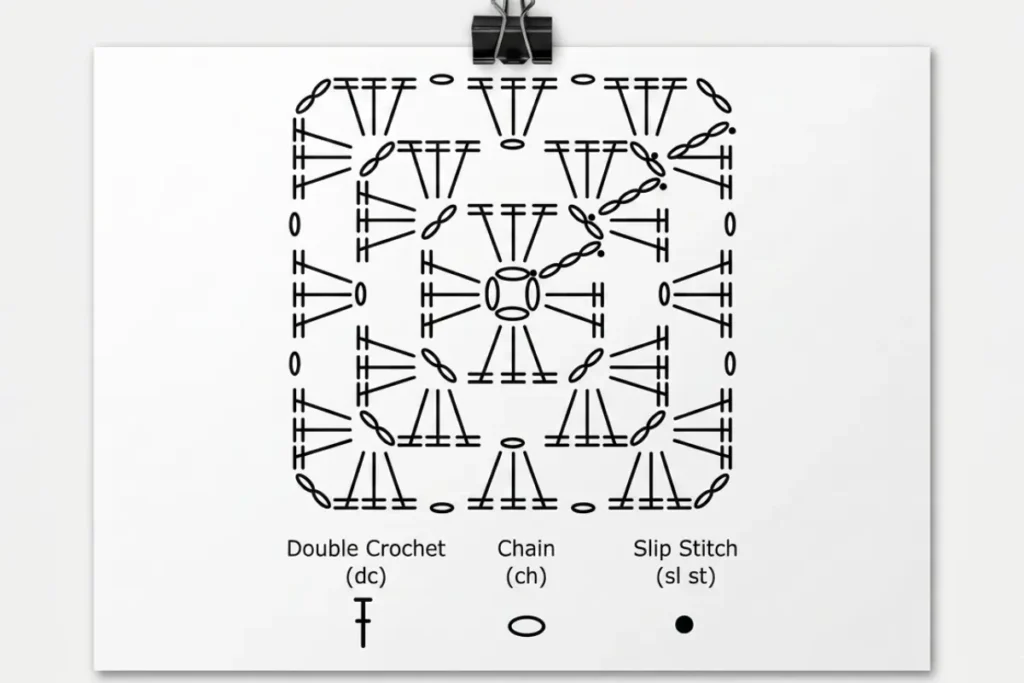
If you’ve ever wanted to learn how to read a granny square crochet pattern diagram, you’re in the right place. Crochet diagrams (also called crochet charts or stitch charts) are visual representations of a pattern — and once you know how to read them, they can be far more intuitive than written instructions alone.
In this guide, you’ll learn exactly how to read a granny square diagram, what each crochet symbol means, what materials you need, and tips to help you crochet a perfect square every time. Whether you’re a total beginner or brushing up on the basics, this post has you covered.
What Is a Crochet Pattern Diagram?
A crochet pattern diagram is a visual chart that maps out every stitch in a pattern using standardized symbols. Instead of reading a long list of written instructions like “dc, ch2, dc, sl st,” you follow a picture that shows exactly where each stitch goes and how the stitches relate to each other spatially.
Diagrams are especially helpful for circular patterns like granny squares, because you can see at a glance how each round builds on the one before it. They are also useful for visual learners and for understanding stitch placement without having to count through rows of text.
Most crochet diagrams follow international symbol standards, meaning a double crochet stitch looks the same whether the pattern was written in English, French, or Japanese — making them genuinely universal.
Materials You’ll Need to Crochet a Granny Square
Before you dive into reading the diagram, let’s talk about what you’ll need to make a granny square. The good news: this is one of the most accessible crochet projects out there. Here’s what to gather:
Yarn
The most beginner-friendly choice is a
worsted weight yarn (#4 weight). It’s thick enough to see your stitches clearly, works up quickly, and is widely available in hundreds of colors. That said, granny squares can technically be made with any yarn weight — from fine fingering weight (for delicate, lacy squares) to bulky yarn (for chunky, cozy blankets).
Tips for choosing yarn:
- Choose a smooth, light-colored yarn if you’re a beginner — it makes it easier to see your stitches and count them.
- Acrylic yarn is affordable, machine washable, and great for practice.
- If you want to make a granny square blanket, consider buying all your yarn at once from the same dye lot to keep colors consistent.
If you enjoy making wearable crochet projects, check out these
beginner crochet wearables for more ways to put your yarn to use.
Crochet Hook
For worsted weight (#4) yarn, a
5mm (H/8) crochet hook is the standard recommendation. Always check the yarn label — it will have a recommended hook size printed on it. If your square is turning out too tight, go up a hook size. If it’s too loose and floppy, go down a size.
Ergonomic hooks with cushioned handles are worth the investment if you plan to crochet for extended periods, as they reduce hand fatigue significantly.
Other Supplies
- Scissors: A small, sharp pair dedicated to yarn works best.
- Tapestry needle: Essential for weaving in your yarn ends when you finish each square. A blunt-tipped needle with a large eye is what you need.
- Stitch markers: Optional but helpful for marking the beginning of rounds.
- Gauge ruler: Useful if you need your finished squares to be a specific size — for example, when joining many squares together into a blanket.
- Blocking board and pins: Blocking your finished squares (dampening them and pinning them flat to dry) makes a dramatic difference in how neat and uniform they look.
Understanding Crochet Diagram Symbols
Every symbol in a crochet diagram represents a specific stitch. The symbols used in a classic granny square are relatively simple — you only need to know three core stitches to get started. Here’s a breakdown of each one:
Chain Stitch (ch)
Symbol in a diagram: A small oval or elongated loop.
The chain stitch is the foundation of almost everything in crochet. In a granny square, chain stitches are used to start the project (called a foundation chain or a magic ring), to create corner spaces, and to connect groups of stitches.
How to make a chain stitch:
- Start with a slip knot on your hook.
- Yarn over (wrap the yarn over the hook from back to front).
- Draw the yarn through the loop already on your hook.
- You’ve made one chain stitch! Repeat steps 2–3 for each additional chain.
In diagrams, follow the chain ovals from the center outward. Each oval represents one “ch” in the written pattern.
Slip Stitch (sl st)
Symbol in a diagram: A small filled circle or solid dot.
The slip stitch is the shortest crochet stitch — it adds almost no height. In granny squares, it’s most commonly used to join rounds (connecting the last stitch of a round to the first) or to move your hook to a new position without adding visible height.
How to make a slip stitch:
- Insert your hook into the designated stitch or space.
- Yarn over.
- Pull the yarn through both the stitch AND the loop on your hook in one motion.
Done! It’s the fastest stitch to learn and becomes second nature very quickly.
Double Crochet (dc)
Symbol in a diagram: A tall vertical line with two small horizontal bars (crossbars) through the middle of it.
The double crochet is the workhorse stitch of the granny square. It creates the bulk, texture, and structure of the square. In most granny square patterns, double crochets are worked in groups of three — these groups are called
double crochet clusters (or dc clusters). The angle of the symbol in the diagram indicates the direction the stitch leans, so pay attention to that.
How to make a double crochet stitch:
- Yarn over (yo) before inserting your hook.
- Insert the hook into the designated stitch or space.
- Yarn over again and draw the yarn through the stitch — you now have 3 loops on your hook.
- Yarn over and draw through the first 2 loops — 2 loops remain on your hook.
- Yarn over and draw through the last 2 loops. One double crochet complete!
Three double crochets worked into the same space form one cluster. The corner of a granny square typically has a larger cluster or two clusters separated by chain stitches to create an open corner space.
How to Read a Granny Square Crochet Diagram
Reading a granny square diagram is much simpler than it might look at first glance. Here are the key rules to follow:
Start From the Center
Granny squares are worked in rounds, so the diagram starts at the center and spirals outward. The very center of the diagram shows how to begin — usually with a magic ring or a small number of chain stitches joined into a loop.
Follow Each Round
Each concentric ring in the diagram represents one round of crochet. Work your way outward from the center, one round at a time. Most diagrams use a thick line or color change to distinguish between rounds.
Read Counter-Clockwise
Standard crochet diagrams worked in the round are read counter-clockwise (right to left) for right-handed crocheters, mirroring the direction you naturally crochet. Left-handed crocheters may find it helpful to mirror the diagram.
Match the Symbol to the Stitch
Every time you see a symbol in the chart, perform that stitch. An oval? Make a chain. A dot? Make a slip stitch. A tall line with crossbars? Make a double crochet. Refer to the symbol key (usually printed alongside the diagram) if you’re ever unsure.
Pay Attention to Where Stitches Are Worked
This is one of the most important details to notice. In a granny square, stitches are almost always worked
into chain spaces rather than into individual stitches. A chain space (ch-sp) is the open loop formed by a chain stitch. The diagram will show the symbols positioned inside or above those spaces to indicate this.
Round-by-Round Granny Square Overview
Here’s a plain-language walkthrough of how the classic granny square is constructed, to help you connect the diagram to the actual crochet:
Starting the Center
Most classic granny squares begin with a
magic ring (also called a magic loop or adjustable ring). This is a technique that lets you pull the center hole tight once your first round is complete, leaving no visible gap. Alternatively, you can chain 4 and join with a slip stitch to form a small ring — this is a slightly easier start for true beginners.
Round 1 — The First Cluster Round
Into the center ring, you’ll work a series of double crochet clusters separated by chain stitches. Typically this means working 4 groups of 3 double crochets (one for each side of the eventual square), with 2–3 chains between each group to create the corner spaces. At the end of this round, join with a slip stitch.
Round 2 — Building the Square Shape
This round reinforces the square shape by adding more clusters along the sides and larger corner spaces. You’ll work into the chain spaces from the previous round, adding clusters and corner chains to define the square’s four corners clearly.
Round 3 and Beyond — Expanding Outward
Each additional round adds more clusters along the sides (adding one more cluster per side with each round) and maintains the corner structure. The square grows evenly and symmetrically with each round you add.
To make a larger square, simply keep adding rounds using the same logic: one extra cluster per side per round, corners stay the same.
Tips for a Perfect Granny Square
- Keep your tension consistent. Too tight and your square will curl; too loose and it will be floppy. Aim for a relaxed, even tension.
- Count your stitches at the end of each round. Catching a mistake early saves a lot of frustration later.
- Use stitch markers to mark the beginning of each round and your corner chain spaces.
- Weave in ends as you go. It’s much easier to weave in each color as you finish it rather than leaving dozens of ends until the end of the project.
- Block your squares. Even if your squares look a little uneven while crocheting, blocking (wetting them, shaping them, and letting them dry flat) can make a huge difference and produce perfectly square, professional-looking results.
- Don’t be afraid to frog (unravel) and restart. Every experienced crocheter has done it countless times. It’s part of the process, not a failure.
What Can You Make with Granny Squares?
Once you’ve mastered the basic granny square, the possibilities are genuinely endless. Here are some popular projects that use granny squares:
- Blankets and afghans — the classic use. Join squares together in a grid for a cozy, colorful throw.
- Bags and totes — granny squares make sturdy, stylish bag panels.
- Pillows and cushion covers — use just one or four large squares for a decorative pillow.
- Clothing — cardigans, tops, skirts, and even hats can be constructed from joined squares. If you love crochet clothing, take a look at this simple crochet top pattern for women for inspiration on what’s possible.
- Wall hangings and home décor — a collection of colorful granny squares makes beautiful fiber art. For more ideas, see these charming crochet décor patterns to brighten your space.
- Baby items — soft, colorful blankets made from granny squares are perennial favorites. Our easy textured crochet baby blanket free pattern is a great companion project.
How to Join Granny Squares Together
Once you’ve made your squares, you’ll need to join them. Here are the most common methods:
Slip Stitch Join
Hold two squares with right sides together and slip stitch through both edges along one side. This creates a visible ridge on the wrong side and a clean line on the right side.
Single Crochet Join
Similar to the slip stitch join but uses single crochet instead. This creates a slightly raised seam that can be used decoratively on the right side of the work.
Flat Slip Stitch Join
Hold squares flat (not folded) and slip stitch through corresponding edge stitches. This is the flattest, most invisible join and works beautifully for blankets.
Whip Stitch (Sewn Join)
Using a tapestry needle and yarn, whip stitch through the edge stitches of two squares. This is done flat and produces a neat, nearly invisible seam.
Troubleshooting Common Granny Square Problems
My Square Is Curling Into a Bowl Shape
This is a tension issue — your stitches are too tight. Try going up one hook size, or consciously relax your grip on the yarn and hook.
My Square Is Ruffling at the Edges
This means you have too many stitches or your tension is too loose. Try going down one hook size or check that you’re not accidentally adding extra stitches each round.
My Corners Are Pointed Instead of Square
Make sure you’re working the correct number of chain stitches into each corner space. Most granny square patterns use ch-2 or ch-3 at each corner — skipping these or making too few chains results in pointed, pinched corners.
My Center Has a Visible Hole
If you started with a chain ring instead of a magic ring, some hole is expected. To minimize it, start with a magic ring. If you did use a magic ring, make sure you pulled it closed tightly before joining your first round.
The Benefits of Learning to Read Crochet Diagrams
Once you’re comfortable reading crochet diagrams, a whole new world of patterns opens up to you. Many of the most beautiful and intricate crochet patterns — particularly those from Japan, Germany, and other non-English-speaking countries — are published in diagram form only. Being able to read a chart means language is no longer a barrier.
Diagrams also make it much easier to spot mistakes. If you’ve made an error, you can compare your actual work to the chart visually and pinpoint exactly where you went wrong. This is far faster than re-reading rows of written instructions.
Crochet is also one of the most rewarding and peaceful hobbies you can take up. If you’re curious about the wider benefits, this piece on
unlocking joy through the benefits of crochet is worth a read. And if you’re interested in using your craft as a mindfulness practice, don’t miss
how to embrace crochet mindfulness for inner peace.
Frequently Asked Questions
What size is a standard granny square?
A basic 3-round granny square worked in worsted weight yarn with a 5mm hook measures approximately 4 inches x 4 inches (10cm x 10cm). The finished size will vary depending on the yarn weight, hook size, and the number of rounds you complete.
How many granny squares do I need for a blanket?
This depends on the size of your squares and the size of the blanket you want to make. For a throw blanket measuring roughly 50 x 60 inches using 4-inch squares, you’d need approximately 150–195 squares. A calculator can help you figure out the exact number based on your square size.
Can I make a granny square with one color?
Absolutely. While the classic granny square uses multiple colors (one per round or one per cluster group), a solid single-color granny square is equally valid and has a clean, modern look.
Do I need to block granny squares?
Technically no, but it’s highly recommended, especially if you’re joining many squares together. Blocking ensures each square is the same size and shape, making the joining process much easier and the finished project look far more polished.
What’s the best project for a first-time granny square maker?
A simple dishcloth or small potholder made from just one or two squares is ideal. You’ll learn the stitch pattern without committing to a large project, which means you can practice without pressure. Once you’re comfortable, try a small bag or a beginner blanket.
Ready to Start Crocheting?
The granny square is one of those foundational crochet skills that keeps giving. Once you know how to make one, you can build almost anything — from cozy home décor to wearable fashion pieces. And now that you understand how to read a crochet diagram, you have a tool that will help you tackle far more complex patterns with confidence.
If you’re looking for your next cozy crochet project after mastering granny squares, check out our
easy textured crochet baby blanket pattern, explore some
crochet home décor patterns, or try your hand at a fun
free crochet hat pattern — all great ways to keep your momentum going.
Happy crocheting!