
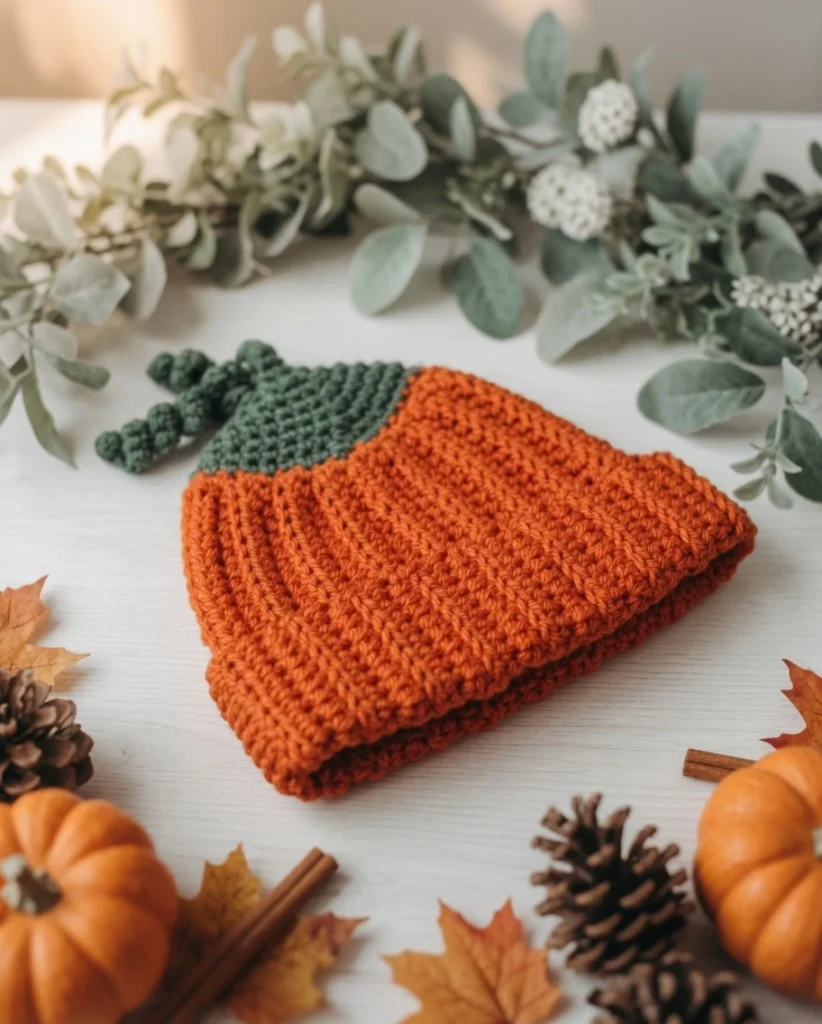
There is nothing quite as charming as a handmade accessory to celebrate the arrival of autumn. This easy crochet Pumpkin Beanie is the ultimate cozy project for the fall season, featuring a beautiful textured ribbing and an adorable curled vine and stem topper. It is the perfect statement piece for your family’s pumpkin patch photos or a sweet newborn shoot for an October baby.
Because this pattern includes six sizes ranging from a small 0-3 month baby beanie all the way up to a standard adult size, you can easily whip up matching hats for the whole family. The rhythmic half double crochet stitches make this a relaxing, beginner-friendly project that works up surprisingly fast. Grab your favorite autumn-hued yarn and get ready to create your new favorite fall beanie!
Materials Needed
- Yarn: Medium (4) Weight Yarn (Lion Brand Yarn Basic Stitch in “Pumpkin” and “Pine Heather” recommended)
- Crochet Hook: 5.50mm (I)
- Yarn Needle
- Scissors
Sizing
This Pumpkin Beanie pattern includes 6 sizes: Baby Small (0-3 months), Baby Medium (3-6 months), Baby Large (6-12 months), Toddler (1-3 years), Child (3-10 years), and Adult.
Size Chart:
- Baby Small (0-3 Months): Head 12-14″ x 4.5-6″ | Hat Circumference 12″ | Hat Height 5.5″ | Yardage: Orange 60 yds, Green 15 yds
- Baby Medium (3-6 Months): Head 14-15″ x 6-6.25″ | Hat Circumference 14″ | Hat Height 6″ | Yardage: Orange 72 yds, Green 20 yds
- Baby Large (6-12 Months): Head 16-17″ x 6.25-6.5″ | Hat Circumference 16″ | Hat Height 6.5″ | Yardage: Orange 85 yds, Green 25 yds
- Toddler (1-3 years): Head 17-18″ x 7.25-7.5″ | Hat Circumference 16″ | Hat Height 7.5″ | Yardage: Orange 93 yds, Green 25 yds
- Child (3-10 years): Head 19-20″ x 7.5-8″ | Hat Circumference 18″ | Hat Height 8″ | Yardage: Orange 112 yds, Green 30 yds
- Adult (20-23″): Head 20-23″ x 8-9.5″ | Hat Circumference 18″ | Hat Height 8.5″ | Yardage: Orange 120 yds, Green 30 yds
The hat circumference is made to be smaller than the head circumference since the hat will stretch 1-2” (for the smaller sizes) and 2-4” (for the larger sizes). If between sizes, go up a size.
Gauge & Notes
Gauge: 15 STs x 8 Rows = 4 x 4 in HDC BLO. Adjust hook size up or down to meet gauge.
Important Notes:
- The CH 1 at the beginning of each row/round does NOT count as a stitch.
- The topper is worked in the round. At the end of each round, join with a slip stitch to the first ST of the round and CH 1. Work the 1st ST of the next round into the same stitch you’re joined to.
- Pattern is in order by size, starting with the smallest size first.
- The row/round numbers will be in order of size from smallest to largest. When there is only one number, all sizes are the same.
- The number in parentheses at the end of each row/round represents the total number of stitches to be worked in that row/round. Numbers will be in order of size from smallest to largest.
- Stitches between asterisk are to be repeated until the end of that row/round.
This pattern uses USA crochet terminology
Abbreviations Used
- ST(s) – Stitch(es)
- SL ST – Slip Stitch
- CH – Chain
- SC – Single Crochet
- SC2TOG – Single Crochet 2 Together
- HDC – Half Double Crochet
- HDC BLO – Half Double Crochet in the Back Loop Only
HDC BLO: A finished stitch has two loops when looking at it from above. The loop closest to you is the Front Loop and the one furthest away from you is the Back Loop. To work a HDC BLO, work a HDC as normal but work it in the back loop only.
Changing Colors: On the last stitch of round 1 for the topper, change color from orange to green. Start the last SC as normal, insert your hook into last stitch and pull up a loop, then drop the orange yarn and finish the final pull through with green yarn. Join to the 1st SC of round 1 with a SL ST and continue using the green yarn for the remainder of the pattern.
Pattern Instructions

Main Body
Starting with orange yarn
CH (23, 25, 27, 29, 31, 33)
Row 1: HDC in the 2nd CH from the hook. HDC in each CH across. CH 1 & turn. (22, 24, 26, 28, 30, 32)
Rows 2- (24, 28, 32, 32, 36, 36): HDC BLO in each ST across. CH 1 & turn. (22, 24, 26, 28, 30, 32)
Bring both short sides of the beanie together. SL ST the ends together, working 1 SL ST into the foundation chain from the beginning and the corresponding ST from the last row.
CH 1 and flip beanie inside out so the seam is on the inside. Keep orange yarn attached and move onto the Topper.
Topper
Continuing with orange yarn
(All Sizes) Round 1: SC in each row around the top of the beanie, on the last ST change to green yarn. Join & CH 1. (24, 28, 32, 32, 36, 36)
(Child & Adult Sizes Only) Round (2, 2): SC x7, SC2TOG repeat around. Join & CH 1. (32)
(Baby Large, Toddler, Child, & Adult Sizes Only) Round (2, 2, 3, 3): SC x 6, SC2TOG repeat around. Join & CH 1. (28)
(Baby Medium, Baby Large, Toddler, Child, & Adult Sizes Only) Round (2, 3, 3, 4, 4): SC x 5, SC2TOG repeat around. Join & CH 1. (24)
(All Sizes – Baby Small start here) Round (2, 3, 4, 4, 5, 5): SC x 4, SC2TOG repeat around. Join & CH 1. (20)
Round (3, 4, 5, 5, 6, 6): SC x 3, SC2TOG repeat around Join & CH 1. (16)
Round (4, 5, 6, 6, 7, 7): SC x 2, SC2TOG repeat around. Join & CH 1. (12)
Round (5, 6, 7, 7, 8, 8): SC2TOG around. Join & CH 1. (6)
Rounds (6, 7, 8, 8, 9, 9) – (8, 9, 10, 10, 11, 11): SC in each ST around. Join & CH 1. (6)
Tie off yarn, leaving a 6” long tail. Weave tail end through the last 6 STs, pull tight to close the hole on the top. Secure with a few knots and weave in end on the inside of the hat. Move onto the vines.
Vines
Vines can be made any length by chaining any number. The instructions below make vines that are approximately 2” & 3”.
Attach green yarn to the base of the stem (round 5, 6, 7, 7, 8, 8).
Vine 1: CH 11
2 SC in the 2nd CH from hook. 2 SC in each CH across. (20) Join to the base of the vine. Keep yarn attached and move onto the 2nd vine.
Vine 2: CH 16
2 SC in the 2nd CH from hook. 2 SC in each CH across. (30) Join to the base of the vine.
Tie off yarn, leaving a 6” long tail. Weave tail in on the inside of the beanie.
Tips
- Check Your Gauge: During testing, crocheters needed a range of hooks between 5mm and 6mm to hit the required gauge. Because the beanie relies on negative ease (being smaller than the actual head) to fit properly, skipping your gauge swatch could result in a hat that is far too baggy or uncomfortably tight.
- The Folded Brim: The height measurements provided in the sizing chart include a 1-2 inch folded brim. If you prefer a slouchy look, simply add 2-3 more repeat rows to the Main Body before seaming.
- Yarn Substitutions: If you don’t have Lion Brand Basic Stitch on hand, look for any soft, worsted weight acrylic. Vanna’s Choice in Terracotta or Caron Simply Soft in Pumpkin are excellent alternatives that will give you that perfect, deep autumn orange.
FAQ
Can I make this beanie flat instead of in the round? The main body of this pattern is actually worked completely flat in rows! You only join it into a tube at the end of the main body section. The topper is the only part worked in the round.
How do I know which size to make? It is always best to physically measure the head circumference of the person you are making the hat for. Because the hat stretches to fit, you want the hat circumference (not the head circumference) to be 1-4 inches smaller than the actual head, depending on the size.
Conclusion
Congratulations on finishing your cozy Pumpkin Beanie! This adorable, customizable hat is the perfect accessory to keep your family warm and stylish all season long. Share your finished beanie in the comments below!
