
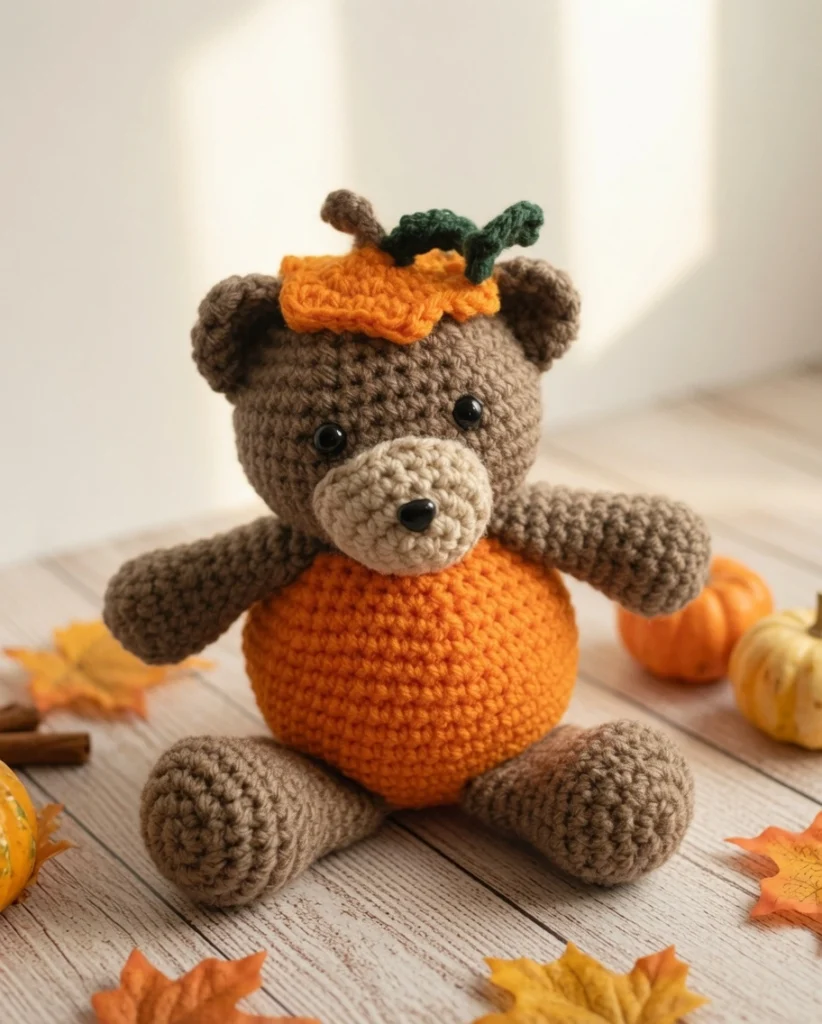
There is nothing quite as charming as combining two beloved autumn motifs into one adorable project. This Crochet Pumpkin Bear takes the classic, snuggly shape of an amigurumi bear and gives it a festive, harvest-season twist by topping it with a cute little pumpkin hat. It is the ultimate transitional decoration, perfect for sitting on a mantel from the first crisp day of September all the way through Thanksgiving.
This pattern is wonderfully satisfying to make and is ideal for intermediate crocheters who have experience with basic amigurumi shaping. The body and head are cleverly worked in one continuous piece, minimizing seaming and creating a sturdy, cuddly finished toy. Whether you are making a gift for a little one who loves fall or adding to your own seasonal decor, this pumpkin bear is guaranteed to bring a smile to anyone’s face. It pairs beautifully with other autumnal projects, like a festive crochet bunting draped across your fireplace.
Materials Needed
- Worsted weight yarn in brown, orange, and a small amount of tan and green
- G crochet hook
- Fiberfill
- 2 – 11mm safety eyes
- 1 – 13 mm safety nose
- Yarn needle
- Scissors
Abbreviations Used
- MR – Magic ring
- SC – Single crochet
- SC2TOG – Single crochet two together (decrease)
- CH – Chain stitch
- HDC – Half double crochet
- DC – Double crochet
- SL ST – Slip stitch
- ST(S) – Stitch(es)
This pattern uses USA crochet terminology
Pattern Instructions
Body and Head
The body and head are made in one piece, from the bottom up, the other pieces are made separately and sewn on at the end. All parts except the vine and stem are made starting with the magic ring.
Begin with magic ring, using orange yarn
Round 1: in mr, ch 1, 6 sc (6 sc)
Round 2: 2 sc in each st (12 sc)
Round 3: [2 sc in first st, 1 sc in next st] repeat around (18 sc)
Round 4: [2 sc in first st, 1 sc in next 2 sts] repeat around (24 sc)
Round 5: [2 sc in first st, 1 sc in next 3 sts] repeat around (30 sc)
Round 6: [2 sc in first st, 1 sc in next 4 sts] repeat around (36 sc)
Round 7: [2 sc in first st, 1 sc in next 5 st] repeat around (42 sc)
Round 8: [2 sc in first st, 1 sc in next 6 st] repeat around (48 sc)
Round 9: 1 sc in each st (48 sc)
Round 10: 1 sc in each st (48 sc)
Round 11: 1 sc in each st (48 sc)
Round 12: 1 sc in each st (48 sc)
Round 13: 1 sc in each st (48 sc)
Round 14: 1 sc in each st (48 sc)
Round 15: 1 sc in each st (48 sc)
Round 16: 1 sc in each st (48 sc)
Round 17: [sc2tog, 1 sc in next 6 sts] repeat around (42 sc)
Round 18: [sc2tog, 1 sc in next 5 sts] repeat around (36 sc)
Round 19: [sc2tog, 1 sc in next 4 sts] repeat around (30 sc)
Round 20: [sc2tog, 1 sc in next 3 sts] repeat around (24 sc)
Round 21: [sc2tog, 1 sc in next 2 sts] repeat around (18 sc)
switch to brown yarn, begin stuffing and continue to stuff as you work
Round 22: 2 sc in each st (36 sc)
Round 23: [2 sc in first st, 1 sc in next 5 st] repeat around (42 sc)
Round 24: 1 sc in each st (42 sc)
Round 25: 1 sc in each st (42 sc)
Round 26: 1 sc in each st (42 sc)
Round 27: 1 sc in each st (42 sc)
Round 28: 1 sc in each st (42 sc)
Round 29: 1 sc in each st (42 sc)
Round 30: 1 sc in each st (42 sc)
Round 31: [sc2tog, 1 sc in next 5 sts] repeat around (36 sc)
Insert Safety Eyes between rows 28 and 29, about 5 or 6 stitches apart
Round 32: [sc2tog, 1 sc in next 4 sts] repeat around (30 sc)
Round 33: [sc2tog, 1 sc in next 3 sts] repeat around (24 sc)
Round 34: [sc2tog, 1 sc in next 2 sts] repeat around (18 sc)
Round 35: [sc2tog, 1 sc in next st] repeat around (12 sc)
Round 36: sc2tog around (6 sc)
Finish off, weave around opening to close, weave in end
Arms (make 2)
Begin with magic ring, using brown yarn
Round 1: in mr, ch 1, 6 sc (6 sc)
Round 2: 2 sc in each st (12 sc)
Round 3: [2 sc in first st, 1 sc in next st] repeat around (18 sc)
Round 4: 1 sc in each st (18 sc)
Round 5: 1 sc in each st (18 sc)
Round 6: [sc2tog, 1 sc in next st] repeat around (12 sc)
Round 7: 1 sc in each st (12 sc)
Round 8: 1 sc in each st (12 sc)
Round 9: 1 sc in each st (12 sc)
Round 10: 1 sc in each st (12 sc)
Round 11: 1 sc in each st (12 sc)
Round 12: 1 sc in each st (12 sc)
Finish off and cut yarn leaving a long tail for sewing
Legs (make 2)
Begin with magic ring, using brown yarn
Round 1: in mr, ch 1, 6 sc (6 sc)
Round 2: 2 sc in each st (12 sc)
Round 3: [2 sc in first st, 1 sc in next st] repeat around (18 sc)
Round 4: [2 sc in first st, 1 sc in next 2 sts] repeat around (24 sc)
Round 5: 1 sc in each st (24 sc)
Round 6: 1 sc in each st (24 sc)
Round 7: [sc2tog, 1 sc in next 2 sts] repeat around (18 sc)
Round 8: 1 sc in each st (18 sc)
Round 9: 1 sc in each st (18 sc)
Round 10: 1 sc in each st (18 sc)
Round 11: 1 sc in each st (18 sc)
Round 12: 1 sc in each st (18 sc)
Round 13: 1 sc in each st (18 sc)
Finish off and cut yarn leaving a long tail for sewing
Ears (make 2)
Begin with magic ring, using brown yarn
Round 1: in mr, ch 1, 6 sc (6 sc)
Round 2: 2 sc in each st (12 sc)
Round 3: [2 sc in first st, 1 sc in next 3] repeat around (15 sc)
Round 4: 1 sc in each st (15 sc)
Finish off and cut yarn leaving long tail for sewing
Muzzle
Begin with magic ring, using tan yarn
Round 1: in mr, ch 1, 6 sc (6 sc)
Round 2: [3 sc in first st, 1 sc in next 2 sts] repeat (10 sc)
Round 3: [2 sc in each of the next 3 sts, 1 sc in next 2 sts] repeat (16 sc)
Round 4: 1 sc in first 2 sts, 2 sc in each of next 2 sts, 1 sc in next 6 sts, 2 sc in each of next 2 sts, 1 sc in next 4 sts (20 sc)
Round 5: 1 sc in each st (20 sc)
Finish off and cut yarn leaving long tail for sewing, add safety nose just above the center of the muzzle
Pumpkin Hat
Begin with magic ring, using orange yarn
Round 1: in mr, ch 1, 6 sc (6 sc)
Round 2: 2 sc in each st (12 sc)
Round 3: [2 sc in first st, 1 sc in next st] repeat around (18 sc)
Round 4: [1 sc in first 2 sts, (hdc, dc, hdc) in next st] repeat around (12 sc, 6 (hdc, dc, hdc ) sections)
Finish off and cut yarn leaving long tail for sewing
Stem
With brown yarn
ch 4
sc in second ch from hook, sl st in next 2 ch
finish off cut yarn leaving ends long enough to tie
Vine
With green yarn
ch 10
work 2 sl st in each ch
finish off and cut yarn leaving ends long enough to tie
Hat Assembly
Pull the yarn ends of the stem through the stitches in the center of the hat, tie securely and trim ends. Repeat the same process with the vine.

Assembly
Sew the muzzle onto the front of the head below the eyes, lightly stuffing it as you sew it on.
Sew the ears to the top side of the head, curving them to fit along the head.
Lightly stuff the ends of the arms and sew to the side of the body as close as possible to the color change between body and head.
Lightly stuff the ends of the legs and stitch them to the bottom of the body. I wanted my bear to be sitting so to determine the proper placement for the legs I just sat the bear body down and put the legs where I wanted them and sewed them in that place.
Sew the little pumpkin top hat to the top of the head in between the ears.
Tips
- Consistent Tension is Key: Because you are transitioning from a wide orange base to a narrower brown head in one continuous piece, keeping your tension even is vital. If your stitches are too loose, the color change area will look stretched out. For more help managing your tension and keeping your work looking professional, review our tips on how to crochet a perfect granny square, as these principles apply to all crochet work.
- Strategic Stuffing: Pay close attention to the instruction to start stuffing at Round 21. You want the orange pumpkin base to be firmly stuffed to give it a nice, plump shape, but be careful not to overstuff the brown head area, or the decreases will gap and look messy.
- Positioning the Legs: The designer’s tip to sit the body down and position the legs before sewing is brilliant. Because the bottom of the bear is rounded, pinning the legs in place while the bear is sitting ensures your finished toy won’t tip over.
FAQ
Can I use a different weight yarn? Yes, you can use a DK or bulky weight yarn, but you will need to adjust your hook size accordingly. Keep in mind that changing the yarn weight will change the overall size of your finished bear, and you may need to adjust safety eye sizes so they don’t look disproportionate.
Can I make this without safety eyes? Absolutely. If you are making this bear for a baby or toddler, embroidered eyes are a much safer alternative. Simply use a length of black yarn and a tapestry needle to stitch satin stitch eyes in the same location specified in Round 31.
Does the pumpkin hat have to be sewn on? While the pattern instructs you to sew it on, you could easily add a small loop of yarn to the top of the hat and a button to the bear’s head to make it a removable accessory! If you love making seasonal amigurumi, you might also enjoy pairing this bear with a stunning star patchwork blanket for a beautiful, cozy autumn display.
Conclusion
Congratulations on creating your adorable Crochet Pumpkin Bear! This charming, festive amigurumi makes a perfect cuddly companion or autumn decoration. Share your finished bear in the comments below!
