
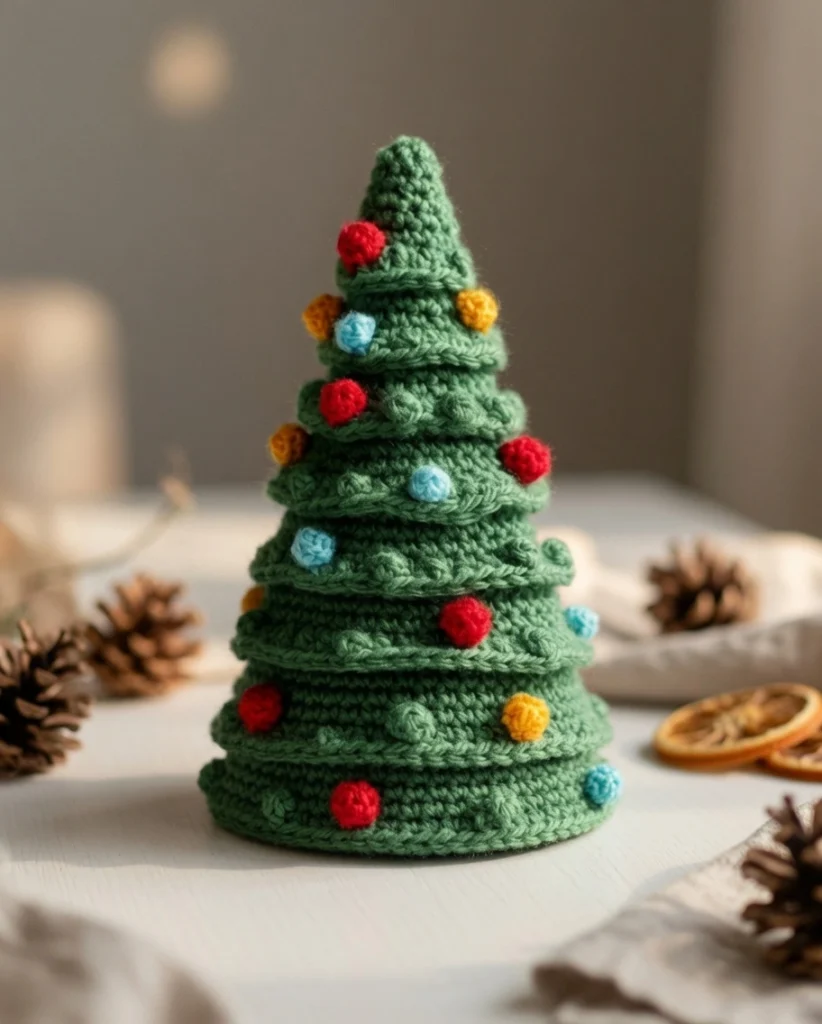
There is nothing quite like filling your home with handmade decorations during the holiday season. If you are looking for a charming, festive project that doesn’t require weeks of work, this small crochet Christmas tree is the perfect choice. It makes a wonderful addition to your mantle, a delightful table centerpiece, or a heartfelt, personalized gift for someone special.
This pattern is incredibly fun because it uses a clever back-loop technique to create textured, layered “branches” that give the tree a beautifully realistic silhouette. The approximate size of the finished crochet tree is 6–8 inches tall (15–20 cm) and about 3–4 inches in diameter (7.5–10 cm) at its base. Because it is worked entirely in the round with basic stitches, it is a fantastic project for advanced beginners looking to practice their shaping and amigurumi skills.
Materials Needed
- Green worsted-weight yarn (for the tree body)
- Multicolored yarn scraps (for the ornaments)
- Beige or brown yarn (for the tree base/trunk)
- Crochet hook (size G/4.0 mm)
- Yarn needle
- Polyfill stuffing
Abbreviations Used
- Ch: Chain
- Sl st: Slip stitch
- Sc: Single crochet
- Inc: Increase (2 sc in the same stitch)
- Dec: Decrease (sc 2 together)
Pattern Instructions
This pattern uses USA crochet terminology
Tree
Using green worsted-weight yarn and a G/4.0 mm hook keeps the stitches tight for a firmer shape.
Rnd 1: Start with a magic ring, 6 sc into the ring. (6 sts)
Rnd 2: Inc in each st around. (12 sts)
Rnd 3: Sc in next st, Inc repeat around. (18 sts)
Rnd 4: Sc in each st around. (18 sts)
Rnd 5: Sc in next 2 sts, Inc repeat around. (24 sts)
Rnd 6: Sc in each st around. (24 sts)
Continue this pattern, increasing every few rounds, until you reach your desired tree width. For the layering effect: After every increase round, crochet 2-3 rounds in back loops only to create the ridges. Gradually taper off the increases as the cone narrows.
Tree Base
Using beige or brown yarn.
Rnd 1: Start with a magic ring, 6 sc into the ring. (6 sts)
Rnd 2: Inc in each st around. (12 sts)
Rnd 3: Sc in next st, Inc repeat around. (18 sts)
Rnd 4-6: Sc in each st around. (18 sts)
Stuff the base lightly and sew it to the bottom of the tree.
Ornaments
Using multicolored yarn.
Rnd 1: Start with a magic ring, 6 sc into the ring. Sl st to join. (6 sts)
Fasten off and leave a tail for sewing. Make multiple ornaments in different colors and sew them onto the tree randomly. You can also choose to use beads for the ornaments on your tree.
Assembly
To bring your little tree to life, you will want to lightly stuff the main tree body as you work to maintain a sturdy, upright cone shape. Be careful not to over-stuff, or your tree will look lumpy and your stitches will stretch out unnaturally. Once the tree cone is complete and closed off at the top, attach the stuffed base securely to the bottom of the tree using your yarn needle and matching brown or green yarn. Finally, sew your multicolored yarn ornaments (or attach your beads) evenly across the tree. You can also choose to wrap a strand of gold yarn around the tree as a garland, or attach a small crocheted or store-bought star at the very top for an extra festive finishing touch!
Tips
The sizing of this tree is highly flexible. If you want the tree larger or smaller, you can easily adjust the yarn weight and hook size accordingly. For a smaller tree, use sport or fine yarn with a smaller hook (like a 3.5mm or 2.75mm). For a larger tree, use bulky yarn with a larger hook (like a 6.0mm or 8.0mm).
When working the back-loop-only rounds for the textured branches, try to keep your tension consistent. If your back-loop stitches are too loose, the tree will look stretched out; if they are too tight, the fabric will pucker. If you love making festive holiday decor, you will absolutely adore the Baby Grinch Crochet Pattern for a pop of mischievous fun, or the Easy Textured Crochet Baby Blanket for a cozy winter gift. For more ways to spruce up your space, check out our Charming Crochet Decor Patterns, or practice your small stuffing and shaping skills with this How to Crochet a Pincushion tutorial!
FAQ
How do I know when to stop increasing and start tapering the tree? Because the pattern leaves the exact final size up to you, a good rule of thumb is to stop increasing when the diameter of your flat circle matches the width you want the bottom of your tree to be. Once you reach that width, stop increasing entirely and just work even rounds (one sc in each stitch) for a few rounds to build the straight lower trunk. Then, begin working a decrease (sc2tog) once every few rounds to slowly narrow the top into a point.
Do I have to use polyfill? While polyfill is the standard for amigurumi, you can get creative with your stuffing! For a heavier, more structured tree that stands perfectly flat on a table without tipping over, you can fill the very bottom inch of the base with dried lentils, rice, or small pebbles before adding the polyfill on top. Just be sure to use a very tight stitch count at the bottom so nothing spills out!
Can I make this tree scent like pine? Yes! A wonderful trick is to place a few drops of essential pine oil or peppermint extract onto a small cotton ball and tuck it deep inside the polyfill stuffing before you sew the base completely closed. Every time you walk by your little tree, it will smell like a fresh winter forest.
Conclusion
Congratulations on creating your small crochet Christmas tree! This beautifully textured, customizable holiday decor piece makes a perfect handmade gift or festive accent. Share your finished tree in the comments below!

1 thought on “Small Crochet Christmas Tree”