
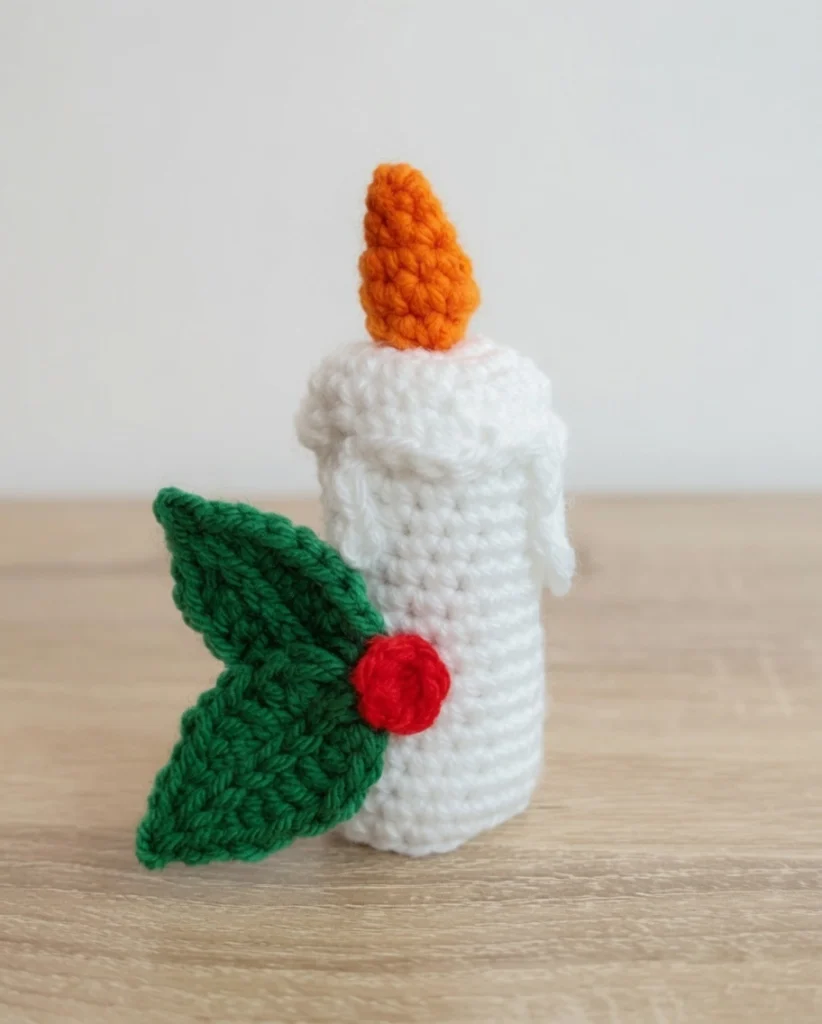
The holiday season is the perfect excuse to fill your home with cozy, handmade decor. While real candles bring a lovely warm glow to a room, a crocheted alternative offers a charming, ever-lasting touch that is completely safe around little ones and pets. This free Christmas candle amigurumi pattern is an incredibly fun and rewarding holiday craft.
This pattern is beautifully designed with a textured wax drip edge and a pointy little flame. Because you’ll be working in a continuous spiral of single crochet stitches, it is a fantastic project for crocheters looking to practice their amigurumi skills on a smaller, highly detailed scale.
Materials Needed
- Yarn: White (or your chosen candle main color) and Orange (or your chosen flame color)
- Hook: Size to match your chosen yarn (the sample uses a hook that results in a 5-inch tall candle)
- Stitch Marker: To help you keep track of your rounds (a bobby pin works great too!)
- Polyfil Stuffing: For shaping the candle body and flame
- Tapestry Needle: For weaving in ends and sewing pieces together
- Scissors
Abbreviations Used
- ML – magic loop
- R – row/round
- st – stitch
- slp st – slip stitch
- ch – chain
- sc – single crochet
- hdc – half double crochet
- dc – double crochet
- tr – treble crochet
- FLOsc – front loop only single crochet
- FLOscdec – front loop only single crochet decrease
- BLOsc – back loop only single crochet
- BLOscdec – back loop only single crochet decrease
- inc – increase
- dec – decrease
- dc – double crochet
- ** – repeat
- () – number of sts in row
This pattern uses USA crochet terminology
Pattern Instructions
Candle Main Body
Use white yarn, or whatever you chose as your candle’s main color here!
R1: ML 6 (6)
R2: inc in each st (12)
R3: sc, inc around (18)
R4: BLOsc around (18)
Note on using BLOsc: I find using BLO stitches helps direction changes. We want the candle to have a sharp transition between the flat top and rounded cylinder side – thus, the BLOsc. Additionally, we’ll be coming back to this loop later on to attach the wax drip details!
R5 – R19: sc around (15 rows total)
R20: sc, BLOscdec around (12)
Stuff the body of the candle here! Be careful not to over-stuff. I roll the candle body gently between my palms to help maintain the correct shape and move the stuffing around inside.
R21: dec in each st around (6)
Fasten off, leaving a long tail. Use the tail to sew through the remaining stitches, and pull tight to close. Weave any remaining tail in.
Wax Drips
For this detail, we’ll be working in the BLO loops left behind from R4 of the candle body.
Attach whatever color you used for the candle’s main body here – be sure the top of the candle is facing you when you attach. You’ll be working counter-clockwise: This is important because we want the right side of the work to be facing out!
Attach to the first BLO loop. You can find this one because there’s a little “gap” between the first and last BLO. The first one is towards the inside of the spiral, and the last is further out. Attach your yarn to this stitch!
Once you’ve attached, chain 2 stitches. This counts as your first single crochet this round! I also highly recommend marking this stitch with your stitch marker.
Work one single crochet in each BLO loop all the way around the candle top – this should be 18 stitches total, including the chain 2 that we made to start the round.
Once you’ve worked your way around once, we’ll add a second round of single crochet. To start this round, place a single crochet in the top of the chain 2 you made when you attached the yarn, then place one single crochet in each of the single crochets you made last round.
Now that we have two rows of single crochet around the top of the candle, it’s time to add the third and final row – the wax drip details. I strongly recommend a stitch marker for this row! Things can get a little fiddly.
R3: sc & hdc in same st, sc, slp st (stitches 1-3 out of 18)
This forms your first “swoop” of wax. To add the first drip:
ch4, slp st down ch (3st total), slp st to next st (stitch 4 out of 18)
After you add the drip, we’ll repeat the “swoop” of wax:
sc & hdc in same st, sc, slp st (stitches 5-7 out of 18)
Your second drip of wax will be a little longer!
ch5, slp st down ch (4st total), slp st to next st (stitch 8 out of 18)
Now we’ll make two more swoops of wax:
sc & hdc in same st, sc, slp st twice (stitches 9-14 out of 18)
And add our last drip of wax:
ch4, slp st down ch (3st total), slp st to next st (stitch 15 out of 18)
We’ll finish off this row with a final swoop of wax!
sc & hdc in same st, sc, slp st in last st of round (stitches 16-18 out of 18)
Cut a long tail – we’ll use this to sew the wax drips down after we attach the flame!
Flame
Use your orange yarn (or whatever color you’ve picked for your candle’s flame) here.
R1: ML 3
Note: Why Magic Loop 3? I find that an ML3 makes a pointier cone shape than an ML6. It can be a little fiddly, so work your single crochets slightly looser than you might normally – not too loose, though!
R2: inc in each st (6)
R3: sc, inc around (9)
R4: sc around (9)
Stuff the flame a little here. Not too much – just a pinch of fluff should do!
R5: sc, dec around (6)
Fasten off, then cut a long tail. Sew through the remaining 6 stitches and pull tight to cinch closed. We’ll use this tail to attach the flame to the top of the candle, so don’t weave it in!
Assembly
Sew through the ML on the candle body to somewhere underneath the wax drip layer. You can lift the “skirt” of this layer up a bit – we’ll be using it to hide the knot we’ve created to attach the flame to the top of the candle.
Whip stitch the flame of the candle on, being careful to hide your stitches under the flame itself!
Once you’ve whip stitched the flame on, send the tail back to somewhere underneath the wax drip “skirt.” Tie a knot, then weave in the tail end.
If you’re planning to attach your mistletoe and holly berry applique, hide all of the knots you use to sew the item on under the wax “skirt” too! If not, we’re ready to sew the wax layer down.
Use the tail yarn left over from the wax drip to tack the row down. Be extra sure to tack the wax drips down themselves, as they tend to curl a little.
Continue all the way around your candle, then tie a knot and weave in any remaining tail.
Last, we’ll help shape the flame by giving it a tiny pinch!
Tips
Working in a continuous spiral can sometimes cause your stitches to drift or “lean” to one side, which is completely normal for amigurumi. Using a stitch marker and moving it up at the start of every single round is the best way to prevent losing your place. Additionally, when making your wax drips, try to keep your chain stitches relatively tight. If your chains are too loose, the drips will look floppy rather than holding that satisfying melted wax shape.
FAQ
Can I make this candle larger? Absolutely! To make a taller or wider candle, simply continue repeating Round 5 (sc around) until you reach your desired height before beginning your decreases in Round 20. Just keep in mind that if you make the candle significantly wider, you will need to adjust the math for the wax drip round to ensure it fits smoothly around the top.
Why does my flame look rounded instead of pointy? The pointiness of the flame comes from starting with a Magic Loop of only 3 stitches. If your flame looks too round at the top, it usually means your stitches in that first magic loop were worked too tightly. Try working those initial 3 single crochets just a tiny bit looser so the base of the flame can naturally taper into a point.
More Holiday Crochet Ideas
- Baby Grinch Crochet Pattern
- Cutie Ghost Crochet Patterns
- Charming Crochet Decor Patterns to Brighten Your Space
- Cozy Up Your Space: Crochet Home Decor Patterns
Conclusion
Congratulations on creating your Christmas crochet candle! This charming, faux-flame decor piece makes a perfect addition to your holiday mantel or a thoughtful handmade gift. Share your finished candle in the comments below!
