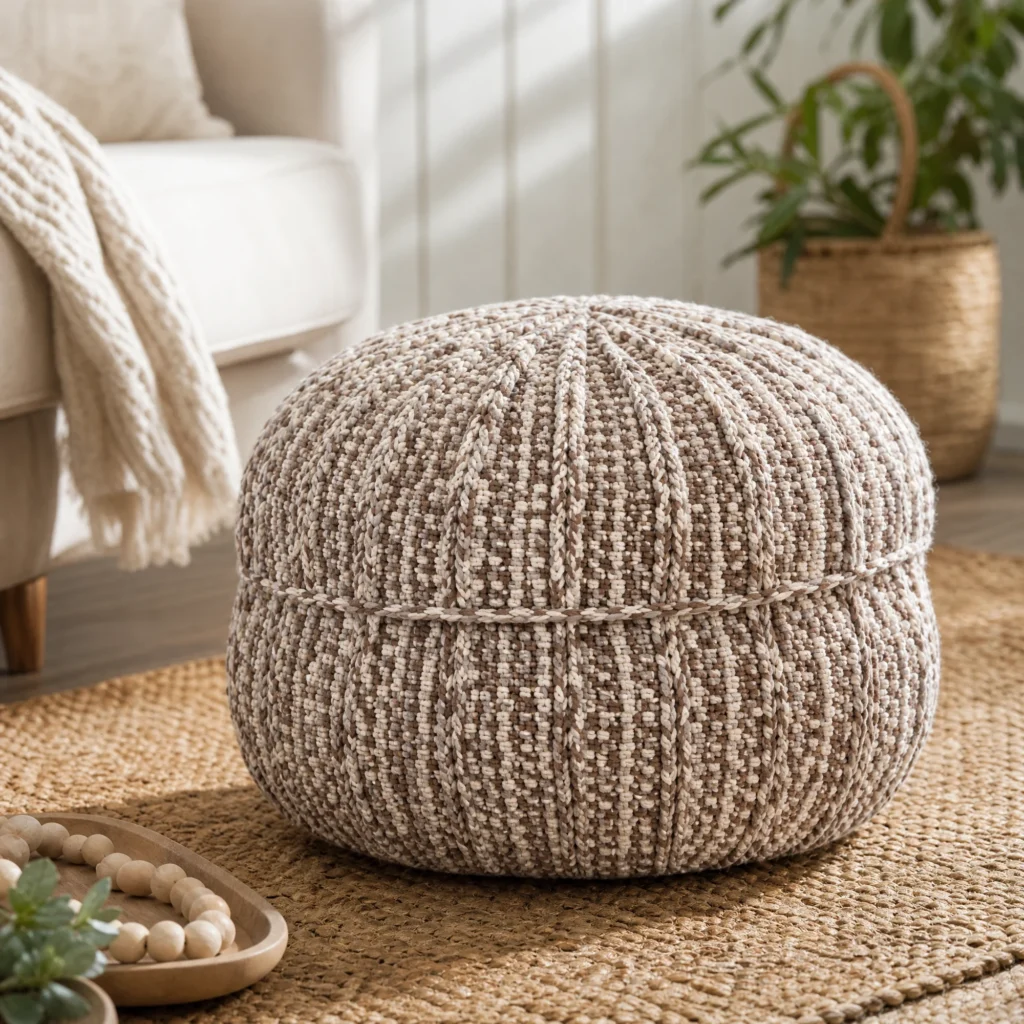
Wheel Spokes Crochet Pouf Pattern
Creating your own crochet pouf can transform the aesthetics of your living space while adding a functional element. The Wheel Spokes Crochet Pouf not only serves as stylish seating but can also double as a footrest or decorative item. Follow this comprehensive crochet pattern using the supplied materials for a fun and satisfying project!

About the Crochet Project
This pouf features a wheel spoke stitch design that embodies both texture and charm. Crochet enthusiasts of all levels can enjoy the rich texture and versatility of this pouf, which can be customized in various colors. The use of Bernat® Maker Home Dec™ yarn makes it suitable for a home environment as it’s durable and easy to clean.
Materials
For this project, you will need the following supplies to ensure a beautiful and sturdy full crocheted pouf:
-
Yarn
- Bernat® Maker Home Dec™ (8.8 oz/250 g; 317 yds/290 m) — quantity: 1 (pattern shows skein details; no explicit number of balls listed)
- Pebble Beach Varg (11019) — 5 balls or 1330 yds/1210 m
-
Crochet Hook
- Size U.S. I/9 (5.5 mm) crochet hook or size needed to obtain gauge
Crochet Abbreviations
The following abbreviations are used within the pattern:
- Ch – Chain
- sc – Single crochet
- dc – Double crochet
- dcfp – Double crochet front post
- sl st – Slip stitch
Pattern Notes
Before you begin, consider these notes to make your crocheting experience smoother:
- Always check your gauge before starting. Adjustments in hook size may be necessary depending on your tension.
- The pouf is constructed in two main pieces that are joined together. This construction method allows for easy assembly and stuffing.
- Throughout the pattern, pay careful attention to stitch counts at the end of each round to ensure your design remains balanced and symmetrical.
Instructions
Top and Bottom: Make 2 pieces alike
-
Ch 2.
-
1st round: 8 sc in 2nd ch from hook. Join with sl st to first sc.
Stitch count: 8 sts (implicit) -
2nd round: Ch 2. 2 dc in each sc around. Join with sl st to first dc.
Stitch count: 16 dc -
3rd round: Ch 2. 2 dcfp around each dc around. Join with sl st to first dcfp.
Stitch count: 32 sts. -
4th round: Ch 2. *(Dcfp around post of next dcfp) twice. 1 dc in space between 2 groups of 2 dcfp. Repeat from * around. Join with sl st to first dcfp.
Stitch count: 48 sts. -
5th round: Ch 2. *(Dcfp around post of next dcfp) twice. 1 dc in next dc. Repeat from * around. Join with sl st to first dcfp.
Stitch count (as printed): not shown on this line; proceed to next round as written. -
6th round: Ch 2. *(Dcfp around post of next dcfp) twice. 2 dc in next dc. Repeat from * around. Join with sl st to first dcfp.
Stitch count: 64 sts. -
7th round: Ch 2. *Dcfp around post of next dcfp. Ch 4. Dcfp around post of next dc. 1 dc in each of next 2 dc. Repeat from * around. Join with sl st to first dcfp.
Stitch count (as printed): not explicitly given on this line. -
8th round: Ch 2. *Dcfp around post of next dcfp. Ch 6. Dcfp around post of next dc. 2 dc in next dc. 1 dc in next dc. Repeat from * around. Join with sl st to first dcfp.
Stitch count: 80 sts. -
9th round: Ch 2. *Dcfp around post of next dcfp. Ch 6. Dcfp around post of next dc. 1 dc in each of the next 3 dc. Repeat from * around. Join with sl st to first dcfp.
Stitch count (as printed): not explicitly shown on this line. -
10th round: Ch 2. *Dcfp around post of next dcfp. Ch 6. Dcfp around post of next dc. 1 dc in next dc. 2 dc in next dc. 1 dc in next dc. Repeat from * around. Join with sl st to first dcfp.
Stitch count: 96 sts. -
11th round: Ch 2. *Dcfp around post of next dcfp. Ch 6. Dcfp around post of next dc. 1 dc in each of the next 4 dc. Repeat from * around. Join with sl st to first dcfp.
Stitch count (as printed): not explicitly shown on this line. -
12th round: Ch 2. *Dcfp around post of next dcfp. Ch 6. Dcfp around post of next dc. 1 dc in each of next 2 dc. 2 dc in next dc. 1 dc in next dc. Repeat from * around. Join with sl st to first dcfp.
Stitch count: 112 sts. -
13th round: Ch 2. *Dcfp around post of next dcfp. Ch 6. Dcfp around post of next dc. 1 dc in each of next 5 dc. Repeat from * around. Join with sl st to first dcfp.
Stitch count (as printed): not explicitly shown on this line. -
14th round: Ch 2. *Dcfp around post of next dcfp. Ch 6. Dcfp around post of next dc. 1 dc in each of next 2 dc. 2 dc in next dc. 1 dc in each of next 2 dc. Repeat from * around. Join with sl st to first dcfp.
Stitch count: 128 sts. -
15th round: Ch 2. *Dcfp around post of next dcfp. Ch 6. Dcfp around post of next dc. 1 dc in each of next 6 dc. Repeat from * around. Join with sl st to first dcfp.
Stitch count: not explicitly shown on this line. -
16th round: Ch 2. *Dcfp around post of next dcfp. Ch 6. Dcfp around post of next dc. 1 dc in each of the next 2 dc. 2 dc in next dc. 1 dc in each of next 3 dc. Repeat from * around. Join with sl st to first dcfp.
Stitch count: 144 sts. -
17th round: Ch 2. *Dcfp around post of next dcfp. Ch 6. Dcfp around post of next dc. 1 dc in each of the next 7 dc. Repeat from * around. Join with sl st to first dcfp.
Stitch count: not explicitly shown on this line. -
Repeat the last round (with no further increases) until work from center (radius) measures approximately 15″ [38 cm] or 30″ [76 cm] total width.
Make Chain Links (worked when RS facing)
- With right side facing, twist the first horizontal ch-4 bar of the 7th round to form a loop.
- Draw the 2nd horizontal ch-6 bar of the 8th round through the first loop without twisting.
- Repeat, drawing the next horizontal ch-6 bar through the previous loop without twisting until all loops have been worked.
Note: Twisting only the first horizontal ch-4 bar will prevent gaps in work.
Next Round (after chain links)
- Ch 2. *Dcfp around post of next dcfp. Sl st in remaining loop of chain link to secure. Dcfp around post of next dc. 1 dc in each of next 7 dc. Repeat from * around. Join with sl st to first dcfp.
Fasten off.
Join Pieces / Assembly
- With the wrong sides of the top and bottom facing each other and final rounds aligned (taking care to match the pattern), join yarn with sl st through both thicknesses to any dc.
- Ch 1.
- Working through both thicknesses, join the top and bottom edges together with sl st in each st around, inserting pillow forms as you work.
- Join with sl st to first sl st.
- Fasten off.
Finishing
- Fasten off after the final top/bottom round (after “Next round”).
- Fasten off after joining top and bottom edges (assembly step).
Frequently Asked Questions
What crochet hook is used for this pattern?
You will need a Size U.S. I/9 (5.5 mm) crochet hook or the size needed to obtain gauge.
How much yarn will I need?
The pattern specifies that you will need 1 skein of Bernat® Maker Home Dec™ and 5 balls of Pebble Beach Varg (11019), totaling approximately 1330 yards.
Is this project worked in rows or rounds?
This crochet pouf is constructed entirely in rounds.
Does this crochet project require assembly?
Yes, the pouf is made of two separate pieces that are joined together during assembly.
What are the finished dimensions of the pouf?
The finished pouf will measure approximately 30″ [76 cm] in total width when complete.
Conclusion
The Wheel Spokes Crochet Pouf Pattern is a delightful way to beautify your home while also providing a comfy seating solution. With its unique design and customizability, it’s perfect for any crochet enthusiast. Gather your materials, follow the instructions step by step, and enjoy creating a piece that will surely become a cherished addition to your living space!