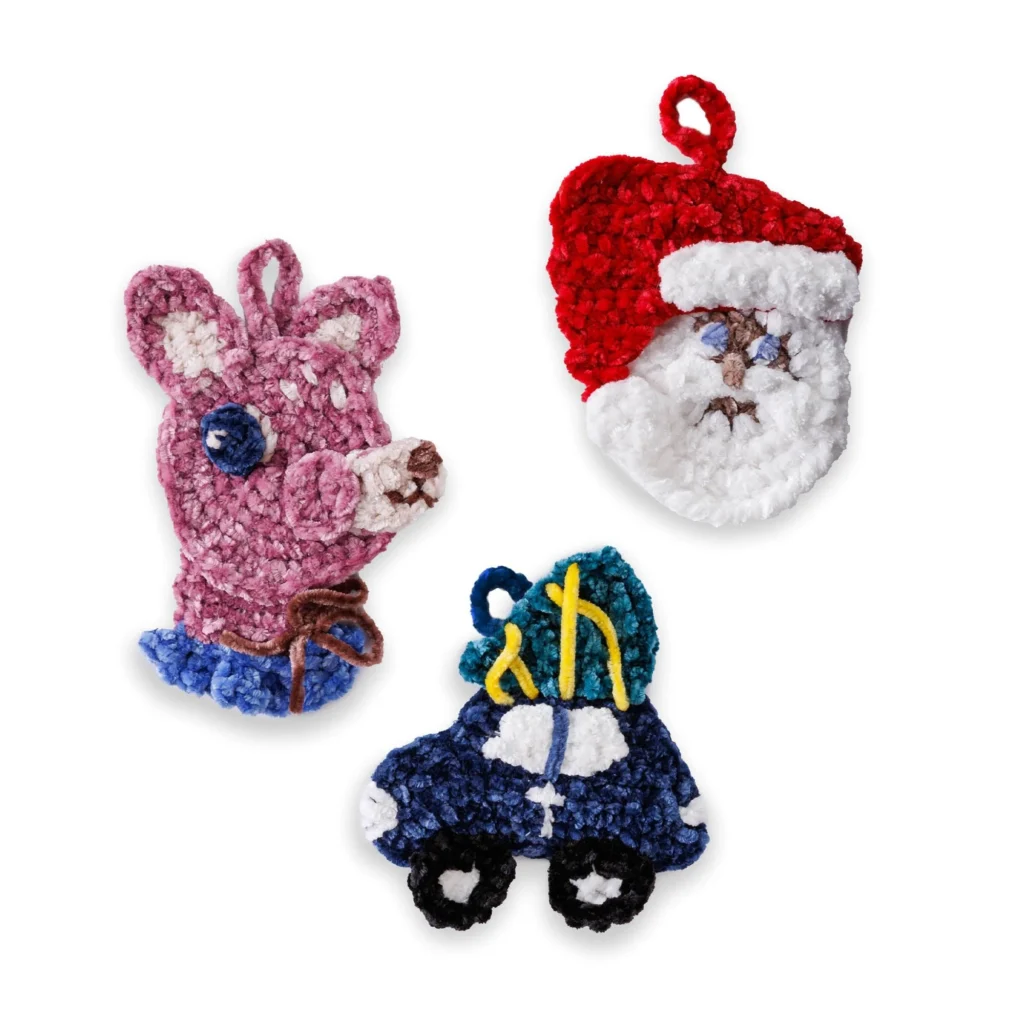
Vintage Whimsy Crochet Christmas Ornaments Pattern
Crochet holiday ornaments lend a cozy charm to your seasonal decorations, and what better way to create unique treasures than with the Vintage Whimsy Crochet Christmas Ornaments Pattern? This lovely project features three delightful ornaments: Santa, a Deer, and a Car, all crafted from soft and luxurious Bernat® Velvet Minis™ yarn. Not only will these ornaments enhance your holiday decor, but they also make heartfelt gifts for friends and family.
In this article, you’ll find detailed instructions alongside tips and tricks to guide you in creating these whimsical Christmas ornaments. Plus, if you’re looking for more festive crochet patterns, be sure to check out these additional crochet designs that are perfect for the holidays!
About the Crochet Project
The Vintage Whimsy Crochet Christmas Ornaments Pattern is an enchanting collection that allows crocheters to craft beautiful decorations for the festive season. The project is divided into three main sections: the Santa, the Deer, and the Car. Each ornament is distinct in design while sharing a cohesive vintage style that adds charm to any Christmas tree or home decor.
Yarn
This project utilizes Bernat® Velvet Minis™ kit featuring 20 balls of yarn. The texture is perfect for creating soft and inviting ornaments. The specific color requirements for each ornament are outlined below:
-
Santa
- Contrast A: Mushroom – 1 ball or 4 yds
- Contrast B: Snowy White – 1 ball or 10 yds
- Contrast C: Red – 1 ball or 8 yds
- Contrast D: Smokey Blue – 1 ball or 1 yd
-
Deer
- Contrast A: Orchid Hush – 1 ball or 15 yds
- Contrast B: Sandy Cream – 1 ball or 4 yds
- Contrast C: Rich Blue – 1 ball or 2 yds
- Contrast D: Chocolate – 1 ball or 1 yd
- Contrast E: Twilight – 1 ball or 2 yds
-
Car
- Contrast A: Twilight – 1 ball or 10 yds
- Contrast B: Snowy White – 1 ball or 4 yds
- Contrast C: Velveteal – 1 ball or 4 yds
- Contrast D: Blackbird – 1 ball or 3 yds
- Contrast E: Joyful Gold – 1 ball or 1 yd
Crochet Hook
For this project, you will need a size U.S. H/8 (5 mm) crochet hook or a size that will help you obtain the desired gauge.
Finished Measurements
This pattern does not provide specific finished sizes for each ornament, but generally, they will vary, with Santa typically being the largest, followed by the Deer, and then the Car.
Crochet Abbreviations
Here are some common abbreviations used in the pattern:
- ch = chain
- hdc = half double crochet
- sc = single crochet
- dc = double crochet
- sl st = slip stitch
- st(s) = stitch(es)
Pattern Notes
As you get started with the ornaments, keep in mind the following important notes:
- When changing colors, hold the unused color on the wrong side of your work.
- Join all rounds with a slip stitch to the first stitch of each round.
- Pay close attention to the special stitches mentioned, including the reverse single crochet (reverse sc), which you’ll encounter in the Santa’s head.
Santa
Head
The head of Santa is worked in the round, starting with a chain and creating a series of half double crochets.
- With Contrast A (Mushroom), ch 3.
- 1st rnd: 10 hdc in 3rd ch from hook. Join. (10 hdc)
- 2nd rnd: Ch 2. 2 hdc in each of next 4 hdc. Break A. Join B. With B, 2 hdc in each hdc to end of rnd. Join. (20 hdc)
- 3rd rnd: Ch 2. *1 hdc in next hdc. 2 hdc in next hdc. Rep from * around. Join. (30 hdc)
- 4th rnd: Ch 1. (1 sc in each of next 4 hdc. 2 sc in next hdc) 4 times. 1 hdc in each of next 2 hdc. 2 dc in next hdc. 1 dc in each of next 2 hdc. 2 dc in next hdc. 1 hdc in each of next 2 hdc. 1 sc in each of last 2 hdc. Join.
- 5th rnd: Ch 1. Working from left to right, instead of right to left as usual, work 1 reverse sc in each of next 11 sc. Fasten off.
REVERSE SC
The reverse sc is worked as indicated in the 5th round (reverse direction) and referred to as REVERSE SC.
Hat
Next, crochet Santa’s hat using Contrast C (Red):
- With Contrast C, ch 2.
- 1st row: (WS). 1 sc in 2nd ch from hook. Turn. (1 sc)
- 2nd row: Ch 1. 2 sc in first sc. Turn. (2 sc)
- 3rd row: Ch 1. 1 sc in first sc. 2 sc in last sc. Turn. (3 sc)
- 4th row: Ch 1. 2 sc in first sc. 1 sc in each of next 2 sc. Turn. (4 sc)
- 5th row: Ch 1. 1 sc in each of first 3 sc. 2 sc in last sc. Ch 10. Turn. (14 sts: 5 sc and ch-10)
- 6th row: 1 sc in 2nd ch from hook. 1 sc in each of next 8 ch. 1 sc in each sc to end of row. Turn. (14 sc)
- 7th row: Ch 2. 1 hdc in each of first 4 sc. 1 sc in each sc to end of row. Turn.
- 8th row: Ch 1. 1 sc in each of first 7 sc. 1 hdc in each st to end of row. Turn.
- 9th row: Ch 2. 1 hdc in each of next 7 hdc. 1 sc in each of next 4 sc. Sl st in last 3 sc. Turn.
- 10th row: Skip first sl st. Sl st in next 3 sts. 1 sc in next 2 sc. 1 hdc each in next 4 sts. 1 dc each in next 2 hdc. Dc2tog. Fasten off.
Hat Brim
- With Contrast B (Snowy White), ch 12.
- 1st row: (WS). 1 hdc in 3rd ch from hook. 1 hdc in each ch to end of chain. Turn. (10 hdc)
- 2nd row: Ch 1. Sc2tog. 1 sc in each hdc to last 2 hdc. Sc2tog. Fasten off. (8 sts)
Sew Hat Brim to 6th row of Hat.
Pompom
- With Contrast B, ch 3.
- 1st rnd: 10 hdc in 3rd ch from hook. Join. (10 hdc) Fasten off.
Sew Pompom to 1st row of Hat. Sew Hat to Head as shown in photo.
Mustache
Make two:
- With Contrast B, ch 5.
- 1st row: 1 sc in 2nd ch from hook. 1 sc in next ch. 1 sl st in last 2 ch. (4 sts) Fasten off.
Sew Mustache to Head as shown in photo.
Santa Nose / Eyes / Brows / Mustache Assembly & Finishing
- Nose: With A, embroider nose between Mustache pieces using bullion st.
- Eyes and Eyebrows: With B, embroider whites of Eyes and Eyebrows with straight st as shown in photo. Then with D, embroider pupils with satin st.
Hanging Loop
- With Contrast C, ch 12. Fasten off.
- Sew Hanging Loop to top of Hat as shown in photo.
Deer
Head
The deer head follows a similar structure as Santa:
- With Contrast A (Orchid Hush), ch 2.
- 1st rnd: 6 sc in 2nd ch from hook. Join. (6 sts)
- 2nd rnd: Ch 1. 2 sc in each sc around. Join. (12 sts)
- 3rd rnd: Ch 1. *1 sc in next sc. 2 sc in next sc. Rep from * around. Join. (18 sts)
- 4th rnd: Ch 1. *1 sc in each of next 2 sc. 2 sc in next sc. Rep from * around. Join. (24 sts)
- 5th rnd: Ch 1. 1 sc in next sc. 2 sc in next sc. *1 sc in each of next 3 sc. 2 sc in next sc. Rep from * to last 2 sc. 1 sc in each of last 2 sc. Join. (30 sts)
- 6th rnd: Ch 2 (does not count as hdc). (1 hdc in each of next 2 sc. 2 hdc in next sc) 3 times. 1 sc in each of next 2 sc. Sl st in each of next 2 sc. 1 sc in each of next 2 sc. (2 hdc in next sc. 1 hdc in each of next 2 sc) 4 times. Join. (38 sts) Fasten off.
Muzzle
- With Contrast B (Sandy Cream), ch 6.
- 1st row: 1 hdc in 3rd ch from hook. 1 hdc in next 2 ch. 5 hdc in last ch. Working into opposite side of foundation ch, 1 hdc in each of next 3 ch. Fasten off.
- Using straight st, embroider nose and mouth on Muzzle.
Cheek
- With A, ch 3.
- 1st rnd: 10 hdc in 3rd ch from hook. Join. (10 hdc) Fasten off.
- Sew Muzzle to Head as shown in photo. Sew Cheek on top of Muzzle as shown in photo.
Ears (make 2)
- With Contrast B, ch 5.
- 1st row: (WS). 1 sc in 2nd ch from hook. 1 sc in each of next 2 ch. 3 sc in last ch. Working into opposite side of foundation ch, 1 sc in each of next 3 ch. Break B, join A. Turn. (9 sts)
- 2nd row: With A, ch 1. 1 sc in each of next 3 sc. 2 hdc in next sc. (1 dc, 1 tr, 1 dc) all in next sc. 2 hdc in next sc. 1 sc in each of next sc to end of row. (13 sts) Fasten off.
Sew one Ear to front of Head as shown in photo. Sew one Ear to back of Head as shown in photo.
Eye
- With Contrast E (Twilight), ch 2.
- 1st rnd: 6 sc in 2nd ch from hook. Join. (6 sc) Fasten off.
- Sew Eye to Head as shown in photo. Using B, embroider spots on Head and whites of Eye as shown in photo.
Hanging Loop (Deer)
(Hanging loop is stated for Deer near Deer assembly instructions.)
- With Contrast C, ch 12. Fasten off.
- Sew Hanging Loop to top of Head as shown in photo.
Car
The car is a more complex addition to your ornament collection but follows straightforward steps.
Car Body (make 2)
- With Contrast A (Twilight), ch 17.
- 1st row: (RS). 1 sc in 2nd ch from hook. 1 sc in each ch to end of chain. Turn. (16 sts)
- 2nd row: Ch 1. 1 sc in each sc to end of row. Turn.
- 3rd row: Ch 1. Sc2tog. 1 sc in each sc to last 2 sc. Sc2tog. Turn. (14 sts)
- 4th row: As 3rd row. (12 sts)
- 5th row: Ch 1. Sc2tog. 1 sc in each of next 7 sc. Turn. Leave remaining sts unworked. (8 sts)
- 6th row: Ch 1. 1 sc in each st to end of row. Turn.
- 7th row: Ch 1. Sc2tog. 1 sc in each sc to last 2 sc. Sc2tog. Fasten off.
Edging (Car Body)
- Holding WS together, join A with sl st at any point around Car Body.
- 1st rnd: Ch 1. Working through both thicknesses, work sc evenly around Car Body. Join. Fasten off.
Window
- With Contrast B (Snowy White), ch 8.
- 1st row: 1 sc in 2nd ch from hook. 1 sc in each ch to end of chain. Turn. (7 sc)
- 2nd row: Ch 1. Sc2tog. 1 sc in each sc to last 2 sc. Sc2tog. Fasten off. (5 sts)
- Sew Window to Car Body as shown in photo. Using A, embroider line in middle of Window.
Wheels (make 2)
- With Contrast B, ch 2.
- 1st rnd: 6 sc in 2nd ch from hook. Break B. Join with D (Blackbird). (6 sc)
- 2nd rnd: With D, ch 1. 2 sc in each sc around. Join. Fasten off.
Sew Wheels to Car Body as shown in photo.
Tree
- With Contrast C (Velveteal), ch 10.
- 1st row: 1 sc in 2nd ch from hook. 1 sc in each ch to end of chain. Turn. (9 sc)
- 2nd row: Ch 1. Working in back loops only, 1 sc in each of next 3 sc. Sc3tog. 1 sc in each sc to end of row. Turn. (7 sts)
- 3rd and alt rows: Ch 1. Working in back loops only, 1 sc in each st to end of row. Turn.
- 4th row: Ch 1. Working in back loops only, 1 sc in each of next 2 sc. Sc3tog. 1 sc in each sc to end of row. Turn. (5 sts)
- 5th row: Ch 1. Working in back loops only, 1 sc in next sc. Sc3tog. 1 sc in last sc. Turn. (3 sts)
- 8th row: Ch 1. Working in back loops only, Sc3tog. Fasten off.
Sew Tree to top of Car Body as shown in photo. Using a length of E, wrap and embroider yarn around Tree as shown in photo.
Car Lights and Door Details (Finishing)
Using Contrast B, embroider Car Lights with satin st as shown in the photo. Using the same length, embroider door details.
Hanging Loop (Car)
- With Contrast A, ch 12. Fasten off.
- Sew Hanging Loop to top of Car Body.
Frequently Asked Questions
What crochet hook is used for this pattern?
You’ll need a size U.S. H/8 (5 mm) crochet hook or the size needed to obtain gauge.
Is this project worked in rows or rounds?
This project incorporates both rows and rounds. Most components, like the Santa’s head and the Deer head, are worked in rounds, while the hat and other parts may use a row format.
Does this crochet project require assembly?
Yes, assembly is required. Each ornament comprises multiple parts that you will need to sew together for a complete look.
Conclusion
The Vintage Whimsy Crochet Christmas Ornaments Pattern offers a delightful way to infuse personality and warmth into your holiday decor. With unique designs for Santa, a Deer, and a Car, these handcrafted ornaments are sure to bring a festive spirit to your home. Enjoy the creative process, and share your finished ornaments with loved ones this season! Embrace the joy of crafting, and if you’re inspired to explore even more crochet projects, check out these additional free crochet ornament patterns.