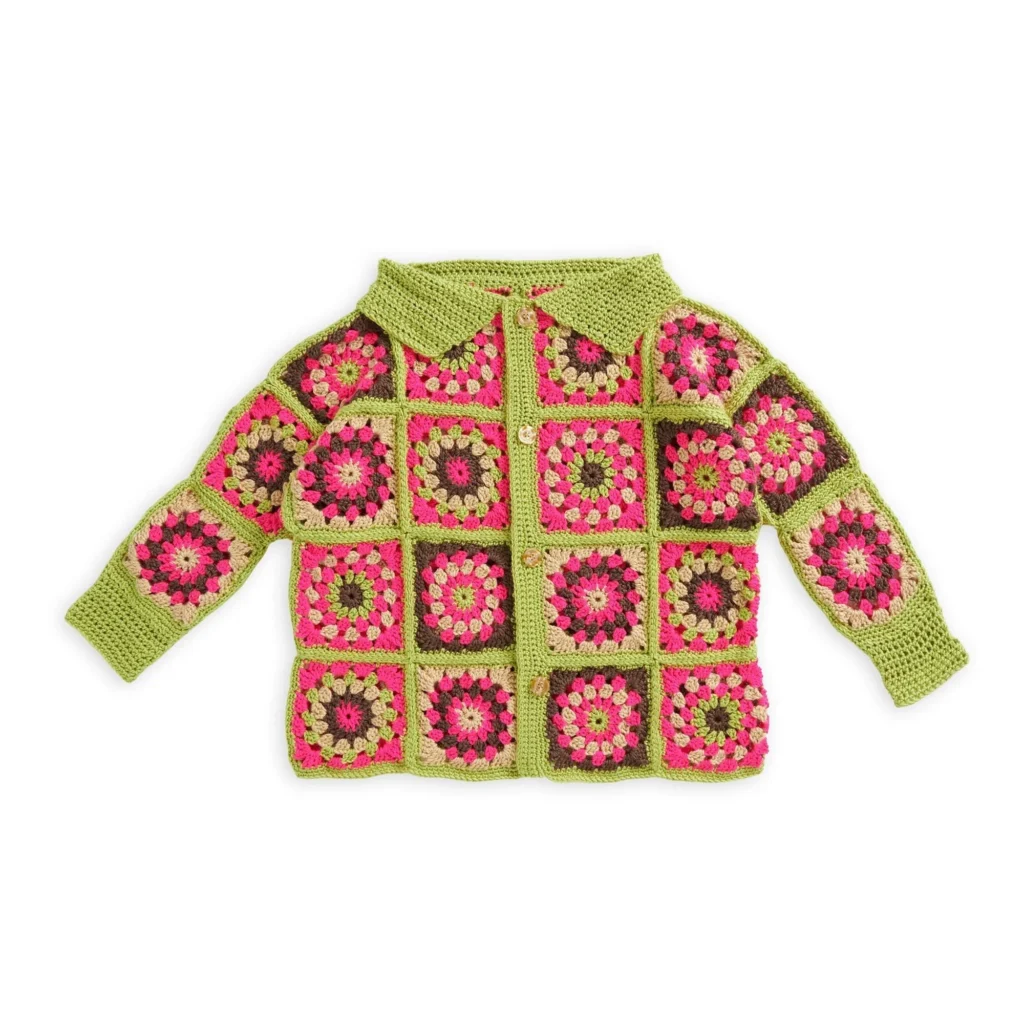
Bright & Bold Crochet Granny Square Cardigan Pattern
Crocheting a cardigan can be a rewarding experience, combining various crochet skills into one stunning garment. The Bright & Bold Crochet Granny Square Cardigan is perfect for showcasing colorful designs while keeping you warm and stylish. In this article, we will explore the project details, provide a materials list, and guide you through the step-by-step instructions to create your own vibrant granny square cardigan.

About This Crochet Project
The Bright & Bold Crochet Granny Square Cardigan is constructed entirely from granny squares. This versatile garment features various colors and is perfect for layering. The use of granny squares not only allows for creativity but also makes the cardigan suitable for those who want to experiment with color combinations. Once completed, this cardigan will be a functional and fashionable addition to any wardrobe.
Finished Measurements
The cardigan is available in three sizes:
- XS/S/M
- L/XL
- 2/3XL
Please ensure to check the pattern for exact measurements to achieve the desired fit.
Materials
To create the Bright & Bold Crochet Granny Square Cardigan, you will need the following materials. All yarn is Caron® Simply Soft™:
Yarn
-
Contrast A (Chartreuse 39771):
- XS/S/M: 4 balls (1009 yds / 922 m)
- L/XL: 4 balls (1187 yds / 1085 m)
- 2/3XL: 5 balls (1484 yds / 1357 m)
-
Contrast B (Bone 39799):
- XS/S/M: 1 ball (252 yds / 230 m)
- L/XL: 1 ball (315 yds / 288 m)
- 2/3XL: 2 balls (393 yds / 360 m)
-
Contrast C (Neon Pink 39775):
- XS/S/M: 1 ball (244 yds / 223 m)
- L/XL: 1 ball (305 yds / 279 m)
- 2/3XL: 2 balls (381 yds / 349 m)
-
Contrast D (Taupe 39783):
- XS/S/M: 2 balls (580 yds / 530 m)
- L/XL: 3 balls (724 yds / 662 m)
- 2/3XL: 2 balls (905 yds / 828 m)
Notions/Tools
- Susan Bates® Silvalume® crochet hook size needed to obtain gauge
- Susan Bates® yarn needle
- Susan Bates® stitch markers
- Four 1¼” [32 mm] buttons
- Sewing needle and Coats and Clark™ Dual Duty matching sewing thread
Gauge
The gauge is essential for ensuring the right fit for your cardigan. Please check the pattern for specific gauge details to make sure your stitches match the required tension.
Crochet Abbreviations
Understanding the following abbreviations will help you follow the crochet instructions effectively:
- ch = chain
- sl st = slip stitch
- sc = single crochet
- dc = double crochet
- tr = treble crochet
Pattern Notes
Before you dive into the pattern, here are a few tips:
- The cardigan is worked from granny squares, so mastering the basic granny square technique is recommended.
- Prepare your yarn in advance to avoid interruptions during your crochet session.
- Keep track of your color changes, as the pattern utilizes multiple contrasting colors.
Instructions
Granny Square (Make 42)
To create the cardigan, you’ll need to make a total of 42 granny squares. Below are the breakdowns for creating different squares using contrasting colors:
- Make 10 Squares using A as Color 1, D as Color 2 and Color 4, B as Color 3, and C as Color 5.
- Make 10 Squares using B as Color 1, D as Color 2 and Color 4, C as Color 3, and B as Color 5.
- Make 12 Squares using C as Color 1, A as Color 2, D as Color 3 and Color 5, and B as Color 4.
- Make 10 Squares using D as Color 1 and Color 5, C as Color 2, B as Color 3, and A as Color 4.
Granny Square Construction (with Color Substitutions)
-
With Color 1, ch 5. Join with sl st to first ch to form a ring.
-
1st rnd: (RS). Ch 3. 11 dc in ring. Join. (Total: 12 dc). Fasten off.
-
2nd rnd: Join Color 2 with sl st in sp between any 2 dc. Ch 3. 1 dc in the same sp as sl st.
*Ch 1. 2 dc in the next sp between the next 2 dc. Repeat from * around. (Total: 24 dc and 12 ch-1 sps). Fasten off. -
3rd rnd: Join Color 3 with sl st in any ch-1 sp. Ch 3. 2 dc in the same sp as sl st.
*Ch 1. 3 dc in the next ch-1 sp. Repeat from * around. Ch 1. Join. (Total: 36 dc and 12 ch-1 sps). Fasten off. -
4th rnd: Join Color 4 with sl st in any ch-1 sp. Ch 2. 2 dc in the same sp as sl st.
*Ch 2. 3 dc in the next ch-1 sp. Repeat from * around. Join. (Total: 36 dc and 12 ch-2 sps). Fasten off. -
5th rnd: Join Color 5 with sl st in any ch-2 sp. Ch 3. 3 dc in the same sp as sl st.
Ch 1. 4 dc in the next ch-2 sp.
*Ch 1. (2 dc. 2 tr. Ch 2. 2 tr. 2 dc) in the next ch-2 sp (corner made). (Ch 1. 4 dc in next ch-2 sp) twice.
Repeat from * two more times. Ch 1. (2 dc. 2 tr. Ch 2. 2 tr. 2 dc) in the next ch-2 sp.
Ch 1. Join. Fasten off. (4 corners with two 4-dc groups along each of the 4 sides between corners). -
6th rnd: Join A with sl st in any corner ch-2 sp.
*(Skip the next st. 1 sc in each of the next 3 sts. 1 sc in the next ch-1 sp) 3 times. 3 sc in the corner ch-2 sp. Repeat from * 3 times more.
Join. (Total: 72 sc). (15 sc along each side and 3 sc in each ch-2 sp).
Assembly / Joining Granny Squares
Arrange the granny squares according to the assembly diagram.
- With A, sew the squares together using a flat seam.
- Make sure to carefully sew the underarm/gusset squares in place.
- One square will be placed under each arm, and two edges of each underarm/gusset square will be sewn to the edges of the two squares in the sleeve and the other two edges of the underarm/gusset square will be sewn to the edges of the two squares in the body of the cardigan.
Buttonhole Band
- Place markers on the Right Front edge for 4 buttonholes:
- Bottom buttonhole ¾” [2 cm] below the joining sp of the 2nd row of granny squares
- 2nd and 3rd buttonholes ¾” [2 cm] below the joining sp of the next row of granny squares
- Top buttonhole ¾” [2 cm] below the top corner
Buttonhole Band Rows
-
1st row: (RS). Join A with sl st at the bottom right front edge. Work in sc in each st to the first marker.
*[Ch 3. Skip the next 3 sc (buttonhole). 1 sc in each st to the next marker] 3 times.
Ch 3. Skip the next 3 sc. 1 sc in each st to the end of the row. Turn. -
2nd row: Ch 1. 1 sc in each sc and ch to the end of the row. Turn.
-
3rd row: Ch 1. 1 sc in each st to the end of the row. Turn.
Continue repeating the last row until the Buttonhole Band measures 1½” [4 cm]. Fasten off.
Button Band
-
1st row: (RS). Join A with sl st at the top left front edge. Ch 1. 1 sc in the same sp as sl st. Work the same number of sc along the front edge as the Buttonhole Band. Turn.
-
2nd row: Ch 1. 1 sc in each sc to the end of the row. Turn.
Continue repeating the 2nd row until the Button Band measures 1½” [4 cm]. Fasten off.
Collar
-
1st row: (RS). Join A with sl st to the top right corner at the neck edge. Ch 1. 1 sc in the same sp as sl st. Work 79 sc evenly along the neck edge. Turn. (Total: 80 sc)
-
2nd row: Ch 2. Hdc2tog. 1 hdc in each st to the end of the row. Turn. (Total: 79 sts)
Continue to repeat the 2nd row, decreasing 1 st at the beginning of each row, until the collar measures approximately 6″ [15 cm]. Fasten off.
Cuffs
-
1st rnd: (RS). Join A with sl st at seam. Ch 1. 1 sc in the same sp as sl st. Work 39 sc evenly around the sleeve edge. Join. (Total: 40 sc)
-
2nd rnd: (WS). Ch 2. 1 hdc in the next sc. Hdc2tog. *1 hdc in each of the next 2 dc. Hdc2tog. Repeat from * around. Join. (Total: 30 hdc)
-
3rd rnd: (RS). Ch 2. 1 hdc in each st around. Join.
Repeat the 3rd rnd until the cuff measures 5″ [12.5 cm]. Fasten off.
Lower Edging
With RS facing, join A with sl st to lower Left Front corner. Work in sc evenly across the lower edge to the opposite corner of the Right Front. Fasten off.
Finally, using a sewing needle and thread, sew the buttons to the Button Band opposite the buttonholes. Weave in all ends for a clean finish.
Frequently Asked Questions
What crochet hook is used for this pattern?
You will need a Susan Bates® Silvalume® crochet hook in the size necessary to obtain the gauge.
Is this project worked in rows or rounds?
This project uses rounds for the granny squares, which are then sewn together.
Does this crochet project require assembly?
Yes, the individual granny squares will need to be sewn together to form the cardigan.
What kind of yarn is recommended for this cardigan?
The recommended yarn for this project is Caron® Simply Soft™.
Are the sizes adjustable for different body types?
Each size listed has specific measurements. You can modify the number of squares or adjust the tension to customize the fit.
Conclusion
The Bright & Bold Crochet Granny Square Cardigan is a colorful and fashionable project that allows you to express your creativity through crochet. With simple granny squares as the foundation, you can customize colors to your liking and create a stylish piece for any occasion. Enjoy the process of making this beautiful cardigan and showcasing your crochet skills!