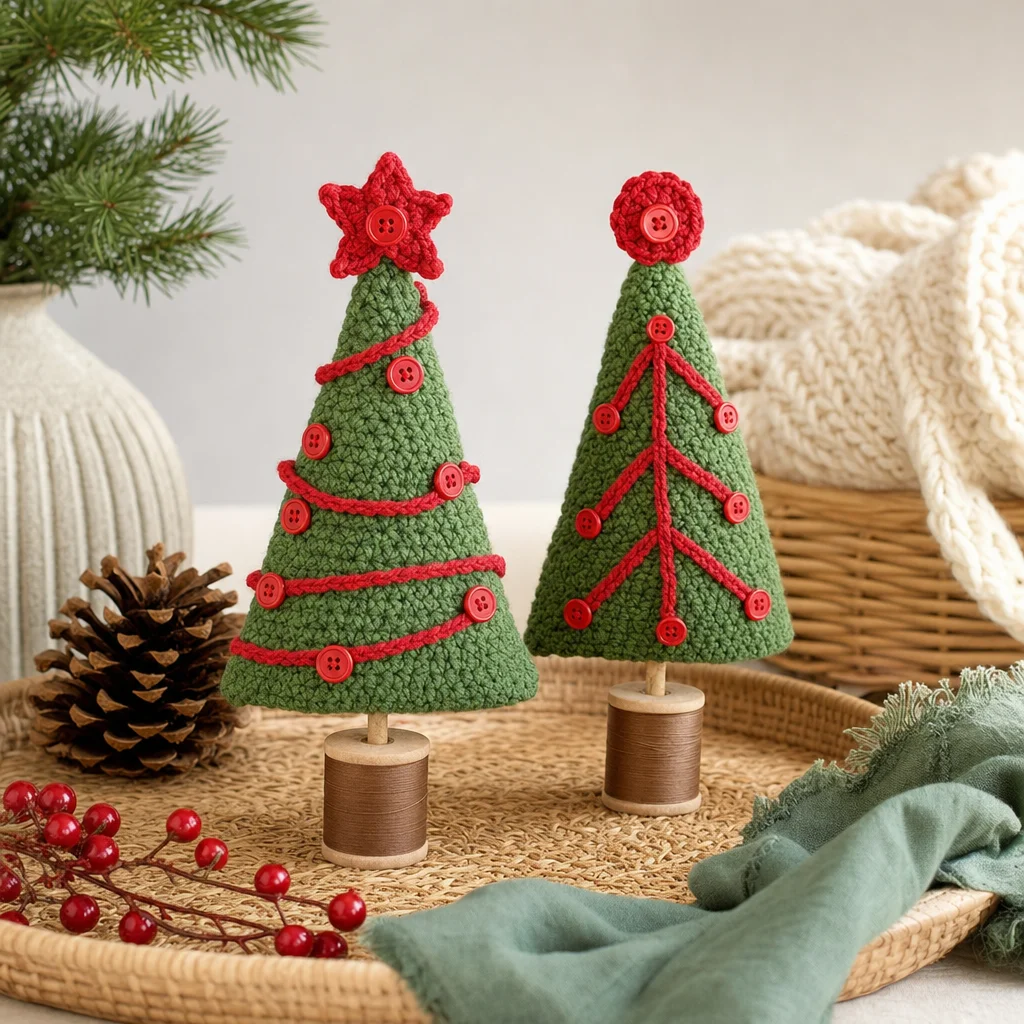
Crochet Christmas Tree Duo Pattern
The holidays are a wonderful time for creativity, and what better way to decorate your home than with handmade ornaments? The Crochet Christmas Tree Duo Pattern features two charming trees that add a delightful touch to your festive decor. Crafted with the classic RED HEART® Super Saver® yarn, this project offers a satisfying mix of crochet skills and embellishments. You may also find 10 Free Crochet Christmas Ornament Patterns To Trim Your Tree This Year useful.
About the Crochet Project
This pattern consists of two crochet Christmas trees, each with unique designs. Tree 1 features star embellishments at the top, while Tree 2 showcases circular decorations. Both trees stand proud with their respective trunks made from wooden dowels, making them perfect for display on shelves, mantels, or as part of your festive centerpiece.
The project is engaging because it not only teaches you basic crochet techniques but also allows for creativity in the color choices and embellishments. If you want to further enhance your holiday decor, consider pairing this pattern with additional crochet items. For examples of other festive projects, check out these 10 festive free Christmas crochet patterns.
Materials

Yarn
For this project, you will need the following yarns from RED HEART® Super Saver®:
- 629 Green Tones A (1 skein)
- 979 Mistletoe B (1 skein)
- 0319 Cherry Red C (1 skein)
Crochet Hook
- 5.0mm [US H-8]
Notions
In addition to yarn and hook, gather these materials:
- Yarn Needle
- Buttons:
- Tree 1: 21 to 24 – 7/16” red buttons and 2 – 3/4” red buttons
- Tree 2: 18 – 9/16” red buttons and 2 – 3/4” red buttons
- Tree Trunk: Two spools of Coats Cotton Machine Quilting Thread (color #8975)
- Dowels or Chopsticks: Two 1/8” X 7 1/2” long wood dowels or one set of wood chopsticks
- Sewing needle and red sewing thread
- Tacky Glue
Crochet Abbreviations
- ch = chain
- sc = single crochet
- st = stitch
- hdc = half double crochet
- dc = double crochet
- sk = skip
- sl st = slip stitch
Pattern Notes
Before you begin, make note of the following assembly directions:
- The finishing step involves sewing the bottom edge of three tree sides to the tree bottom, ensuring the wrong sides are facing each other.
- For Tree 1, you will be making two stars for embellishment; whereas, Tree 2 will have two circles.
- Additionally, Tree 2 needs three center tree stems and three branches of varying lengths.
- As for the tree trunks, glue the wooden dowel into the spool and insert the remaining dowel into the center bottom of each tree, securing it with glue.
Tree Structure
TREE (MAKE 2)
Tree Sides (make 3)
Starting at the bottom, with color A:
- Row 1: ch 2, 3 sc in 2nd ch from hook; turn – 3 sc
- Row 2: ch 1, sc in each st across; turn
- Row 3: ch 1, 2 sc in first st, sc in next st, 2 sc in last st; turn – 5 sc
- Rows 4-6: ch 1, sc in each st across; turn.
- Row 7: ch 1, 2 sc in first st, sc in each st across to last st, 2 sc in last st; turn – 7 sc
- Rows 8–27: Repeat rows 4–7 (5 times).
- Rows 28–32: Repeat Row 4.
- Fasten off.
Tree Bottom
With color A:
- ch 2.
- Row 1: 3 sc in 2nd ch from hook; turn – 3 sc
- Row 2: ch 1, sc in each st across, turn.
- Row 3: ch 1, 2 sc in first st, sc in each st across to last st, 2 sc in last st; turn – 5 sc
- Row 4: ch 1, sc in each st across; turn.
- Rows 5–16: Repeat rows 3 and 4 (6 times) – 17 sc at end of last row.
- Fasten off, leaving a sewing length.
Finishing
- With wrong sides facing, sew the bottom edge of the three tree sides to the edges of the tree bottom.
- With right sides facing, sc 2 tree sides together.
- Add stuffing as desired and sc the last two tree sides together, continuing to add additional stuffing as needed.
- Finally, weave in ends.
Tree 1 Embellishments
Star (make 2)
With color C:
- Ch 4, slip st in first ch to form a ring.
Round 1:
- Ch 1, work 10 sc in ring; join with a slip st in first sc – 10 sc.
Round 2:
- Ch 1, sc in first sc, ch 5, sc in 2nd ch from hook, hdc in next ch, dc in next 2 ch, skip next sc in round 1*, sc in next sc, repeat from * around ending last repeat at **, join with a slip st in first sc – 5 points.
- Fasten off, leaving a sewing length.
Assembly for Tree 1 Star:
With right sides facing, sew two stars together, matching stitches. Sew star to the top of the tree. Using the sewing needle and thread, sew one 3/4” button to the center of each side of the star. Weave in ends.
Garland
With color B:
- Make 4 chains in different lengths for garland to wrap around the tree.
- Fasten off, leaving a sewing length.
- Start at the bottom or top, placing garland chains 1½” apart.
- Sew garlands in place.
- With the sewing needle and thread, sew 7/16” buttons between the garland, on each side of the tree.
Tree 2 Embellishments
Circle (make 2)
With color B:
- ch 2.
Round 1:
- 6 sc in 2nd ch from hook; join with a slip st in first sc – 6 sc.
Round 2:
- Ch 3 (counts as dc), dc in the first sc, 2 dc in each sc around; join with a slip st in the top of the beginning ch-3 – 12 dc.
- Fasten off leaving a sewing length.
Assembly for Tree 2 Circle:
With right sides facing, sew circles together, matching stitches. Sew the assembled circle to the top of the tree and, using the sewing needle and thread, sew one 3/4” button to the center of each side of the circle. Weave in ends.
Center Tree Stem (make 3)
With color C:
- ch 33.
- Fasten off, leaving a sewing length.
Tree Branches (make 3 in each length)
- Branch 1: With color C, ch 15. Fasten off, leaving a sewing length.
- Branch 2: With color C, ch 19. Fasten off, leaving a sewing length.
- Branch 3: With color C, ch 23. Fasten off, leaving a sewing length.
Tree 2 Branch/Stem Placement + Buttons
- Sew one stem to the center of each side of the tree.
- Sew the tree branches to the stem in a triangular shape as depicted.
- Sew one 9/16” button to the ends of each branch.
Tree Trunk (for both trees)
- Insert the wood dowel into the thread spool, add glue to the top of the spool.
- Insert the remaining wood dowel into the center bottom of the tree and glue the spool to the tree.
Frequently Asked Questions
What crochet hook is used for this pattern?
The pattern calls for a 5.0mm [US H-8] crochet hook.
Is this project worked in rows or rounds?
The trees are primarily worked in rows, particularly for the tree sides and bottoms.
Does this crochet project require assembly?
Yes, there is assembly involved in this project, particularly when attaching the tree sides to the bottom and adding tree trunks.
Conclusion
The Crochet Christmas Tree Duo Pattern offers a delightful way to bring handmade charm into your holiday decor. With the detailed instructions provided, you’ll be able to create two unique trees that you can proudly display each winter. These festive crochet decorations make for wonderful gifts and seasonal keepsakes. Happy crocheting!