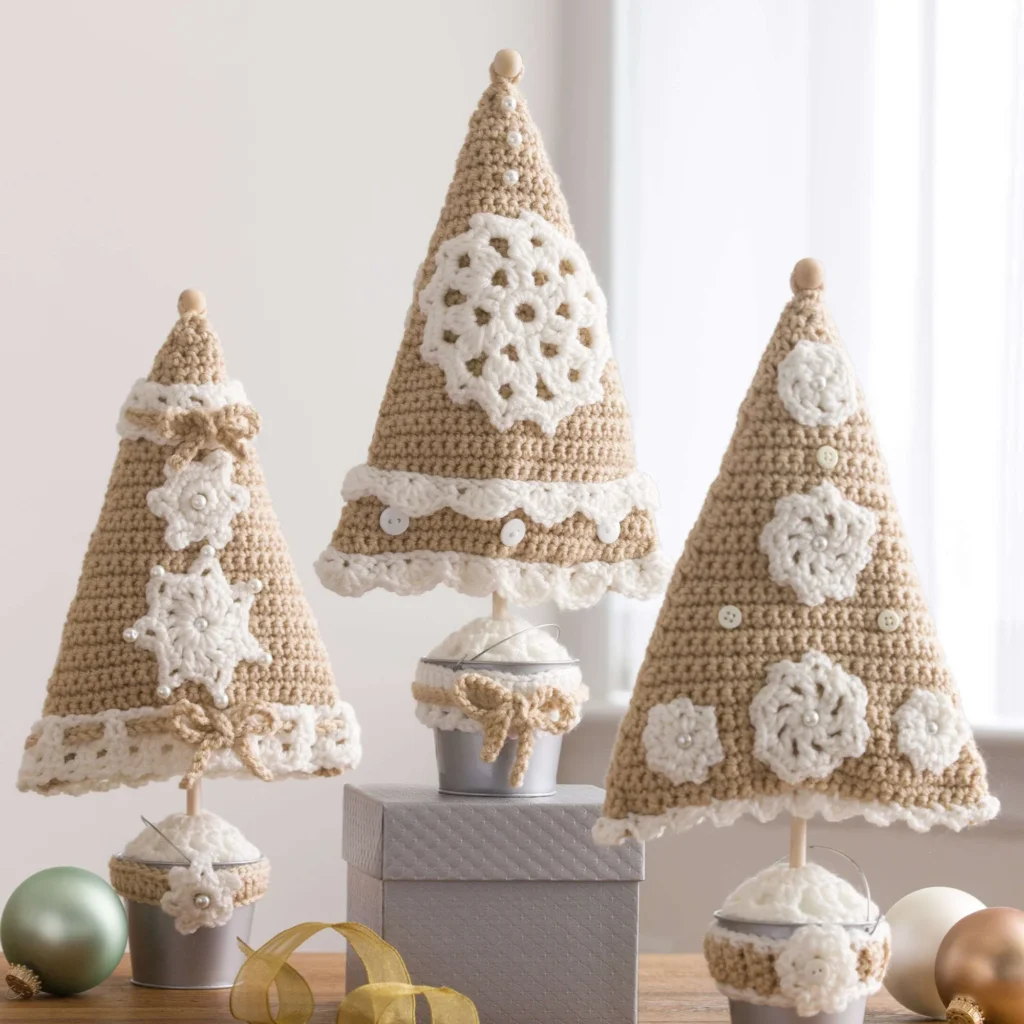
Crochet Triangle Christmas Trees Pattern
As the holiday season approaches, there’s no better way to brighten your home than with handmade decorations! The Crochet Triangle Christmas Trees Pattern offers a charming way to bring the spirit of Christmas into your space. With their delightful colors and festive embellishments, these crochet trees will not only enhance your holiday décor but also provide a satisfying project to engage with during the colder months. Here’s everything you need to create your own set of crochet triangle Christmas trees.
About the Crochet Project
The Crochet Triangle Christmas Trees are not just decorative pieces; they encapsulate the creativity and warmth of handmade crafts. Each tree features two main components: a triangular body and a decorative skirt, along with unique embellishments like snowflakes, and bows. The pattern allows for customization with different colors and decorative elements, making it perfect for personal touches or gifts.
Materials

To create your crochet triangle Christmas trees, you will need the following materials:
Yarn
- RED HEART® Super Saver® yarn (1 skein each color):
- A: 334 Buff (or “Buff A”)
- B: 316 Soft White (or “Soft White B”)
Tools
- Crochet Hook: Susan Bates® Crochet Hook – 4 mm [US G-6]
- Yarn Needle: for weaving in ends
Embellishments
- Pearl beads: 24 (¼” / 6mm, quantity not specified; used for decoration)
- Wood beads: three (⅝” / 15 mm, quantity: 3)
- White buttons: 12¼-½” / 6-12 mm (quantity not specified; used for decoration)
Structural Components
- Dowel rods: three (15/16” diameter x 12” long / 23mm diameter x 30.5 cm long)
- Tin buckets: three (3” / 7.5 cm, samples by Oriental Trading Company)
- Styrofoam balls: three (3” / 7.5 cm)
- Sewing needle and white thread
- Polyester fiberfill: for stuffing the trees
- Craft glue: for assembly
Crochet Abbreviations
Understanding the abbreviations used in this pattern is crucial for successful execution:
- ch: chain
- sc: single crochet
- dc: double crochet
- sc2tog: single crochet two together (decrease)
- sl st: slip stitch
- beg: beginning
- Cl: cluster
Special Techniques
- Join with sc: As defined in the pattern, this technique is used to secure various components together seamlessly.
Tree Assembly
The crochet trees are designed to be made in three parts. Each tree comprises a triangle body, a decorative skirt, and embellishments for a festive look.
Triangle Body (Make 3)
To start, you will make two triangles per tree, as follows:
- Foundation Chain: With A, ch 32.
- Row 1 (Right Side): Sc in 2nd ch from hook and in each ch across, turn—31 sc.
- Row 2: Ch 1, sc in each st, turn.
- Row 3: Ch 1, sc2tog, sc in each st across to last 2 sts, sc2tog, turn—29 sc.
- Rows 4 and 5: Repeat Row 2.
- Row 6: Repeat Row 3—27 sc.
- Rows 7–36: Repeat Rows 4–6 ten times—7 sc.
- Rows 37–40: Repeat Rows 2 and 3 twice—3 sc.
- Row 41: Ch 1, sc2tog, sc in last st, turn—2 sc.
- Row 42: Ch 1, sc2tog—1 sc. Fasten off.
Skirt
To create the decorative skirt of the tree:
- Foundation Chain: With B, ch 7; join with slip stitch in first ch to form a ring.
- Round 1 (Right Side): Ch 3 (counts as first dc), 15 dc in ring; join with slip st in top of beginning ch—16 dc.
- Round 2: Ch 3, dc in next st, *ch 3, dc in next 2 dc; repeat from * around, ch 3; join with sl st in top of beginning ch—16 dc and 8 ch-3 spaces.
- Round 3: Sl st in next st, 4 sc in each ch-3 space; join with slip st in first sc—32 sc. Fasten off.
Tree 1 Decorations
Circle Motif (Make 2)
To add decorative flair, these circle motifs add a lovely touch:
- Foundation Chain: With B, ch 7; join with slip stitch in first ch to form a ring.
- Round 1 (Right Side): Ch 1, 12 sc in ring; join with slip st in first sc—12 sc.
- Round 2: Ch 3, dc in next sc, *ch 3, dc in next 2 sc; repeat from * around, ch 3; join with slip st in top of beginning ch—12 dc and 6 ch-3 spaces.
- Round 3: Slip stitch in next st, (slip stitch, beg 3-dc Cl, ch 4, 3-dc Cl) in first ch-3 space, [ch 4, 3-dc Cl] twice in each ch-3 space, ch 4; join with slip st in top of beginning cluster—12 clusters and 12 ch-4 spaces.
- Round 4: Work [(2 sc, ch 3, 2 sc)] in each ch-4 space; join with slip st in first sc. Fasten off.
Scallop Trim
Scallop Trim #1
With B, ch 72.
- Row 1 (Right Side): Sc in 2nd ch from hook, *skip next 2 ch, 5 dc in next ch; repeat from * across to last ch, sc in last ch. Fasten off.
Scallop Trim #2
With B, ch 63. Work the same as scallop trim #1.
Bucket Trim
With B, work an even number of ch as needed to fit around top edge of bucket.
- Row 1: Dc in 2nd ch from hook and in each ch across, turn—odd number of dc.
- Row 2: Ch 3, skip next dc, sc in next st, *ch 3, skip next dc, sc in next dc; repeat from * across. Fasten off.
Bow
With 2 strands of A held together, work enough ch to wrap around the bucket and tie a bow. Fasten off.
Assembly (Tree 1)
- Weave in ends.
- Sew a circle motif on each triangle.
- At the top of each triangle, sew 3 pearl beads in a vertical row.
- With right sides held together, sew triangle sides together. Turn tree right side out and stuff lightly (do not overstuff).
- With a sewing needle and thread, sew short edges of scallop trim #1 together, then sew trim to the bottom edge of the tree. Sew short edges of scallop trim #2 together, place trim on tree, and sew to the nearest round.
- With a sewing needle and thread, sew bottom edges together, leaving a ½” (1.5 cm) opening in the center for the dowel.
- Apply glue to ⅔ of the dowel and insert it into the tree, leaving the remainder for the bucket. Allow glue to dry thoroughly throughout all assembly and finishing steps before handling.
- Apply glue to the outside of the bucket near the top edge and glue bucket trim in place around. Allow to dry, then tie a bow around the trim. You may want to apply glue to an inconspicuous area of the knot to prevent it from unraveling and securing loops to prevent drooping.
Finishing Tree 1
- Insert a Styrofoam ball in the bucket.
- Apply glue around the ball where it meets the inside of the bucket and allow to dry.
- With a pin, mark the center of the ball.
- Lightly mark 1½” (4 cm) from the bottom edge of the dowel and insert the dowel into the ball up to this mark.
- Carefully remove the dowel and fill the hole with glue.
- With the right side facing the tree, slide the skirt onto the dowel, then reinsert it into the hole.
- Ensure that the tree is standing straight, slide the skirt down to the ball, and allow glue to dry thoroughly.
Tree 2 Decorations
Large Snowflake (Make 2)
With B, ch 6; join with slip st in the first ch to form a ring.
- Round 1 (Right Side): Ch 4 (counts as dc, ch 1), dc in the ring, *ch 1, dc in the ring; repeat from * 11 times, ch 1; join with sl st in 3rd ch of beginning ch-4—14 dc and 14 ch-1 spaces.
- Round 2: Ch 1, sc in first ch-1 space, *ch 5, sc in next 2 ch-1 spaces; repeat from * 5 times, ch 5, sc in the last ch-1 space; join with sl st in first sc—7 ch-5 spaces. Fasten off.
Medium Snowflake (Make 2)
With B, ch 6; join with slip st in the first ch to form a ring.
- Round 1 (Right Side): Ch 1, 12 sc in the ring; join with sl st in first sc—12 sc.
- Round 2: Ch 1, (sc, ch 5, sc) in the same st as join, *sc in next sc, (sc, ch 5, sc) in the next sc; repeat from * 4 times, sc in last sc; join with sl st in first sc—6 ch–5 spaces. Fasten off.
Lower Band Trim
With B, ch 7.
- Row 1 (Right Side): Dc in 3rd ch from hook, *ch 1, skip next ch, dc in next ch; repeat from * once, turn—3 dc and 2 ch-1 spaces.
- Row 2: Ch 1, sc in first dc, *ch 1, skip next dc, sc in next dc; repeat from * once, turn—3 sc and 2 ch-1 spaces.
- Row 3: Ch 3, dc in first sc, *ch 1, skip next sc, dc in next sc; repeat from * once, turn—3 dc and 2 ch-1 spaces.
- Repeat Rows 2 and 3 until trim fits around the lower rounds of the tree. Fasten off.
Upper Band Trim
Work the same as lower band trim, repeating Rows 2 and 3 until the trim fits around the upper section of the tree.
Bow (Make 2)
With 2 strands of A held together, work as many ch as needed to weave in and out of each band and tie a bow. Fasten off.
Bucket Trim (Tree 2)
With A, work as many ch as needed to fit around the outside of the bucket near the top edge plus 2 ch.
- Row 1 (Right Side): Dc in 3rd ch from hook and in each ch across. Fasten off.
Flower
With B, ch 6; join with slip st in the first ch to form a ring.
- Round 1 (Right Side): Ch 1, 12 sc in the ring; join with sl st in the first sc—12 sc.
- Round 2: Ch 1, sc in the same st as join, *ch 5, sc in next 2 sc; repeat from * 4 times, ch 5, sc in the last sc; join with sl st in the first sc—6 ch-5 spaces. Fasten off.
Assembly (Tree 2)
- Weave in ends.
- Sew 1 medium and 1 large snowflake on each triangle; do not sew through outer ch-spaces of the large snowflake.
- Sew a pearl bead in the center of each snowflake, sewing through the triangle, sew a bead on the 3rd ch of each ch-5 of the large snowflake, pulling outward slightly to create a point.
- Repeat the assembly steps from Tree 1.
- Sew short ends of each band together to form a ring.
- Weave the appropriate bow through the upper and lower bands.
- Place the upper band on the…
(Continued… text not required)
Finishing Tree 2
Refer to the finishing steps of Tree 1 for completing your Tree 2.
Tree 3 Decorations
Large Swirl (Make 4)
With B, ch 6; join with slip st in the first ch to form a ring.
- Round 1 (Right Side): Ch 5 (counts as dc, ch 2), dc in the ring, *ch 2, dc in the ring; repeat from * 5 times, join with slip st in the 3rd ch of the beginning ch—8 dc and 8 ch-2 spaces.
- Round 2: Slip st in the next ch, (sc, ch 3, sc) in each ch-2 space around (petal made); join with slip st in the first sc—8 ch-3 spaces. Fasten off.
Medium Swirl (Make 2)
Work the same as Round 1 of the large swirl. Fasten off.
Small Swirl (Make 5)
With B, ch 6; join with slip st in the first ch to form a ring.
- Round 1 (Right Side): *Ch 3, sc in the ring; repeat from * 7 times, join with slip st in the base of the beginning ch—8 ch-3 spaces. Fasten off.
Curved Trim
With B, ch 3.
- Row 1 (Right Side): Work 2 sc in the 2nd ch from the hook, *ch 3, 2 sc in the 2nd ch from the hook; repeat from * as needed to fit around the lower edge of the tree. Fasten off.
Bucket Trim (Tree 3)
With A, ch 4.
- Row 1 (Right Side): Sc in the 2nd ch from the hook, sc in the next 2 ch, turn—3 sc.
- Row 2: Ch 1, working in back loops only, sc in each st, turn. Working an odd number of rows, repeat Row 2 until the trim fits around the top of the bucket. Fasten off. Sew short edges together.
Edging Round
With the right side of either edge facing: join B with sc at the seam, working in ends of rows.
- Working Around: Ch 1, skip the first row, sc in the next row, *ch 1, skip the next row, sc in the next row; repeat from * around to the last row, ch 1, skip the last row; join with slip stitch in the first sc. Fasten off.
- Repeat on the opposite edge.
Assembly (Tree 3)
- Weave in ends.
- Sew 2 large swirls, one medium swirl, and 2 small swirls on each triangle. Sew beads and buttons as shown or where desired.
- Repeat Step 3 of Tree 1 Assembly.
- Sew short ends of the curved band together to form a ring. Position the band at the lower edge of the tree and with a sewing needle and thread, sew in place.
- Steps 4 and 5: Repeat Steps 5 and 6 of Tree 1 Assembly.
- Apply glue around the outside of the bucket near the top edge and glue bucket trim in place. Sew a button to the center of the remaining small swirl. Glue the swirl to the front of the bucket trim.
Finishing Tree 3
Use the finishing instructions from Tree 1 to complete Tree 3.
Frequently Asked Questions
What crochet hook is used for this pattern?
You will need a Susan Bates® Crochet Hook in size 4 mm [US G-6] for this pattern.
Is this project worked in rows or rounds?
The crochet triangle Christmas trees are predominantly worked in rows, with certain sections such as the skirt and some decorations worked in rounds.
Does this crochet project require assembly?
Yes, this project involves assembly as you will sew different components together to create the final trees.
How many components does each tree have?
Each tree consists of a triangular body, a skirt, and several decorative motifs, plus embellishments like beads and buttons.
What is the finished size of the trees?
The finished dimensions are not explicitly stated, but the trees create a charming tabletop display when completed, making them a delightful addition to your holiday décor.
Conclusion
Creating the Crochet Triangle Christmas Trees is not just a fun activity but also a way to add a personal touch to your home for the festive season. With simple shapes, colorful yarn, and decorative elements, these trees encapsulate the joy of crafting while celebrating the spirit of Christmas. Enjoy making them, and let your handmade creations bring warmth and cheer to your holiday festivities!