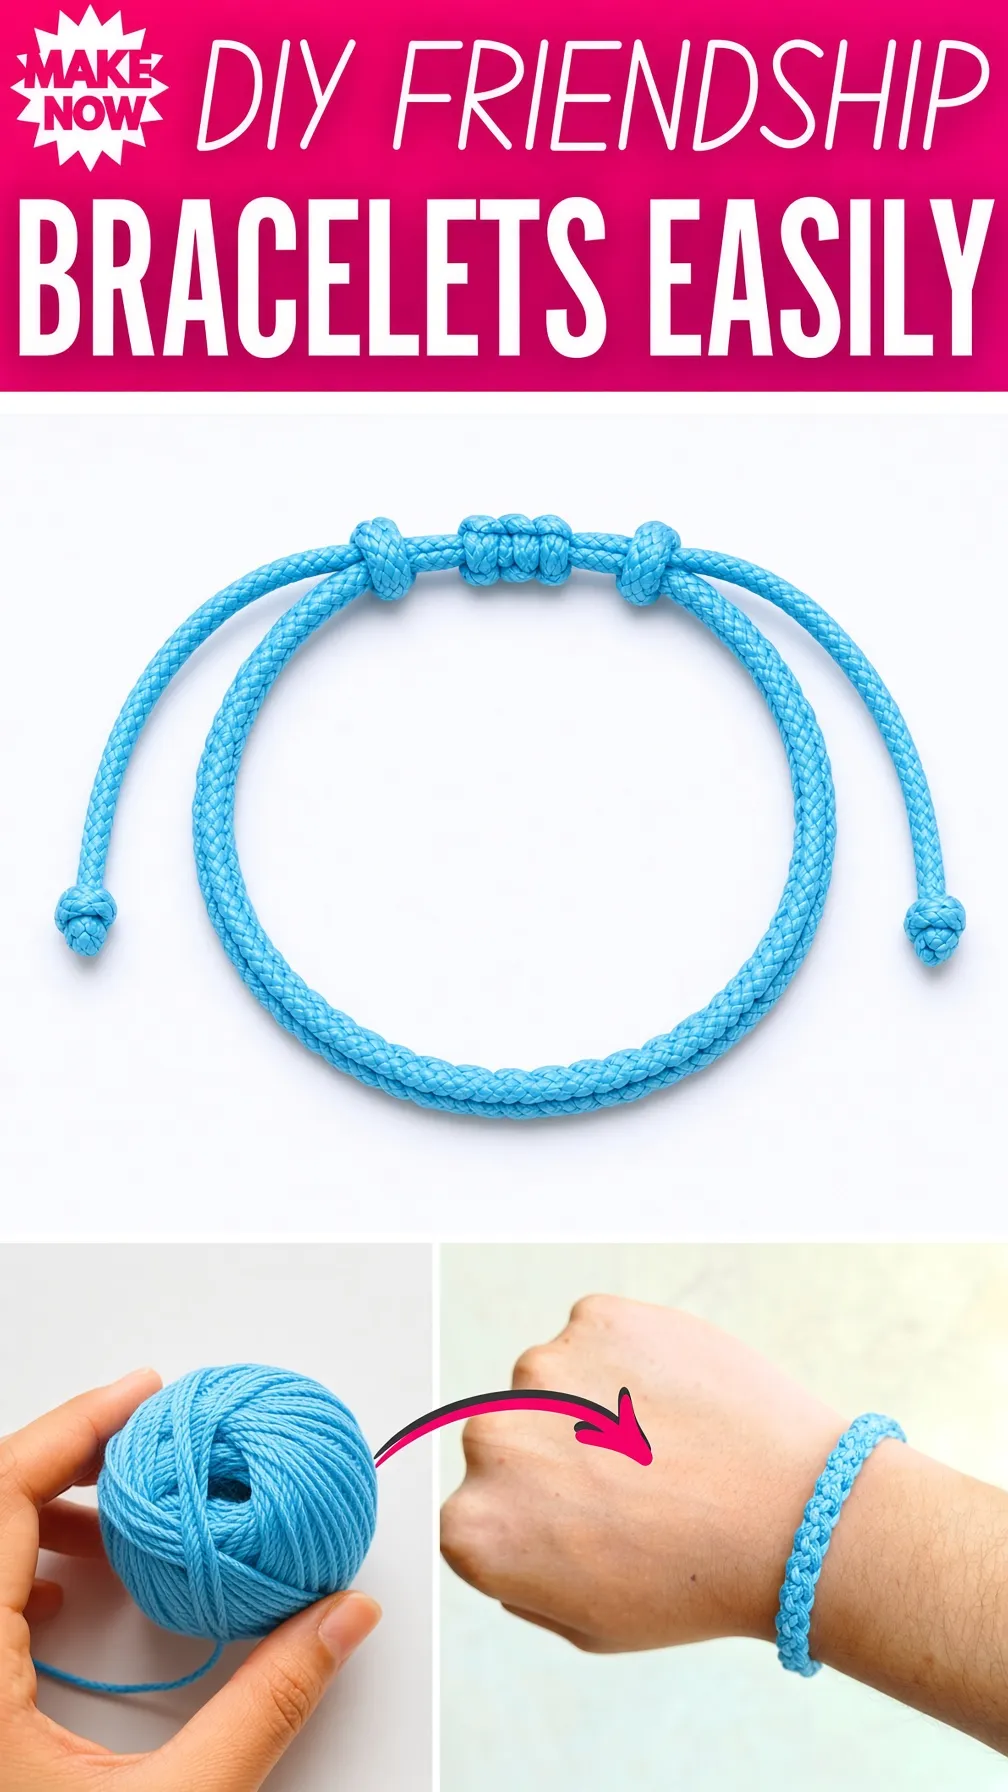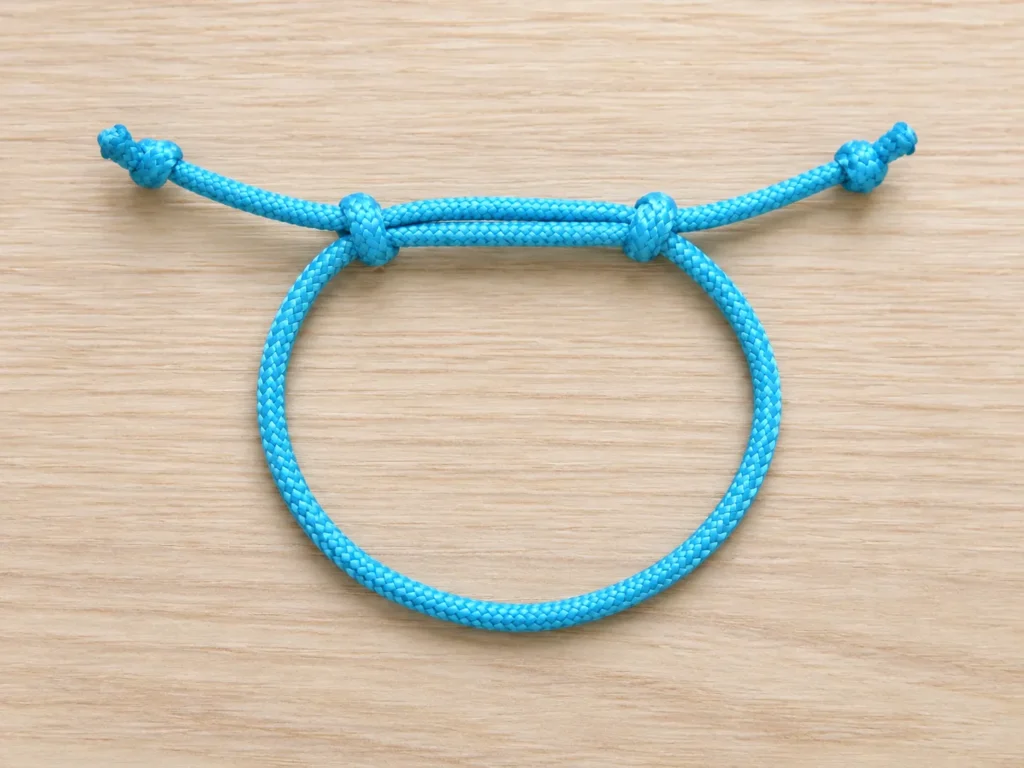
This technique is especially useful for friendship bracelets, cord bracelets, handmade jewelry, and simple necklaces. You only need cord and a few basic knotting steps, making it a practical beginner project.
What Is a Sliding Knot Bracelet?
A sliding knot bracelet uses two adjustable knots instead of a fixed closure.
Each end of the bracelet is tied around the opposite side of the cord. The knots stay secure while still allowing the cord to move through them.
That means you can:
- loosen the bracelet to put it on
- tighten it around your wrist
- adjust the size whenever needed
- avoid using a metal clasp
This simple closure can also work for necklaces as long as the finished opening is large enough to fit over your head.
Why Use a Simple Sliding Knot?
A sliding knot is useful because it creates a clean adjustable finish with very few materials.
It is especially helpful when you want to make:
- adjustable friendship bracelets
- minimalist cord bracelets
- beaded bracelets
- handmade gift bracelets
- simple necklaces
- bracelets in different wrist sizes
You can also decorate the ends with beads after the knots are complete.
Materials You Will Need
You only need one main material:
- Cord
The source tutorial uses paracord in the photos, but it notes that any cord around 1 mm or thicker can work.
Suitable options include:
- waxed cotton cord
- satin cord
- knotting cord
- paracord
It is better to start with more cord than you think you need.
A practical guideline is to use approximately twice the desired finished length.
That gives you enough extra cord to form the knots and adjust the finished bracelet.
Choosing the Right Cord
For beginners, use a cord that is easy to grip and not too slippery.
Very thin cord can be harder to control, while thicker cord makes the knotting steps easier to see.
If you are adding beads, make sure the cord is thin enough to pass through the bead holes.
How to Tie a Simple Sliding Knot Bracelet
Step 1: Cross the Cord Ends

Lay the bracelet cord in a loop.
Cross the two loose ends over each other.
At this point, both ends should point outward in opposite directions.
You can think of the two loose ends as two small loops or “ears” extending from the main bracelet cord.
Do not tighten anything yet.
Step 2: Loop the Right End Around the Main Cord
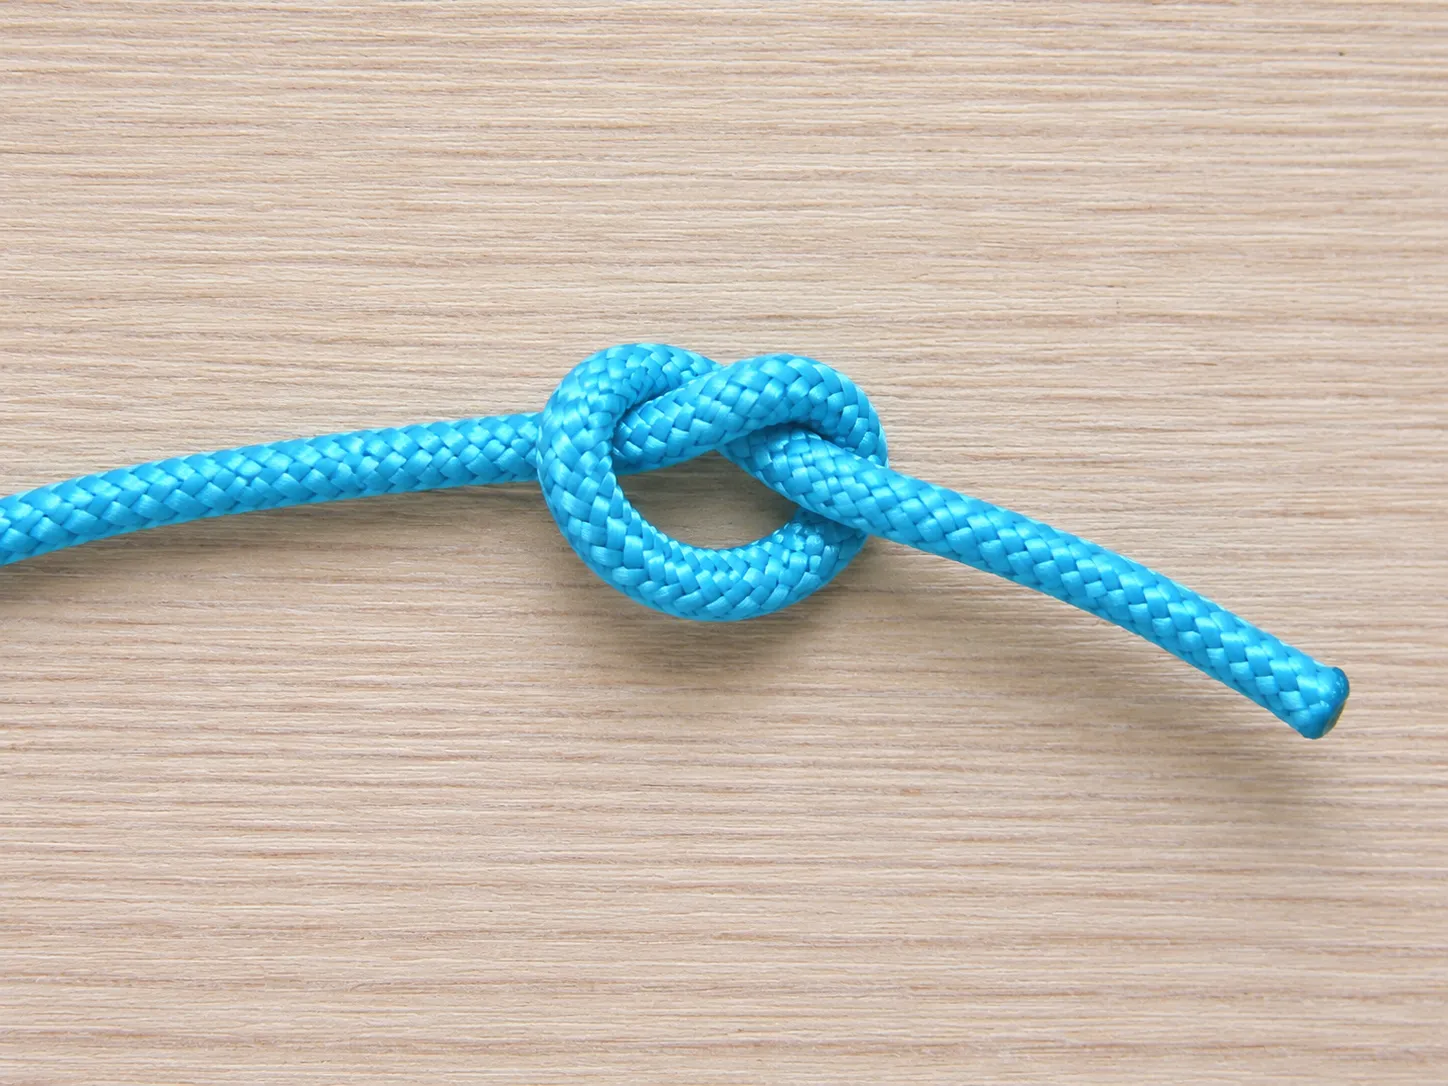
Take the right loose end.
Bring it:
- over the main section of cord
- underneath it
- around the cord again
You are wrapping the right end around the main bracelet cord to prepare the first sliding knot.
Keep the wrap loose enough that you can still move the cord.
Step 3: Feed the End Through the Loop
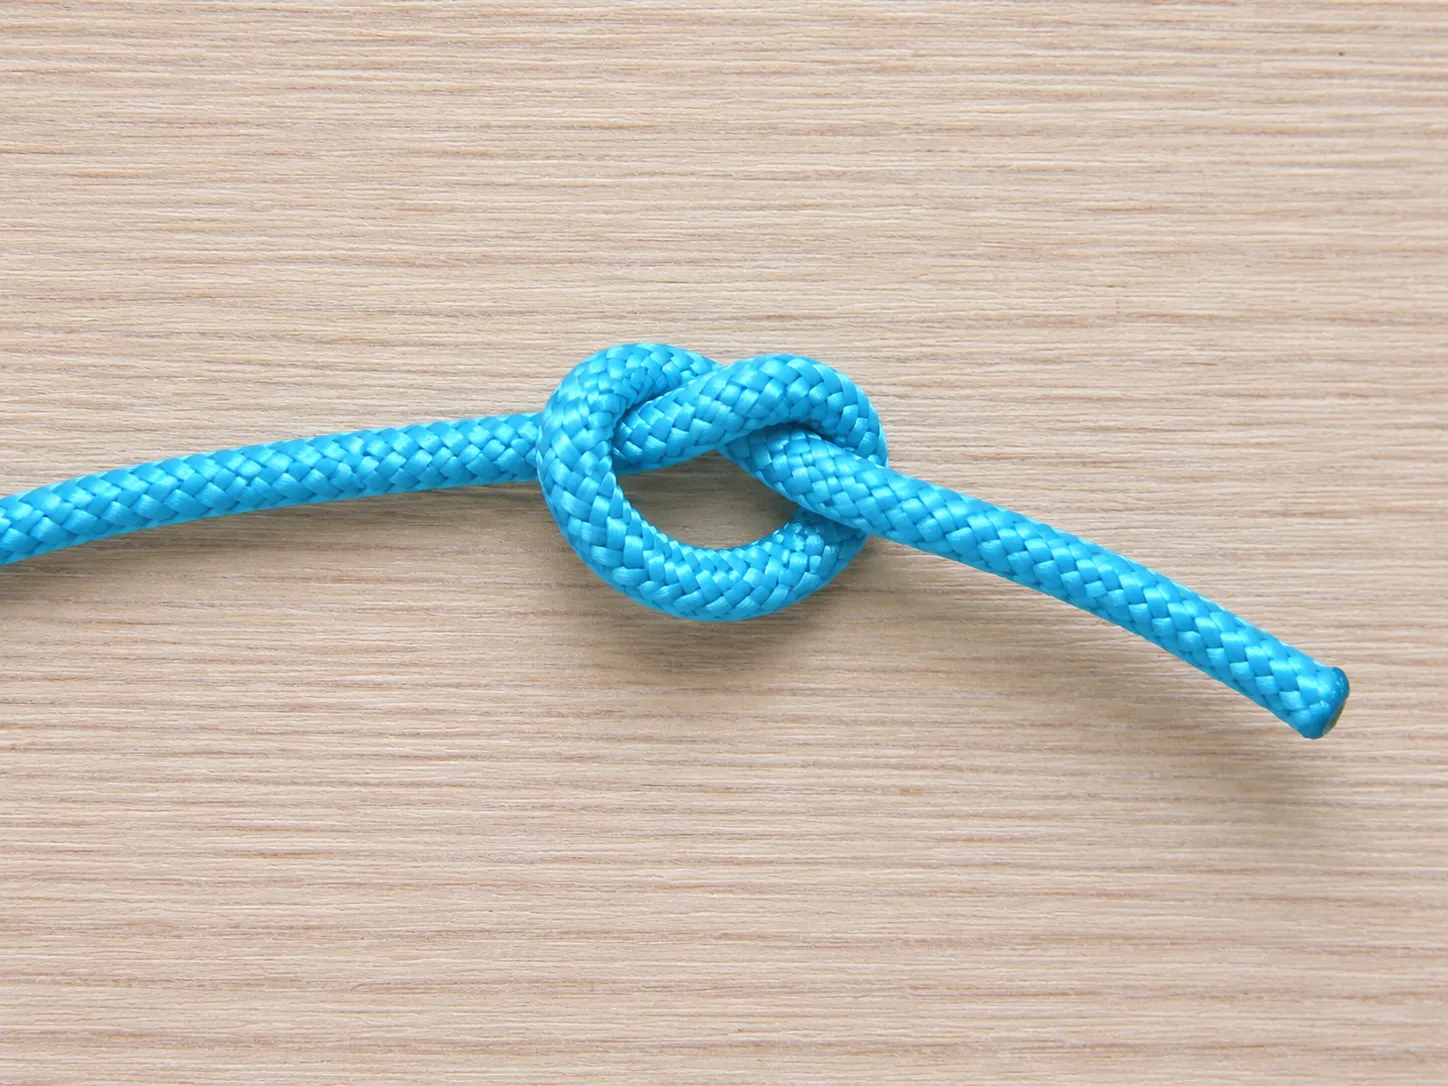
Take the same right end and feed it through the loop you just created.
This forms a simple overhand-style knot around the main cord.
Pull the knot together carefully.
The main cord should still be able to slide through the knot.
Step 4: Tighten the First Sliding Knot
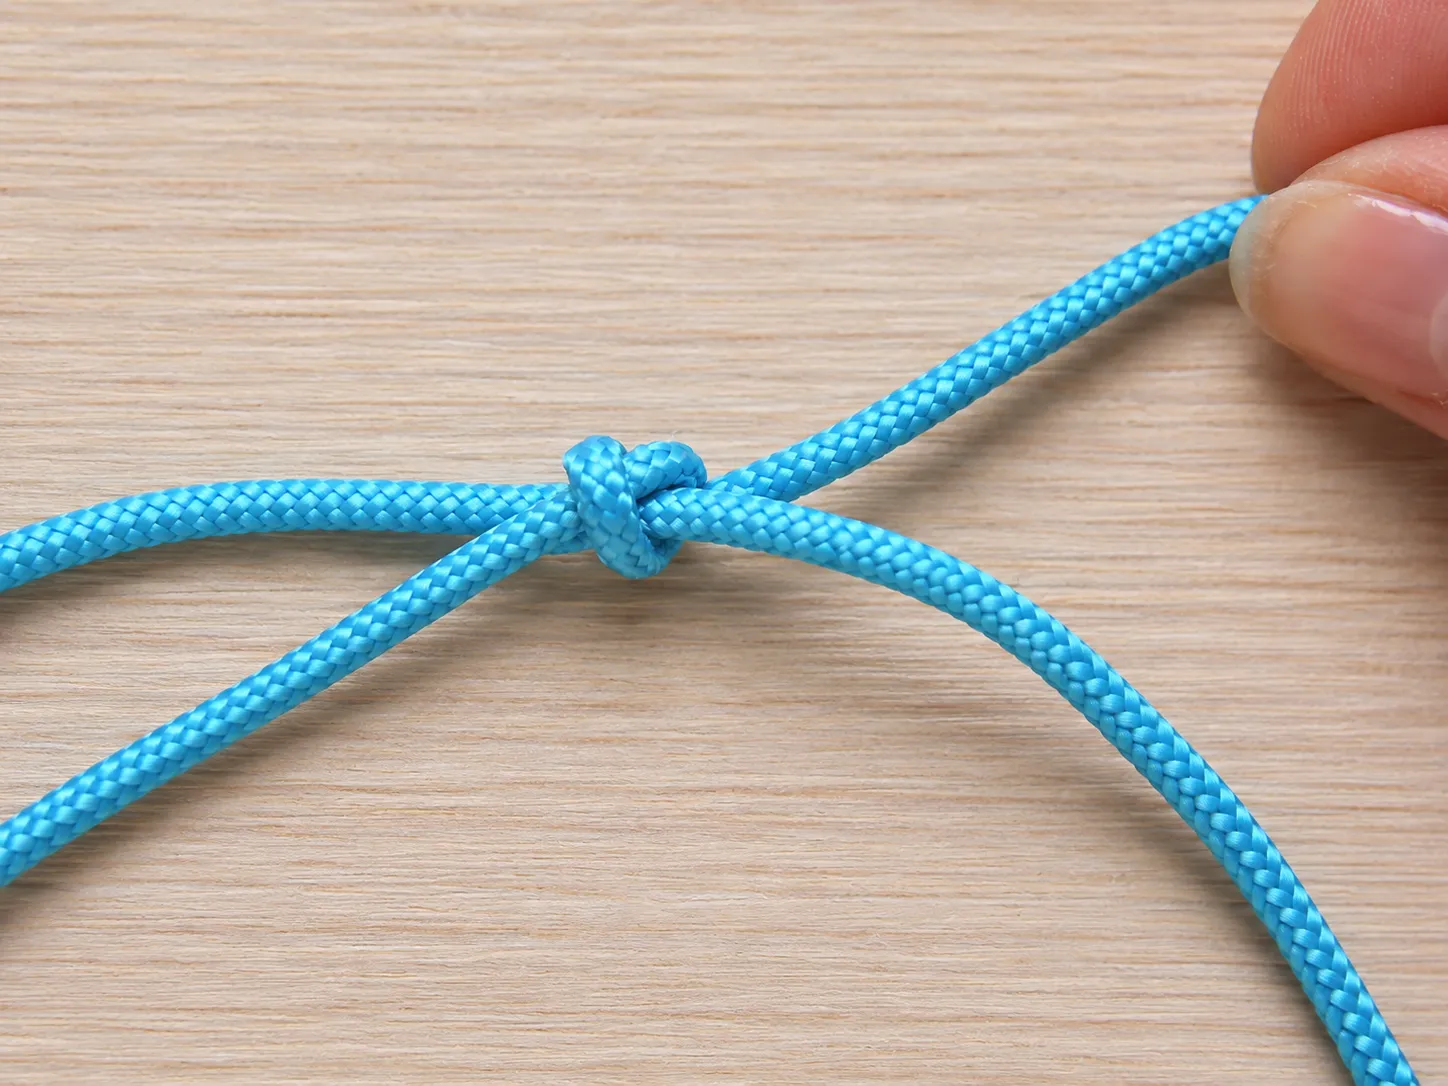
Pull the knot firmly.
However, do not tighten it so much that the main cord becomes trapped.
The goal is to create a secure knot that can still move along the bracelet cord.
Test it by gently sliding the cord back and forth.
If it moves smoothly, the knot is working correctly.
Step 5: Check the Bracelet Size
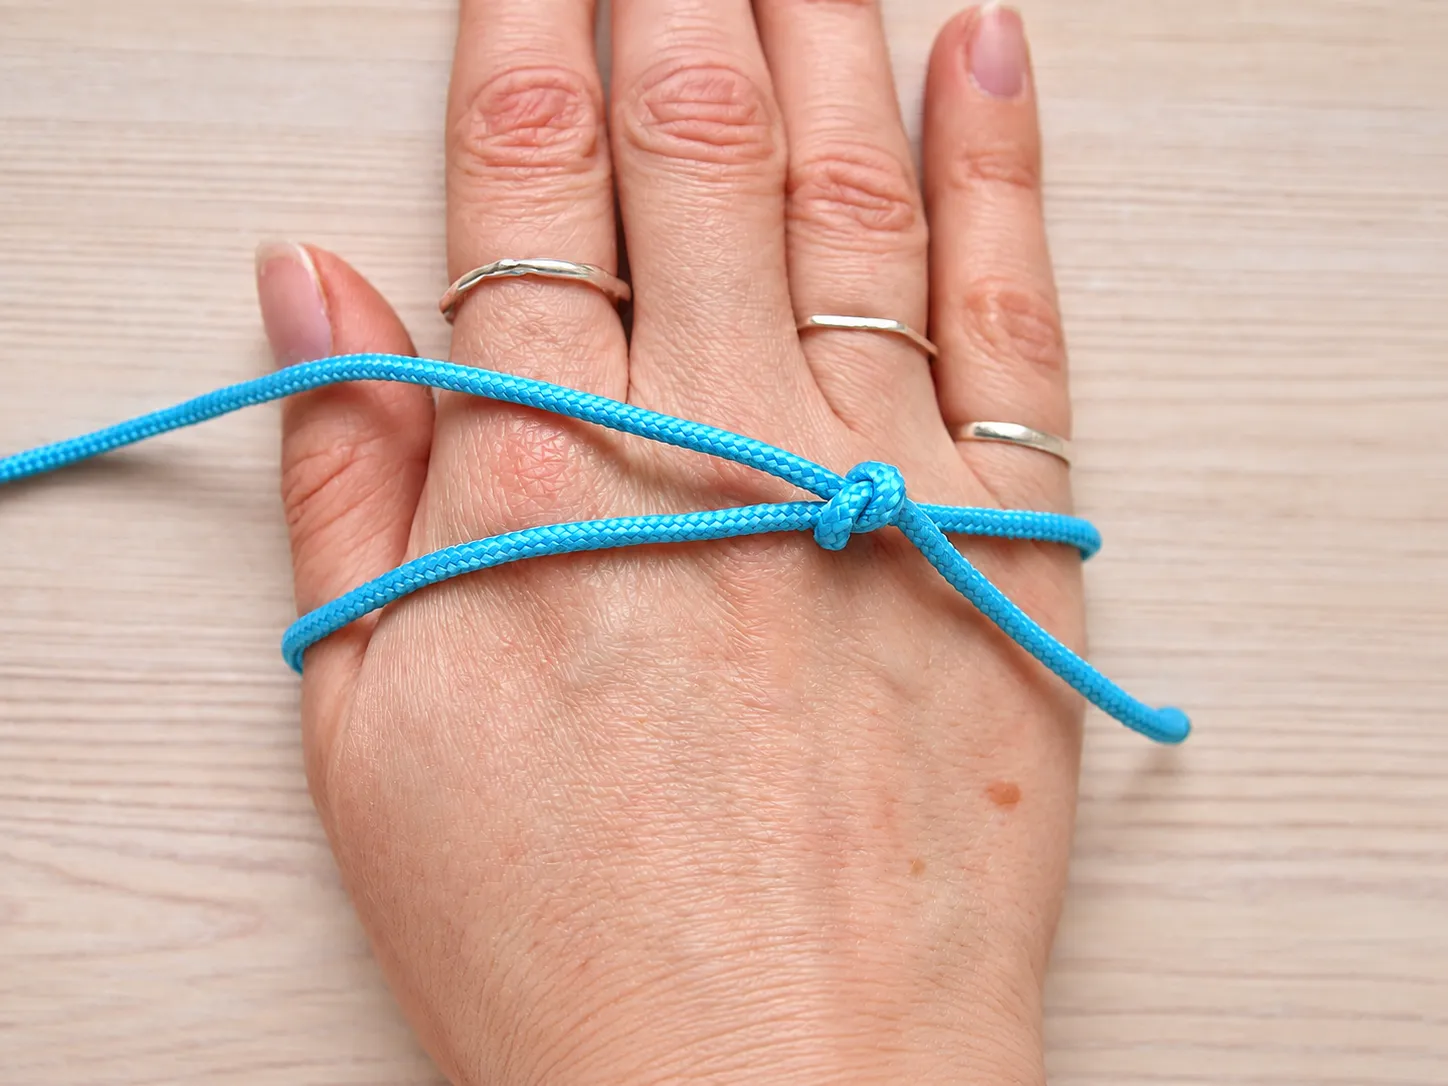
Before making the second knot, test the opening.
The bracelet must be large enough to slide over the widest part of your hand.
Slip the loop over your hand and check the fit.
If you are making a necklace instead, make sure the opening is large enough to pass over your head.
This step is important because the position of the second knot will determine the finished adjustable range.
Step 6: Make the Second Sliding Knot
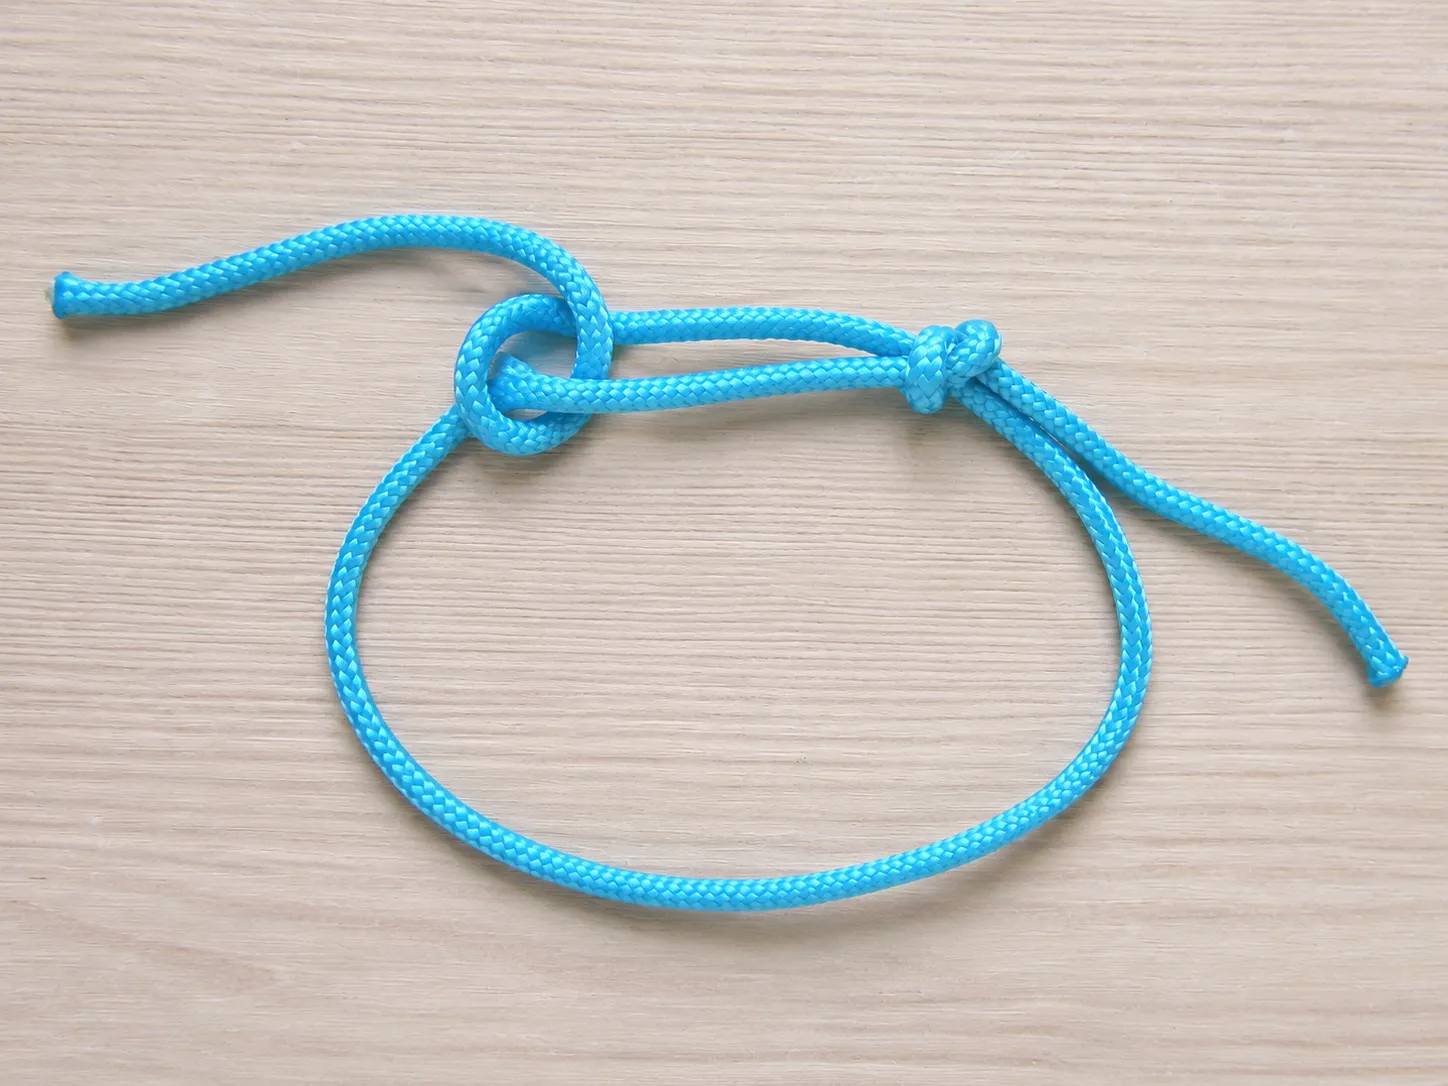
Now work with the left loose end.
Repeat the same basic method you used on the right side.
Wrap the left end:
- over the opposite main cord
- underneath
- around
- through the loop
You can place the second knot close to the first one or leave a little space between them.
Be careful not to pull or move the first knot while you are working, because that can change the bracelet size.
Step 7: Tighten the Second Knot
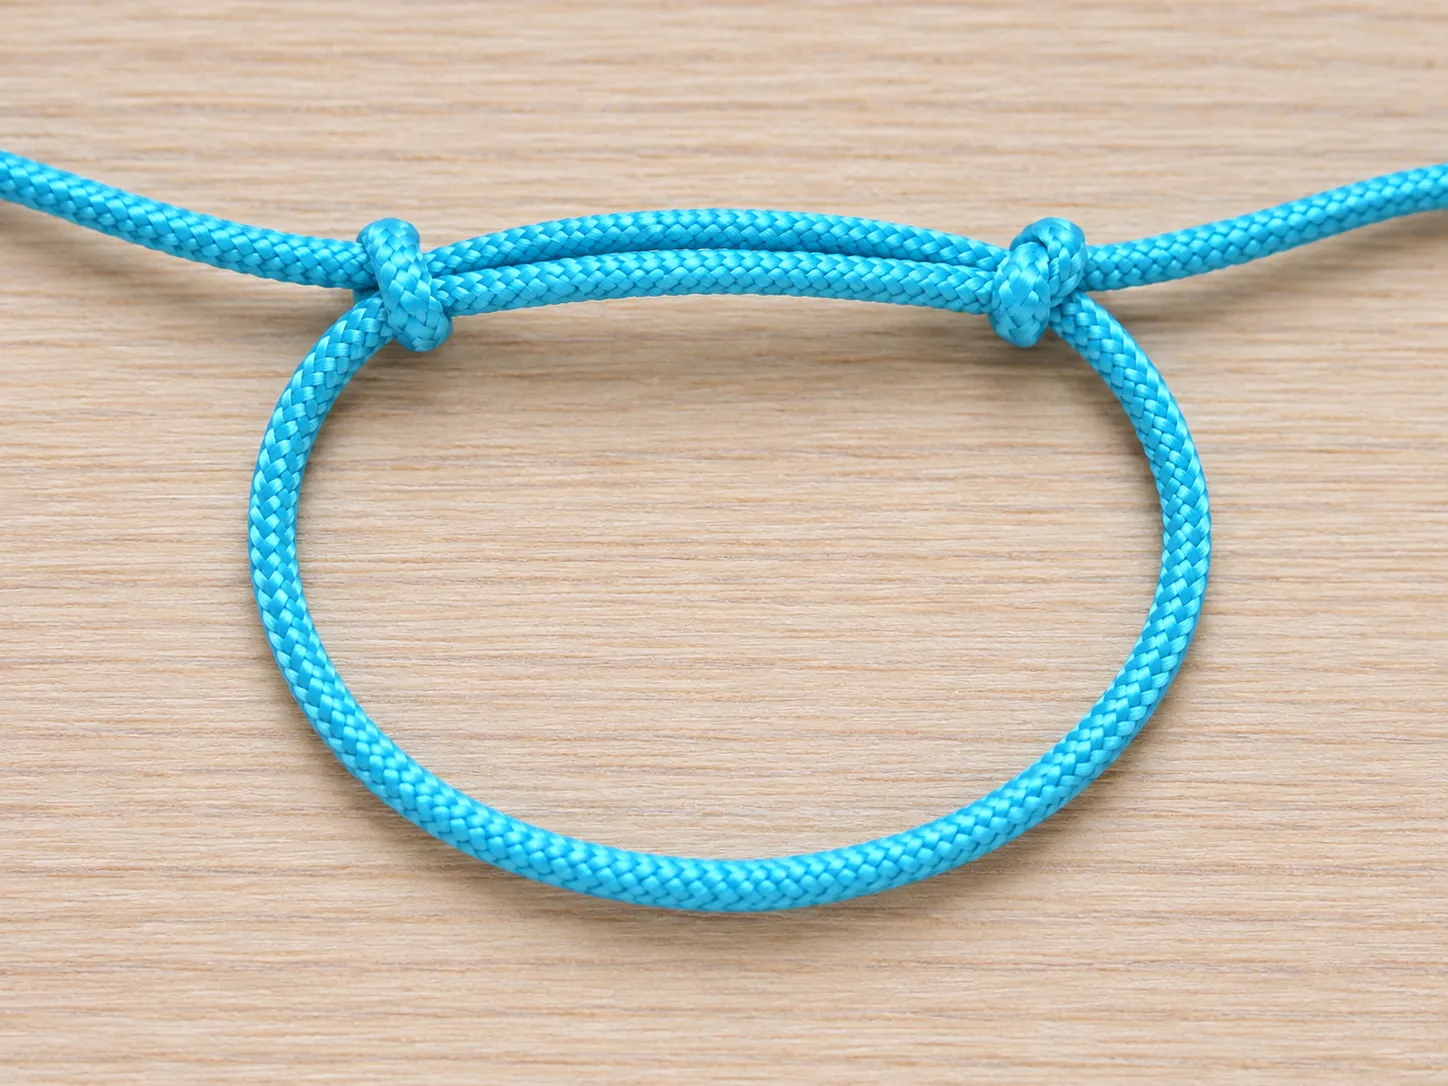
Pull the second knot firmly.
Again, make sure the main cord can still slide through it.
At this stage, both ends should now have a sliding knot.
Test the bracelet by pulling the ends apart and then pushing the knots closer together.
The bracelet should open and close smoothly.
Step 8: Finish the Cord Ends
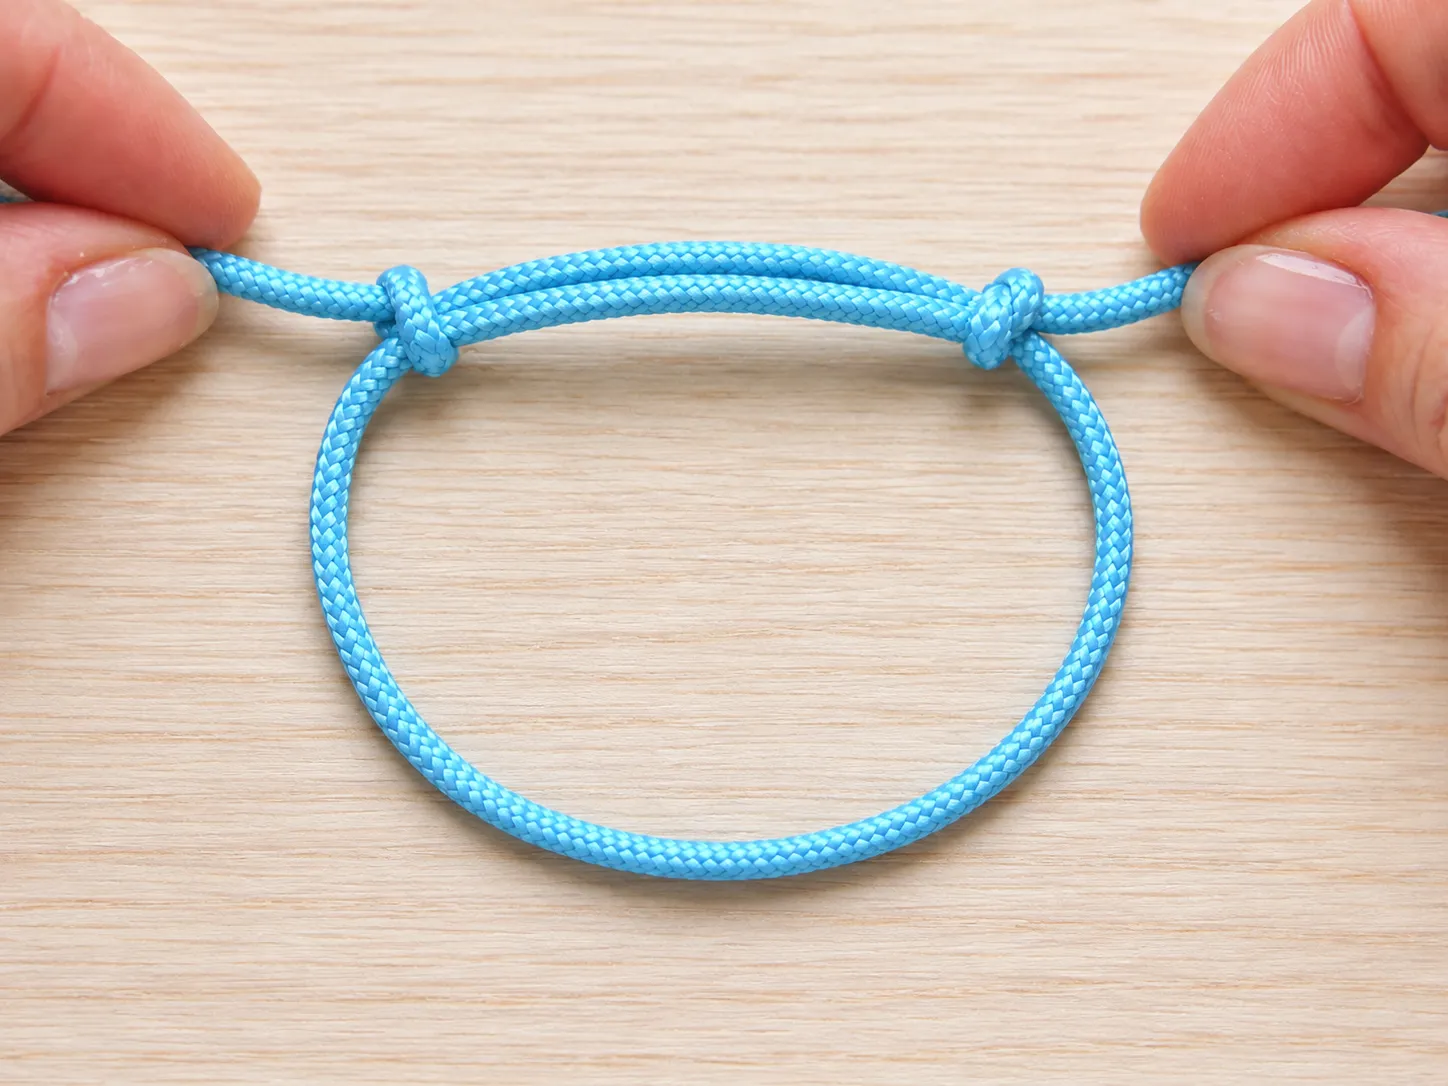
Tie a small knot at each loose end.
This makes the bracelet easier to tighten and also helps stop the ends from slipping back through the sliding knots.
You can leave the ends simple or decorate them.
Optional finishing ideas include:
- adding small beads
- adding decorative knots
- trimming the ends neatly
- leaving short tassel-like ends
Your adjustable sliding knot bracelet is now finished.
How the Sliding Knot Works
The sliding knot works because each knot wraps around the opposite side of the bracelet cord.
The knot itself stays in place, but the cord inside it can still move.
When you pull the loose ends, the bracelet becomes smaller.
When you pull the bracelet loop outward, it becomes larger.
That makes the bracelet adjustable without using a clasp.
Tips for Making a Neat Sliding Knot Bracelet
Do Not Overtighten the Knots
If the knots are too tight, the cord may not slide properly.
Pull them firmly enough to stay secure, but leave just enough movement for adjustment.
Test the Size Before Making the Second Knot
This is one of the most important steps.
Make sure the bracelet fits over your hand before completing the second knot.
Otherwise, you may end up with a bracelet that is too small to put on.
Use Extra Cord
Starting with extra cord is much easier than discovering halfway through that the ends are too short.
Using about twice the final length gives you more room for knotting.
Keep Both Knots Similar
Try to make the two sliding knots approximately the same size.
Matching knots give the bracelet a cleaner, more balanced finish.
Trim Only After Testing
Do not cut the loose ends too early.
First:
- adjust the bracelet
- test it on your wrist
- make sure both knots slide
- confirm the final fit
Then trim the ends if needed.
Can You Add Beads to a Sliding Knot Bracelet?
Yes.
Beads can be added either to the main bracelet cord or to the loose ends.
You can place beads near the center of the bracelet before tying the sliding knots.
You can also add one small bead to each loose end after finishing the adjustable closure.
Just make sure the bead holes are large enough for your chosen cord.
Best Cord for a Sliding Knot Bracelet
The tutorial works with cord around 1 mm or thicker.
Common options include:
Waxed Cotton Cord
Waxed cotton works well because it holds knots nicely and has a handmade jewelry look.
Satin Cord
Satin cord creates a smooth, shiny bracelet.
Because it can be slippery, take care when tightening the knots.
Knotting Cord
General jewelry knotting cord is another good option, especially for simple bracelets.
Paracord
Paracord is thicker and works well when you want a chunkier bracelet.
It is also easy for beginners to see while learning the knot.
How Much Cord Do You Need?
A good starting point is approximately twice the finished length you want.
For example, if you want a bracelet that measures around 8 inches when finished, start with around 16 inches of cord.
You may need more depending on:
- cord thickness
- bead placement
- knot size
- bracelet style
It is usually safer to start with too much cord rather than too little.
How to Adjust the Bracelet
To make the bracelet larger:
Pull the bracelet loop gently outward so the cord slides through the knots.
To make it smaller:
Pull the loose cord ends away from each other.
The knots should slide along the cord while staying secure.
Common Sliding Knot Problems
The Knot Will Not Slide
The knot may be too tight.
Gently loosen it and test the cord again.
You can also check whether the cord material has too much friction.
The Bracelet Keeps Loosening
The knots may be too loose.
Tighten each knot slightly while making sure the cord can still move.
The Bracelet Is Too Small to Fit Over My Hand
This usually happens when the second knot is tied before testing the opening.
If possible, loosen the second knot and reposition it farther away.
The Ends Pull Through the Knots
Tie a small stopper knot at each loose end.
You can also add beads larger than the sliding-knot opening.
Frequently Asked Questions
Is a sliding knot easy for beginners?
Yes. A simple sliding knot is beginner-friendly because it uses basic wrapping and overhand-style knotting.
Once you make the first side, the second side follows the same method.
What cord should I use for a sliding knot bracelet?
Cord around 1 mm or thicker works well.
Waxed cotton, satin cord, knotting cord, and paracord are all suitable options.
How do you make a bracelet adjustable?
Tie one sliding knot around each opposite side of the bracelet cord.
The cords can then move through the knots, allowing the bracelet to become larger or smaller.
Can I use this knot for necklaces?
Yes.
The same sliding-knot method can work for a necklace as long as the opening is large enough to fit over your head.
Can I add beads?
Yes.
You can add beads to the main bracelet or to the loose ends after finishing the knots.
How do I stop the bracelet ends from slipping out?
Tie a small knot at each loose end.
This creates a stopper and also makes the bracelet easier to tighten.
Simple Sliding Knot Bracelet Summary
For a quick reference, the basic method is:
- Cross the two cord ends.
- Wrap the right end around the opposite cord.
- Feed the right end through the loop.
- Tighten while keeping the cord able to slide.
- Check the bracelet fits over your hand.
- Repeat the knot with the left end.
- Tighten the second knot.
- Tie stopper knots at the ends.
- Add beads if desired.
Make an Easy Adjustable Bracelet
This simple sliding knot bracelet is a useful project to learn because the same adjustable closure can be used with many different jewelry designs.
Once you understand how the two sliding knots work, you can use the technique for plain cord bracelets, friendship bracelets, beaded jewelry, and simple necklaces.
It is quick, practical, and easy to customize, making it a great addition to a collection of beginner bracelet patterns and tutorials.