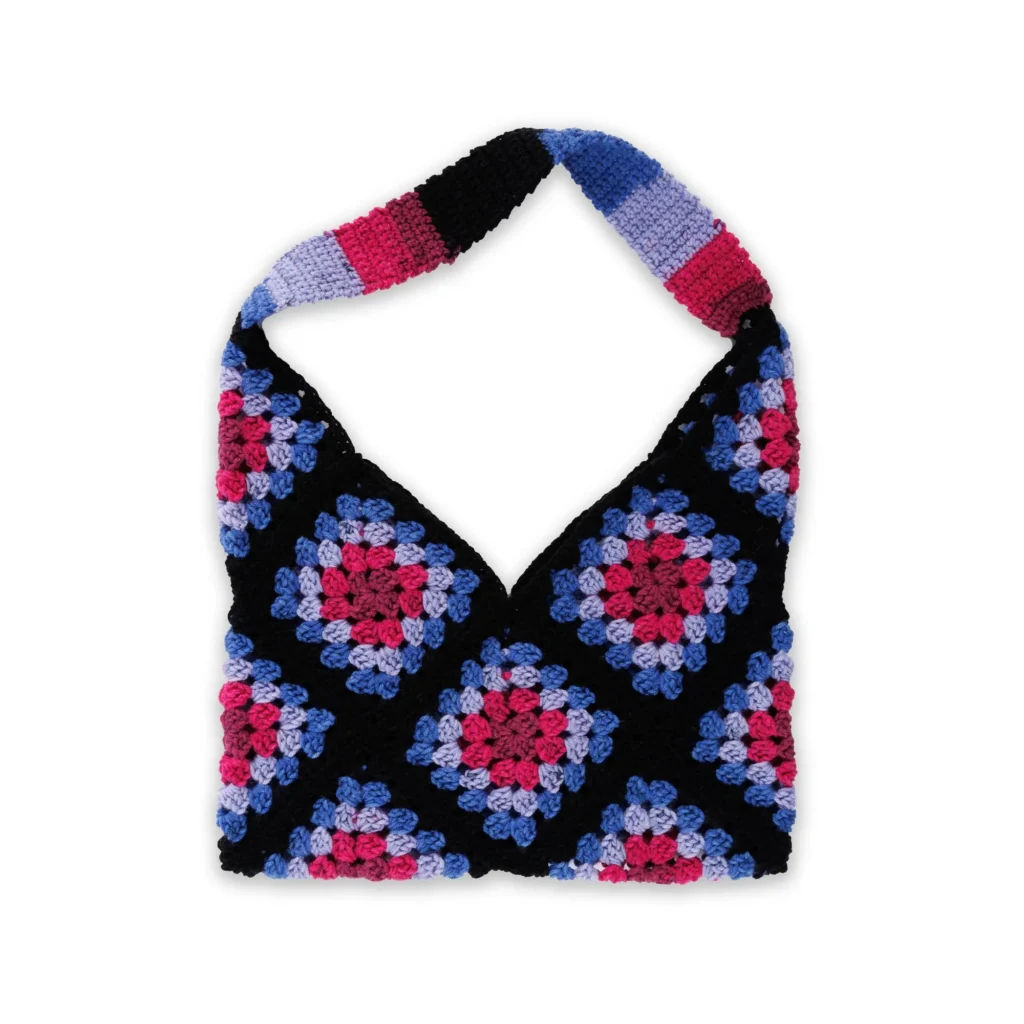
Crochet Granny Square Serenity Bag Pattern
Crocheting a bag is a wonderful way to showcase your creativity and skills. The Crochet Granny Square Serenity Bag is not only functional but also a stylish accessory that can be made in your favorite colors. This project will guide you through creating beautiful granny squares that are then assembled to form a vibrant, personalized bag. Follow along with our detailed instructions, and you’ll have a stunning crochet bag that will surely turn heads.
About the Bag
This Granny Square Serenity Bag is made using a traditional granny square technique, presenting an opportunity to practice your skills while creating something beautiful. It features 12 individual squares that come together to form a stylish bag. The structured design allows for carrying essentials while providing a trendy, colorful look. You can choose from multiple color styles offered in the Red Heart® All in One™ Granny Square yarns, making the project adaptable to any fashion preference.
Materials

Before you begin crocheting, gather all the materials you’ll need for this project. Here’s the complete list:
Yarn
- Red Heart® All in One™ Granny Square™ (8.8 oz / 250 g; 417 yds / 381 m)
- VERSION 1: White-Citrus Twist (2002) — 1 ball or 12 squares
- VERSION 2: Black-Hyper Violet (2022) — 1 ball or 12 squares
Crochet Hook
- Susan Bates® Silvalume® crochet hook:
- Size U.S. I/9 (5.5 mm) or size needed to obtain gauge
Notions
- Susan Bates® yarn needle
Crochet Abbreviations
Familiarizing yourself with crochet abbreviations will help as you follow this pattern. Here are some key terms used in the instructions:
- ch = chain
- dc = double crochet
- sl st = slip stitch
- sp = space
- RS = right side
Motif Instructions
To make the foundation of your bag, you’ll begin by creating 12 separate granny squares. Below are the instructions for crafting each motif.
Motif Notes
- Ch 3 at the beginning of each round counts as a dc.
- Ch 6 at the beginning of rounds counts as a dc and ch-3 space.
- Join all rounds with a sl st to the 3rd ch of the ch-6 unless otherwise indicated.
Motif Instructions
-
Starting the Motif: Begin with Color 1, ch 4. Join with a sl st to the first ch to form a ring.
-
1st rnd: (RS) Ch 6. (3 dc, ch 3) 3 times in the ring. 2 dc in the ring. Join.
-
2nd rnd: Sl st in the next ch-3 space. Ch 6. 3 dc in the same space as the last sl st. *Ch 1. (3 dc, ch 3, 3 dc) in the next ch-3 space. Repeat from * twice more. Ch 1. 2 dc in the first ch-3 space. Join.
-
3rd rnd: Sl st in the next ch-3 space. Ch 6. 3 dc in the same space as the last sl st. *Ch 1. 3 dc in the next ch-1 space. Ch 1. (3 dc, ch 3, 3 dc) in the next ch-3 space. Repeat from * twice more. Ch 1. 3 dc in the last ch-1 space. Ch 1. 2 dc in the first ch-3 space. Join.
-
4th and 5th rnds: Sl st in the next ch-3 space. Ch 6. 3 dc in the same space as the last sl st. *Ch 1. (3 dc) in each ch-1 space to the next ch-3 space. Ch 1. (3 dc, ch 3, 3 dc) in the next ch-3 space. Repeat from * twice more, then from * to once. 2 dc in the first ch-3 space. Join.
Fasten off.
Assembly
Seaming with Flat Sl St Join
Using the assembly diagram, sl st motifs together following these steps:
- Ensure you’re working through the back loops only, and keep your working yarn to the wrong side (WS) of the work to create a flat sl st chain detail visible on the right side (RS) of your work.
Strap
To add the strap, the yarn can be utilized in a self-striping manner, allowing the colors to transition as they appear.
- Ch 9.
- 1st row: (RS) 1 sc in the 2nd ch from hook. 1 sc in each ch to the end of the chain. Turn. (8 sc)
- 2nd row: Ch 1. 1 sc in each sc to the end of the row. Turn.
- Repeat the 2nd row until your work from the beginning measures 18″ [45.5 cm].
- Fasten off.
Attaching the Strap
Using a whipstitch, attach each end of the strap to the corner of the two top motifs at the bag opening: (3 dc, ch-3, 3 dc).
Finishing
After each motif, fasten off and weave in ends for both the motifs and strap attachment points as specified.
About the Crocheted Granny Square
The use of granny squares in crochet projects has a rich history. Each square is a small project in itself, allowing crocheters to experiment with colors and patterns in a manageable way. This design approach also enables you to create larger projects, such as blankets or bags, by simply increasing the number of squares you make.
How the Pieces Are Constructed
Each square is individually crocheted and then joined through a series of slip stitches. This method not only provides a decorative edge to the finished product but also helps maintain the integrity of the granny square design as you assemble the bag. The strap complements the finished squares and makes it easier to carry.
Frequently Asked Questions
What crochet hook is used for this pattern?
You will need a Susan Bates® Silvalume® crochet hook in size U.S. I/9 (5.5 mm) or the size necessary to obtain the correct gauge.
How many squares are required?
The pattern requires you to create 12 squares, which will be assembled to form the complete bag.
Does this project require assembly?
Yes, after creating the individual motifs, you will need to seam them together using a flat slip stitch join method and attach the strap.
What yarn is used in this pattern?
This project uses Red Heart® All in One™ Granny Square yarn, available in various color versions such as White-Citrus Twist and Black-Hyper Violet.
What are the finished dimensions of the bag?
While the specific dimensions are not provided, the size of the bag will depend on the tension and gauge achieved during the crochet process.
Conclusion
The Crochet Granny Square Serenity Bag is a delightful crochet project that combines practicality with artistry. With its vivid colors and unique granny squares, this bag undoubtedly stands out. Enjoy the process of creating your own version, whether as a gift or a personal accessory. Happy crocheting!