
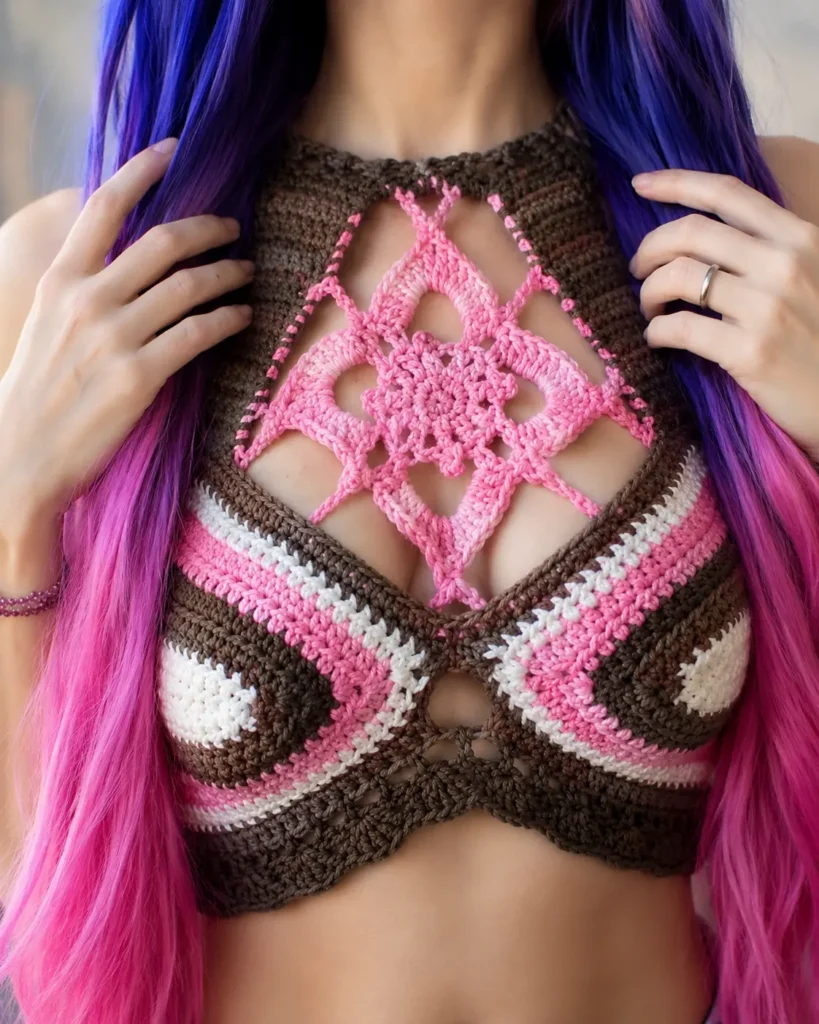
If you’ve been searching for a crochet halter top pattern that combines bohemian flair with structured elegance, the Primrose High Neck Halter Top is exactly what your hook has been waiting for. This stunning multi-colored top features a striking flower motif at the center, a high neck design, and a corset-style tie that makes it as flattering as it is fun to make. Whether you’re a seasoned crocheter or someone who’s tackled a few granny square projects and is ready to level up, this guide will walk you through everything you need to know — with extra tips and context the base pattern leaves out.
What Is the Primrose Halter Top?
The Primrose is a high neck crochet halter top designed to be worked in sections: two shaped cups, a decorative flower motif, side panels, a top panel, a bottom band, and finishing ties. The result is a layered, textured piece that looks intricate but is built stitch by stitch in manageable parts. It uses worsted weight cotton yarn in multiple colors, making it a great stash-buster project while producing a finished top that feels fresh and professional.
Materials You’ll Need
Before you cast on, gather the following:
- 270–300 yards of worsted weight yarn (the lower amount is for S/M; the higher for L/XL). Cotton yarn is strongly recommended for both breathability and stitch definition — the pattern was designed with 100% cotton in mind.
- Four colors — the original uses earthy, warm tones. Think a solid neutral (like a warm brown), a variegated or ombre yarn, and two accent shades in complementary tones such as blush pink and cream. You’ll need approximately one skein per color.
- E/3.5mm crochet hook — this is a relatively small hook for worsted weight, which gives the fabric a tighter, more structured feel suited to a garment top.
- Scissors, yarn needle for weaving in ends, and stitch markers (optional but helpful).
Pro tip: Swatching matters here. The gauge is 16 half double crochet stitches and 11 rows per 4 inches. If your gauge is off, your cup measurements will be off — and since fit is the entire point of a halter top, take the time to swatch and adjust your hook size if needed.
Sizing and Fit
The Primrose comes in two sizes: S/M and L/XL. Rather than relying on body measurements alone, the pattern takes a smarter approach — it asks you to measure a bra or bikini top that already fits the way you want. The cup measurements are:
- S/M: 6″ tall × 7″ wide
- L/XL: 7.5″ tall × 8.75″ wide
The band length can be extended or shortened to suit your bust measurement by simply adding or omitting rows of the mesh band pattern. This flexibility is one of the pattern’s strengths and means it can work for a broader range of body types than the two listed sizes suggest.
Key Stitches and Techniques to Know First
The Primrose uses several techniques that you’ll want to practice before diving in if you haven’t used them before:
Foundation Half Double Crochet (Fhdc): This replaces a starting chain and first row, creating a stretchier, cleaner base edge. The cups begin with this technique, so mastering it means a more polished result.
Foundation Single Crochet (Fsc): Used for the halter tie, this creates a long, flexible chain-like cord with integrated structure.
Magic Ring: Used to start the flower motif. It creates a tight, closed center — essential when you don’t want a hole in the middle of your flower.
Picot: A decorative stitch (ch 3, slip stitch in the first chain) added within the flower motif to create pointed, petal-like tips.
4 Treble Cluster: A more advanced stitch used in the flower construction. It pulls four unfinished treble crochets together into one stitch, creating a gathered, sculptural effect. Work through the steps slowly — this stitch is easier than it looks once you understand the “build and close” logic.
If you’ve worked through motif-based projects like crochet granny square designs, the multi-round flower motif here will feel very familiar in concept, even if the specific stitches are new.
How the Cups Are Constructed
The cups are worked flat, back and forth in rows, starting with a foundation half double crochet row. They’re shaped by working an increase at the center point of each row (hdc, ch 1, hdc into the chain space) — this creates the curved, rounded shape that gives the cup its structure.
Each row is assigned a specific yarn color following a striped sequence, and the number of rows differs between S/M and L/XL. The last row of the first cup uses single crochet, while the last row of the second cup includes a slip stitch connection that joins the two cups at the center — a neat technique that avoids seaming entirely.
What the base pattern doesn’t spell out: Make sure your color changes are neat on the wrong side. Since this is a garment worn against the body, messy floats or tails on the inside can cause discomfort. Weave in each color tail as you go rather than leaving them all until the end.
The Flower Motif
The flower motif is the star of the show, worked in rounds with the accent color yarn. It begins with a magic ring, builds out through increases, and develops into a multi-petal flower with open chain loops and a final round that creates the pointed “diamond” shape visible at the center of the finished top.
Once completed, the flower is held behind the joined cups (wrong sides facing each other) and attached via a row of single crochet that works through both layers simultaneously — securing the motif and creating the characteristic crossed-cup look.
Side Panels, Top Panel, and Band
With the cups and motif connected, you build outward:
- Side panels are worked flat alongside each side of the motif, creating the structured rectangular panels that frame the center. These are worked in a two-color stripe repeat for visual continuity.
- The top panel bridges across the top of the entire piece, worked in a mesh pattern (alternating half double crochet and chain spaces) that the halter tie threads through.
- The band is worked along the bottom edge of the cups, creating a foundation for the corset ties on each side. It uses a similar mesh construction to the top panel.
- Side bands extend from the sides of the cup area downward, finished with a mesh row so a long chain corset tie can be woven through.
If you enjoy the construction logic here — building a garment outward from a central motif — you’ll love applying similar techniques to wearable pieces like crochet granny square pants or granny square shorts, which follow the same principle of modular construction joined into a cohesive garment.

Finishing: The Ties
The Primrose has two sets of ties:
- Halter ties (neck ties): A foundation single crochet chain of 90 stitches, woven through the top panel’s mesh row. These tie behind the neck to hold the top up.
- Corset tie (back/side tie): A much longer chain of 200 stitches, woven through the side band’s mesh row on each side and tied in front or back to cinch the fit.
Fit tip: The 90-stitch halter tie and 200-stitch corset tie are starting points. If you have a longer torso or prefer more tie length for a bow, add extra foundation stitches. It’s easier to trim excess than to redo a tie that’s too short.
Care Tips for Your Finished Top
Since the pattern is made in 100% cotton yarn, your finished Primrose should hold up well to gentle machine washing on a delicate cycle in cold water. Lay it flat to dry — hanging a wet cotton garment can stretch it out of shape. Avoid the dryer to preserve the stitch definition and prevent shrinkage.
Final Thoughts
The Primrose High Neck Halter Top is a genuinely rewarding project. It teaches foundation stitches, motif construction, join-as-you-go techniques, and garment shaping all within one design. Work at your own pace, embrace the color striping, and don’t skip the gauge swatch. The result is a wearable piece of fiber art that’s as at home at a music festival as it is on a summer balcony.
Happy hooking!
