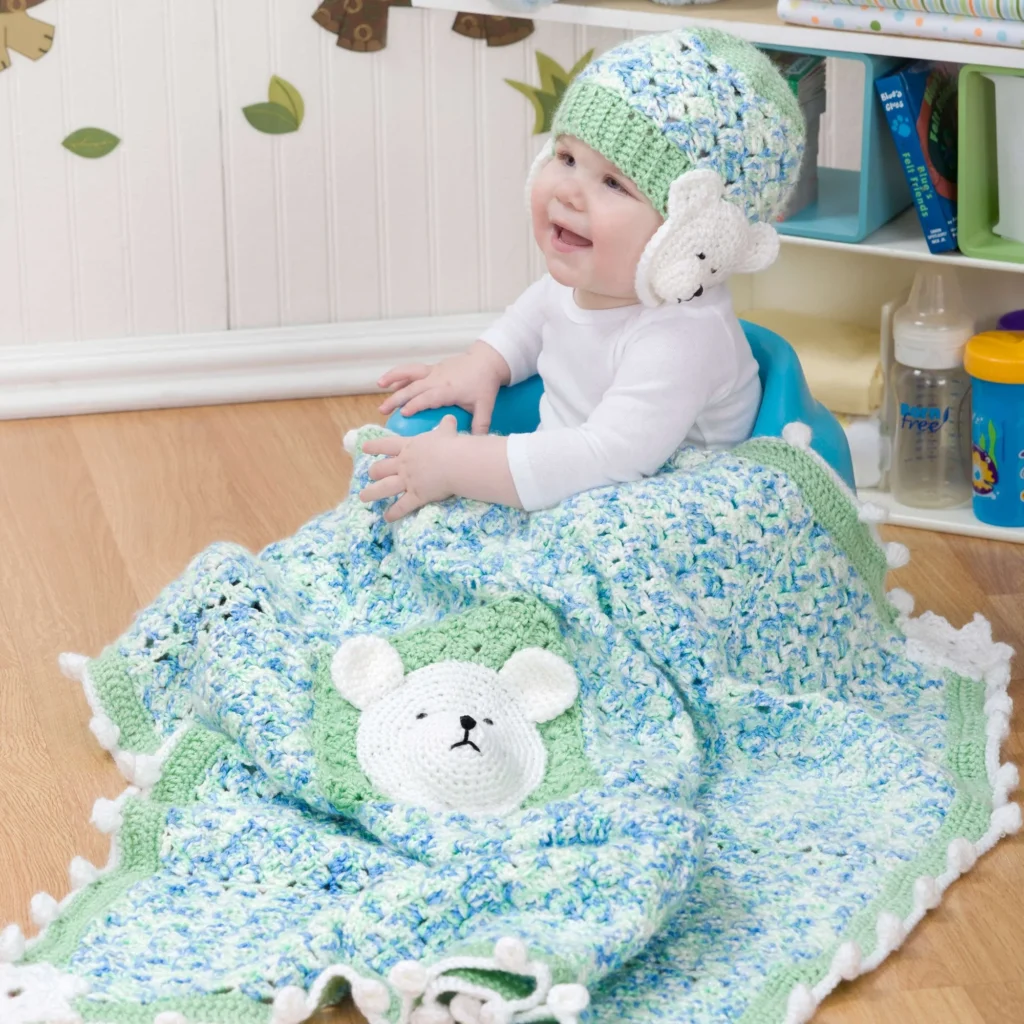
Polar Bear Crochet Blanket & Hat Pattern
Create a delightful Polar Bear-themed crochet blanket and matching hat that will be perfect for chilly days! This project features cozy squares and an adorable bear appliqué that adds charm. It’s not just a functional piece but also a decorative item you can use in your home or give as a thoughtful gift.
About the Blanket and Hat
The Polar Bear Crochet Blanket & Hat is an appealing and functional crochet project made with your comfort in mind. The blanket consists of vibrant squares featuring a playful design, and the hat includes sweet earflaps that will keep you warm. This crochet pattern is designed to be engaging for crocheters of all skill levels, allowing you to explore various techniques while creating a lovely finished product.
Finished Measurements
While specific dimensions are not provided in the original pattern, typically, a baby blanket might be about 36” x 36”, and the hat will fit snugly on an average child’s head.
Materials

To complete this project, you will need the following materials:
-
Yarn:
- RED HEART® “Soft Baby Steps™”:
- 5 balls of color 9932 Puppy Print A
- 2 balls of color 9620 Baby Green B
- 1 ball of color 9600 White C
- AUNT LYDIA’S® “Fashion Crochet Thread”, Size 3:
- Small amount of black (12)
- RED HEART® “Soft Baby Steps™”:
-
Crochet Hook:
- 4 mm [US G-6]
-
Accessories:
- Split lock stitch marker
- Yarn needle
- Small amount of stuffing
Crochet Abbreviations
- Ch – Chain
- Dc – Double crochet
- Sc – Single crochet
- Inc – Increase (2 single crochets in the same stitch)
- Dec – Decrease (2 stitches together)
- St – Stitch
- Hdc – Half double crochet
Main Pattern
Blanket (Square) Instructions
To begin, you will make a total of 16 squares: 15 in Puppy Print A and 1 in Baby Green B.
- Ch 36
Row Instructions
- Row 1: Dc in 4th ch from hook, *skip 3 ch, (sc, ch 3, 3 dc) in next ch; repeat from * to last 4 ch, skip 3 ch, sc in last ch; turn.
- Rows 2-13: Ch 3, dc in first sc, *skip next 3 dc, (sc, ch 3, 3 dc) in next ch-3 space; repeat from * to last st; sc in top of ch-3; turn.
- Row 14: Ch 3, dc in first sc, ch 2, sc in next ch-3 space, *ch 3, sc in next ch-3 space; repeat from * to last 2 sts; ch 3, dc in next sc, dc in top of ch-3. Fasten off.
Assembly: Sew squares together in a grid of 4 across and 4 down, ensuring the green square is placed second from the right in the second row.
Bear Appliqué
Head
Work the head of the bear in continuous rounds without joining, using a stitch marker to denote the beginning of each round.
Head Rounds
- Round 1: With C, ch 2; 6 sc in 2nd ch from hook.
- Round 2: 2 sc in each sc around – 12 sc.
- Round 3: [Sc in next sc, inc] 6 times – 18 sc.
- Round 4: [Sc in next 2 sc, inc] 6 times – 24 sc.
- Round 5: [Sc in next 3 sc, inc] 6 times – 30 sc.
- Round 6: Sc in next 2 sc, inc, [sc in next 4 sc, inc] 5 times, sc in last 2 sc – 36 sc.
- Round 7: [Sc in next 5 sc, inc] 6 times – 42 sc.
- Round 8: Sc in next 3 sc, inc, [sc in next 6 sc, inc] 5 times, sc in last 3 sc – 48 sc.
- Round 9: [Sc in next 7 sc, inc] 6 times – 54 sc.
- Round 10: Sc in next 4 sc, inc, [sc in next 8 sc, inc] 5 times, sc in last 4 sc – 60 sc.
- Round 11: [Sc in next 9 sc, inc] 6 times – 66 sc.
Fasten off, leaving a length of yarn for sewing.
Snout
- Round 1: With C, ch 2; 6 sc in 2nd ch from hook.
- Round 2: 2 sc in each sc around – 12 sc.
- Round 3: Sc in each sc around.
- Round 4: [Sc in next sc, inc] 6 times – 18 sc.
- Round 5: Sc in each sc around.
- Round 6: [Sc in next 2 sc, inc] 6 times – 24 sc.
- Round 7: [Sc in next 3 sc, inc] 6 times – 30 sc.
- Round 8: [Sc in next 4 sc, inc] 6 times – 36 sc.
- Round 9: [Sc in next 5 sc, inc] 6 times – 42 sc.
Fasten off, leaving a length of yarn for sewing.
Snout Placement / Embroidery
Sew the snout in place on the head, lightly stuffing as you go. Use the crochet thread to embroider satin stitch eyes and nose and straight stitches for the mouth. Attach this to the Baby Green B square.
Ear (Make 2)
- Rounds 1-3: Work the same as Head Rounds 1-3 – 18 sc.
- Rounds 4-6: Sc in each sc around.
- Round 7: [Sc in next sc, dec] 6 times – 12 sc.
Fasten off and do not stuff; sew in place.
Blanket Edging (Worked along each side separately)
-
Row 1: With right side facing, join B in any corner; ch 1, work 120 sc evenly across (30 sc across each square); turn.
-
Row 2: Ch 1, sc in each sc across; turn.
-
Row 3: Ch 3, skip first sc, dc in next sc and in each sc across; turn.
-
Row 4: Ch 1, sc in each dc across and in top of ch-3; turn.
Fasten off B. -
Row 5 (add C): With right side facing, join C in first sc; ch 1, sc in next 4 sc, *(slip st, ch 1, 9 hdc) all in next sc, drop loop from hook, insert hook from front in first hdc, then into dropped loop, pull loop through, ch 1 to close, sc in next 9 sc; repeat from * across, ending sc in last 5 sc. Fasten off.
Repeat Edging: Repeat Edging Rows 1-5 on each side.
Snowflake (Make 4)
- With C, ch 6; join with a slip st to form a ring.
- Round 1: Ch 1, 12 sc in ring; join with a slip st in first sc.
- Round 2: Ch 3, 2 dc in same sc as joining, ch 1, skip next sc, *3 dc in next sc, ch 1, skip next sc; repeat from * around; join in top of ch-3.
- Round 3: Ch 1, sc in same st as joining, *(hdc, dc, ch 2, dc, hdc) all in next dc, sc in next dc, sc in ch-1 space, sc in next dc; repeat from * around, end at ; join. Fasten off.
Snowflake Placement
Sew one snowflake at each corner of the blanket.
Hat Construction
Start the hat with Baby Green B by chaining 7 and working in ribbing as follows:
Ribbing Rows
- Row 1: Sc in 2nd ch from hook and each ch across; turn – 6 sc.
- Rows 2-64: Ch 1, working in back loops only, sc in each sc across.
Crown
- Crown Row 1: Ch 1, sc in end of each row across ribbing; turn – 64 sc. Fasten off B.
- Crown Row 2: Join A in first sc; ch 3, dc in same st as joining, *skip next 3 sc, (sc, ch 3, 3 dc) all in next sc; repeat from * to last 4 sc; skip next 3 sc, sc in last sc; turn.
- Crown Rows 3-6: Repeat Row 2 of Blanket Square.
- Crown Row 7: Repeat Row 14 of Blanket Square.
- Crown Row 8: Ch 1, sc in each sc and ch across – 64 sc. Fasten off A.
- Crown Row 9: Join B in first sc; ch 1, sc in same sc and in next 13 sc, dec, [sc in next 14 sc, dec] 3 times; turn – 60 sc.
Crown Decreasing Rows
- Row 10: Ch 1, [sc in next 8 sc, dec] 6 times; turn – 54 sc.
- Row 11: Ch 1, [sc in next 7 sc, dec] 6 times; turn – 48 sc.
- Row 12: Ch 1, [sc in next 6 sc, dec] 6 times; turn – 42 sc.
- Row 13: Ch 1, [sc in next 5 sc, dec] 6 times; turn – 36 sc.
- Row 14: Ch 1, [sc in next 4 sc, dec] 6 times; turn – 30 sc.
- Row 15: Ch 1, [sc in next 3 sc, dec] 6 times; turn – 24 sc.
- Row 16: Ch 1, [sc in next 2 sc, dec] 6 times; turn – 18 sc.
- Row 17: Ch 1, [sc in next sc, dec] 6 times; turn – 12 sc.
- Row 18: Ch 1, [dec] 6 times; turn – 6 sc. Fasten off and sew back seam.
Polar Bear Earflaps
Head (Make 2)
- Rounds 1-7: Repeat Rounds 1-7 of Bear Head – 42 sc.
- Round 8: Slip st in each sc around. Fasten off.
Ear (Make 4)
- With C, ch 2.
Ear Rows
- Row 1: 4 Sc in 2nd ch from hook; turn.
- Row 2: Ch 1, 2 sc in each sc across; turn – 8 sc.
- Row 3: Ch 1, sc in next 2 sc, [inc] 4 times, sc in last 2 sc – 12 sc. Fasten off.
Snout (Make 2)
- Round 1: With C, ch 2; 6 sc in 2nd ch from hook.
- Round 2: 2 sc in each sc around – 12 sc.
- Round 3: Sc in each sc around.
- Round 4: [Sc in next sc, inc] 6 times – 18 sc. Fasten off.
Finishing
- Sew 2 ears in place on each head.
- Sew snouts in place, lightly stuffing them.
- Embroider details similar to the bear on the blanket and sew in place on each side of the hat.
Frequently Asked Questions
What type of yarn is used for this project?
The project utilizes RED HEART® “Soft Baby Steps™” yarn in colors Puppy Print A, Baby Green B, and White C, alongside AUNT LYDIA’S® “Fashion Crochet Thread” for detailing.
Is this project worked in rows or rounds?
The blanket is primarily worked in rows for the squares, while the bear appliqué and hat are worked in rounds.
Does this crochet project require assembly?
Yes, the squares must be sewn together for the blanket, and the bear features need to be sewn onto the blanket and hat.
Conclusion
The Polar Bear Crochet Blanket & Hat Pattern combines warmth and whimsy in one lovely project. This delightful piece not only serves as a cozy accessory for colder months but also showcases your crochet skills with charming appliqué details. Happy crocheting!