Bugs and Blooms Crochet Blanket Pattern
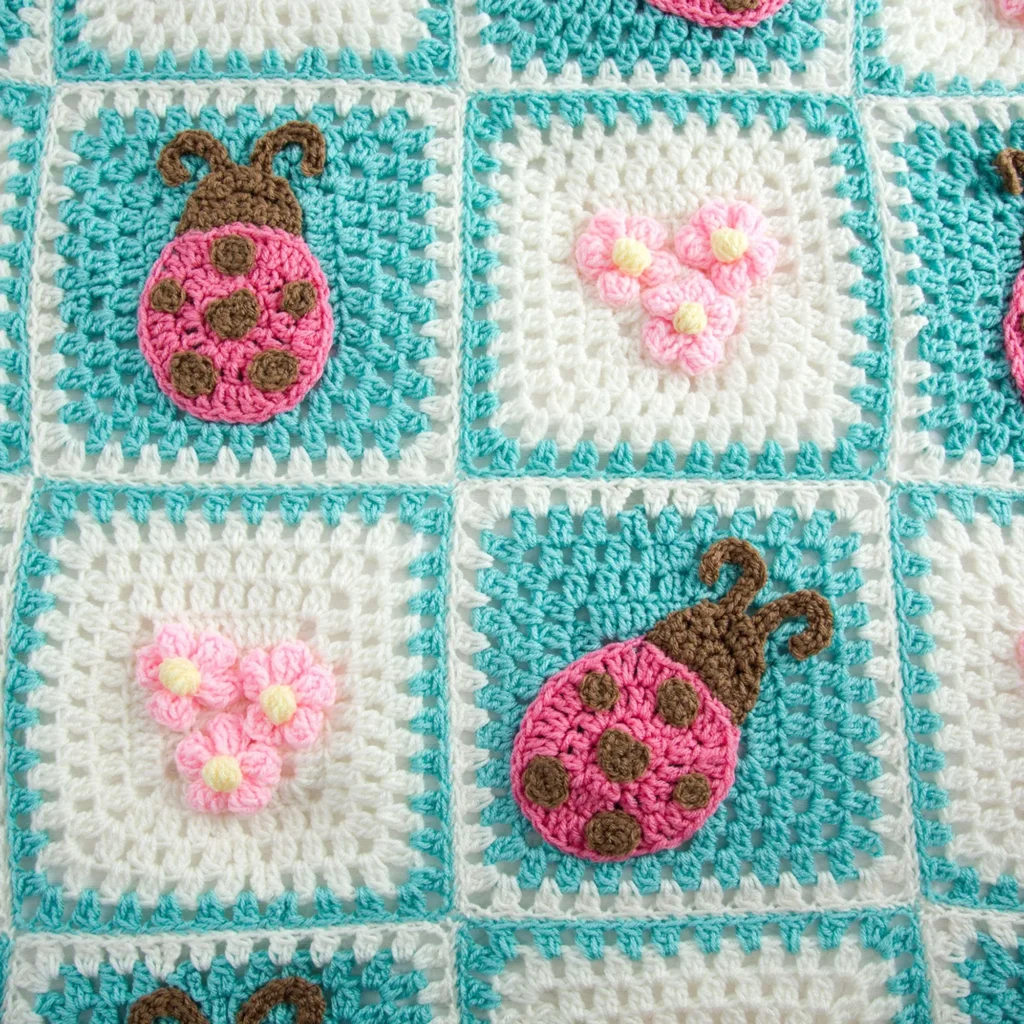
Welcome to the Bugs and Blooms Crochet Blanket Pattern, where whimsy meets warmth! This delightful blanket combines vibrant squares adorned with cute ladybugs and charming flowers, creating a perfect addition to any child’s room or cozy couch. Whether you’re a seasoned crocheter or just looking to add a touch of fun to your crafting repertoire, this pattern is designed to inspire creativity and joy.
About the Blanket
This blanket features 30 individual squares, each hand-crocheted and then assembled to form a beautiful and functional piece. With the majority of the squares made using cheerful colors, the ladybug and floral designs not only demonstrate your crochet skills but also add a playful and vibrant touch to your home. The blanket can be used as a throw, a decorative piece, or even a baby blanket, making it versatile for various settings.
Finished Measurements
The blanket measures approximately 48 inches x 48 inches, providing a cozy covering for snuggling up during chilly evenings or adding a pop of color to your living space.
Materials

To create your Bugs and Blooms blanket, you will need the following materials:
Yarn
- RED HEART® Super Saver
- 3 skeins each of 505 Aruba Sea (A)
- 3 skeins each of 316 Soft White (B)
- 1 skein each of:
- 706 Perfect Pink (C)
- 373 Petal Pink (D)
- 360 Café Latte (E)
- 322 Pale Yellow (F)
Crochet Hook
- Susan Bates® Crochet Hooks
- 5.5mm [US I-9]
- 3.75mm [US F-5] (for ladybug spots only)
Notions
- Yarn needle for weaving in ends
Crochet Abbreviations
- ch = chain
- dc = double crochet
- sc = single crochet
- sl st = slip stitch
- Cl = cluster
- rep = repeat
- st(s) = stitch(es)
Main Blanket Instructions
SQUARE I (make 15)
With A, ch 5; join with slip st in first ch to form a ring.
Round 1 (right side)
Ch 3 (counts as first dc here and throughout), 2 dc in ring, [ch 3, 3 dc in ring] 3 times, ch 3; join with slip st in top of beginning ch
— 12 dc and 4 corner ch-3 spaces.
Round 2
Ch 3, dc in next 2 dc, (2 dc, ch 3, 2 dc) in next corner ch-3 space, [dc in next 3 dc, (2 dc, ch 3, 2 dc) in next corner ch-3 space] 3 times; join with slip st in top of beginning ch
— 28 dc and 4 corner ch-3 spaces.
Round 3
Ch 3, dc in next 4 dc, (2 dc, ch 3, 2 dc) in next corner ch-3 space, [dc in next 7 dc, (2 dc, ch 3, 2 dc) in next corner ch-3 space] 3 times, dc in last 2 dc; join with slip st in top of beginning ch
— 44 dc and 4 corner ch-3 spaces.
Round 4
Ch 3, dc in next dc (beginning ch-3 and following dc count as first 2-dc Cl), [ch 1, skip next dc, 2-dc Cl in next dc] 2 times, ch 1, skip next dc, (2-dc Cl, ch 3, 2-dc Cl) in next corner ch-3 space,
*[ch 1, skip next dc, 2-dc Cl in next dc] 5 times, ch 1, skip next dc, (2-dc Cl, ch 3, 2-dc Cl) in next corner ch-3 space; repeat from * 2 more times, [ch 1, skip next dc, 2-dc Cl in next dc] 2 times, ch 1, skip last dc; join with slip st in top of beg ch
— 28 clusters.
Round 5
Slip st in next dc, (slip st, ch 3, dc) in next ch-1 space,
[*ch 1, 2-dc Cl in each ch-1 space; rep from * to next corner ch-3 space, ch 1, (2-dc Cl, ch 3, 2-dc Cl) in next corner ch-3 space] 4 times,
**ch 1, 2-dc Cl in each ch-1 space; repeat from ** to end of round, ch 1; join with slip st in top of beginning ch
— 32 clusters.
Round 6
Repeat Round 5—36 clusters.
Fasten off A.
Round 7
With right side facing, draw up a loop of B in first ch-1 space, ch 3, dc in same ch-1 space,
[*ch 1, 2-dc Cl in each ch-1 space; repeat from * to next corner ch-3 space, ch 1, (2-dc Cl, ch 3, 2-dc Cl) in next corner ch-3 space] 4 times,
**ch 1, 2-dc Cl in each ch-1 space; repeat from ** to end of round, ch 1; join with slip st in top of beginning ch
— 40 clusters.
Fasten off.
SQUARE II (make 15)
Make same as Square I using B for Rounds 1–6 and A for Round 7.
LADYBUG (make 15)
Body (make 1 for each ladybug)
With C, ch 8.
Round 1 (right side)
Dc in 4th ch from hook (beginning ch counts as first dc), dc in next 3 ch, 3 dc in last ch; working across opposite side of foundation ch, dc in next 3 ch, dc in next ch; join with slip st in top of beginning ch
— 12 dc.
Round 2
Ch 3 (counts as first dc here and throughout), dc in same st as joining, 2 dc in next dc, [dc in next dc, 2 dc in next dc] 5 times; join with slip st in top of beginning ch
— 19 dc.
Round 3
Ch 3, 2 dc in each dc around; join with slip st in top of beginning ch
— 37 dc.
Fasten off.
Head & Antenna (make 1 for each ladybug)
With E, ch 10.
Row 1 (right side)
Sc in 2nd ch from hook and in each ch across, turn — 9 sc.
Row 2
Ch 1, [sc2tog] twice, 2 sc in next sc, [sc2tog] twice, turn — 6 sc.
Row 3
Ch 1, sc2tog, 2 sc in each of next 2 sc, sc2tog, turn — 6 sc.
Row 4
Slip st in first 2 sts, ch 14 for antennae, slip st in 2nd ch from hook and in each ch across, slip st in next 2 sc of head, ch 14 for antennae, slip st in 2nd ch from hook and in each ch across, slip st in last 2 sc of head.
Fasten off, leaving a long tail for sewing head to body.
Oval Spot (make 3 for each ladybug)
With smaller hook and E, ch 3.
Round 1
Work 2 sc in 2nd ch from hook, 3 sc in last ch; working across opposite side of foundation ch, 2 sc in next ch; join with slip st in first sc.
Fasten off, leaving a long tail for sewing spot to body.
Round Spot (make 2 for each ladybug)
With smaller hook and E, ch 2.
Round 1
Work 5 sc in 2nd ch from hook; join with slip st in first sc.
Fasten off, leaving a long tail for sewing spot to body.
Heart Spot (make 1 for each ladybug)
With smaller hook and E, ch 3.
Round 1
Work (hdc, ch 3, slip st, ch 3, hdc, 3 sc) in 3rd ch from hook; join with slip st in top of beginning ch.
Fasten off, leaving a long tail for sewing spot to body.
FLOWERS (make 45)
Petals
With D, ch 4, (2-tr Cl, ch 4, slip st, [ch 4, 2-tr Cl, ch 4, slip st] 4 times) in 4th ch from hook.
Fasten off and pull tight. Tie ends of yarn securely in knot on wrong side of piece. Trim ends close to knot.
Center
With F, ch 3, 4-dc in Cl in 3rd ch from hook.
Fasten off, leaving a long tail, and pull tight. Using tail, attach center securely to petals with knot on wrong side. Trim ends close to knot.
Finishing
Assemble Squares
- Whip stitch one head to each ladybug body.
- Sew one heart spot to center of each ladybug body.
- Sew oval and round spots about ¼” (6mm) in from outside edge of body, as follows:
Beginning at center top of body and working clockwise, sew one oval spot, one round spot, one oval spot, one oval spot, and one round spot, spacing the spots evenly around.
Note: Angle the oval spots downward slightly, using photograph or assembly diagram as a guide. - Using assembly diagram as a guide and sewing with matching color yarn, sew one ladybug to center of each square I, using small running stitches and ensuring that the stitches do not show on wrong side of piece.
- Take care to curl the tips of the antennas as you sew them to the square.
- With B, sew 3 flowers to center of square II, attaching just the tips of the flower petals.
- Press all squares lightly, blocking into shape, using warm steam iron and placing a double thickness of cloth between iron and square; making sure not to pass iron over flowers so as not to flatten them.
Assemble Throw
- Arrange squares as shown in assembly diagram.
- Whip stitching through back loops only on back side of squares, sew squares together.
- Weave in ends.
- Block lightly from wrong side.
Border
Round 1 (right side)
With right side facing, join D with sc in any corner ch-3 space, 2 sc in same ch-3 space, sc evenly spaced around entire outer edge, working 3 sc in each corner ch-3 space; join with slip st in first sc.
Fasten off.
Round 2
With right side facing, join A with sc in center sc of any 3-sc corner, 2 sc in same sc, sc in each sc around, working 3 sc in center sc of each corner; join with slip st in first sc.
Fasten off.
Round 3
With right side facing, join C with sc in center sc of any 3-sc corner, ch 5, sc in same sc,
*ch 5, skip next 3 sc, (sc, ch 5, sc) in next sc; repeat from * all the way round throw, working (sc, ch 5, sc) in each corner sc and adjusting the number of stitches skipped near corners as needed.
Fasten off.
Weave in ends. Press border lightly with warm steam iron.
Frequently Asked Questions
What crochet hook is used for this pattern?
You will need a 5.5mm [US I-9] hook for the main blanket and a 3.75mm [US F-5] hook to create the ladybug spots.
Is this project worked in rows or rounds?
The Bugs and Blooms blanket is predominantly worked in rounds.
Does this crochet project require assembly?
Yes, after crocheting the squares and embellishments, you will need to assemble them into the final blanket, sewing the pieces together and adding the border.
Conclusion
The Bugs and Blooms Crochet Blanket Pattern invites you into a world of color and creativity. With its charming ladybugs and delicate flowers, this handmade crochet project not only warms your space but also brings a sense of joy and accomplishment. Grab your yarn, hooks, and let your creativity bloom with every stitch! Happy crocheting!