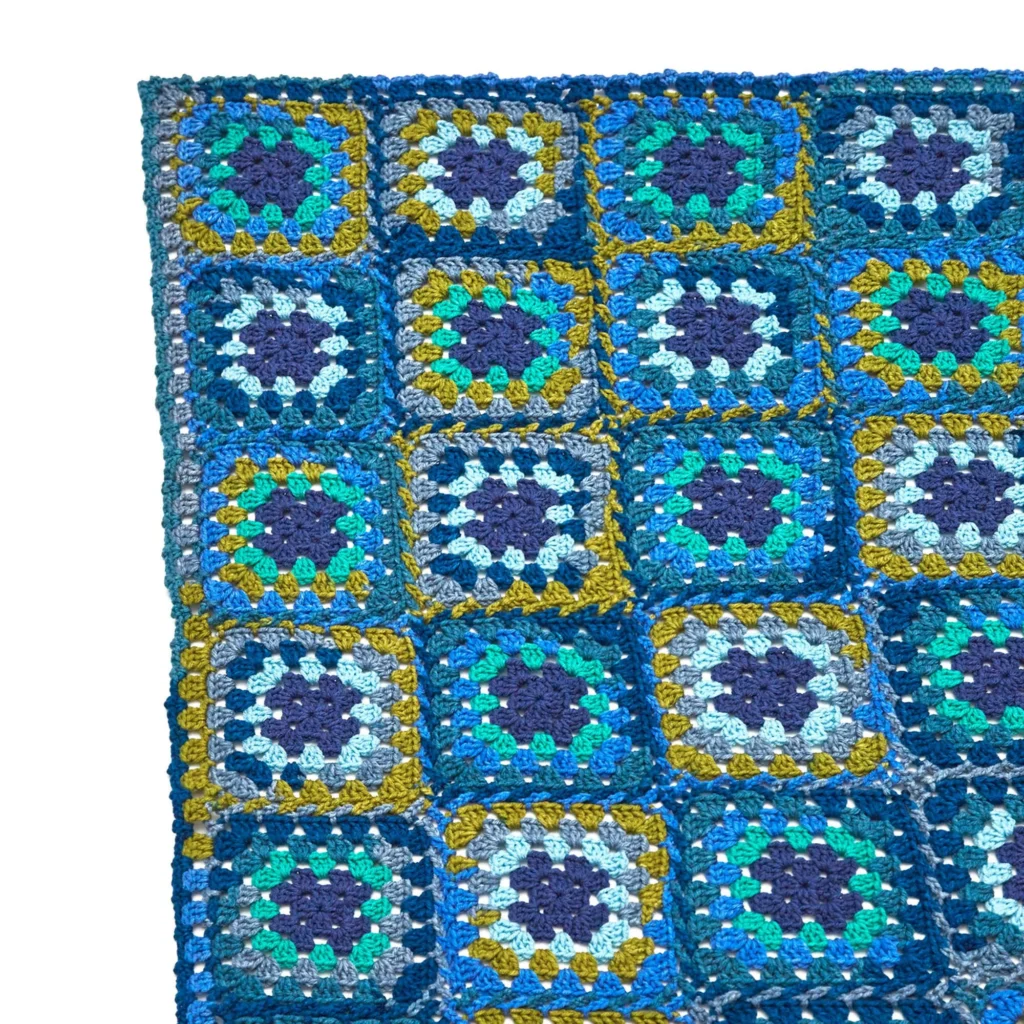
Crochet Gotta Love Granny Throw Pattern
Crocheting a throw entirely out of granny squares is a delightful project that is both charming and comfortable. The Crochet Gotta Love Granny Throw incorporates vibrant colors and a fun join-as-you-go technique for a unique and vibrant finished product. This pattern consists of 42 granny squares assembled in a visually pleasing arrangement with an elegant border.
About the Gotta Love Granny Throw
The Gotta Love Granny Throw is perfect for adding a splash of color to your home décor. Whether draped over a couch or used as a cozy blanket on chilly nights, this throw embodies warmth and cheer. Using Red Heart With Love yarn, known for its softness and array of color choices, this project is both enjoyable to crochet and soft to the touch, making it a suitable gift for friends and family.
Materials

Before you begin, gather the following materials:
Yarn
- RED HEART® With Love® yarn (Art. E400):
- 6 skeins 1974 Rainforest Stripe A
- 1 skein each of:
- 1814 True Blue B
- 1562 Jadeite C
- 1502 Iced Aqua D
Crochet Hook
- Susan Bates® Crochet Hook: 6mm [US J-10]
Notions
- Yarn needle
Pattern Technical Notes
- The throw is made from 42 Granny Squares, arranged into 6 rows of 7 squares each.
- Granny Squares are joined together while Round 6 is worked, using a join-as-you-go technique.
- Each Granny Square is worked in joined rounds with the right side always facing.
- The yarn color is changed by fastening off the old color and joining the new color. To reduce the number of yarn tails to weave in during the finishing stage, work over the tails as you go.
- A border is worked all the way around the outer edges of the completed throw.
Crochet Abbreviations
The following crochet abbreviations are used in this pattern:
- ch = chain
- dc = double crochet
- st = stitch
- sl st = slip stitch
- [ ] = work directions in brackets as many times as indicated
- ( ) = work directions in parentheses as a group
Granny Square Instructions
Granny Square I
With B, ch 4; join with a slip st in the first ch to form a ring.
Round 1 (Right Side)
- Ch 3 (counts as dc here and throughout), 2 dc in ring, [ch 2, 3 dc in ring] 3 times, ch 2; join with slip st in top of beginning ch-3—12 dc and 4 ch-2 spaces.
Round 2
- Ch 3, (2 dc, ch 3, 3 dc) in last ch-2 space made (first corner made),
- [ch 1, (3 dc, ch 2, 3 dc) in next ch-2 space (corner made)] 3 times, ch 1; join with slip st in top of beginning ch-3—24 dc, 4 ch-1 spaces, and 4 corner ch-2 spaces (two 3-dc groups along each of 4 sides between corner ch-2 spaces).
Fasten off.
Round 3
- With right side facing, draw up a loop of C in any ch-1 space, ch 3, 2 dc in same ch-1 space, ch 1, (3 dc, ch 2, 3 dc) in next corner ch-2 space,
- *ch 1, 3 dc in next ch-1 space, ch 1, (3 dc, ch 2, 3 dc) in next corner ch-2 space; repeat from * around, ch 1; join with slip st in top of beginning ch-3—36 dc, 8 ch-1 spaces, and 4 corner ch-2 spaces (three 3-dc groups along each of 4 sides between corner ch-2 spaces).
Fasten off.
Round 4
- With right side facing, draw up a loop of A in ch-1 space immediately following any corner ch-2 space, ch 3, 2 dc in same ch-1 space, ch 1, 3 dc in next ch-1 space, ch 1, (3 dc, ch 2, 3 dc) in next corner ch-2 space, *[ch 1, 3 dc in next ch-1 space] twice, ch 1, (3 dc, ch 2, 3 dc).
Round 5
- Ch 3, 2 dc in last ch-1 space made, [ch 1, 3 dc in next ch-1 space] twice, ch 1, (3 dc, ch 2, 3 dc) in next corner ch-2 space, *[ch 1, 3 dc in next ch-1 space] 3 times, ch 1, (3 dc, ch 2, 3 dc) in next corner ch-2 space; repeat from * around, ch 1; join with slip st in top of beginning ch-3—60 dc, 16 ch-1 spaces, and 4 corner ch-2 spaces (five 3-dc groups along each of 4 sides between corner ch-2 spaces).
Round 6 (Joining Round)
- [*Ch 4, slip st in next ch-1 space; repeat from * to next corner ch-2 space, ch 4, (slip st, ch 6, slip st) in corner ch-2 space] 4 times, ch 4; join with slip st in slip st at base of beginning ch-4—20 ch-4 spaces and 4 corner ch-6 spaces (5 ch-4 spaces along each of 4 sides between corner ch-6 spaces).
Fasten off.
General Granny Square Join Instructions
“All following Granny Squares are worked the same as Granny Square I, as follows:”
- Round 3 is worked with C in every other square and with D in every other square.
- Refer to diagram for arrangement of squares.
- Join edge(s) of square being made to neighboring square(s) while Round 6 is worked, using corner-join, side-join, and 4-corner-join (see Special Stitches) as instructed.
- Detailed instructions are provided for the next few squares. If you are familiar with join-as-you-go techniques, you may not need to read all of the instructions.
Continuing with Granny Squares
Each subsequent granny square is created similarly, changing the color as specified. Below are the instructions for Granny Squares II to VII.
Granny Square II
With B, ch 4; join with slip st in first ch to form a ring.
Rounds 1–5: Work the same as Rounds 1–5 of Granny Square I, using B for Rounds 1 and 2, D for Round 3, and A for Rounds 4 and 5. Do not fasten off.
Round 6 (Joining Round)
Continuing with A,
- *Ch 4, slip st in next ch-1 space; repeat from * to next corner ch-2 space, ch 4; hold Granny Square I and Granny Square II side by side;
- Join to side of Granny Square I: (slip st, corner-join, slip st) in corner ch-2 space,
- [side-join, slip st in next ch-1 space] 4 times, side-join, (slip st, corner-join, slip st) in corner ch-2 space;
- Complete Round: [*ch 4, slip st in next ch-1 space; repeat from * to next corner ch-2 space, ch 4, (slip st, ch 6, slip st) in corner ch-2 space] twice, ch 4; join with slip st in slip st at base of beginning ch-4.
Fasten off.
Granny Square III
Note: Granny Square III is worked the same as Granny Square II, EXCEPT that C is used for Round 3 (instead of D) and one edge of Granny Square III is joined to the edge of Granny Square II that is opposite the Granny Square II side edge attached to Granny Square I. When all three squares are joined together, they form a strip.
With B, ch 4; join with slip st in first ch to form a ring.
Rounds 1–5: Work the same as Rounds 1–5 of Granny Square I using B for Rounds 1 and 2, C for Round 3, and A for Rounds 4 and 5. Do not fasten off.
Round 6 (Joining Round)
Continuing with A,
- *Ch 4, slip st in next ch-1 space; repeat from * to next corner ch-2 space, ch 4; hold Granny Square II and Granny Square III side by side so that Granny Squares I–III form a strip;
- Join to side of Granny Square II: (slip st, corner-join, slip st) in corner ch-2 space,
- [side-join, slip st in next ch-1 space] 4 times, side-join, (slip st, corner-join, slip st) in corner ch-2 space;
- Complete Round: [*ch 4, slip st in next ch-1 space; repeat from * to next corner ch-2 space, ch 4, (slip st, ch 6, slip st) in corner ch-2 space] twice, ch 4; join with slip st in slip st at base of beginning ch-4.
Fasten off.
Granny Squares IV to VII
Follow the same method as previously described, changing colors according to the pattern instructions until all 42 squares are completed.
Completing Additional Squares
Continue to make and join 34 more squares in the same method described earlier, remembering to maintain the color changes for Round 3.
Border
After completing all quilt squares, add a border for a finishing touch.
With the right side facing, draw up a loop of A in the ch-4 space immediately following any corner ch-6 space.
Round 1 (Right Side)
- Ch 3, 2 dc in the same ch-4 space,
- *ch 1, 3 dc in next ch-4 space; repeat from * around working as follows at joins between squares and corners:
- Join between squares: Ch 1, dc in first ch-3 space of join, dc in 3rd ch of next ch-3 space of join, dc in the same ch-3 space.
- Corner: Ch 1, (3 dc, ch 2, 3 dc) in corner ch-6 space.
- At end of the round, join with slip st in the top of the beginning ch-3.
Round 2
- Slip st in the next 2 dc, (slip st, ch 1, sc, ch 2, sc) in the first ch-1 space,
- *ch 3, (sc, ch 2, sc) in next ch-1 space; repeat from * around working (sc, ch 2, sc, ch 3, sc, ch 2, sc) in each corner ch-2 space;
- Join with slip st in the first sc.
Fasten off.
Finishing
Finally, weave in any remaining ends. Your Granny Throw is now ready to be loved and displayed!
Frequently Asked Questions
What crochet hook is used for this pattern?
The project uses a 6mm (US J-10) crochet hook.
Is this project worked in rows or rounds?
This project is worked in rounds, specifically through 6 rounds for each granny square and a final border round.
How many granny squares are needed for the throw?
You will need to create 42 granny squares to complete the throw.
Does this crochet project require assembly?
Yes, the squares are joined together using a join-as-you-go technique, which is incorporated into the rounds of each square.
What colors are used in this pattern?
The pattern uses a vibrant assortment of colors from RED HEART® With Love® yarn, including Rainforest Stripe for the main body, with accents in True Blue, Jadeite, and Iced Aqua.
Conclusion
The Crochet Gotta Love Granny Throw Pattern not only brings warmth but also joy through its vibrant color palette and the satisfying experience of creating granny squares. Perfect for cozying up on the couch or adding a decorative touch to your home, this throw is a delightful project for any crocheter looking to express their creativity and style. Happy crocheting!