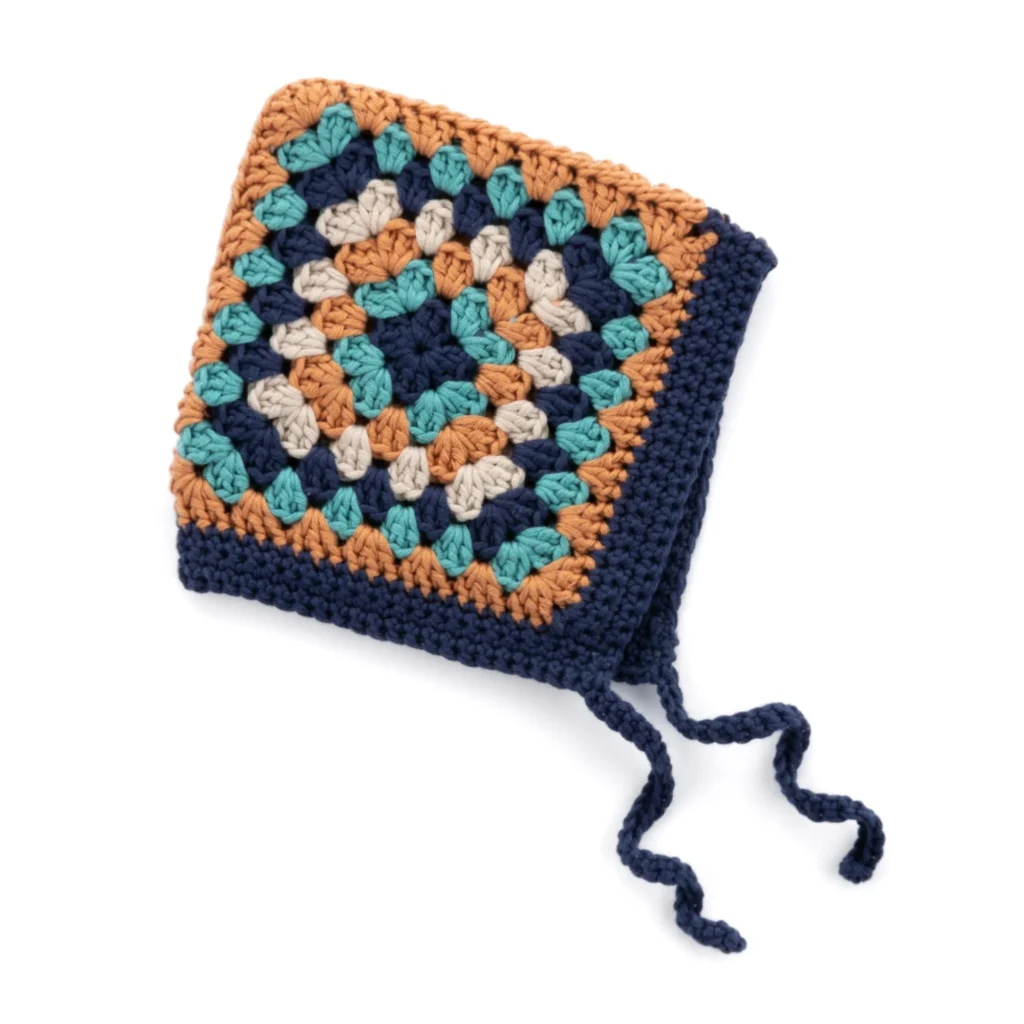
Crochet Granny Square Baby Bonnet Pattern
Creating adorable crochet projects for little ones is a delightful endeavor, and nothing is quite as charming as a handmade baby bonnet. This Crochet Granny Square Baby Bonnet Pattern features lovely granny squares and is perfect for adorning your little one’s head or for gifting to friends and family. With a combination of soothing colors and comfortable cotton yarn, this bonnet will be a soft and stylish addition to any baby’s wardrobe.
About the Crochet Project
This baby bonnet features a lovely granny square design, making it not only cute but also a great way to practice your motif skills. The pattern includes instructions for two sizes: 6-12 months and 18-24 months, allowing you to create a perfectly fitted accessory for babies of different ages. Utilizing Bernat® Softee® Cotton™, the bonnet is lightweight, breathable, and comfortable, ideal for warmer months. The combination of colors will create a fun, vibrant look while still being soft against a baby’s sensitive skin.
Materials

Yarn
For this project, you’ll need the following yarn:
- Bernat® Softee® Cotton™ (4.2 oz/120 g; 254 yds/232 m)
- Contrast A: Seaside Blue (69011) – 1 ball
- Contrast B: Pool Green (69010) – 1 ball
- Contrast C: Sandstone (69009) – 1 ball
- Contrast D: Feather Gray (69002) – 1 ball
Crochet Hook
- Size U.S. G/6 (4 mm) Susan Bates® crochet hook or size needed to obtain gauge.
Notions
- Susan Bates® yarn needle for weaving in ends.
Stitch Abbreviations
Understanding the abbreviations used in this pattern will aid you in successfully completing your crochet project:
- ch = chain
- sl st = slip stitch
- dc = double crochet
- sc = single crochet
- sc2tog = single crochet 2 together
Technical Notes
- The instructions are primarily written for the 6-12 months size.
- If changes are necessary for larger sizes, they will be indicated in parentheses like this (6/12 (18/24)).
- Numbers for each size are shown in the same color throughout the pattern.
- When only one number is provided in black, it applies to both sizes.
Instruction Set
SQUARE (make 2)
Refer to the diagram provided to guide you through the steps:
1st Round (with A)
- With A, ch 4.
- Join with sl st to first ch to form a ring.
- 1st rnd: Ch 4 (counts as dc, ch 1).
- (3 dc, ch 1) three times in ring.
- 2 dc in ring.
- Join with sl st to 3rd ch of beginning ch 4.
- Break A.
2nd Round (join B)
- Join B with sl st in next corner ch-1 sp.
- Ch 4 (counts as dc, ch 1).
- 3 dc in the same ch-1 sp as sl st.
- (3 dc, ch 1, 3 dc) in next corner ch-1 sp. Repeat from * twice more.
- 2 dc in the next corner ch-1 sp (same sp as beg ch 4).
- Join with sl st to 3rd ch of beginning ch 4.
- Break B.
3rd Round (join C)
- Join C with sl st in next corner ch-1 sp.
- Ch 4 (counts as dc, ch 1).
- 3 dc in same ch-1 corner sp as sl st.
- Skip next 3 dc, 3 dc in sp between next 3 dc, skip next 3 dc.
- (3 dc, ch 1, 3 dc) in next corner ch-1 sp. Repeat from * twice more, then from * to once.
- 2 dc in next ch-1 corner sp.
- Join with sl st to 3rd ch of beginning ch 4.
- Break C.
4th Round (join D)
- Join D with sl st in next ch-1 corner sp.
- Ch 4 (counts as dc, ch 1).
- 3 dc in same ch-1 corner sp as sl st.
- Skip next 3 dc, 3 dc in sp between next 3 dc to next corner ch-1 sp, skip next 3 dc.
- (3 dc, ch 1, 3 dc) in next corner ch-1 sp. Repeat from * twice more, then from * to once.
- 2 dc in next ch-1 corner sp.
- Join with sl st to 3rd ch of beginning ch 4.
Continue to Size
Work a further 3 (4) rounds as established, working 1 more group of 3-dc before each corner ch-1 sp each round, in established color sequence, beginning the next round with A. Fasten off, leaving a long tail for seaming.
Finishing
- With WS (wrong side) together and stitches aligned, sew across 2 sides of squares using whipstitch to form the top and back seams.
Bottom Edging
Refer to the diagram for the bottom edging:
1st Row (RS)
- (RS) Join A with sl st in ch-1 sp at the right corner.
- Ch 1.
- 1 sc in the same sp as sl st.
- 1 sc in each of the next 21 (24) dc to the next ch-1 sp.
- Sc2tog over the next 2 ch-1 sps.
- 1 sc in each dc to the last ch-1 sp.
- 1 sc in the last ch-1 sp.
- Turn. 45 (51) sts.
2nd to 4th Rows
- Ch 1.
- 1 sc in each st to the end of the row.
- Turn.
- Fasten off.
Front Edging and Ties
Refer to the diagram for front edging and ties:
1st Row (RS)
- (RS) Join A with sl st to the last sc of the last row of Bottom edging.
- Ch 1.
- Working into the side(s) of the last sc of Bottom edge, 1 sc in the side of the last sc of the next 4 rows.
- 1 sc in each of the next 21 (24) dc to the ch-1 sp.
- Sc2tog over the next 2 ch-1 sps.
- 1 sc in each of the next 21 (24) dc to Bottom edge.
- 1 sc into the side of the last sc of the next 4 rows.
- 51 (57) sts.
2nd and 3rd Rows
- Ch 1.
- 1 sc in each st to the end of the row.
- Turn.
4th Row (ties)
- Ch 29.
- 1 sc in 2nd ch from hook.
- 1 sc in each of the next 27 ch (first tie made).
- 1 sc in each st of Front edging to the end of the row.
- Second tie: Ch 29.
- 1 sc in 2nd ch from hook.
- 1 sc in each of the next 27 ch.
- Join with sl st into the side of the last sc of the 4th row.
- Fasten off.
Weaving Ends
Weave in all ends using your yarn needle.
Frequently Asked Questions
What sizes does this baby bonnet pattern accommodate?
This pattern provides instructions for two sizes: 6-12 months and 18-24 months.
What type of yarn is used for this pattern?
The bonnet is made using Bernat® Softee® Cotton™, which is soft and breathable, making it ideal for baby garments.
Does this pattern require any assembly?
Assembly is minimal as the main construction involves joining squares and adding edging. Follow the finishing steps to seam the squares and attach the bottom edging and front ties.
What crochet hook size is recommended for this project?
A U.S. G/6 (4 mm) crochet hook is needed, but you may use the size required to obtain gauge.
Is the pattern suitable for beginners?
While no skill level is specified, the pattern consists of basic stitches and techniques that can be tackled by those familiar with granny squares and basic crochet skills.
Conclusion
The Crochet Granny Square Baby Bonnet Pattern is a delightful and practical accessory for any baby. Whether you’re crafting for your little one or preparing a special gift, this bonnet brings together beautiful colors and comfortable materials. Follow the step-by-step instructions carefully, and you’ll create a lovely bonnet that’s sure to turn heads. Happy crocheting!