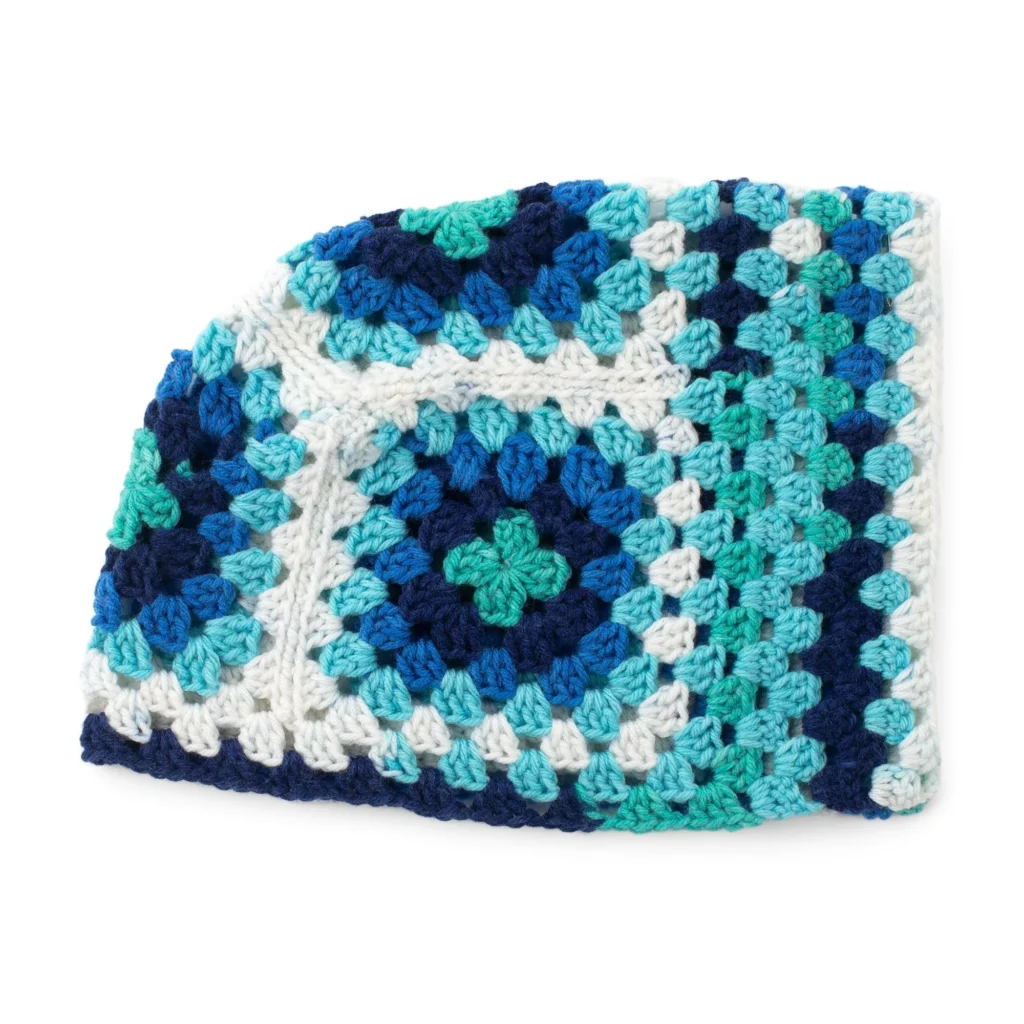
Crochet Granny Couch Cozy Pattern
Enhance your living space with a touch of handmade charm using the Crochet Granny Couch Cozy Pattern. This delightful project not only adds warmth to your seating but also showcases the classic granny square design, making it a perfect addition for any cozy home. Follow along as we detail the materials needed, step-by-step instructions, and additional helpful tips to create your very own Granny Couch Cozy!

About the Crochet Project
The Crochet Granny Couch Cozy is a fun and versatile project that revolves around the timeless granny square motif. The finished cozy consists of four unique granny squares that come together to form a beautiful arm cozy. With just one ball of yarn, you can make two arm cozies—perfect for giving your couch a refreshing look. The project integrates traditional crochet techniques with modern style, allowing you to express your creativity while keeping your furniture comfortable.
Finished Size
The arm cozies measure around 8 inches wide and 13 inches long. This size is ideal for providing comfort on your couch’s armrests while adding a unique decorative element.
Materials
To complete your Crochet Granny Couch Cozy, gather the following materials:
Yarn
- Yarn: Red Heart® All in One™ Granny Square™ (Medium 4)
- Color: Frigid (2004)
- Quantity: 1 ball (will make 2 Arm Cozies)
- Yardage: Approximately 200 yards/183 meters
Tools
- Crochet Hook: Size U.S. I/9 (5.5 mm) Susan Bates® Silvalume® or size needed to obtain gauge
- Yarn Needle
- Tape Measure
Crochet Abbreviations
- ch – chain
- sl st – slip stitch
- dc – double crochet
- sp – space
- rep – repeat
Pattern Notes
- The project uses a self-striping yarn technique, allowing colors to change naturally throughout the work.
- Ensure to work the granny squares as tightly or loosely as per your gauge to maintain consistency in size.
Instructions
Motif
You will need to make 4 granny squares for the project.
- With Color 1, ch 4.
- Join with sl st to first ch to form a ring.
1st Round: (RS)
- ch 6.
- (3 dc, ch 3) 3 times in ring.
- 2 dc in ring.
- Join.
2nd Round
- sl st in ch-3 sp.
- ch 6.
- 3 dc in same ch-3 sp.
-
- ch 1. (3 dc, ch 3, 3 dc) in next ch-3 sp.
- Rep from * twice more.
- ch 1.
- 2 dc in first ch-3 sp.
- Join.
3rd Round
- sl st in ch-3 sp.
- ch 6.
- 3 dc in same ch-3 sp.
-
- ch 1. 3 dc in next ch-1 sp. ch 1. (3 dc, ch 3, 3 dc) in next ch-3 sp.
- Rep from * twice more.
- ch 1. 3 dc in last ch-1 sp.
- ch 1.
- 2 dc in first ch-3 sp.
- Join.
4th and 5th Rounds
-
sl st in ch-3 sp.
-
ch 6.
-
3 dc in same ch-3 sp.
-
- (ch 1, 3 dc) in each ch-1 sp to next ch-3 sp. ch 1.
-
(3 dc, ch 3, 3 dc) in next ch-3 sp.
-
Rep from * twice more, then from * to once.
-
2 dc in first ch-3 sp.
-
Join.
-
Fasten off.
Assembly
Granny Corner
With a yarn needle, join the motifs together as shown in the assembly diagram using a whip stitch to form the Granny Corner.
Edging
Note: Use yarn as ‘self-striping’ yarn, allowing colors to change as they appear.
1st rnd: (RS)
- Join yarn with sl st to ch-3 sp at the bottom right of Granny Corner.
- ch 6.
- 3 dc in the same sp as sl st.
- ch 1.
-
- (3 dc in next ch-1 sp. ch 1) to next ch-3 sp.
- (3 dc, ch 1) in each of the next 2 ch-3 sps.
- Rep from * once more, then from * to .
- (3 dc, ch 3, 3 dc) all in the next ch-3 sp.
- ch 1.
- Rep from * to ** once.
- 2 dc in the first ch-3 sp.
- Join.
2nd rnd
- sl st into ch-3 sp.
- ch 6.
- 3 dc in the same sp as sl st.
- ch 1.
-
- (3 dc in next ch-1 sp. ch 1) to next ch-3 sp.
- (3 dc, ch 3, 3 dc) all in the next ch-3 sp.
- ch 1.
- Rep from * to ** once more.
- 2 dc in the first ch-3 sp.
- Join with sl st into the next ch-3 sp.
Extension
Continue working in rows as follows for Extension (leaving remaining stitches unworked as written):
1st row: (RS)
- ch 4 (counts as dc and ch-1).
- (3 dc in next ch-1 sp. ch 1) to the next ch-3 sp.
- 1 dc in the next ch-3 sp.
- Turn.
- Leave remaining stitches unworked.
2nd row: (WS)
- ch 3.
- 2 dc in the first ch-1 sp.
- ch 1.
- (3 dc in next ch-1 sp. ch 1) to the last ch-1 sp.
- 2 dc in the last ch-1 sp.
- 1 dc in last dc.
- Turn.
3rd row
-
ch 4 (counts as dc and ch-1).
-
(3 dc in next ch-1 sp. ch 1) to the last ch-1 sp.
-
3 dc in the last ch-1 sp. ch 1.
-
1 dc in last dc.
-
Turn.
-
Repeat last 2 rows 4 times more.
-
Fasten off.
Finishing
- Fasten off for the motif.
- Fasten off after completing the extension.
Frequently Asked Questions
What crochet hook is used for this pattern?
You will need a Size U.S. I/9 (5.5 mm) Susan Bates® Silvalume® crochet hook, or a size needed to obtain gauge.
Is this project worked in rows or rounds?
The project is primarily worked in rounds to create the granny squares.
Does this crochet project require assembly?
Yes, after creating the granny squares, you will need to assemble them using a whip stitch to form the corner.
Can I use a different type of yarn for this project?
While the specific yarn recommended is Red Heart® All in One™ Granny Square™, you can substitute with any medium-weight yarn (Medium 4) that provides a similar gauge, if desired.
How many arm cozies can I create with one ball of yarn?
One ball of yarn is enough to make two arm cozies.
Conclusion
The Crochet Granny Couch Cozy Pattern is a charming project that combines classic design with functional home décor. With just a few materials and simple stitches, you can create cozy armrests that beautifully enhance any living room. Dive into this enjoyable crochet project today and showcase your creativity through this timeless design!