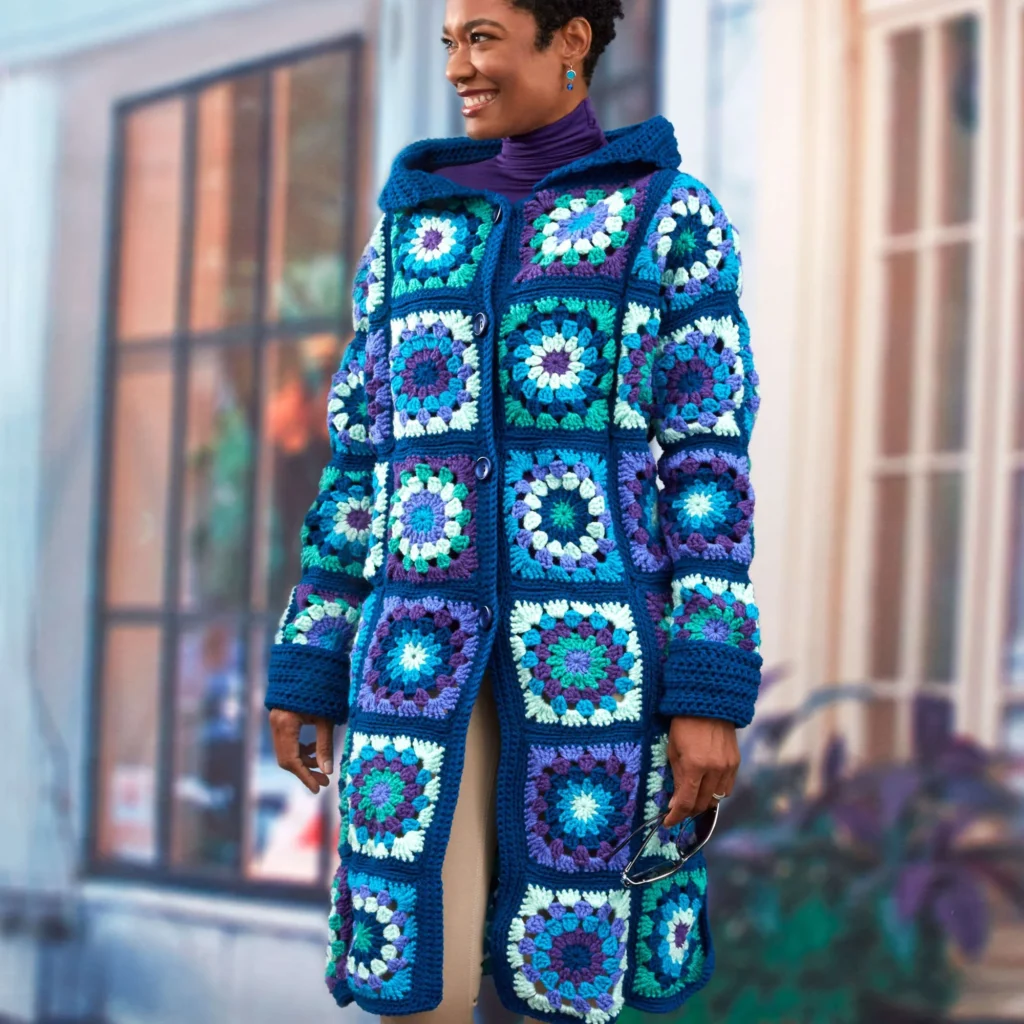
Crochet Glam Granny Coatigan Pattern
Crochet enthusiasts, get ready to embrace the cozy yet chic style of the Crochet Glam Granny Coatigan! This delightful garment combines the classic granny square pattern with a modern coatigan silhouette, making it a perfect addition to your wardrobe. Whether you’re looking for something warm for those cooler days or a stylish piece to layer over your favorite outfits, this coatigan has got you covered.
This detailed pattern will guide you through the creation of beautiful granny squares and their assembly into a stunning coatigan. Using vibrant colors will not only enhance its appeal but also showcase your crochet skills. Let’s jump right into the specifics of your crochet journey!
About the Crochet Project
The Glam Granny Coatigan is constructed entirely from crocheted granny squares, which are assembled to create the body and sleeves of the coatigan. This pattern features several rounds for each square, utilizing a variety of colors from the RED HEART® With Love® yarn collection. This garment doesn’t just keep you warm but also adds a unique flair to your outfit with its colorful design and cozy structure.
Materials

Yarn
For this project, you will need RED HEART® With Love® (Art. E400) yarn in the following quantities and colors:
- 4 (5, 5) skeins 1505 Peacock (A)
- 2 (2, 2) skeins 1932 Minty (B)
- 1 (2, 2) skein(s) each of:
- 1546 Iris (C)
- 1562 Jadeite (D)
- 1530 Violet (E)
- 1803 Blue Hawaii (F)
(Note: Solid color skeins are 7 oz (198 g), 390 yd (357 m) and multicolor skeins are 5 oz (141 g), 230 yd (211 m).)
Crochet Hooks
You will need the following Susan Bates® Crochet Hooks:
- 5.5mm [US I-9]
- 6mm [US J-10]
- 6.5mm [US K-10½]
Notions/Tools
Make sure to gather these additional supplies:
- Four 1¼” [32mm] buttons
- Sewing needle and thread
- Yarn needle
Crochet Abbreviations
Familiarize yourself with the following abbreviations used in this pattern:
- ch: Chain
- dc: Double crochet
- sc: Single crochet
- sl st: Slip stitch
- tr: Treble crochet
Pattern Notes
This pattern consists of multiple granny squares that are worked in rounds. The squares are then assembled together to form the coatigan. Each square has distinctive color rounds, utilizing various shades from the Yarn materials.
Granny Square Parts
GRANNY SQUARE I (make 10)
Instructions:
-
With A, ch 5; join with slip st in first ch to form a ring.
Round 1 (right side):
Ch 3 (counts as dc here and throughout), work 11 dc in ring; join with slip st in top of beginning ch-3—12 dc.
Fasten off.Round 2:
(right side facing) draw up a loop of E in any space between sts, ch 3, dc in same space,
*ch 1, 2 dc in next space between sts; repeat from * around, ch 1;
join with slip st in top of beginning ch-3—24 dc and 12 ch-1 spaces.
Fasten off.Round 3:
(right side facing) draw up a loop of F in any ch-1 space, ch 3, 2 dc in same ch-1 space,
*ch 1, 3 dc in next ch-1 space; repeat from * around, ch 1;
join with slip st in top of beginning ch-3—36 dc and 12 ch-1 spaces.
Fasten off.Round 4:
(right side facing) draw up a loop of C in any ch-1 space, ch 3, 2 dc in same ch-1 space,
*ch 2, 3 dc in next ch-1 space; repeat from * around, ch 2;
join with slip st in top of beginning ch-3—36 dc and 12 ch-2 spaces.
Fasten off.Round 5:
(right side facing) draw up a loop of B in any ch-2 space, ch 3, 3 dc in same ch-2 space, ch 1, 4 dc in next ch-2 space,
*ch 1, (2 dc, 2 tr, ch 2, 2 tr, 2 dc) in next ch-2 space (corner made),
[ch 1, 4 dc in next ch-2 space] twice;
repeat from * 2 more times, ch 1, (2 dc, 2 tr, ch 2, 2 tr, 2 dc) in next ch-2 space,
ch 1;
join with slip st in top of beginning ch-3—4 corners with two 4-dc groups along each of 4 sides between corners.
Fasten off.Round 6:
(right side facing) join A with slip st in any corner ch-2 space,
*[skip next st, sc in next 3 sts, sc in next ch-1 space] 3 times, skip next st, sc in next 3 sts, 3 sc in corner ch-2 space;
repeat from * 3 more times; join with slip st in first sc—72 sc (15 sc along each of 4 sides between 3-sc corners).
Do not fasten off.Round 7:
Continuing with A, ch 1, *sc in each st to next 3-sc corner, 2 sc in each of next 3 sc; repeat from * 3 more times;
join with slip st in first sc—84 sc.
Fasten off.
GRANNY SQUARE II (make 10)
Make same as Granny Square I using:
- B for Round 1
- F for Round 2
- A for Round 3
- E for Round 4
- C for Round 5
- A for Rounds 6 and 7.
GRANNY SQUARE III (make 10)
Make same as Granny Square I using:
- C for Round 1
- D for Round 2
- E for Round 3
- F for Round 4
- B for Round 5
- A for Rounds 6 and 7.
GRANNY SQUARE IV (make 10)
Make same as Granny Square I using:
- D for Round 1
- A for Round 2
- B for Round 3
- C for Round 4
- F for Round 5
- A for Rounds 6 and 7.
GRANNY SQUARE V (make 10)
Make same as Granny Square I using:
- E for Round 1
- B for Round 2
- F for Round 3
- A for Round 4
- D for Round 5
- A for Rounds 6 and 7.
GRANNY SQUARE VI (make 12)
Make same as Granny Square I using:
- F for Round 1
- C for Round 2
- B for Round 3
- D for Round 4
- E for Round 5
- A for Rounds 6 and 7.
Finishing
Assembly
Arrange the Granny Squares as shown in the assembly diagram.
With A, sew the squares together. Take care when sewing the underarm/gusset squares in place:
One square is placed under each arm.
Two edges of the underarm/gusset square are sewn to edges of 2 squares in the sleeve, and the other 2 edges of the underarm/gusset square are sewn to edges of 2 squares in the body of the coat.
When sewing sides of coat, leave the last 2 side squares at the lower edge of the front and back unsewn for side slits.
Button Band
Row 1 (right side):
With right side facing, join A with sc at beginning of left front edge, work sc evenly along the left front edge.
Row 2:
Ch 1, turn, sc in each st across.
Repeat Row 2 until button band measures about 1½” [4 cm].
Fasten off.
Buttonhole Band
Row 1 (right side):
With right side facing, join A with sc at beginning of right front edge,
sc in each st to near top corner of first of upper four Granny Squares,
[ch 3, sk next 3 sc (for buttonhole), sc in each st to near top corner of next Granny Square] 3 times,
ch 3, sk next 3 sc, sc in each st to end of right front edge.
Row 2:
Ch 1, turn, sc in each sc and ch across.
Row 3:
Ch 1, turn, sc in each st across.
Repeat Row 3 until buttonhole band measures about 1½” [4 cm].
Fasten off.
Collar
Row 1 (right side):
With right side facing, join A with sc at beginning of neck edge, work 79 more sc evenly spaced along neck edge—80 sc.
Row 2:
Ch 2 (counts as hdc here and throughout), turn, hdc2tog, hdc in each st across—79 hdc.
Repeat Row 2 until collar measures about 6″ [15 cm].
Fasten off.
Sleeve Cuffs
Round 1 (right side):
With right side facing and beginning under the arm, join A with sc in sleeve edge, work 39 more sc evenly spaced around edge; join with slip st in first sc—40 sc.
Round 2 (wrong side):
Ch 2 (counts as first hdc here and throughout), turn, hdc in next sc, hdc2tog,
*hdc in next 2 sc, hdc2tog; repeat from * around; join with slip st in top of beginning ch-2—30 hdc.
Round 3:
Ch 2, hdc in each st around; join with slip st in top of beginning ch-2.
Repeat Round 3 until cuff measures about 5″ [12.5 cm].
Fasten off.
Repeat around other sleeve edge.
Fold cuff up.
Lower Edging
With right side facing, join A with sc in lower front corner, sc evenly spaced along entire lower edge (including side slits), working 2 sc in each lower corner of side slits.
Fasten off.
Sew buttons to button band, opposite buttonholes. Weave in ends.
Frequently Asked Questions
What crochet hook size is used for this pattern?
You will need Susan Bates® Crochet Hooks of sizes 5.5mm [US I-9], 6mm [US J-10], and 6.5mm [US K-10½].
How many granny squares are needed?
You will create a total of 60 granny squares: 10 of each color set for Squares I, II, III, IV, and V, and 12 of Square VI.
Does this crochet project require assembly?
Yes, after crocheting all the granny squares, they need to be sewn together to form the coatigan.
Conclusion
The Crochet Glam Granny Coatigan Pattern is a beautiful and vibrant project that showcases the charm of granny squares while providing a stylish and functional piece for your wardrobe. With this pattern, you’ll not only enjoy the process of creating beautiful squares but also experience the joy of wearing your handmade garment with pride. Dive into this project, and happy crocheting!