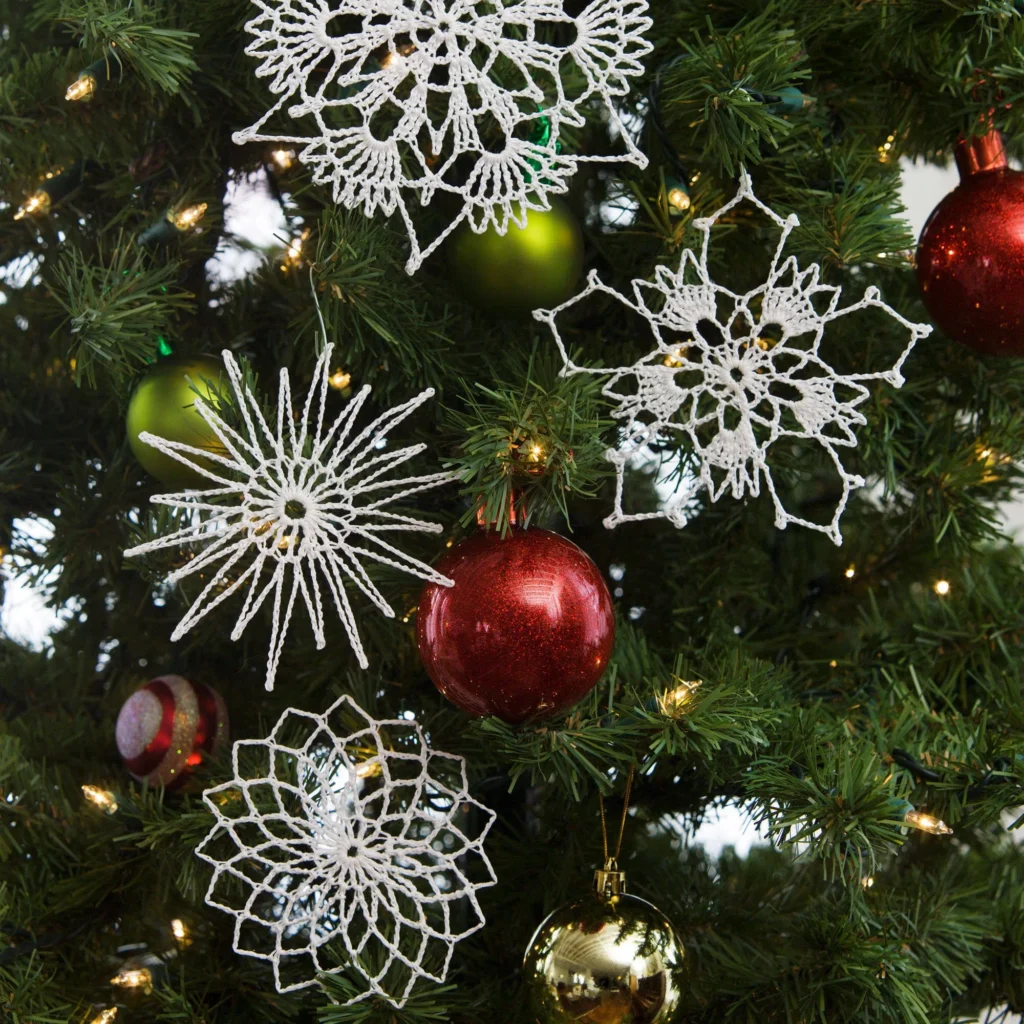
Crochet Flurry of Snowflakes Pattern
Create your own stunning crochet snowflakes with the Crochet Flurry of Snowflakes Pattern! This delightful project not only adds an enchanting touch to your holiday decorations but also makes for wonderful gifts and keepsakes.
About This Crochet Project
Crocheting snowflakes is a timeless tradition that many crafters adore. Each snowflake is unique, just like real snowflakes, and the versatility of crochet allows for a wide range of designs and styles. This pattern features four different styles of snowflakes – each with its own complexity level – making them perfect for both intermediate and easy skill levels.
Let’s explore the materials needed, the crochet techniques involved, and the step-by-step instructions to create these beautiful decorative pieces!

Materials
Yarn
- AUNT LYDIA’S® Classic Crochet Thread, Size 10: 1 ball 001 White
Available in white & ecru, 400 yd; solid color 250 yd; shaded color 300 yd balls.
Crochet Hook
- Susan Bates® Steel Crochet Hook: 1.5mm [US 7]
Notions
- Thread needle
- Rustproof pins
- Fabric stiffener
- Ornament hangers
Crochet Abbreviations
Here are the abbreviations that will be used in this crochet pattern:
- ch: chain
- sl st: slip stitch
- sc: single crochet
- dc: double crochet
- tr: treble crochet
- dtr: double treble crochet
- [ ]: work the instructions within the brackets as directed
- *: repeat the instructions following this symbol as indicated
Snowflake Instructions
SNOWFLAKE Style #1 (Skill level: intermediate)
Setup / Gauge
Ch 8, join with slip st in first ch to form ring.
Round 1
Ch 5 (counts as first tr and ch-1),
[tr into ring, ch 1] 19 times;
slip st in 4th ch of ch-5 to join—
20 tr and 20 ch-1 spaces.
Round 2
Ch 1, sc into next ch-1 space,
*ch 18, sc into next ch-1 space, ch 25, sc into next ch-1 space; repeat from * around;
slip st in beginning sc to join—
10 ch-18 loops and 10 ch-25 loops.
Fasten off and weave in ends.
Referring to photograph for finished shape, stiffen Snowflake, following stiffener directions.
Designed by: Elizabeth P. Williams
SNOWFLAKE Style #2 (Skill level: easy)
Setup / Gauge
Ch 6, join with slip st in first ch to form ring.
Round 1
Ch 3 (counts as first dc), 2 dc into ring, ch 2,
*3 dc into ring, ch 2; repeat from * 4 times;
slip st in top of ch-3 to join—
5 3-dc clusters and 5 ch-2 spaces.
Round 2
Ch 1, sc in top of ch-3,
*ch 7, skip 1 dc, sc in next dc,
**ch 7, skip next ch-2 space, sc in next dc; repeat from * 3 times, then from * to ** once,
ch 7, skip last ch-2 space;
slip st in beginning sc to join—
10 ch-7 loops.
Round 3
Slip st into first ch-7 loop, ch 4 (counts as first tr),
7 tr into same loop, ch 3,
sc into next ch-7 loop, ch 3,
*8 tr into next ch-7 loop, ch 3, sc into next ch-7 loop, ch 3;
repeat from * 3 times;
slip st in top of ch-4 to join—
5 8-tr clusters and 10 ch-3 spaces.
Round 4
Ch 1, sc in top of ch-4,
*ch 6, skip 2 tr, sc in next tr, ch 5, sc in next tr, ch 6, skip 2 tr, sc in last tr in cluster,
[ch 8, sc in 4th ch from hook (picot made)] 3 times, ch 4,
skip ch-3 space and sc and ch-3 space,
**sc in next tr; repeat from * 3 times, then from * to ** once;
slip st in beginning sc to join—
5 3-picot loops, 10 ch-6 loops, and 5 ch-5 loops.
Fasten off and weave in ends.
Referring to photograph for finished shape, stiffen Snowflake, following stiffener directions.
SNOWFLAKE Style #3 (Skill level: intermediate)
Setup / Gauge
Special stitches
dtr (double treble crochet) = Yarn over 3 times, insert hook in indicated stitch or space and draw up a loop, [yarn over and draw through 2 loops] 4 times.
Ch 6, join with slip st in first ch to form ring.
Round 1
Ch 3 (counts as first dc), dc into ring, ch 3,
*2 dc into ring, ch 3; repeat from * 4 times;
slip st in top of ch-3 to join—
6 2-dc clusters and 6 ch-3 spaces.
Round 2
Ch 3 (counts as first dc), dc in top of same st, 2 dc in next dc, ch 4,
skip next ch-3 space,
*2 dc in each of next 2 dc, ch 4; repeat from * 4 times;
slip st in top of ch-3 to join—
6 4-dc clusters and 6 ch-4 spaces.
Round 3
Ch 3 (counts as first dc), 2 dc in top of same st,
*ch 3, skip 2 dc, 3 dc in next dc, ch 6, sc in 4th chain from hook (picot made), ch 2, skip next ch-4,
**3 dc in next dc;
repeat from * 4 times, then from * to ** once;
slip st in top of ch-3 to join—
12 3-dc clusters, 6 ch-3 spaces, and 6 picot loops.
Round 4
Ch 4 (counts as first tr), tr in each of next 2 dc,
*ch 5, skip next ch-3 space, tr in each of next 3 dc, ch 8, skip next picot loop,
**tr in each of next 3 dc; repeat from * 4 times, then from * to ** once;
slip st in top of ch-4 to join—
12 3-tr clusters, 6 ch-5 spaces, and 6 ch-8 spaces.
Round 5
Slip st in next 2 tr and into ch-5 space,
(ch 5 (counts as first dtr), ch 1, [dtr, ch 1] 6 times, dtr) in same ch-5 space,
*ch 3, skip next 3 ch of ch-8 space of previous Round, sc in 4th ch, ch 5, sc in 5th ch (open picot made), ch 3, skip last 3 ch of ch-8 space,
**([dtr, ch 1] 7 times, dtr) in next ch-5 space; repeat from * 4 times, then from * to ** once;
slip st in top of ch-5 to join—
6 8-dtr clusters and 6 open picot loops.
Round 6
Slip st into first ch-1 space, ch 1, sc into same space,
[ch 5, skip next dtr, sc in next space] 6 times,
*ch 10, sc in 4th chain from hook (picot made), ch 6, skip next dtr and open picot loop and dtr,
**sc in next ch-1 space, [ch 5, skip next dtr, sc in next space] 6 times;
repeat from * 4 times, then from * to ** once;
slip st in beginning sc to join—
6 picot loops and 36 ch-5 spaces.
Fasten off and weave in ends.
Referring to photograph for finished shape, stiffen Snowflake, following stiffener directions.
SNOWFLAKE Style #4 (Skill level: easy)
Setup / Gauge
Ch 6, join with slip st in first ch to form ring.
Round 1
Ch 3 (counts as first dc), ch 1,
*dc into ring, ch 1; repeat from * around;
slip st in top of ch-3 to join—
16 dc and 16 ch-1 spaces.
Round 2
Slip st in first ch-1 space, sc in same space,
*ch 6, skip next dc, sc in next ch-1 space; repeat from * 14 times,
ch 3, skip ch-3;
dc in beginning sc to join (counts as last ch-6 loop)—
16 sc and 16 ch-6 loops.
Rounds 3–4 (work both rounds the same)
Ch 1, sc into top of loop just made,
*ch 6, skip next sc, sc in next ch-6 loop; repeat from * 14 times,
ch 3, skip last sc;
dc in beginning sc to join (counts as last ch-6 loop)—
16 sc and 16 ch-6 loops.
Round 5
Ch 1, sc into top of loop just made,
*ch 7, skip next sc, sc in next ch-6 loop; repeat from * 14 times,
ch 7, skip last sc;
slip st in beginning sc to join—
16 sc and 16 ch-7 loops.
Fasten off and weave in ends.
Referring to photograph for finished shape, stiffen Snowflake, following stiffener directions.
Assembly / Finishing
Fasten off and weave in ends (each style).
Stiffen Snowflake by following stiffener directions, referring to photograph for finished shape.
Ornament hangers are listed as required materials.
Frequently Asked Questions
What crochet hook is used for this pattern?
You will need a Susan Bates® Steel Crochet Hook size 1.5mm [US 7].
Is this project worked in rows or rounds?
This project is worked in rounds, following the provided instructions to create each snowflake.
How many different styles of snowflakes are included in this pattern?
The pattern includes four different styles of snowflakes, each with varying skill levels and techniques.
Do I need any special materials to stiffen the snowflakes?
Yes, you will need fabric stiffener to achieve the desired shape and firmness for your finished snowflakes.
How long will it take to make these snowflakes?
The time required will vary based on your experience level and the complexity of the snowflake styles you choose to create. With practice, you’ll find a rhythm in your crochet work!
Conclusion
Creating your own snowflakes with the Crochet Flurry of Snowflakes Pattern is a delightful process that can brighten your home or make unique gifts. Whether you are an experienced crocheter or just starting out, the variety of patterns offered will ensure you find a snowflake that you enjoy making and can proudly display. Grab your materials, and let the crochet magic begin!