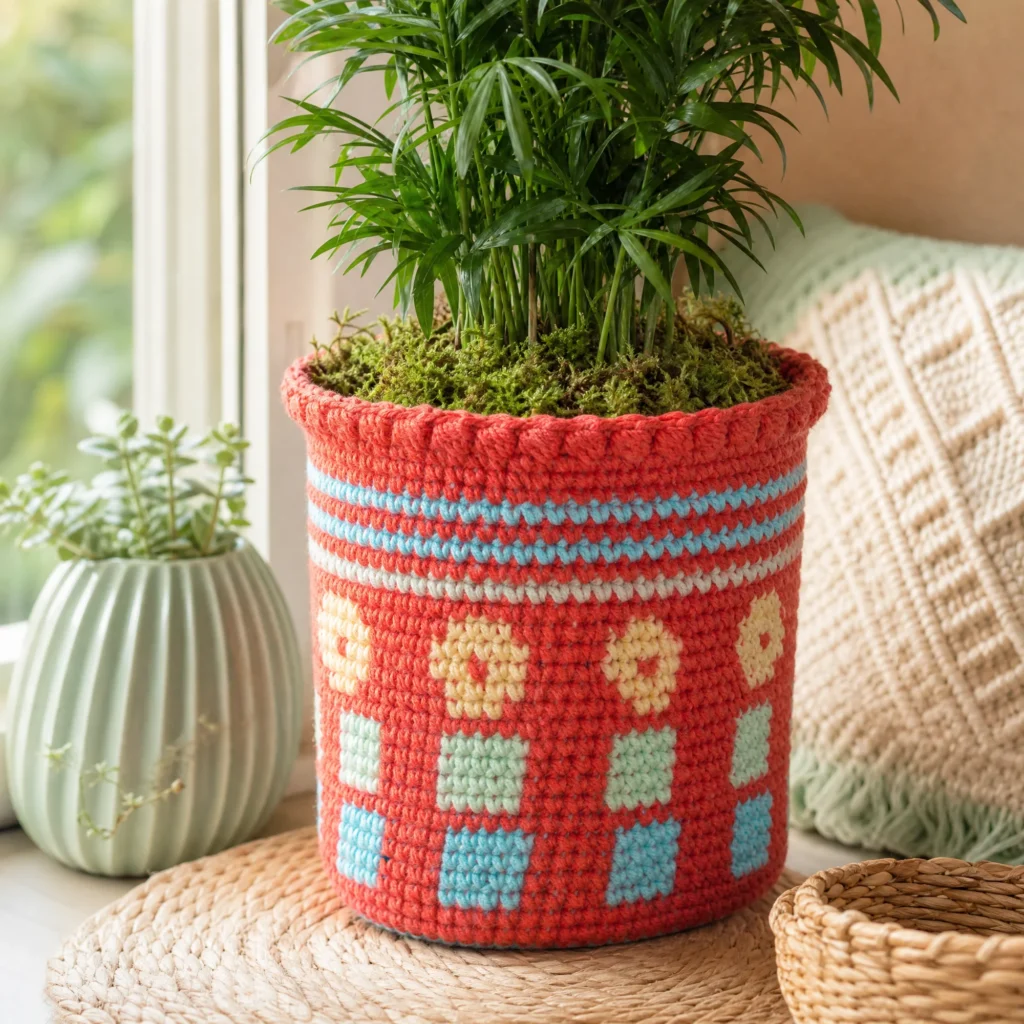
Crochet Tapestry Flower Pot Cozy Pattern
Creating a cozy for your plants not only enhances the aesthetic of your home but also protects your pots while being perfect for indoor gardening. This Crochet Tapestry Flower Pot Cozy Pattern is an excellent way to add a handmade touch to your living space.
About the Crochet Project
This flower pot cozy features a closed-bottom design worked in continuous rounds. The combination of vibrant yarn colors creates a beautiful tapestry effect that can brighten up any dull pot. The use of the bobble stitch adds texture, making it an eye-catching piece that highlights your favorite greenery.
The cozy is designed to fit a 0.71-gallon nursery container, with dimensions of 4¾” (12 cm) bottom diameter, 7” (18 cm) tall, and 6½” (16.5 cm) top diameter, providing ample space for your plants to grow.
Materials

Yarn
For this project, you will need the following yarns:
- RED HEART® Super Saver® (Art. E300)
- 726 Coral A – 1 skein
- 505 Aruba Sea B – 1 skein
- 668 Honeydew C – 1 skein
- 320 Cornmeal D – 1 skein
Crochet Hook
- Susan Bates® Crochet Hook: 5mm [H-8 US]
Notions
- Yarn needle
- 0.71 gal. nursery container (available at Home Depot)
- Dimensions: 4¾” bottom diameter x 7” tall x 6½” top diameter (12 x 18 x 16.5 cm)
Crochet Abbreviations
- ch: chain
- sc: single crochet
- st: stitch
- yo: yarn over
- *: repeat instructions between asterisks as specified
Special Stitch
Bobble (worked over 2 sts)
To create a bobble, follow these instructions:
- yo, insert hook in indicated st, yo, pull up a loop,
- yo and draw through one loop.
- (yo, insert hook in the same st, yo, pull up a loop, yo and draw through one loop) twice (you should have 7 loops on your hook).
- Insert hook in the next st, yo, pull up a loop, yo and pull through all 8 loops on your hook.
- Finally, ch 1.
Cozy (Closed-bottom worked in joined rounds)
Beginning
The cozy starts at the bottom. Using color A, ch 3 and join with a slip stitch in the first ch to form a ring.
Round Instructions
The cozy is created through a series of rounds, as described below:
Round 1 (right side)
- With A, ch 1, [2 sc in ring; change to B, 2 sc in ring; change to A] twice; join with a slip stitch in the first sc—8 sc.
Round 2
- With A, ch 1, [2 sc in next 2 sts; change to B, 2 sc in next 2 sts; change to A] twice; join with slip st in first sc—16 sc.
Round 3
- With A, ch 1, *[2 sc in next st, sc in next st] twice; change to B, [2 sc in next st, sc in next st] twice; change to A; repeat from * once; join with slip st in first sc—24 sc.
Round 4
- With A, ch 1, *[2 sc in next st, sc in next 2 sts] twice; change to B, [2 sc in next st, sc in next 2 sts] twice; change to A; repeat from * once; join with slip st in first sc—32 sc.
Round 5
- With A, ch 1, *[2 sc in next st, sc in next 3 sts] twice; change to B, [2 sc in next st, sc in next 3 sts] twice; change to A; repeat from * once; join with slip st in first sc—40 sc.
Round 6
- With A, ch 1, *[2 sc in next st, sc in next 4 sts] twice; change to B, [2 sc in next st, sc in next 4 sts] twice; change to A; repeat from * once; join with slip st in first sc—48 sc.
Round 7
- With A, ch 1, *[2 sc in next st, sc in next 5 sts] twice; change to B, [2 sc in next st, sc in next 5 sts] twice; change to A; repeat from * once; join with slip st in first sc—56 sc.
Round 8
- With A, ch 1, *[2 sc in next st, sc in next 6 sts] twice; change to B, [2 sc in next st, sc in next 6 sts] twice; change to A; repeat from * once; join with slip st in first sc—64 sc.
Round 9
- With A, carrying B on the wrong side and working in back loops only, ch 1, sc in each st around; join with slip st in first sc.
Round 10
- Ch 1, sc in each st around; join with slip st in first sc.
Rounds 11–14
- With A, ch 1, sc in next 2 sts; change to B, [sc in next 4 sts; change to A, sc in next 4 sts; change to B] 7 times, sc in next 4 sts; change to A, sc in last 2 sts; join with slip st in first sc.
Round 15
- Repeat Round 10.
Rounds 16–19
- With A, ch 1, sc in next 3 sts; change to C, [sc in next 4 sts; change to A, sc in next 4 sts; change to C] 7 times, sc in next 4 sts; change to A, sc in last st; join with slip st in first sc.
Round 20
- With A, repeat Round 10.
Round 21
- With A, ch 1, sc in next 4 sts; change to D, *sc in next 3 sts; change to A, 2 sc in next st, sc in next 6 sts; change to D, [sc in next 3 sts; change to A, sc in next 8 sts; change to D] twice; repeat from * to * once, sc in next 3 sts; change to A, sc in last 4 sts; join with slip st in first sc—66 sc.
Round 22
- With A, ch 1, sc in next 3 sts; change to D, [sc in next 5 sts; change to A, sc in next 6 sts; change to D] 5 times, sc in next 5 sts; change to A, sc in last 3 sts; join with slip st in first st.
Round 23
- With A, ch 1, sc in next 3 sts; change to D, [sc in next 2 sts; change to A, sc in next st; change to D, sc in next 3 sts; change to A, sc in next 5 sts; change to D] 5 times, sc in next 2 sts; change to A, sc in next st; change to D, sc in next 3 sts; change to A, sc in last 2 sts; join with slip st in first st.
Round 24
- With A, ch 1, sc in next 3 sts; change to D, [sc in next 6 sts; change to A, sc in next 5 sts; change to D] 5 times, sc in next 6 sts; change to A, sc in last 2 sts; join with slip st in first st.
Round 25
- With A, ch 1, sc in next 4 sts; change to D, [sc in next 4 sts; change to A, sc in next 7 sts; change to D] 5 times, sc in next 4 sts; change to A, sc in last 3 sts; join with slip st in first st.
Round 26
- With A, repeat Round 10.
Round 27
- With C, repeat Round 10.
Round 28
- With A, repeat Round 10.
Round 29
- With B, repeat Round 10.
Rounds 30 and 31
- Repeat Rounds 28 and 29.
Round 32
- With A, repeat Round 10.
Round 33
- With A, ch 1, [2 sc in next st, sc in next 16 sts, 2 sc in next st, sc in next 15 sts] twice; join with slip st in first sc—70 sts.
Round 34
- With A, ch 1, [2 sc in next st, sc in next 17 sts, 2 sc in next st, sc in next 16 sts] twice; join with slip st in first sc—74 sts. Cut B.
Edging (last round)
Round 35
- With A, ch 3, bobble over the first 2 sts, *bobble over the next 2 sts; repeat from * around; join with slip st in the top of beginning ch-3. Fasten off.
Finishing
Weave in ends and insert your nursery container into the cozy!
Optional Open Bottom
If you prefer an open bottom for your pot cozy, you can use the following instructions:
Foundation Chain
- With A, ch 65.
Round 1 (open bottom)
- Round 1: With A and working over B, sc in 2nd ch from hook and in each ch around; join with slip st to first sc—64 sc.
Continue Pattern
- After completing Round 1 of the open bottom, proceed with Rounds 10–35 as specified in the closed-bottom instructions. Finally, weave in the beginning tail to join the lower edge of Round 1.
Frequently Asked Questions
What crochet hook is used for this pattern?
A Susan Bates® Crochet Hook of size 5mm [H-8 US] is used.
Is this project worked in rows or rounds?
The flower pot cozy is worked in rounds.
Does this crochet pattern require assembly?
No, this pattern does not require any assembly as it is worked in continuous rounds.
What are the finished dimensions of the cozy?
The finished cozy fits a nursery container measuring 4¾” (12 cm) in diameter at the base, 7” (18 cm) in height, and 6½” (16.5 cm) in diameter at the top.
Can I use different colors of yarn for this project?
Yes, you can customize the colors to match your decor or personal preference.
Conclusion
The Crochet Tapestry Flower Pot Cozy Pattern is a fun and creative way to display your plants while adding a personalized touch to your home décor. With a few skeins of vibrant yarn and a crochet hook, you can transform a simple nursery container into a beautiful piece of art that showcases your love for gardening. Happy crocheting!