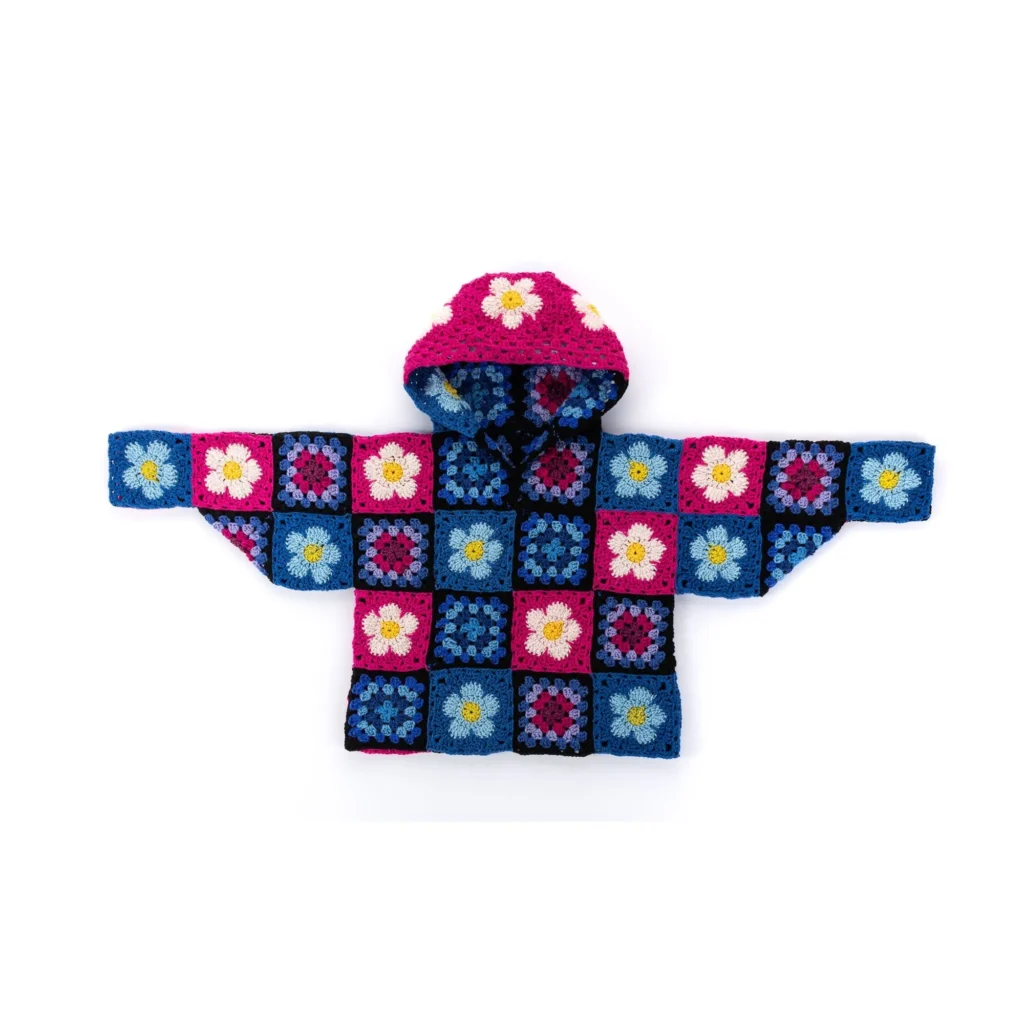
Crochet Flower Power Hoodie Pattern
Crochet lovers, rejoice! The Crochet Flower Power Hoodie Pattern combines vibrant colors and intricate motifs to create a stylish and cozy garment. In this article, we’ll explore the details of this pattern, including materials, instructions, and some tips along the way. Whether you’re enhancing your wardrobe or crafting a special gift, this hoodie is sure to impress.

About the Design
The Flower Power Hoodie features a delightful blend of granny square and flower square motifs. This design results in a colorful and engaging project that utilizes various crochet stitches. It is perfect for showcasing your favorite yarn colors while providing warmth and comfort. Following the pattern’s structured motif assembly, you’ll create a stunning piece that embodies the essence of handmade crochet.
Materials
To kickstart your Flower Power Hoodie, here is the complete list of materials you will need:
Yarn
-
Granny Square motifs
- Red Heart® All in One™ Granny Square™ (8.8 oz/250 g; 417 yds/381 m)
- Contrast A (Hyper Violet (2022)):
- 1 ball for sizes XS/S/M/L
- 1 ball for sizes XL/2/3XL
- 1 ball for size 4/5XL
- Contrast B (Blue Beacon (2032)):
- 1 ball for sizes XS/S/M/L
- 1 ball for sizes XL/2/3XL
- 1 ball for size 4/5XL
- Contrast A (Hyper Violet (2022)):
- Quantity for squares:
- Hyper Violet (2022): 13 squares for all sizes
- Blue Beacon (2032): 14 squares for all sizes
- Red Heart® All in One™ Granny Square™ (8.8 oz/250 g; 417 yds/381 m)
-
Flower Square motifs
- Red Heart® All in One™ Flower Power™ (8.8 oz/250 g; 417 yds/381 m)
- Contrast C (Peony Pop (2021)):
- 2 balls for sizes XS/S/M/L
- 2 balls for sizes XL/2/3XL
- 2 balls for size 4/5XL
- Contrast D (Bluebell (2006)):
- 2 balls for sizes XS/S/M/L
- 2 balls for sizes XL/2/3XL
- 2 balls for size 4/5XL
- Contrast C (Peony Pop (2021)):
- Quantity for squares:
- Peony Pop (2021): 15 squares for sizes XS/S/M/L, 17 squares for sizes XL/2/3XL, 19 squares for size 4/5XL
- Bluebell (2006): 16 squares for sizes XS/S/M/L, 18 squares for sizes XL/2/3XL, 20 squares for size 4/5XL
- Red Heart® All in One™ Flower Power™ (8.8 oz/250 g; 417 yds/381 m)
Tools & Notions
- Size U.S. I/9 [5.5 mm] Susan Bates® Silvalume® crochet hook (or size needed to obtain gauge)
- Susan Bates® yarn needle
Gauge
The gauge for this pattern varies by motif; ensure your tension matches to achieve the intended size and fit.
Abbreviations
- Approx = Approximately
- Beg = Beginning
- Rem = Remaining
- Rep = Repeat
- Rnd(s) = Round(s)
- RS = Right side
- Sp(s) = Space(s)
- St(s) = Stitch(es)
Pattern Notes
Granny Square Motifs
- Each color aligns with one round in the motif using five colors in total. If you find you have too much color left at the end of the round, pull back some stitches and adjust your gauge to finish at the color change. Conversely, if you have too little, tighten your gauge slightly.
- When the motif is complete, cut the yarn at the end of Color 5 (the longest color repeat), leaving a tail for weaving in. Start the next motif with Color 1.
- The motif begins with Color 1 (shortest color repeat) from the center of the pull-skein. Leave a 4″ [10 cm] tail to weave in.
Instructions
Granny Square Motif Instructions (5 Rounds)
Make 13 Squares with A and 14 Squares with B
- With Color 1 (start): Ch 4. Join with sl st to first ch to form a ring.
-
1st Rnd (RS): Ch 6. (3 dc, ch 3) 3 times in ring. 2 dc in ring. Join.
-
2nd Rnd: Sl st in ch-3 space. Ch 6. 3 dc in the same ch-3 space.
- Ch 1. (3 dc, ch 3, 3 dc) in next ch-3 space.
- Rep from * twice more. Ch 1. 2 dc in first ch-3 space. Join.
-
3rd Rnd: Sl st in ch-3 space. Ch 6. 3 dc in the same ch-3 space.
- Ch 1. 3 dc in next ch-1 space. Ch 1. (3 dc, ch 3, 3 dc) in next ch-3 space.
- Rep from * twice more. Ch 1. 3 dc in last ch-1 space. Ch 1. 2 dc in first ch-3 space. Join.
-
4th & 5th Rnds: Sl st in ch-3 space. Ch 6. 3 dc in the same ch-3 space.
- (Ch 1. 3 dc) in each ch-1 space to next ch-3 space. Ch 1.
- (3 dc, ch 3, 3 dc) in next ch-3 space.
- Rep from * twice more, then from * to once.
- 2 dc in first ch-3 space. Join.
- Fasten off.
Flower Square Motif Instructions (Color 1, then Color 2, then Color 3)
Make 15 (17-19) Squares with C and 16 (18-20) Squares with D
- With Color 1, begin: Ch 4. Join with sl st to first ch to form a ring.
-
1st Rnd: Ch 3. Work 9 dc in the ring. Join.
- 10 dc. Color 1 complete.
-
2nd Rnd (Color 2 begins): Ch 3. 1 dc in the first dc. 2 dc in each dc around. Join.
- 20 dc.
-
3rd Rnd: Sl st in next dc. (Ch 3, 1 tr) in the same st as last sl st. 3 tr in the next dc.
- (1 tr, 1 dc) in next dc.
- Sl st in next dc.
-
- (1 dc, 1 tr) in next dc. 3 tr in next dc. (1 tr, 1 dc) in next dc. Sl st in next dc.*
- Rep from * around, ending by joining with sl st to the top of ch-3 of the previous (2nd) rnd.
- Color 2 complete.
-
4th Rnd (Color 3 begins): Sl st in first dc. Ch 3.
- 1 dc in next tr. 1 hdc in next tr. 1 sc in next tr. 1 hdc in next tr. 1 dc in each of the next 2 sts. 1 tr in dc of 2nd rnd below sl st.
- 1 dc in next dc.
- Rep from * 3 times more, then from * to once.
- Join.
-
5th Rnd: Ch 6 (counts as tr and ch-2). 1 tr in the same space as sl st.
- *2 dc in next st. Ch 1. 1 dc in next st. 1 hdc in next st. 1 sc in next st.
- Ch 1. Skip the next st. 1 sc in next st. 1 hdc in next st. 1 dc in next st. Ch 1. 2 dc in the next st.*
- (1 tr, ch 2, 1 tr) all in next st.
- Rep from * twice more, then from * to once.
- Join to 4th ch of ch-6.
-
6th Rnd: Sl st in next ch-2 space. Ch 2 (does not count as st).
- (1 hdc, ch 3, 3 hdc) in the same ch-2 sp. Ch 1.
- (3 hdc, ch 1) in each ch-1 sp to the next corner ch-2 sp.
- (3 hdc, ch 3, 3 hdc) all in next ch-2 sp. Ch 1.
- Rep from * twice more, then from * to once.
- 2 hdc in first ch-2 sp. Join.
- Fasten off at the end of Color 3, leaving a long tail for seaming.
- The finished Motif should measure 6″ [15 cm] square.
Assembly and Finishing
Assembly
Using a mattress stitch, seam squares together as indicated in the instructions. Leave a 4″ [10 cm] opening at the center front. Seam the hood around the neck’s circumference while ensuring the opening is aligned at the front.
Granny Stitch Hood Edging
Use the remaining sections of Color 3 from C to crochet. Join Color 3 to the ch-3 space at the corner ch-3 spanning the hood.
Hood Edging Rows
-
1st Row: Ch 2. 2 dc in the same space. Ch 1.
- (3 dc in next ch-1 space. Ch 1) 4 times.
- 3 dc between the next 2 corner ch-3 spaces. Ch 1.
- Rep from * once more.
- (3 dc in next ch-1 space. Ch 1) 4 times.
- 2 dc in the last corner ch-3 sp. Turn.
-
2nd Row: Ch 2. 1 dc in the first dc. Ch 1.
- *3 dc in the next ch-1 space. Ch 1. Rep from * to the last 2 stitches. 1 dc in the last dc. Turn.
-
3rd Row: Ch 2. 2 dc in the first ch-1 space. Ch 1.
- *3 dc in the next ch-1 space. Ch 1. Rep from * to the last ch-1 space.
- 2 dc in the last ch-1 sp. Fasten off.
Final Seam/Finish
Whipstitch the sides of granny rows to the edges of granny squares on each side.
Frequently Asked Questions
What crochet hook is used for this pattern?
The recommended hook size is U.S. I/9 [5.5 mm], or a size that helps you achieve the correct gauge.
Is this crochet project worked in rows or rounds?
The project is worked in rounds, especially throughout the granny square and flower square motifs.
Does this crochet project require assembly?
Yes, assembly is required for the motifs and attaching the seams of the hoodie.
Conclusion
The Crochet Flower Power Hoodie Pattern is not only an exciting project but also a brilliantly colorful garment that can be worn or gifted. Dive into the creativity of crochet with this pattern, letting your imagination run wild with color combinations and designs. Happy crocheting!