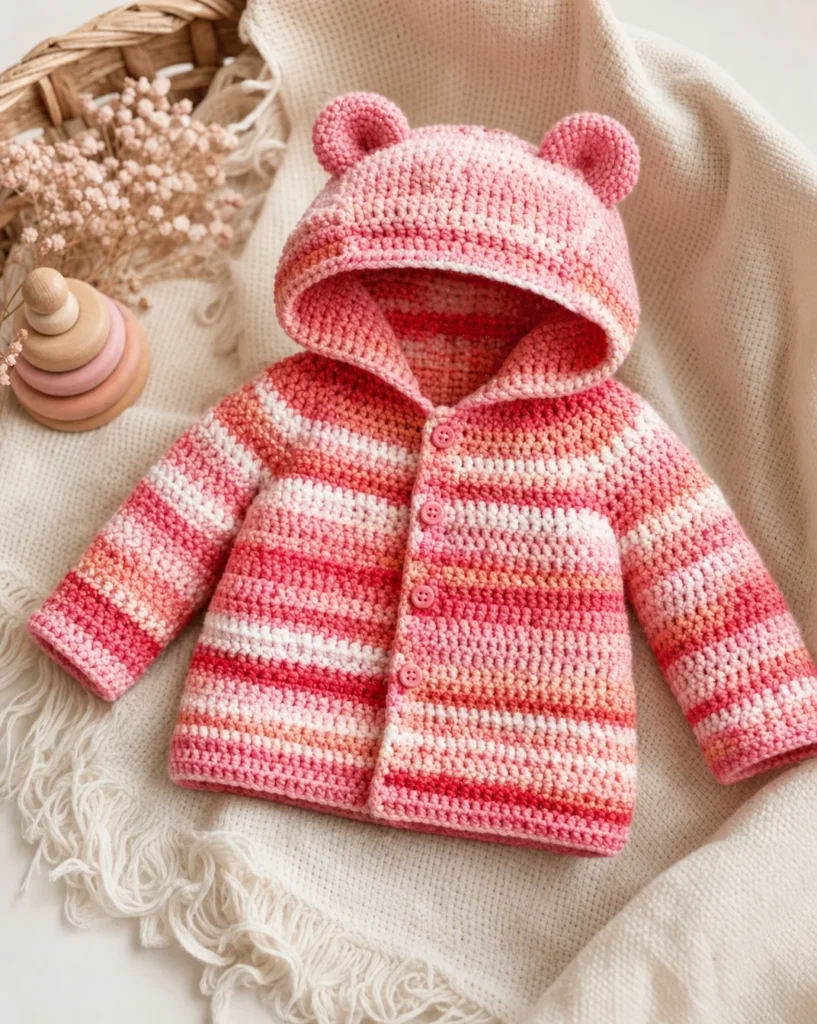
Baby Bear Crochet Hoodie Pattern
Crocheting a cozy hoodie for your little one is a delightful project, and the Baby Bear Crochet Hoodie is a perfect choice. This sophisticated yet simple design is suitable for children aged 6 months to 18 months. Made using Red Heart® Bunches of Hugs™ Prints, this hoodie is not only whimsical but also provides warmth and comfort. Let’s dive into the details of materials, skill level, and step-by-step instructions.

Materials Needed
-
Yarn:
- Red Heart® Bunches of Hugs™ Prints (10 oz/284 g; 678 yds/620 m)
- Color: Princess (6327): 1 ball for all sizes
-
Crochet Hook:
- Size U.S. H/8 [5 mm] crochet hook or sizes needed to obtain gauge
-
Buttons:
- 4 buttons for sizes 5-6
- Total buttons needed: 4 (for all sizes)
Skill Level
- EASY
Instructions
Yoke (Begin at neck edge)
Start by chaining 52.
1st Row (Foundation Row):
- 1 double crochet (dc) in the 4th chain from the hook (counts as 2 dc).
- 1 dc in each of the next 6 chains (Front).
- (1 dc, chain 2, 1 dc) in the next chain.
- 1 dc in each of the next 8 chains (Sleeve).
- (1 dc, chain 2, 1 dc) in the next chain.
- 1 dc in each of the next 14 chains (Back).
- (1 dc, chain 2, 1 dc) in the next chain.
- 1 dc in each of the next 8 chains (Sleeve).
- (1 dc, chain 2, 1 dc) in the next chain.
- 1 dc in each of the next 8 chains (Front).
- Turn.
Result: You will have 54 dc and 4 chain-2 spaces.
2nd Row (Increase Row):
- Chain 3 (counts as dc).
- [1 dc in each dc to the next chain-2 space. (1 dc, chain 2, 1 dc) in the next chain-2 space] 4 times.
- 1 dc in each dc to the end of the row.
- Turn.
Result: You will have 62 dc and 4 chain-2 spaces.
Continue repeating the 2nd row 7 (9-11) more times, resulting in 118 (134-150) dc and 4 chain-2 spaces.
Note (At this Point):
- 17 (19-21) stitches for each Front
- 26 (30-34) stitches for each Sleeve
- 32 (36-40) stitches for Back
Body
1st Row (Division Row):
- Chain 3.
- *1 dc in each dc to the next chain-2 space. 1 dc in the next chain-2 space. Chain 4 for underarm. Skip all stitches of next Sleeve. 1 dc in the next chain-2 space. Repeat from * once more.
- 1 dc in each dc to the end of the row.
- Turn.
Result: You will have 70 (78-86) dc and 2 chain-4 spaces.
2nd Row:
- Chain 3.
- 1 dc in each stitch and chain to the end of the row.
- Turn.
Result: You will have 78 (86-94) dc.
3rd Row:
- Chain 3.
- 1 dc in each dc to the end of the row.
- Turn.
Continue repeating the last row until the Body measures 6 (8-10)” [15 (20.5-25.5) cm] from the underarm. Fasten off.
Sleeves
Note: Turn at the end of each round to maintain the same texture as the Body.
1st Round:
- Join yarn with a slip stitch in the 3rd underarm chain.
- Chain 3 (counts as dc).
- 2 dc in the next chain.
- 1 dc in each dc of the Sleeve.
- 2 dc in the next chain from the underarm chain.
- 1 dc in the last chain.
- Join with a slip stitch to the top of the chain 3.
- Turn.
Result: You will have 32 (36-40) dc.
2nd Round (Decrease Round):
- Chain 3.
- Double crochet two together (dc2tog).
- 1 dc in each dc to the last 2 dc.
- Dc2tog.
- Join with a slip stitch to the top of the chain 3.
- Turn.
Result: You will have 30 (34-38) dc.
3rd Round:
- Chain 3.
- 1 dc in each dc around.
- Join with a slip stitch to the top of the chain 3.
- Turn.
Repeat the 2nd and 3rd rounds 4 (6-7) more times to achieve 22 (22-24) dc.
Continue repeating the 3rd round until the Sleeve measures 6 (8-9)” [15 (20.5-23) cm] from the underarm. Fasten off.
Hood
1st Row:
- Working into the remaining loops of the foundation chain, skip the first chain.
- Join yarn with a slip stitch in the next chain.
- Chain 3.
- 1 dc in each of the next 17 chains.
- (2 dc in the next chain) 14 times.
- 1 dc in each of the next 18 chains.
- Turn, leaving the last chain unworked.
Result: You will have 64 dc.
2nd Row:
- Chain 3.
- 1 dc in each dc to the end of the row.
- Turn.
Continue repeating the last row until the Hood measures 8″ [20.5 cm] from the neck edge. Do not fasten off.
Join Top of Hood:
- Fold the last row of the Hood in half.
- Working through both thicknesses, slip stitch in each stitch across to join the top of the Hood.
Ears (Make 2)
1st Row:
- Chain 5.
- Work 6 treble crochets (tr) in the 5th chain from the hook (the skipped chain 4 counts as tr).
Result: You will have 7 tr.
2nd Row:
- Chain 4 (counts as tr).
- 1 tr in the first stitch (increase made).
- (2 tr in the next stitch) 6 times.
Result: You will have 14 tr.
Fasten off, leaving a long tail to sew each Ear to the Hood, curving the Ear into a crescent shape as shown in the photo.
Finishing
Sew 4 (5-6) buttons evenly spaced along the Left Front. Use coordinating spaces between dc stitches along the Right Front for buttonholes.
And there you have it! A beautifully crafted Baby Bear Crochet Hoodie that you can proudly gift or keep for your little one. Happy crocheting!