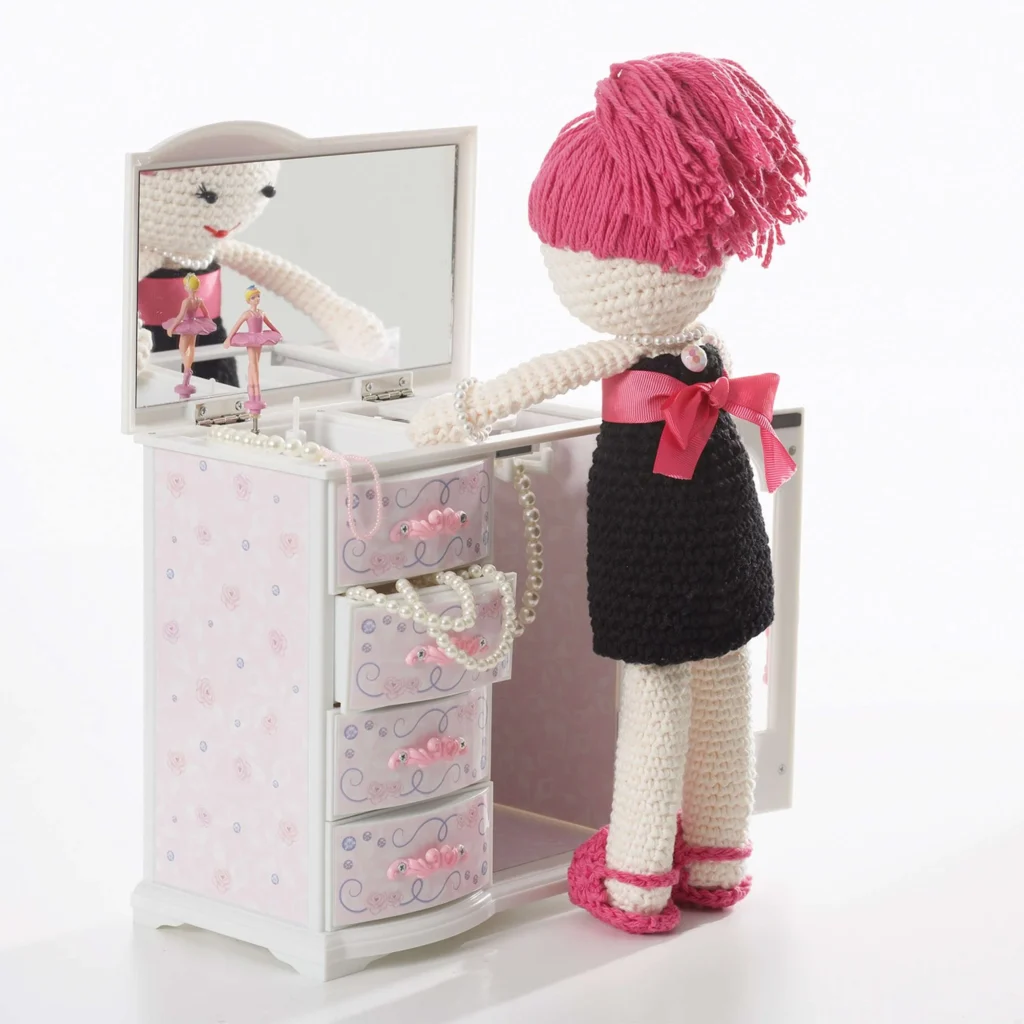
Date Night Lily Doll Pattern
Creating a handmade gift or toy can be a delightful experience, especially when it comes to crafting a charming doll. The Date Night Lily Doll Pattern combines fun colors and cute details making it a perfect crochet project for enthusiasts of all levels. In this detailed guide, you will discover everything you need to know to bring this charming doll to life.
About the Crochet Project
The Date Night Lily Doll is an adorable amigurumi-style doll featuring a lovely dress, stylish accessories, and unique details that make it stand out. Crafted using Lily® Sugar’n Cream yarn, this doll can be customized in various colors to match the personality of the little ones receiving it or to suit any occasion. The combination of soft fabric and intricate design makes it a treasured item for children or as a decorative piece in any room.
Materials

To complete the Date Night Lily Doll Pattern, gather the following materials:
Yarn
- Lily® Sugar’n Cream
- Main Color (MC) (01004 Soft Ecru): 1 ball
- Contrast A (00002) Black: 1 ball
- Contrast B (01740) Hot Pink: 1 ball
Crochet Hooks
- Size 3.5 mm (U.S. E or 4)
- Size 5 mm (U.S. H or 8)
- Alternatively, use the size needed to obtain gauge.
Stuffing
- Poly-fill or similar material for stuffing the doll.
Eyes and Facial Features
- 2 small black beads for eyes.
- Small amount of red embroidery floss for the mouth.
- Small amount of black embroidery floss for eyelashes.
Additional Notions
- 1 button to fasten the doll’s dress.
- Small pearl beads for the necklace and bracelet.
- Grosgrain ribbon: a length of 1 inch [2.5 cm] wide.
Crochet Abbreviations
Before we dive into the pattern, familiarize yourself with the following common crochet abbreviations used in this project:
- ch = chain
- sc = single crochet
- sl st = slip stitch
- tr = treble crochet
- yoh = yarn over hook
- sts = stitches
- sc2tog = single crochet two together (decrease)
pattern notes
- This doll is worked in rounds and constructed in several parts, including the head, body, arms, and legs.
- Each component is stuffed and sewn together to create the final doll.
- Be sure to follow the stitch counts to ensure proper sizing.
Head
With MC and smaller hook, ch 2.
- 1st rnd: 8 sc in 2nd ch from hook. Join with sl st to first sc.
- Stitch count: 8 sc
- 2nd rnd: Ch 1. 2 sc in each sc around. Join with sl st to first sc.
- Stitch count: 16 sc
- 3rd rnd: Ch 1. *2 sc in next sc. 1 sc in next sc. Rep from * around. Join with sl st to first sc.
- Stitch count: 24 sc
- 4th rnd: Ch 1. *2 sc in next sc. 1 sc in each of next 2 sc. Rep from * around. Join with sl st to first sc.
- Stitch count: 32 sc
- 5th rnd: Ch 1. *2 sc in next sc. 1 sc in each of next 3 sc. Rep from * around. Join with sl st to first sc.
- Stitch count: 40 sc
- 6th rnd: Ch 1. 1 sc in each sc around. Join with sl st to first sc.
- Rep last rnd 10 times more.
- Next rnd: Ch 1. *Draw up a loop in each of next 2 sc. Yoh and draw through all loops on hook – sc2tog made. 1 sc in each of next 3 sc. Rep from * around. Join with sl st to first sc.
- Stitch count: 32 sts
- Next rnd: Ch 1. *Sc2tog. 1 sc in each of next 2 sc. Rep from * around. Join with sl st to first sc.
- Stitch count: 24 sts
- Stuff Head.
- Next rnd: Ch 1. *Sc2tog. 1 sc in next sc. Rep from * around. Join with sl st to first sc.
- Stitch count: 16 sts
- Next rnd: Ch 1. *Sc2tog. Rep from * around. Join with sl st to first st. Fasten off.
Body
With MC and smaller hook, ch 30. Join with sl st to first ch.
- 1st rnd: Ch 1. 1 sc in each ch around. Join with sl st to first sc.
- Stitch count: 30 sc
- 2nd rnd: Ch 1. 1 sc in each sc around. Join with sl st to first sc.
- Rep last rnd until work from beg measures 2 ins [5 cm].
- Next rnd: Ch 1. *Sc2tog. 1 sc in each of next 3 sc. Rep from * around. Join with sl st to first sc.
- Stitch count: 24 sts
- Next rnd: Ch 1. 1 sc in each st around. Join with sl st to first sc.
- Rep last rnd until work from beg measures 4 ins [10 cm].
- Next rnd: Ch 1. *Sc2tog. 1 sc in each of next 2 sc. Rep from * around. Join with sl st to first sc.
- Stitch count: 18 sts
- Next rnd: Ch 1. 1 sc in each sc around. Join with sl st to first sc.
- Rep last rnd twice more. Fasten off.
Sew bottom edge of Body closed. Stuff Body.
Arms (Make 2)
With MC and smaller hook, ch 2.
- 1st rnd: 5 sc in 2nd ch from hook. Join with sl st to first sc.
- Stitch count: 10 sc
- 2nd rnd: Ch 1. 2 sc in each sc around. Join with sl st to first sc.
- Stitch count: 10 sc
- 3rd rnd: Ch 1. 1 sc in each sc around. Join with sl st to first sc.
- 4th rnd: Ch 1. 1 sc in each of next 4 sc. 1 tr in next sc (thumb). 1 sc in each of last 5 sc. Join with sl st to first sc.
- 5th rnd: Ch 1. 1 sc in each st around. Join with sl st to first sc.
- 6th rnd: Ch 1. (Sc2tog. 1 sc in each of next 3 sc) twice. Join with sl st to first sc.
- Stitch count: 8 sts
- 7th rnd: Ch 1. 1 sc in each st around. Join with sl st to first sc.
- Rep last rnd until Arm from beg measures 4 ins [10 cm]. Fasten off.
Stuff arms lightly.
Legs (Make 2)
Foot: With MC and smaller hook, ch 5.
- 1st rnd: 1 sc in 2nd ch from hook. 1 sc in each of next 2 ch. 3 sc in last ch. Do not turn. Working in rem loops of foundation ch, 1 sc in each of next 2 ch. 2 sc in last ch. Join with sl st to first sc.
- Stitch count: 10 sc
- 2nd rnd: Ch 1. 2 sc in first sc. 1 sc in each of next 2 sc. 2 sc in each of next 3 sc. 1 sc in each of next 2 sc. 2 sc in each of last 2 sc. Join with sl st to first sc.
- Stitch count: 16 sc
- 3rd rnd: Ch 1. 2 sc in first sc. 1 sc in each of next 4 sc. 2 sc in each of next 4 sc. 1 sc in each of next 4 sc. 2 sc in each of next 3 sc. Join with sl st to first sc.
- Stitch count: 24 sc
- 4th rnd: Ch 1. Working in back loops only, 1 sc in each sc around. Join with sl st to first sc.
- 5th rnd: Ch 1. 1 sc in each of next 7 sc. (Sc2tog) 3 times. 1 sc in each sc to end of rnd. Join with sl st to first sc.
- Stitch count: 21 sts
- 6th rnd: Ch 1. 1 sc in each of next 6 sc. (Sc2tog) 3 times. 1 sc in each sc to last 2 sc. Sc2tog over last 2 sc. Join with sl st to first sc.
- Stitch count: 17 sts
- 7th rnd: Ch 1. 1 sc in each of next 5 sc. (Sc2tog) 3 times. 1 sc in each sc to end of rnd. Join with sl st to first sc.
- Stitch count: 14 sts
- 8th rnd: Ch 1. 1 sc in each st around. Join with sl st to first sc.
- Rep last rnd until Leg measures 5 ins [12.5 cm]. Fasten off.
Stuff Legs.
Finishing
- Sew top of Legs closed using whip st.
- Sew to bottom of Body as shown in picture.
- Attach Arms to sides of Body.
- With black embroidery floss, embroider eyelashes.
- Sew beads to front of Head for eyes.
- With red embroidery floss, embroider mouth.
- Make string of small beads 7 ins [18 cm] long for necklace and tie around neck.
- Make string of small beads 3 ins [7.5 cm] long for bracelet and tie around wrist.
Hair Fringe
- Cut a piece of tape 11 ins [28 cm] long and secure onto a flat surface with sticky side up.
- Cut lengths of B 14 ins [35.5 cm] long and lay them across tape so strip of tape is in the center of yarn.
- Holding tissue paper over top of yarn and using a sewing machine, run a line of stitching along length of tape.
- Remove tape when hair is secure.
- Remove tissue paper after stitching.
- Pin fringe to outside of head.
- Using backstitch and B, sew hair into place along sewn line.
- Fold hair up and secure at top of Head tightly.
Dress
Dress: with A and larger hook
With A and larger hook, ch 34. Join with sl st to first ch, being careful not to twist ch.
- 1st rnd: Ch 1. 1 sc in each ch around. Join with sl st to first sc.
- Stitch count: 34 sc
- 2nd rnd: Ch 1. 1 sc in each sc around. Join with sl st to first sc.
- Rep last rnd 3 times more.
- Next rnd: Ch 1. Sc2tog. 1 sc in each of next 15 sc. Sc2tog. 1 sc in each of last 15 sc. Join with sl st to first st.
- Stitch count: 32 sts
- Next rnd: Ch 1. 1 sc in each st around. Join with sl st to first sc.
- Rep last rnd 3 times more.
- Next rnd: Ch 1. Sc2tog. 1 sc in each of next 14 sc. Sc2tog. 1 sc in each of last 14 sc. Join with sl st to first st.
- Stitch count: 30 sts
- Next rnd: Ch 1. 1 sc in each st around. Join with sl st to first sc.
- Rep last rnd once more.
- Next rnd: Ch 1. (Sc2tog. 1 sc in each of next 3 sc) 6 times. Join with sl st to first sc.
- Stitch count: 24 sts
- Next rnd: Ch 1. (Sc2tog. 1 sc in each of next 2 sc) 6 times. Join with sl st to first sc.
- Stitch count: 18 sts
Bodice (Begin Working in Rows)
- 1st row: Ch 1. 1 sc in each of next 18 sts. Turn.
- 2nd row: Ch 1. 1 sc in each sc across. Turn.
- Rep last row twice more.
- 3rd row: Ch 1. 1 sc in each sc across. Ch 5. Sl st in same sp as last sc. (button loop made). Fasten off.
Sew Button to back to correspond with button loop. Tie Ribbon around waist.
Shoes (Make 2)
With B and larger hook, work from to as given for Foot. Fasten off.
Front Strap
- 1st row: Join B with sl st to back loop of 4th sc. Ch 1. 1 sc in same sp as last sl st. 1 sc in back loop of each of next 2 sc. Turn.
- 2nd row: Ch 1. 1 sc in each of next 3 sc. Turn.
- Rep last row 9 times more. Fasten off.
- Sew cast off edge to opposite side of Shoe.
Back Strap
With B, ch 10. Fasten off. Sew Back Strap to Front Strap as shown in the photo.
Frequently Asked Questions
What materials do I need for the Date Night Lily Doll?
You will need Lily® Sugar’n Cream yarn, two crochet hooks (sizes 3.5 mm and 5 mm), stuffing, black beads for eyes, and various embroidery floss for facial features and accessories.
Does this project require assembly?
Yes, the parts of the doll such as the head, body, arms, and legs are crocheted separately and then sewn together to form the complete doll.
What stitch techniques are used in this pattern?
The pattern primarily uses single crochet stitches along with a few decreases (sc2tog) and a treble crochet stitch for the thumb.
How long will it take to complete this project?
The time taken to complete the Date Night Lily Doll depends on individual skill levels and crochet speed. Prepare to spend a few hours to a day to finish this charming doll.
Can I customize the color of the doll?
Absolutely! Feel free to choose your favorite colors or match the doll’s attire to the receiver’s favorite outfits.
Conclusion
Creating the Date Night Lily Doll brings together crochet skills, creativity, and heartfelt gifting. Each component adds character, making it a delightful and personalized gift for a child or a decorative item for your home. With this detailed guide, you are now ready to start crafting this charming doll from beginning to end. Enjoy your crochet journey!