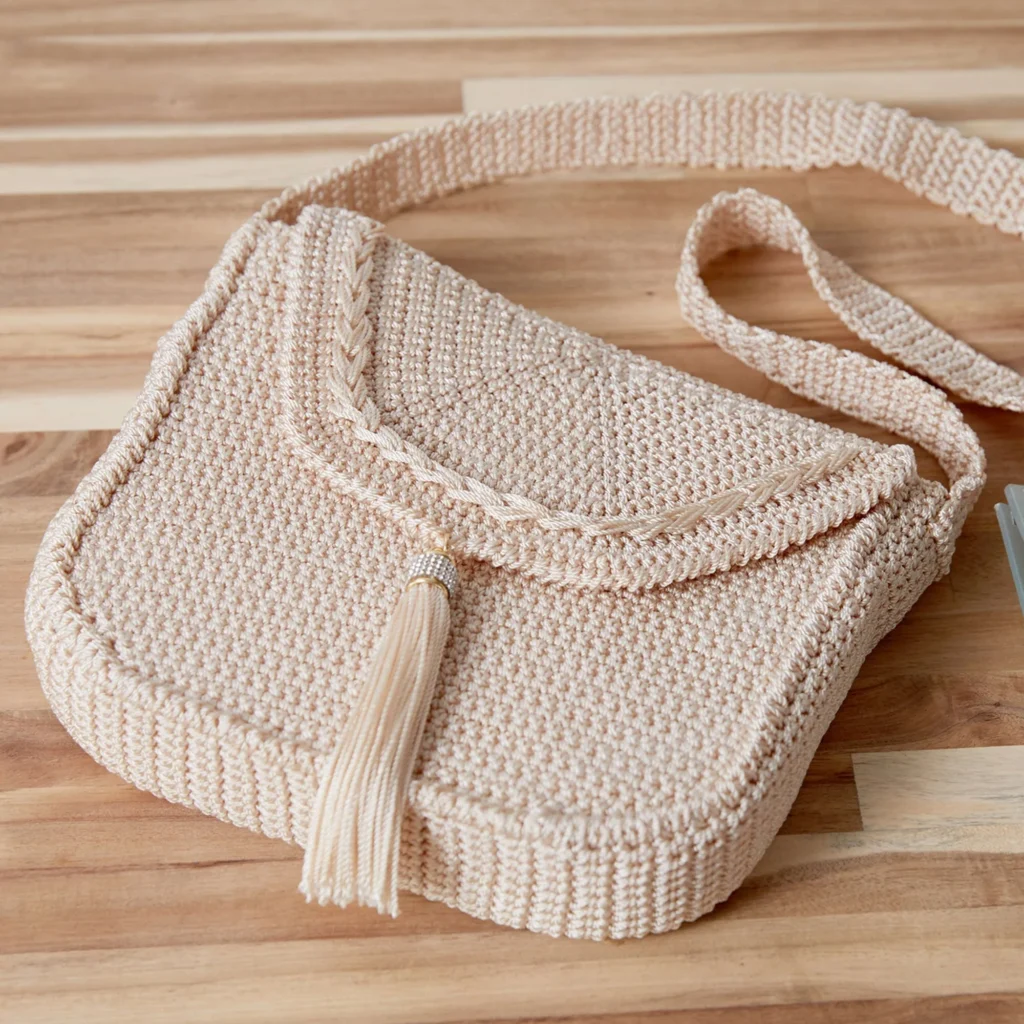
Crochet Cross Body Bag Pattern
Crochet enthusiasts, get ready to elevate your accessory game with this stylish and functional crochet cross body bag! This pattern not only allows you to showcase your yarn skills but also creates a practical piece for daily use. Let’s dive into the details of this delightful crochet project.
About the Bag
This crochet cross body bag is designed for both style and practicality. With a spacious body and a flap closure, it’s the perfect accessory for carrying your essentials while being hands-free. The simple yet effective design allows for customization, from color choices to decorative elements, making it a perfect canvas for your creativity.
Materials

To create your own crochet cross body bag, you will need the following materials:
Yarn
- RED HEART® Crochet Nylon™: 100% Nylon, Size 18
- 4 tubes, Color: 16 Natural
Crochet Hook
- Susan Bates® Crochet Hook: 3.75 mm [US F-5]
Notions
- Susan Bates® Knit Clips™: (10 pack)
- Clear nail polish, to use as directed
- Heavy cardboard or thin book, a 10–11 in [25.5–28 cm] piece (for making tassel)
- Yarn needle
Optional
- Decorative tassel cap and super glue
- Lining and stiffening materials such as craft felt, fabric, interfacing, and/or plastic canvas
Crochet Abbreviations
- Ch = Chain
- Sc = Single crochet
- Sc2tog = Single crochet two together
- St = Stitch
- R = Row
Special Techniques
Adjustable Ring
Wrap yarn into a ring, ensuring that the tail falls behind the working yarn. Grip the ring and tail between your middle finger and thumb. Insert hook through the center of the ring, yarn over (with working yarn), and draw up a loop. Work stitches of the first round in the ring. After the first round of stitches is worked, pull gently on the tail to tighten the ring.
Surface Slip Stitch
Make a slip knot and hold it on the wrong side of the piece. Insert the hook from the right side to the wrong side in the space between stitches. Place the slip knot on the hook and draw up a loop (stretching the loop to about ½ in [1.5 cm] long). Repeat this process as desired. To finish the last surface slip stitch, remove the loop from the hook on the right side of the piece, insert the hook from the wrong side to the right side in the next space, return the loop to the hook, and draw it to the wrong side. Cut the nylon, draw the end through the loop, and pull to tighten. Weave in the end securely.
Instructions
Front
Beginning at the top edge, ch 41.
-
Row 1: Sc in 2nd ch from hook and in each remaining ch across—40 sc.
-
Rows 2–34: Ch 1, turn, sc in each st across.
Shape Lower Section
-
Rows 35–42: Ch 1, turn, sc2tog, sc in each st to last 2 sts, sc2tog—24 sc remain in Row 42.
-
Fasten off.
Back
Make the same as the front.
Flap
Beginning at the center of the top edge, make an adjustable ring. Work back and forth in rows (not rounds).
- Row 1: Ch 1, 3 sc in ring.
- Row 2: Ch 1, turn, 2 sc in each st across—6 sc.
- Row 3: Ch 1, turn, 2 sc in first st, sc in next st, [2 sc in next st, sc in next st] twice—9 sc.
- Row 4: Ch 1, turn, 2 sc in first st, sc in next 2 sts, [2 sc in next st, sc in next 2 sts] twice—12 sc.
- Row 5: Ch 1, turn, 2 sc in first st, sc in next 3 sts, [2 sc in next st, sc in next 3 sts] twice—15 sc.
- Row 6: Ch 1, turn, 2 sc in first st, sc in next 4 sts, [2 sc in next st, sc in next 4 sts] twice—18 sc.
- Row 7: Ch 1, turn, 2 sc in first st, sc in next 5 sts, [2 sc in next st, sc in next 5 sts] twice—21 sc.
- Row 8: Ch 1, turn, 2 sc in first st, sc in next 6 sts, [2 sc in next st, sc in next 6 sts] twice—24 sc.
- Row 9: Ch 1, turn, 2 sc in first st, sc in next 7 sts, [2 sc in next st, sc in next 7 sts] twice—27 sc.
- Row 10: Ch 1, turn, 2 sc in first st, sc in next 8 sts, [2 sc in next st, sc in next 8 sts] twice—30 sc.
- Row 11: Ch 1, turn, 2 sc in first st, sc in next 9 sts, [2 sc in next st, sc in next 9 sts] twice—33 sc.
- Row 12: Ch 1, turn, 2 sc in first st, sc in next 10 sts, [2 sc in next st, sc in next 10 sts] twice—36 sc.
- Row 13: Ch 1, turn, 2 sc in first st, sc in next 11 sts, [2 sc in next st, sc in next 11 sts] twice—39 sc.
- Row 14: Ch 1, turn, 2 sc in first st, sc in next 12 sts, [2 sc in next st, sc in next 12 sts] twice—42 sc.
- Row 15: Ch 1, turn, 2 sc in first st, sc in next 13 sts, [2 sc in next st, sc in next 13 sts] twice—45 sc.
- Row 16: Ch 1, turn, 2 sc in first st, sc in next 14 sts, [2 sc in next st, sc in next 14 sts] twice—48 sc.
- Row 17: Ch 1, turn, 2 sc in first st, sc in next 15 sts, [2 sc in next st, sc in next 15 sts] twice—51 sc.
- Row 18: Ch 1, turn, 2 sc in first st, sc in next 16 sts, [2 sc in next st, sc in next 16 sts] twice—54 sc.
- Row 19: Ch 1, turn, 2 sc in first st, sc in next 17 sts, [2 sc in next st, sc in next 17 sts] twice—57 sc.
- Row 20: Ch 1, turn, 2 sc in first st, sc in next 18 sts, [2 sc in next st, sc in next 18 sts] twice—60 sc.
- Row 21: Ch 1, turn, 2 sc in first st, sc in next 19 sts, [2 sc in next st, sc in next 19 sts] twice—63 sc.
Work Along Straight Edge (Top) of Flap
-
Row 1: Ch 1, do not turn, working in ends of rows, draw up a loop in end of next 2 rows, yarn over and draw through all 3 loops on hook (sc2tog made), sc in end of next 18 rows, draw up a loop in end of next row, draw up a loop in center adjustable ring, yarn over and draw through all 3 loops on hook (sc2tog made), sc in end of next 19 rows, sc2tog (working in ends of last 2 rows)—40 sc.
-
Rows 2–8: Ch 1, turn, sc in each st across.
-
Do not fasten off.
Connect Flap to Back
Hold flap and back with wrong sides (insides) together, and match up the stitches at the top edges. Use the Knit Klips™ to hold the pieces together. With the right side of the flap facing you and working through both thicknesses, perform a reverse sc in each st across the top edges to connect the flap to the back; continue around the remaining edges of the front, reverse sc evenly spaced along the curved edges of the flap. Fasten off.
Sides Panel
- Ch 12.
- Row 1: Sc in 2nd ch from hook and in each remaining ch across—11 sc.
- Rows 2–112: Ch 1, turn, sc in each st across.
- Do not fasten off.
Measure the sides panel to ensure it will fit correctly around the side and lower edges of the back. You may work additional rows or unravel rows if necessary.
Connect Sides Panel to Back
Place the back on a flat surface with the wrong side (inside) facing up. Beginning at one top corner and ending at the other top corner of the back, arrange one long edge of the sides panel along the sides and lower edges of the back. Use the Knit Klips™ evenly spaced to hold the pieces together. Working from the right side (outside) and through both thicknesses, join yarn at one corner and work reverse sc evenly spaced all the way along the edges to join the sides panel to the back.
Connect Sides Panel to Front
Place the front on a flat surface with the wrong side (inside) facing up. Arrange the remaining long edge of the sides panel around the sides and lower edges of the front, using the Knit Klips™ evenly spaced to hold the pieces together. Again, working from the right side (outside) and through both thicknesses, join yarn at one corner and work reverse sc evenly spaced all the way along the edges to join the sides panel to the front.
Strap
-
Ch 6.
-
Row 1: Sc in 2nd ch from hook and in each remaining ch across—5 sc.
-
Rows 2–188: Ch 1, turn, sc in each st across.
-
Fasten off.
Sew the ends of the strap to the right side (outside) of the ends of the sides panel, overlapping the ends about 1–1½ in [2.5–4 cm].
Finishing
Surface Slip Stitch Line
Hold 3 strands of nylon together and beginning and ending at the top edge of the flap, work a surface slip stitch curve along the spaces between stitches of Row 17.
Tassel
Using the 10–11 in [25.5–28 cm] piece of heavy cardboard or a thin book, wrap the nylon thread around the cardboard (or book) 25 times. Cut a 12 in [30.5 cm] piece of nylon thread for tying the tassel top. Thread the 12 in piece under one end of the wraps and tie a strong knot. Place a few drops of super glue in the tassel cap and quickly insert the tassel top section into the cap. Once dried, trim the tassel to create a clean edge. Follow the instructions on the tassel cap package to attach the tassel to the bag flap.
Lining (Optional)
Line the bag if desired. Refer to the notes on suggested methods and materials. Weave in any remaining ends.
Frequently Asked Questions
What crochet hook is used for this pattern?
The pattern specifies using a Susan Bates® Crochet Hook of 3.75 mm [US F-5].
Is this project worked in rows or rounds?
The project is primarily worked in rows, including the front, back, and flaps.
Does this crochet project require assembly?
Yes, the cross body bag requires assembly to join the various panels together and to attach the strap.
Conclusion
This crochet cross body bag pattern is not only an enjoyable project but also results in a practical and beautiful accessory. Whether you’re out shopping or enjoying a day out, this bag will have you covered. Feel free to customize your design for a personal touch, and happy crocheting!