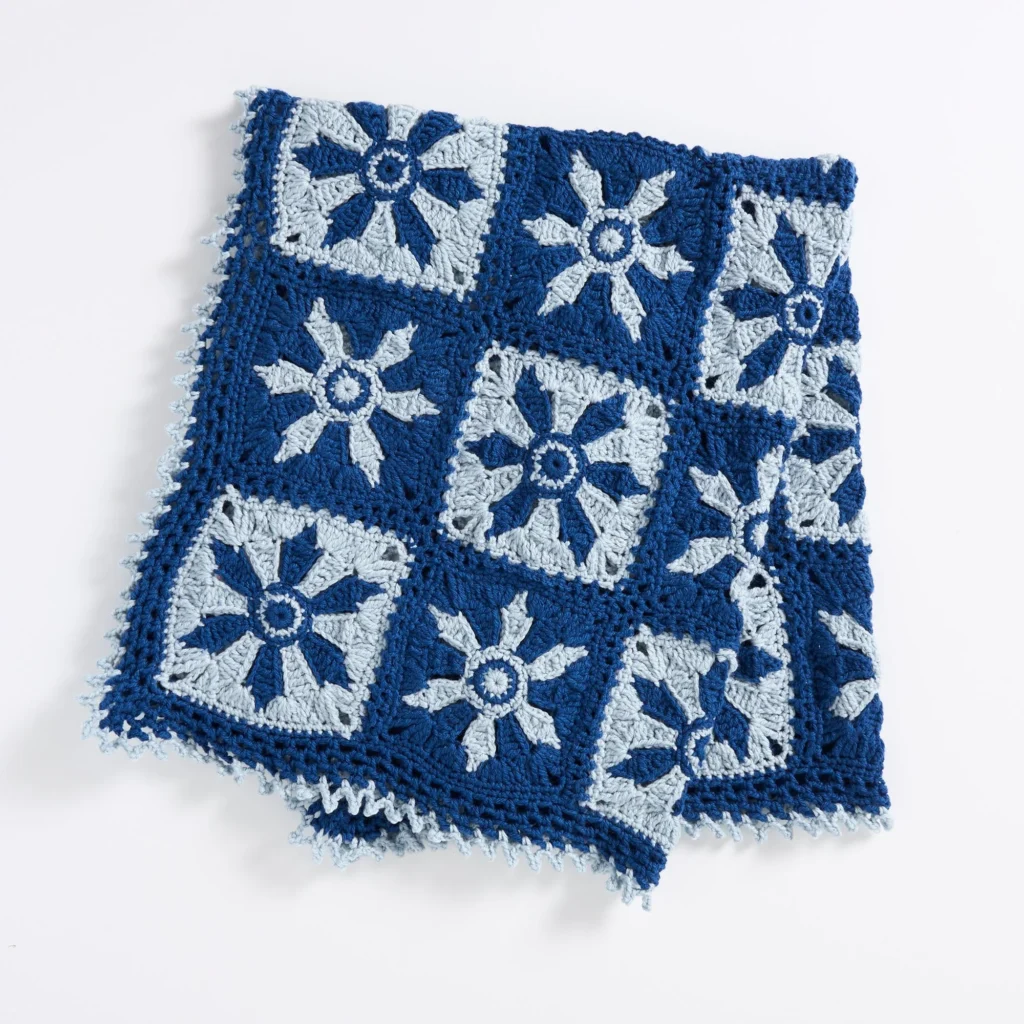
Flying Snowflakes Crochet Throw Pattern
The Flying Snowflakes Crochet Throw is a beautiful and intricate design that brings a touch of winter charm into your home. This throw is crafted using delightful motifs that mimic the delicate beauty of snowflakes, making it a perfect addition to your living space during the colder months. Whether you’re looking to snuggle up on the couch or add a decorative touch to your home, this crochet throw promises to be a satisfying project.
About the Crochet Project
This crochet pattern is designed with motifs, specifically two types of snowflake motifs – Motif A and Motif B, both of which you will create and join together to form the elegant throw. The play of colors in navy and alloy blue creates depth and interest, giving the throw a stunning appearance. The construction involves joining motifs into strips before adding an edging that pulls everything together beautifully.
Materials

Yarn
- Patons® Inspired™ Yarn
- Contrast A Navy (92039): 3 balls or 505 yds/460 m
- Contrast B Alloy Blue (92018): 2 balls or 430 yds/390 m
Crochet Hooks
- Susan Bates® Silvalume crochet hook
- Size U.S. I/9 (5.5 mm) (or size needed to obtain gauge)
Notions
- Yarn needle
Crochet Abbreviations
- ch = chain
- sl st = slip stitch
- sc = single crochet
- hdc = half double crochet
- dc = double crochet
- tr = treble crochet
- dtr = double treble crochet
Motifs
Motif A (make 15)
Refer to the diagram on page 3 for visual guidance.
1st rnd
- With Color B, ch 3.
- Join with sl st to first ch to form a ring.
- Ch 1. 12 sc in ring. Join Color B with sl st to first sc. Do not break Color B.
2nd rnd
- With Color A, ch 1.
- 1 sc in same space as sl st.
- *2 sc in next sc. 1 sc in next sc. Rep from * 4 times more.
- 2 sc in next sc. (Total of 18 sc).
- Join Color A with sl st to first sc. Do not break Color A.
3rd rnd
- With Color B, ch 1.
- 1 sc in same space as sl st.
- *2 sc in next sc. 1 sc in each of the next 2 sc. Rep from * 4 times more.
- 2 sc in next sc. 1 sc in next sc.
- Join Color B with sl st to first sc. (Total of 24 sc).
4th rnd
- With Color B, *Ch 10.
- 1 sl st in 2nd ch from hook.
- 1 sc in next ch.
- 1 hdc in next ch.
- 1 dc in next ch.
- 1 tr in each of the next 2 ch.
- 1 dc in next ch.
- 1 hdc in next ch.
- 1 sc in next ch.
- Skip next sc of 3rd rnd.*
- With Color A, sl st in the next sc of the 3rd rnd.
- Rep from * to * once more.
- With Color B, sl st in the next sc of the 3rd rnd) 6 times, ending the last repeat with sl st in the first st of the 3rd rnd. (This creates a total of 12 petals).
- Fasten off both colors.
5th rnd
- Join Color A with sl st in the 6th ch of any petal.
- Ch 5. Sl st in top of the same petal. Ch 5. Sl st in next dc of the same petal.
- *Sl st in the 6th ch of the next petal. Ch 5. Sl st in top of the same petal. Ch 5. Sl st in next dc of the same petal. Rep from * around.
- Join with sl st in the 6th ch of the first petal.
6th rnd
- Ch 5 (counts as dtr). 1 tr in same space as last sl st.
- *Sl st in next ch-5 space.
- (Sl st in next ch-5 space. (1 tr. 2 dc. 1 tr) all in space between next 2 sl st. Sl st in next ch-5 space) twice.
- 1 sl st in the next ch-5 space.
- (1 tr. 1 dtr. Ch 3. 1 dtr. 1 tr) all in space between the next 2 sl st.
- Rep from * twice more, then from * to * once.
- (1 tr. 1 dtr) all between next 2 sl st.
- Ch 3. Join with sl st to top of ch 5.
7th rnd
- Ch 1. 1 sc in same space as last sl st.
- 1 sc in each st around, working (1 sc. Ch 3. 1 sc) into each corner ch-3 space.
- Join with sl st to first sc.
- Fasten off.
Motif B (make 15)
Work as given for Motif A, substituting Color A for Color B and Color B for Color A.
Finishing
Join Motifs into Strips
You will join motifs into 5 strips, 6 motifs long while alternating colors as follows:
- Join A with sl st in any corner ch-3 space of the first motif.
- With WS facing each other, ch 1. 1 sc in corner ch 3 space of the second motif.
- *Ch 1. Skip next sc. 1 sc in next sc of the first motif.
- Ch 1. Skip next sc. 1 sc in next sc of the second motif.*
- Rep from * to end of row, always working into corner ch 3 space.
Edging
1st rnd (RS)
- Join A with sl st to top right corner of the throw.
- Ch 1. 2 sc in same space as sl st.
- Work 18 sc evenly across the motif. 1 sc in joining ch-1 sp.
- Rep from * to * across the top edge of the throw to the last corner ch-3 space.
- 3 sc in corner ch-3 space.
- Rep from * to * along the side of the throw to the last corner ch-3 space.
- 3 sc in corner ch-3 space.
- Rep from * to * across the bottom edge of the throw.
- 3 sc in corner ch-3 space.
- Rep from * to * along the side of the throw back to the first ch-3 sp.
- 1 sc in same ch-3 sp as the first 2 sc.
- Join with sl st to first sc.
2nd rnd
- Ch 1. (1 sc. Ch 3. 1 sc) in the same space as the sl st.
- Ch 3. Skip next sc. 1 sc in next sc.
- Rep from * to * to next corner sc. (1 sc. Ch 3. 1 sc) in next corner sc three times.
- Rep from * to * to last sc.
- Skip last sc.
- Ch 2. Join with sc to first sc.
3rd rnd
- Ch 1. 1 sc around post of joining sc.
- *Ch 3. 1 sc in next ch-3 space. Rep from * around, working (1 sc. Ch 3. 1 sc) in each corner ch-3 space and ending with ch-3.
- Join with sl st to first sc.
4th rnd
- As 3rd rnd. Break A.
5th rnd
- Join B with sl st in any ch-3 space.
- Ch 1. 1 sc in same space as sl st.
- Ch 2. Picot. Ch 2.
- 1 sc in next ch-3 space. Ch 2. Picot. Ch 2.
- Rep from * around.
- Join with sl st to first sc.
- Fasten off.
Frequently Asked Questions
What materials do I need for this crochet throw?
You will need Patons® Inspired™ yarn in navy and alloy blue, a Susan Bates® Silvalume crochet hook size U.S. I/9 (5.5 mm), and a yarn needle.
How do I join the motifs?
You will join the motifs into strips by using slip stitches in the designated chain spaces, alternating colors as you go.
What is the finished size of the throw?
The finished size is not specified in the provided materials, but you can expect it to be a cozy throw blanket suitable for your couch or chair.
Do I need to make all motifs the same color?
No, you will be alternating colors, creating a beautiful visual contrast with the two colors specified in the pattern.
Is this project worked in rounds or rows?
The project is constructed using rounds to form the individual motifs which are then assembled into strips.
Conclusion
The Flying Snowflakes Crochet Throw is a captivating project that showcases creative motive work and elegant color contrasts. Following this pattern will not only take you through the delightful process of crocheting but will also provide you with a stunning finished throw that is perfect for home use or as a thoughtful gift. Enjoy the journey as you create your unique winter-inspired masterpiece!