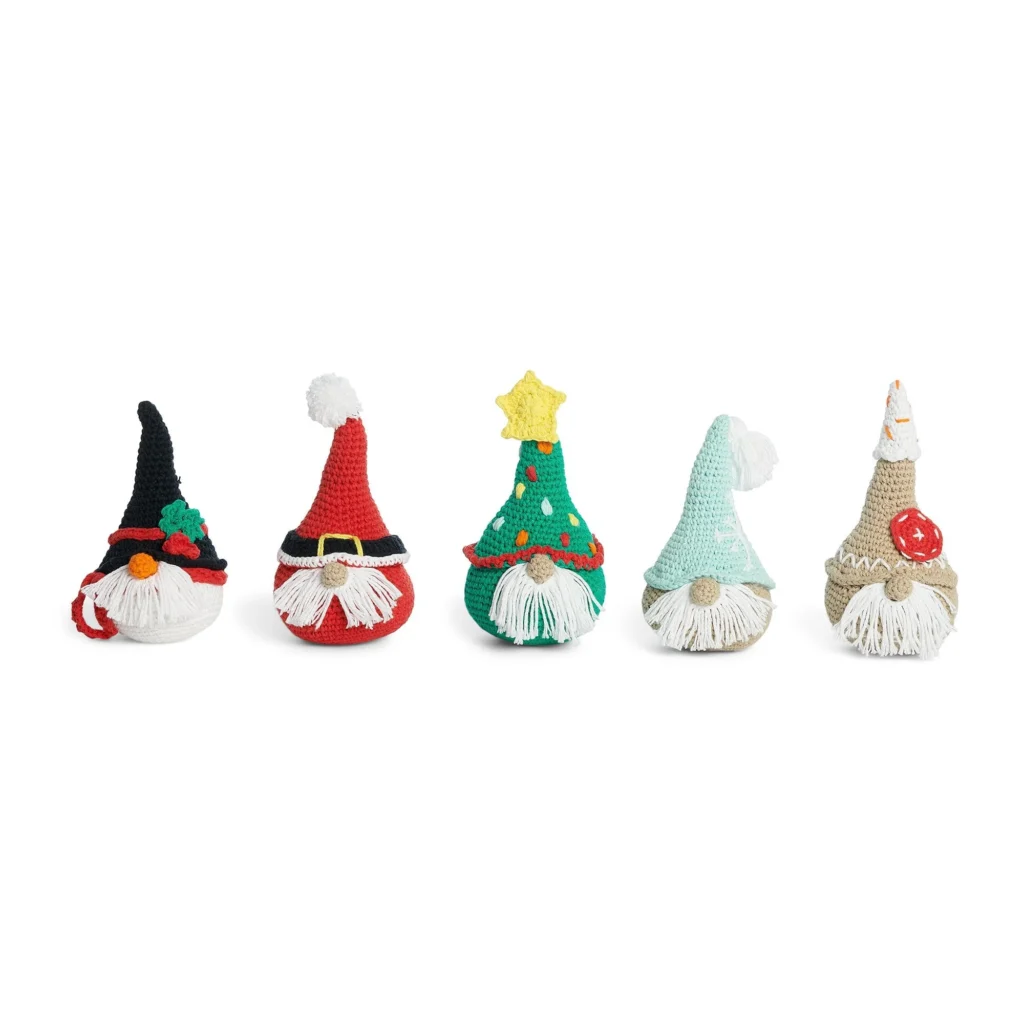
Crochet Gnomes Family of Five Pattern
Bring a touch of whimsy to your home décor this holiday season with this delightful crochet gnome family pattern! Each gnome features its own unique design, allowing you to create a charming collection that can be displayed together or separately. Follow this detailed crochet tutorial to make five adorable gnomes: a Christmas Tree Gnome, Snowflake Gnome, Gingerbread Gnome, Snowman Gnome, and Santa Gnome. You may also find Full Of Texture Crochet Beanie Free Pattern useful.
About the Crochet Project
This project is perfect for all crochet enthusiasts looking to add a fun seasonal decoration to their collection. Each gnome is worked in rounds, ensuring a seamless finish, and they can be personalized with colors and embellishments. With straightforward instructions and clear construction concepts, you will quickly find joy in creating this merry gnome family.
Materials

Yarn
For these adorable gnomes, you’ll need a variety of yarn colors based on the specific gnome you choose to create:
-
Christmas Tree Gnome:
- Main Color (MC): Mod Green (01223) — 1 ball or 120 yds/109 m
- Contrast A: Red (00095) — 1 ball or 6 yds/5 m
- Contrast B: Jute (00082) — 1 ball or 6 yds/5 m
- Contrast C: White (00001) — 1 ball or 17 yds/15 m
- Contrast D: Yellow (00010) — 1 ball or 17 yds/15 m
- Contrast E: Beach Glass (01132) — 1 ball or 6 yds/5 m
- Contrast F: Hot Orange (01628) — 1 ball or 6 yds/5 m
-
Snowflake Gnome:
- Main Color (MC): Beach Glass (01132) — 1 ball or 60 yds/55 m
- Contrast A: Jute (00082) — 1 ball or 60 yds/55 m
- Contrast C: White (00001) — 1 ball or 17 yds/15 m
-
Gingerbread Gnome:
- Main Color (MC): Jute (00082) — 1 ball or 120 yds/109 m
- Contrast A: White (00001) — 1 ball or 17 yds/15 m
- Contrast B: Red (00095) — 1 ball or 11 yds/10 m
- Contrast C: Hot Orange (01628) — 1 ball or 6 yds/5 m
-
Snowman Gnome:
- Main Color (MC): Black (00002) — 1 ball or 60 yds/55 m
- Contrast A: White (00001) — 1 ball or 60 yds/55 m
- Contrast B: Orange (01628) — 1 ball or 6 yds/5 m
- Contrast C: Red (00095) — 1 ball or 11 yds/10 m
- Contrast D: Mod Green (01223) — 1 ball or 6 yds/5 m
-
Santa Gnome:
- Main Color (MC): Red (00095) — 1 ball or 120 yds/109 m
- Contrast A: Jute (00082) — 1 ball or 6 yds/5 m
- Contrast B: White (00001) — 1 ball or 22 yds/20 m
- Contrast C: Black (00002) — 1 ball or 17 yds/15 m
- Contrast D: Yellow (00010) — 1 ball or 6 yds/5 m
Tools/Notions
You will also need the following tools:
- Size U.S. F/5 [3.75 mm] Susan Bates® Silvalume® crochet hook or size needed to obtain gauge
- Susan Bates® stitch markers
- Polyfil Fiber Stuffing
- Susan Bates® yarn needle
Crochet Abbreviations
- Ch = Chain
- Sc = Single Crochet
- PM = Place Marker
- Rnd = Round
- Sc2tog = Single Crochet Two Together
Pattern Notes
Your gnome family pieces will be worked in continuous rounds (unless otherwise stated) and will require stuffing. Follow the specific instructions for each individual gnome, and feel free to customize colors and embellishments to suit your style!
Body Instructions
Magic Loop Technique
To start your gnomes, you’ll use the magic loop method. For those unfamiliar, this technique allows you to create a tight, adjustable loop that is excellent for amigurumi and similar projects.
Body (make 1)
Create the base of your gnome by following these instructions:
- Make a magic loop.
- 1st rnd (RS): Ch 1. 6 sc in magic loop. Do not join, work in continuous rnds. 6 sc. PM for beg of rnd.
- 2nd rnd: 2 sc in each sc around. 12 sc.
- 3rd rnd: *1 sc in next sc. 2 sc in next sc. Rep from * around. 18 sc.
- 4th rnd: *1 sc in each of next 2 sc. 2 sc in next sc. Rep from * around. 24 sc.
- 5th rnd: *1 sc in each of next 3 sc. 2 sc in next sc. Rep from * around. 30 sc.
- 6th rnd: *1 sc in each of next 4 sc. 2 sc in next sc. Rep from * around. 36 sc.
- 7th rnd: *1 sc in each of next 5 sc. 2 sc in next sc. Rep from * around. 42 sc.
- 8th rnd: *1 sc in each of next 6 sc. 2 sc in next sc. Rep from * around. 48 sc.
- 9th rnd: *1 sc in each of next 7 sc. 2 sc in next sc. Rep from * around. 54 sc.
- 10th to 14th rnds: 1 sc in each sc around.
- 15th rnd: *Sc2tog. 1 sc in each of next 7 sc. Rep from * around. 48 sts.
- 16th and 17th rnds: 1 sc in each st around.
- 18th rnd: *Sc2tog. 1 sc in each of next 6 sc. Rep from * around. 42 sts.
- 19th rnd: As 16th rnd.
- 20th rnd: *Sc2tog. 1 sc in each of next 5 sc. Rep from * around. 36 sts.
- 21st rnd: As 16th rnd.
- 22nd rnd: *Sc2tog. 1 sc in each of next 4 sc. Rep from * around. 30 sts.
- 23rd rnd: *Sc2tog. 1 sc in each of next 3 sc. Rep from * around. 24 sts.
- Fasten off. Stuff Body.
Hat Instructions
Hat (make 1)
The hat of your gnome is equally important, giving it a signature charm:
- Make a magic loop.
- 1st rnd (RS): 4 sc in magic loop. Do not join, work in continuous rnds. 4 sc. PM for beg of rnd.
- 2nd rnd: *1 sc in next sc. 2 sc in next sc. Rep from * around. 6 sc.
- 3rd rnd: *1 sc in each of next 2 sc. 2 sc in next sc. Rep from * around. 8 sc.
- 4th rnd: 1 sc in each sc around.
- 5th rnd: *1 sc in each of next 3 sc. 2 sc in next sc. Rep from * around. 10 sc.
- 6th rnd: As 4th rnd.
- 7th rnd: 2 sc in next st. 1 sc in each sc to end of rnd. 11 sc.
- 8th to 14th rnds: As 7th rnd. 18 sc.
- 15th rnd: *2 sc in next sc. 1 sc in each of next 8 sc. Rep from * around. 20 sc.
- 16th rnd: *2 sc in next sc. 1 sc in each of next 9 sc. Rep from * around. 22 sc.
- 17th rnd: *2 sc in next sc. 1 sc in each of next 10 sc. Rep from * around. 24 sc.
- 18th rnd: *2 sc in next sc. 1 sc in each of next 11 sc. Rep from * around. 26 sc.
- 19th rnd: *2 sc in next sc. 1 sc in each of next 12 sc. Rep from * around. 28 sc.
- 20th rnd: *2 sc in next sc. 1 sc in each of next 13 sc. Rep from * around. 30 sc.
- 21st rnd: *2 sc in next sc. 1 sc in each of next 4 sc. Rep from * around. 36 sc.
- 22nd rnd: As 4th rnd.
- 23rd rnd: *2 sc in next sc. 1 sc in next 5 sc. Rep from * around. 42 sc.
- 24th rnd: As 4th rnd.
- 25th rnd: *2 sc in next sc. 1 sc in each of next 6 sc. Rep from * around. 48 sc.
- 26th rnd: *2 sc in next sc. 1 sc in each of next 7 sc. Rep from * around. 54 sc.
- 27th rnd: *2 sc in next sc. 1 sc in each of next 8 sc. Rep from * around. 60 sc.
- Fasten off at end of last rnd. Stuff Hat.
Nose Instructions
Nose (make 1)
Each gnome also requires a cute nose to complete its character:
- Ch 2.
- 1st rnd: 4 sc in 2nd ch from hook. Do not join, work in continuous rnds. 4 sc. PM for beg of rnd.
- 2nd rnd: 2 sc in each sc around. 8 sc.
- 3rd and 4th rnds: 1 sc in each sc around.
- 5th rnd: (Sc2tog) 4 times. 4 sts.
- Fasten off. Stuff Nose.
Beard Instructions
Beard (make 1)
- Cut one 6” [15 cm] length of White yarn and tie the end in a knot to form a circle.
- Cut 20 – 5” [12.5 cm] lengths of White and add as fringe to the circle at the opposite end of the knot.
Main Assembly Instructions
- Pin Hat on Body to find the placement for the Nose.
- Stitch Nose in place.
- Pull the Beard ‘ring’ under the nose and stitch the knot in place to hold the beard under the Nose.
- Trim Beard.
- Sew Hat to Body over the top of the Nose.
Christmas Tree Gnome Details
-
Hat Trim:
With RS facing, join Contrast A with sl st to any back sc of Hat.- 1st rnd: *Ch 3. Skip next sc. Sl st in next sc. Rep from * around. Join with sl st in the same sl as first sl st. Fasten off.
-
Star:
With Contrast D, ch 4.- 1st rnd: Ch 3 (counts as dc). 9 dc in 4th ch from hook. Join with sl st to top of ch-3. 10 dc.
- 2nd rnd: Ch 1. 1 sc in the same sp as sl st. *(2 dc. Ch 2. Sl st to top of last dc. 2 dc) in next dc. 1 sc in next dc. Rep from * around, ending at . Join with sl st to first sc. Fasten off.
-
Light Bulbs Embroidery:
With Contrast A, D, E, and F using Satin St, embroider ‘light bulbs’ as shown in the picture.
Santa Gnome Details
-
Hat Trim:
With RS facing, join Contrast B with sl st to any back sc.- 1st rnd: Ch 1. 2 sc in the same sp as sl st. *1 sc in each of the next 9 sc. 2 sc in next sc. Rep from * around, ending at . Join with sl st to first sc. 66 sc.
-
Hat Belt:
With Contrast C, ch 56. Join with sl st to first ch to form a ring.- 1st rnd: Ch 1. 1 sc in the same sp as sl st. 1 sc in each ch around. Join with sl st to first sc. 56 sc.
- 2nd to 4th rnds: Ch 1. 1 sc in each sc around. Join with sl st to the first sc. Fasten off leaving a long end for sewing. Sew Hat Belt on the Hat.
-
Buckle Embroidery:
With Contrast D and Straight St, embroider a ‘buckle’ over Hat Belt as shown in the picture.
Snowman Gnome Details
-
Hat Stripe:
With Contrast C, ch 56. Join with sl st to the first ch to form a ring.- 1st rnd: Ch 1. 1 sc in the same sp as sl st. 1 sc in each ch around. Join with sl st to first sc. 56 sc. Fasten off leaving a long end for sewing.
-
Holly:
Make 2 with Contrast D.
With Contrast D, ch 7.- 1st rnd: Sl st in 2nd ch from hook. (Sl st in next ch. Ch 2. Sl st in next st) twice. Sl st in next ch. (Sl st. Ch 3. Sl st) in the last ch. Working on the opposite side of ch, (Sl st in next ch. Ch 2. Sl st in next ch) twice. Sl st in last ch. Join with sl st to the first sl st. Fasten off, leaving a long end for sewing.
-
Berry:
With Contrast C, ch 4. Join with sl st to first ch to make a ring.- 1st rnd: Ch 2. (Yoh and draw up a loop. Yoh and draw through 2 loops on hook) twice. Yoh and draw through all 3 loops on hook – beg cluster made. Ch 1. [(Yoh and draw up a loop. Yoh and draw through 2 loops on hook) 3 times. Yoh and draw through all 4 loops on hook – cluster made. Ch 1] twice. Join with sl st to first cluster. Fasten off leaving a long end for sewing.
-
Scarf:
With Contrast C, ch 111.- 1st row: 1 dc in 5th ch from hook (counts as dc and ch 1). *Ch 1. Skip next ch. 1 dc in next ch. Rep from * to end of chain. Fasten off. Sew Hat Stripe on Hat. Sew Holly over Hat Stripe. Sew Berry over ends of Holly. Tie Scarf behind Beard.
Snowflake Gnome Details
-
Tassel:
With Contrast C, using Straight St:- Wrap C around a 3” [7.5 cm] piece of cardboard 20 times. Tie securely at one end. Cut across the other end. Wrap yarn twice around tassel ¼” [1 cm] from tied end, and fasten securely. Attach Tassel to tip of Hat.
-
Snowflake Embroidery:
With Contrast C, using Straight St, embroider snowflake as shown in the picture.
Gingerbread Gnome Details
-
Button:
With Contrast B, ch 2.- 1st rnd: 6 sc in 2nd ch from hook. Join with sl st to first sc. 6 sc.
- 2nd rnd: Ch 1. 2 sc in each sc around. Join with sl st to first sc. 12 sc.
- 3rd rnd: Ch 1. *1 sc in next st. 2 sc in next sc. Rep from * around. Join with sl st to first sc. 18 sc.
- 4th rnd: Ch 1. *1 sc in each of the next 2 sc. 2 sc in next sc. Rep from * around. Join with sl st to first sc. 24 sc. Fasten off leaving a long end for sewing.
-
Icing:
With Contrast A, work 1st to 11th rnds as given for Hat.- 12th rnd: *Sl st in next sc. 3 dc in next sc. Skip next sc. Rep from * around. Join with sl st to first sl st. Fasten off.
-
Gingerbread Embroidery and Finishing:
With Contrast A, using Running St, embroider details on Body along 8th and 9th rnds of Body as shown in the picture.
With Contrast A, using Running St, embroider button details along the last rnd as shown in the picture.
With Contrast A, sew Button to Hat using Cross stitch.
With Contrast C, using Running St, embroider details on Icing as shown in the picture. Sew Icing on Top of Hat.
With Contrast C, using Straight St, embroider zig-zags over 24th and 25th rnds of Hat as shown in the picture.
Frequently Asked Questions
What materials do I need to make these gnomes?
You will need various yarn colors, a crochet hook, stuffing, and a few basic tools. For a complete list of materials, refer to the Materials section above.
Does this project require assembly?
Yes, each gnome requires assembly, including the placement of the hat, nose, and beard. Detailed assembly instructions are provided in the Main Assembly section.
What is the skill level for this crochet pattern?
The pattern does not specify a skill level, but it involves working in the round and basic crochet techniques, making it suitable for those with some experience in crochet.
How long does it take to complete a gnome?
The time it takes to complete each gnome varies based on your crochet speed. Allow a few hours for each gnome, especially if you are new to amigurumi.
Where can I find more crochet patterns?
For more crochet inspiration, check out this list of crochet patterns that you might enjoy!
Enjoy making your Crochet Gnomes Family of Five! It’s a wonderful way to spread festive cheer and engage in a cozy crafting experience. Happy crocheting!