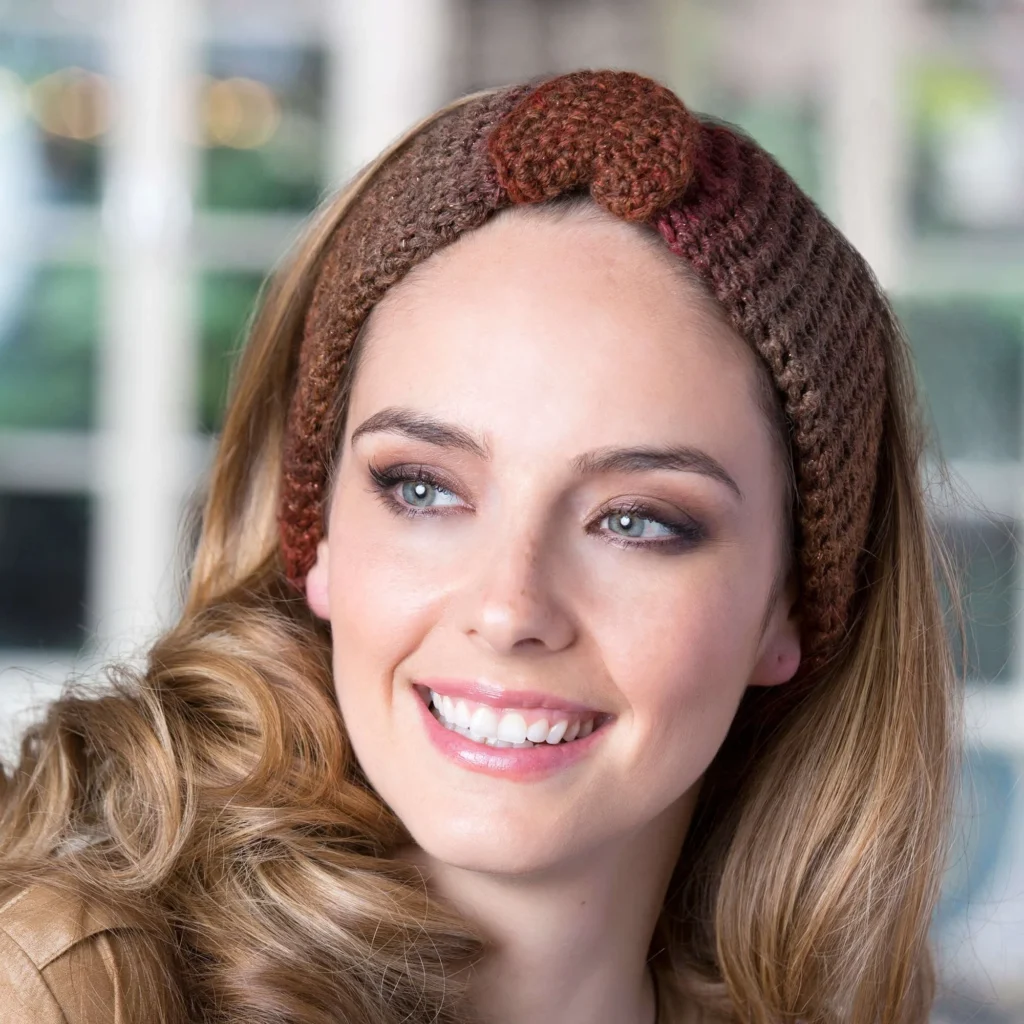
Buttoned Crochet Headband Pattern
Crocheting is a wonderful way to create lovely items that not only showcase your creativity but also serve a practical purpose. Today, we’ll be working on a charming Buttoned Crochet Headband pattern that is perfect for both adults and children. This stylish accessory will keep your ears warm while making a trendy statement, and its unique button design adds a touch of flair.
About the Crochet Project
This crocheted headband features a simple yet effective design, crafted in rounds to create a warm and cozy fit. The use of the RED HEART® Boutique Midnight® yarn in the stunning 1944 Harvest Moon colorway gives this headband a vibrant and warm aesthetic. The buttons not only are functional but also enhance the overall design.
Making this patterned headband is a fantastic weekend project that yields a stylish finish suitable for chilly days or a sporty look year-round.
Finished Measurements
The final dimensions will depend on how tightly you crochet; however, after following the provided pattern, you can expect a comfortable fit that wraps around most heads snugly, making it a versatile accessory.
Materials

To create your buttoned crochet headband, you will need the following materials:
Yarn
- RED HEART® Boutique Midnight® (Art. E786), 1 ball in 1944 Harvest Moon (2.5 oz / 70 g), 153 yd (140 m)
Crochet Hook
- Susan Bates® Crochet Hook, 6 mm [J-10 US]
Notions/Tools
- Yarn needle
- Stitch marker
- Two 11/8” (28.5 mm) wooden buttons
- Sewing needle
- Matching thread (optional for buttons)
Crochet Abbreviations
Familiarize yourself with these common crochet abbreviations used in this pattern:
- Ch = Chain
- sc = Single crochet
- sl st = Slip stitch
- sc2tog = Single crochet two together
- sc3tog = Single crochet three together
- ( ) = Instructions inside parentheses are to be worked together
Pattern Notes
- The headband is worked in rounds, beginning with a circular foundation.
- Use a stitch marker to indicate the starting point of each round, moving it up as you complete each round.
- The headband is slightly shaped for a perfect fit around the head and features buttonholes for adjustable sizing.
Headband Instructions
First Side
- Ch 24; taking care not to twist the chain, join with a slip stitch in the first single crochet in the first chain to form a ring.
- Round 1: Ch 1, working in back bars, sc in each chain around; join with slip stitch in the first sc—24 sc.
- Place marker for the beginning of the round and move the marker up as each round is completed.
- Rounds 2–22: Ch 1, sc in each sc around; join with slip stitch in the first sc.
- Round 23: Ch 1, sc in first sc, sc2tog twice, sc to last 5 sc, sc2tog twice, sc in last sc; join with slip stitch in the first sc—20 sc.
- Round 24: Ch 1, sc in each sc around; join with slip stitch in the first sc.
- Rounds 25–30: Repeat the last 2 rounds 3 times—8 sc.
- Round 31: Ch 1, sc in first sc, sc2tog, sc in the next 2 sc, sc2tog, sc in last sc; join with slip stitch in the first sc—6 sc.
Continue to follow the pattern:
- Round 32: Ch 1, sc in each sc around; join with slip stitch in the first sc.
- Round 33: Sc2tog 3 times; join with slip stitch in the first sc—3 sc.
- Round 34: Sc3tog—1 sc. Do not fasten off.
Buttonhole Loop Row
- Ch 12, working in back bars, slip stitch in the 2nd chain from the hook and in each chain.
- Fasten off, leaving a long tail for sewing.
Second Side
- With the right side facing, join yarn with a slip stitch to the first chain of the foundation chain.
- Round 1: Working across the opposite side of the foundation chain, ch 1, sc in each chain around; join with slip stitch in the first sc—24 sc.
- Rounds 2–34 and Buttonhole Loop Row: Repeat Rounds 2–34 and Buttonhole Loop Row of the first side.
Finishing Headband
- To form the buttonhole loop, sew the end of the buttonhole loop row to Row 34 of the first side.
- Repeat for the second side.
Cinching Band
- Ch 3.
Row Instructions
- Row 1: Sc in the 2nd and last chain from the hook, turn—2 sc.
- Rows 2–5: Ch 1, sc in each sc, turn.
- Row 6: Ch 1, 2 sc in each sc, turn—4 sc.
- Row 7: Ch 1, sc in each sc, turn.
- Row 8: Ch 1, 2 sc in the first sc, sc in the next 2 sc, 2 sc in the last sc, turn—6 sc.
- Row 9: Ch 1, sc in each sc, turn.
- Row 10: Ch 1, 2 sc in the first sc, sc in the next 4 sc, 2 sc in the last sc, turn—8 sc.
- Rows 11 and 12: Ch 1, sc in each sc, turn.
- Row 13: Ch 1, skip the first sc, sc to the last 2 sc, sc2tog, turn—6 sc.
- Row 14: Ch 1, sc in each sc, turn.
- Rows 15 and 16: Repeat the last 2 rows—4 sc.
- Row 17: Ch 1, skip the first sc, sc in the next sc, sc2tog, turn—2 sc.
- Row 18: Ch 1, sc in each sc, turn.
- Round 19: Ch 1, sc evenly spaced around; join with slip stitch in the first sc. Fasten off.
Assembly and Finishing
- With a yarn needle, gather the midsection of the headband by weaving the length of yarn in and out, pulling tightly, and securing.
- Wrap the cinching band around the gathered section and sew the ends together; tack the band in place to the underside of the headband.
- Center each button on the top side 6” (15 cm) (or at desired distance) from the end of each buttonhole loop and sew in place with a strand of yarn or matching thread.
- Weave in any ends to finish your project neatly.
Frequently Asked Questions
What crochet hook is used for this pattern?
The pattern specifies using a Susan Bates® Crochet Hook, 6 mm [J-10 US].
Is this project worked in rows or rounds?
The buttoned crochet headband pattern is predominantly worked in rounds.
Does this crochet project require assembly?
Yes, the headband has assembly steps, particularly in securing the cinching band and attaching the buttons.
Conclusion
This Buttoned Crochet Headband Pattern is a delightful project that can be completed in a short amount of time, allowing you to create a beautiful accessory that is both functional and stylish. Ready your yarn and hook, and dive into this project to keep your ears cozy and trendy! Happy crocheting!