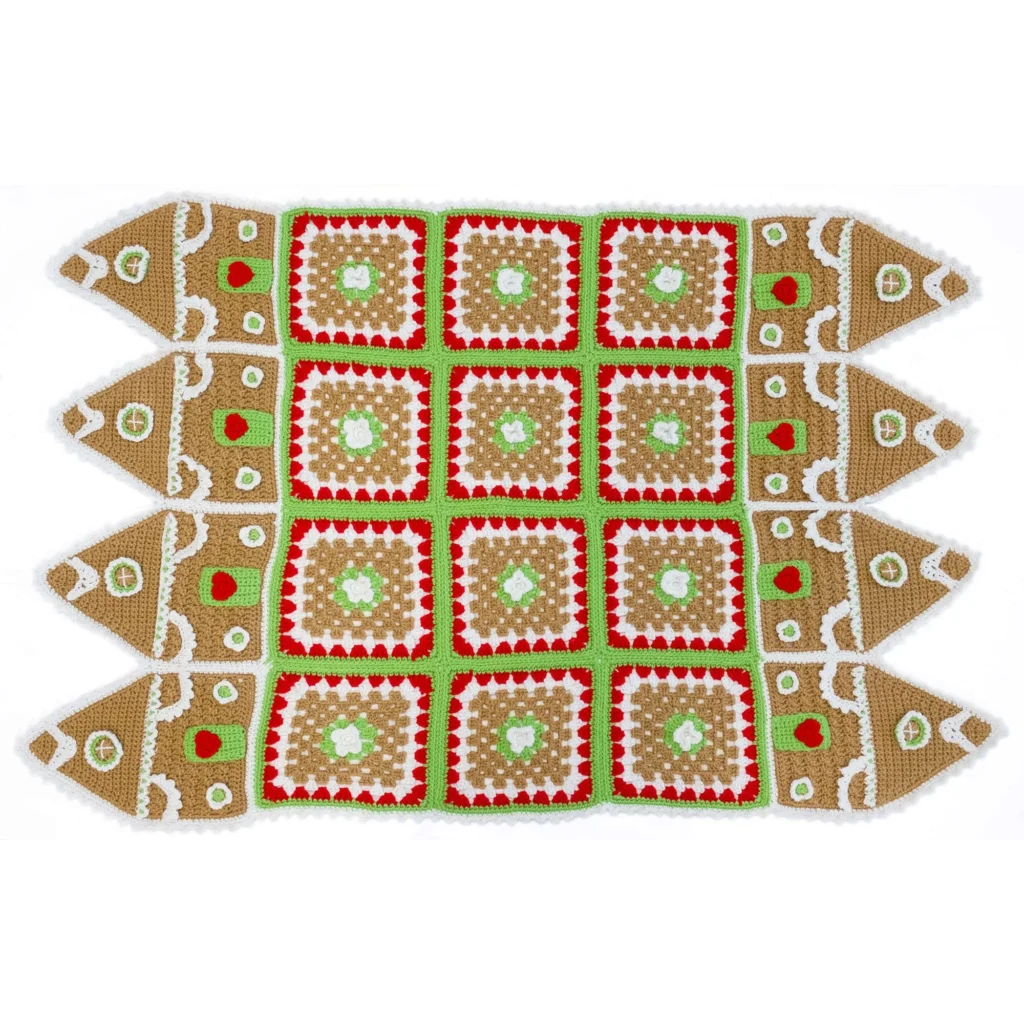
Crochet Gingerbread House Throw Pattern
Bring warmth and holiday cheer to your home with the delightful Crochet Gingerbread House Throw Pattern. This festive throw combines the charming look of gingerbread houses and cozy granny squares to create a unique and beautiful blanket. Perfect for cozy nights in, this project makes for a wonderful gift or a delightful addition to your home decor during the holidays.
About the Crochet Project
The crochet throw features a playful design reminiscent of a gingerbread house, complete with charming embellishments such as hearts, windows, and much more. It is made primarily of granny squares that are expertly joined together, along with individual gingerbread houses that are stitched and adorned to add character. This pattern allows for creativity while simultaneously guiding you through each step in a structured manner, ensuring a fun and festive crafting experience.
Materials

To create this delightful gingerbread house throw, you’ll need the following materials:
Yarn
-
RED HEART® Super Saver®:
- 3 skeins of 336 Warm Brown (A)
- 1 skein each of 319 Cherry Red (C) and 672 Spring Green (D)
-
RED HEART® Holiday®:
- 2 balls of 140 White/Silver (B)
Crochet Hook
- Susan Bates® Crochet Hook: 5.5mm [US I-9]
Notions
- Yarn needle
Crochet Abbreviations
Here’s a quick reference for the crochet abbreviations used throughout the pattern:
- ch: chain
- sc: single crochet
- dc: double crochet
- hdc: half double crochet
- sl st: slip stitch
- st: stitch
- ( ): instructions to be repeated
Special Technique
Join with sc
To join with a single crochet (sc):
- Place a slip knot on your hook.
- Insert the hook into the indicated stitch.
- Yarn over and draw up a loop.
- Yarn over and draw through both loops on the hook.
Pattern Instructions
Throw
This throw is primarily made from granny squares and gingerbread houses. Below are the instructions broken down into simple sections for easy understanding.
Granny Square (Make 12)
- With B, ch 4; join with slip st in first ch to form a ring.
Round 1 (right side)
Ch 1, 12 sc in ring; join with slip st in front loop of first sc—12 sc.
Round 2
Working in front loops only, ch 1, hdc in same st as join,
*(2 dc, hdc) in next sc (petal made), ch 1, slip st in next sc, ch 1, hdc in next sc; repeat from * twice,
(2 dc, hdc) in next sc (petal made), ch 1, slip st in next sc;
join with slip st in first ch—4 petals.
Fasten off.
Round 3
With right side facing and working in back loops only of sts 2 rows below, join D with slip st in first sc, ch 3 (counts as first dc here and throughout), 2 dc in same sc, ch 2, 3 dc in next sc,
*(ch 1, skip next sc, 3 dc in next sc, ch 2, 3 dc in next sc; repeat from * twice,
ch 1, skip last sc;
join with slip st in top of beginning ch—2 groups of 3 dc and 1 ch-1 space on each side and 4 corner ch-2 spaces.
Fasten off.
Round 4
With right side facing, join A with slip st in any corner ch-2 space,
(ch 3, 2 dc, ch 2, 3 dc) in same space as join,
*(ch 1, 3 dc in next ch-1 space, ch 1, (3 dc, ch 2, 3 dc) in next corner ch-2 space; repeat from * twice,
ch 1, 3 dc in last ch-1 space, ch 1;
join with slip st in top of beginning ch—3 groups of 3 dc and 2 ch-1 spaces on each side and 4 corner ch-2 spaces.
Fasten off.
Rounds 5 and 6
Slip st in each dc to first ch-2 space, (ch 3, 2 dc, ch 2, 3 dc) in same space,
(ch 1, 3 dc in each ch-1 space across to next corner ch-2 space, *ch 1, (3 dc, ch 2, 3 dc) in next corner ch-2 space, (ch 1, 3 dc) in each ch-1 space across to next corner ch-2 space; repeat from * around, ch 1;
join with slip st in top of beginning ch—5 groups of 3 dc and 4 ch-1 spaces on each side and 4 corner ch-2 spaces.
Fasten off.
Round 7
With right side facing, join B with slip st in any corner ch-2 space,
(ch 3, 2 dc, ch 2, 3 dc) in same space,
(ch 1, 3 dc) in each ch-1 space across to next corner ch-2 space,
*(ch 1, (3 dc, ch 2, 3 dc) in next corner ch-2 space, (ch 1, 3 dc) in each ch-1 space across to next corner ch-2 space; repeat from * around, ch 1;
join with slip st in top of beginning ch—6 groups of 3 dc and 5 ch-1 spaces on each side and 4 corner ch-2 spaces.
Fasten off.
Round 8
With C, repeat Round 7—7 groups of 3 dc and 6 ch-1 spaces on each side and 4 corner ch-2 spaces.
Round 9
With right side facing, join D with sc in any corner ch-2 space, 2 sc in same space,
*sc in each st and ch-1 space across to next ch-2 space, 3 sc in next ch-2 space; repeat from * twice,
sc in each remaining st and ch-1 space;
join with slip st in first sc—108 sc.
Round 10
Ch 1, sc in same st as join, 3 sc in next sc,
*sc in next 29 sc, 3 sc in next sc; repeat from * twice, sc in each sc to first sc;
join with slip st in first sc—128 sc.
Fasten off.
Granny Square Joining Preparation (Sewing Strips)
With D, wrong sides held together, and working through inner loops, sew 3 strips of 4 granny squares each, then sew strips together across long edges.
Gingerbread House (Make 8)
- With A, ch 30.
Row 1 (wrong side)
Sc in 2nd ch from hook and in each ch across, turn—29 sc.
Row 2 (right side)
Ch 3, dc in each st across, turn—29 dc.
Row 3
Ch 1 (counts as first slip st),
*dc in next st, slip st in next st; repeat from * across, turn—15 slip sts and 14 dc.
Row 4
Ch 3, dc in each st across, working last st in beginning ch-1 space, turn.
Row 5
Repeat Row 3.
Rows 6–13
Repeat last 2 rows 4 times; change to B at end of Row 13.
Carry A along the wrong side of the piece.
Row 14
Ch 1, sc in each st across, turn.
Row 15
Ch 1, working in back loops only, slip st in first sc,
*ch 4 (looped fringe made), skip next sc, slip st in next sc; repeat from * across;
change to A, turn—15 slip sts and 14 looped fringes.
Cut B.
Row 16
Ch 1, working in back loops only, sc in first slip st,
*sc in next skipped sc 2 rows below, sc in next slip st; repeat from * across, turn—29 sc.
Roof (House Top)
Row 17
Ch 1, sc in first sc, sc2tog, sc in each sc across to last 3 sc, sc2tog, sc in last sc, turn—27 sc.
Row 18
Ch 1, sc in each sc across, turn.
Rows 19–38
Repeat last 2 rows 10 times—5 sc.
Row 39
Ch 1, sc2tog, sc in next sc, sc2tog, turn—3 sc.
Do not fasten off.
Edging
Round 1 (right side)
Ch 1, sc3tog (tip of roof made); working in ends of rows, sc evenly down edges of roof and house to foundation ch; working in the opposite side of foundation ch, 3 sc in first ch, sc in each ch across to last ch, 3 sc in last ch; working in ends of rows, sc evenly up edges of house and roof to tip of the roof, 3 sc in the tip of the roof; join with slip st in next st.
Fasten off.
Round 2
With right side facing, join B with sc in any st except the center st of any 3-sc group, sc in each st around, working 3 sc in center st of each 3-sc group; join with slip st in first sc.
Fasten off.
Heart (Make 8)
With C, ch 2.
Round 1 (right side)
Work 6 sc in 2nd ch from hook—6 sc.
Do not join.
Round 2
(Sc, ch 2, sc) in the first sc, slip st in next sc, 3 hdc in next sc, ch 1, slip st in next sc, ch 1, 3 hdc in next sc, slip st in next sc;
join with slip st in first sc.
Fasten off, leaving a long tail for sewing.
Door (Make 8)
With D, ch 13.
Row 1 (right side)
Sc in 2nd ch from hook and in each ch across, turn—12 sc.
Rows 2–8
Ch 1, sc in each sc across, turn.
Fasten off, leaving a long tail for sewing.
Window (Make 8)
With A, ch 4.
Round 1 (right side)
Work 11 dc in 4th ch from hook (beginning ch counts as first dc); join in top of beginning ch—12 dc.
Fasten off.
Round 2
With right side facing, join D with sc in any dc, 2 sc in next dc,
*sc in next dc, 2 sc in next dc; repeat from * around;
change to B; join with slip st in first sc—18 sc.
Round 3
*Ch 2, slip st in next sc; repeat from * around; join with slip st in the base of beginning ch.
Fasten off.
Flower (Make 16)
With D, ch 2.
Round 1 (right side)
Work 8 sc in 2nd ch from hook; change to B—8 sc.
Do not join.
Round 2
Working in back loops only,
*(slip st, ch 1, hdc) in next sc, hdc in next sc, ch 1; repeat from * around;
join with slip st in first slip st.
Fasten off.
Roof Trim (Make 8)
With B, ch 14.
Row 1 (right side)
Sc in 2nd ch from hook and in next 3 ch, skip next 2 ch,
(dc, [ch 1, dc] 4 times) in next ch, skip next 2 ch, sc in last 4 ch.
Fasten off.
Swag Trim (Make 16)
With B, ch 14.
Row 1 (right side)
Sc in 2nd ch from hook and in each ch across, turn—13 sc.
Row 2
Ch 2, sc in 2nd ch from hook, *slip st in next 2 sc, ch 2, sc in 2nd ch from hook; repeat from * across to last sc, sc in last sc.
Fasten off.
Finishing Gingerbread House
Placement and Decoration
- Refer to the photograph for placement of pieces.
- Weave in ends.
- Position the roof trim in a “V” near the top of the house and sew in place.
- With B, embroider 4 straight stitches on the window to create window panes.
- Position the window above the looped fringes and with A, back stitch through the outer edge of Round 1.
- Open looped fringes of Row 15 so each space is visible and tack in place.
- With D, embroider a French knot in the center of each space.
- Sew heart in place on the upper half of the door.
- Center the door on the house and sew in place.
- Place a flower on each side of the door and with A, back stitch through the outer edge of Round 1.
- Sew one end of swag trim between the 4th and 5th looped fringes from the side edge and sew the other end to the side edge about 1” (2.5 cm) below looped fringes.
- Repeat with the 2nd swag trim on the opposite edge.
Assembly
- With wrong sides held together and working through the inner loops with B, sew 2 houses together from the bottom of the roof to the lower edge of the house.
- Repeat to join 3rd and 4th house to form a strip.
- Join remaining 4 houses in the same manner to form the 2nd strip.
- With D, sew strips to each long edge of the granny square section.
Finishing
Border
Note: Work multiples of 3 sts.
Round 1 (right side)
With the right side facing, join B with sc in any st on the edge of the granny square section, evenly space sc around, working 3 sc in the center st of the 3-sc group on each roof; join with slip st in the first sc.
Round 2
Ch 2, sc in the 2nd ch from the hook,
*slip st next 3 sc, ch 2, sc in 2nd ch from hook; repeat from * around; join with slip st in the first ch.
Fasten off.
Weave in ends.
Frequently Asked Questions
What crochet hook is used for this pattern?
A 5.5mm [US I-9] crochet hook is recommended for this project.
Is this project worked in rows or rounds?
This crochet pattern involves both rounds for the granny squares and rows for the gingerbread houses.
How many granny squares are needed for the throw?
You will need to make a total of 12 granny squares to complete the throw.
Can I customize the colors for this pattern?
Absolutely! While the pattern suggests specific colors, feel free to choose any yarn shades that suit your personal style or fit your home decor.
Does this crochet project require assembly?
Yes, after creating the granny squares and gingerbread houses, they will be assembled together to complete the throw.
Conclusion
The Crochet Gingerbread House Throw Pattern is not only a fun and creative project but also a perfect way to spread holiday cheer and warmth. By combining gorgeous granny squares with charming gingerbread houses, this throw is sure to become a treasured piece in your home for years to come. Happy crocheting!