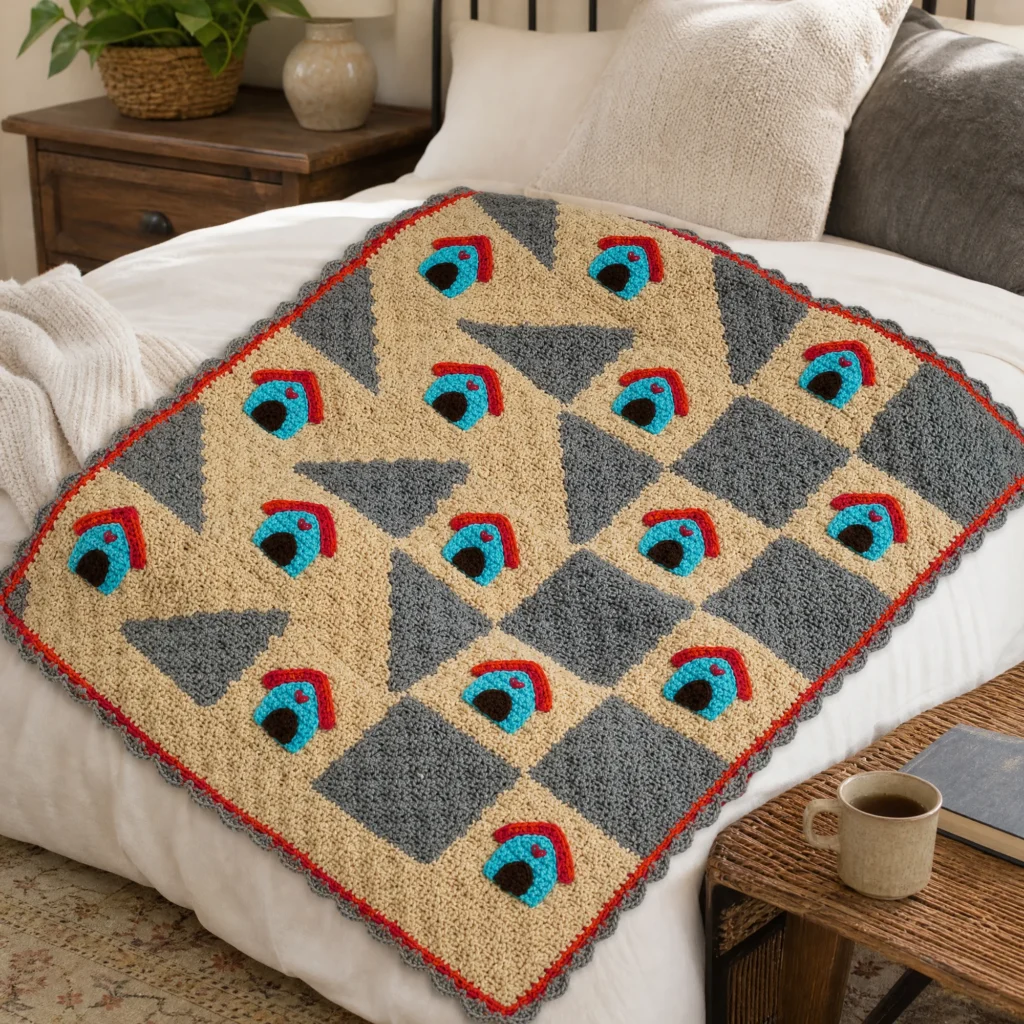
Crochet a Dog’s Home Throw Pattern
Crocheting a cozy throw for your furry friend is a delightful project that combines functionality with creativity. This throw pattern, designed as a charming doghouse motif, is perfect for adding a warm touch to your home or making a thoughtful gift for a dog lover. Below, you will find all the necessary instructions, materials, and tips to help you craft this lovely crochet throw.

About the Dog’s Home Throw
The Dog’s Home Throw is not just a blanket; it features visually appealing doghouse squares that are interconnected to form a cozy patchwork design. The combination of soft colors in the yarn creates a soothing atmosphere, making it ideal for both you and your pet. The square motifs are created using traditional crochet stitches, and they come together into a pleasing layout.
Finished Measurements
This throw is designed to be a comfortable size for snuggling; it measures approximately 46 inches by 46 inches once completed, making it perfect for covering your lap or draping over your pet’s favorite resting spot.
Materials
To create this beautiful throw, you will need the following materials:
Yarn
- RED HEART® Super Saver® Yarn
- 2 skeins each:
- 334 Buff (A)
- 400 Grey Heather (B)
- 1 skein each:
- 512 Turqua (C)
- 3941 Chili (D)
- 365 Coffee (E)
- 2 skeins each:
Crochet Hook
- Susan Bates® Crochet Hook
- Size 5mm [US H-8]
Other Notions
- Yarn needle for sewing assembly pieces together.
Crochet Abbreviations
Here’s a handy reference for the abbreviations used in this pattern:
- ch = chain
- sc = single crochet
- dc = double crochet
- slip st = slip stitch
Pattern Notes
- Stitch/Color Notation:
- Use color A (Buff) throughout the majority of the squares.
- For half B/half A squares (using Grey Heather), follow the color block instructions in the pattern.
Squares
You will crochet a total of 12 squares in color A and 13 squares in half B/half A. Below are the step-by-step instructions for creating these squares.
Half B/Half A Square Instructions:
Row 1
- With B, ch 3,
- 3 dc in 3rd ch from hook (one shell made)
- ch 3, turn.
Row 2
- 3 dc in 3rd ch from hook,
- slip st in ch-3 space of the first shell,
- ch 3,
- 3 dc in same ch-3 space,
- ch 3, turn — 2 shells.
Row 3
- 3 dc in 3rd ch from hook,
- *slip st in ch-3 space of next shell, ch 3, 3 dc in same ch-3 space; repeat from * across,
- ch 3, turn — 3 shells.
Rows 4-7
- Repeat Row 3.
- At end of Row 7: do not ch 3, turn, slip st in each st across shell, slip st into ch-3 space of shell, fasten off — B — 7 shells.
Row 8 (Switch to A Half)
- With A:
- slip st in ch-3 space of same shell,
- ch 3, 3 dc in same ch-3 space,
- *slip st in ch-3 of next shell, ch 3, 3 dc in same ch-3 space; repeat from * across to last shell,
- end with slip st in last ch-3 space, turn,
- slip st in each st across shell.
Rows 9-13
- Repeat Row 8 until 1 shell remains, fasten off.
Doghouse Component (Make 12)
Now, let’s create the small doghouses which will be appliqued onto the squares.
Row 1
- With C, ch 10,
- sc in 2nd ch from hook and in each ch across,
- ch 1, turn — 9 sc.
Rows 2-6
- Sc in each sc across, ch 1, turn.
Rows 7-9
- Sc first 2 sc together,
- sc in each sc across,
- sc last 2 sc together,
- ch 1, turn — 3 sc.
Row 10
- Sc 3 sc together, fasten off — 1 sc.
Roof
Now to build the roof of the doghouse.
- With D, ch 20,
- sc in 2nd ch from hook and in each of next 8 ch,
- 3 sc in next ch,
- sc in each of last 9 ch,
- fasten off.
Doorway (Doghouse Door)
Next, let’s create a cute entry for the doghouse.
Row 1
- With E, ch 3,
- sc in 2nd ch from hook,
- 5 sc in last ch,
- working down the opposite side of foundation ch,
- sc in next ch,
- ch 1, turn — 7 sc.
Row 2
- Sc in each of next 3 sc,
- 3 sc in next sc,
- sc in each of last 3 sc,
- fasten off — 9 sc.
Assembly Instructions
With the yarn needle, use a running stitch for assembly steps:
- Sew the doorway to the lower edge of the doghouse at the center.
- Sew the doghouse to the center of a solid color square, ensuring enough room at the top for the roof.
- Sew the roof to the top of the doghouse.
- With D, embroider a heart at the center of the doghouse above the doorway, as shown in the instruction diagram.
Assemble Squares into Rows
The squares will be arranged into rows of 5 squares across and 5 down, as specified below:
Rows 1, 3, 5
- Half A/B square with B triangle to lower left,
- solid square,
- half A/B square with B triangle to upper right,
- solid square,
- half A/B square with B triangle to lower left.
Rows 2, 4
- Solid square,
- half A/B square with B triangle to lower right,
- solid square,
- half A/B square with B triangle to upper left,
- solid square.
Border
To finish off your throw beautifully, add a border around it.
Round 1
- With D, sc evenly around, working 3 sc in each corner,
- join with slip st to first sc,
- fasten off.
Round 2
- With B, join with slip st to center sc of any corner 3-sc group,
- ch 3,
- dc in same sc,
- *ch 2,
- skip next 2 sc,
- slip st in next sc,
- ch 2,
- skip next 2 sc,
- 2 dc in next sc;
- repeat from * around, adjusting stitches as necessary,
- fasten off.
Frequently Asked Questions
What yarn is recommended for this pattern?
You’ll need RED HEART® Super Saver® yarn in Buff, Grey Heather, Turqua, Chili, and Coffee colors.
How many squares are required to make this throw?
You need a total of 12 squares in Buff and 13 squares in half Grey Heather and half Buff.
Does this project require assembly?
Yes, the doghouses and squares need to be sewn together during the assembly process.
Is a specific crochet hook size used for this pattern?
Yes, you will need a 5mm [US H-8] crochet hook to complete this project.
What are the finished measurements of the Dog’s Home Throw?
The throw measures approximately 46 inches by 46 inches when completed.
Conclusion
With this Crochet a Dog’s Home Throw Pattern, you can create a beautiful and warm throw that serves both aesthetic and practical purposes. Use your creativity to personalize the design further, and enjoy the wholesome process of creating something special not just for yourself, but for your beloved pets. Happy crocheting!