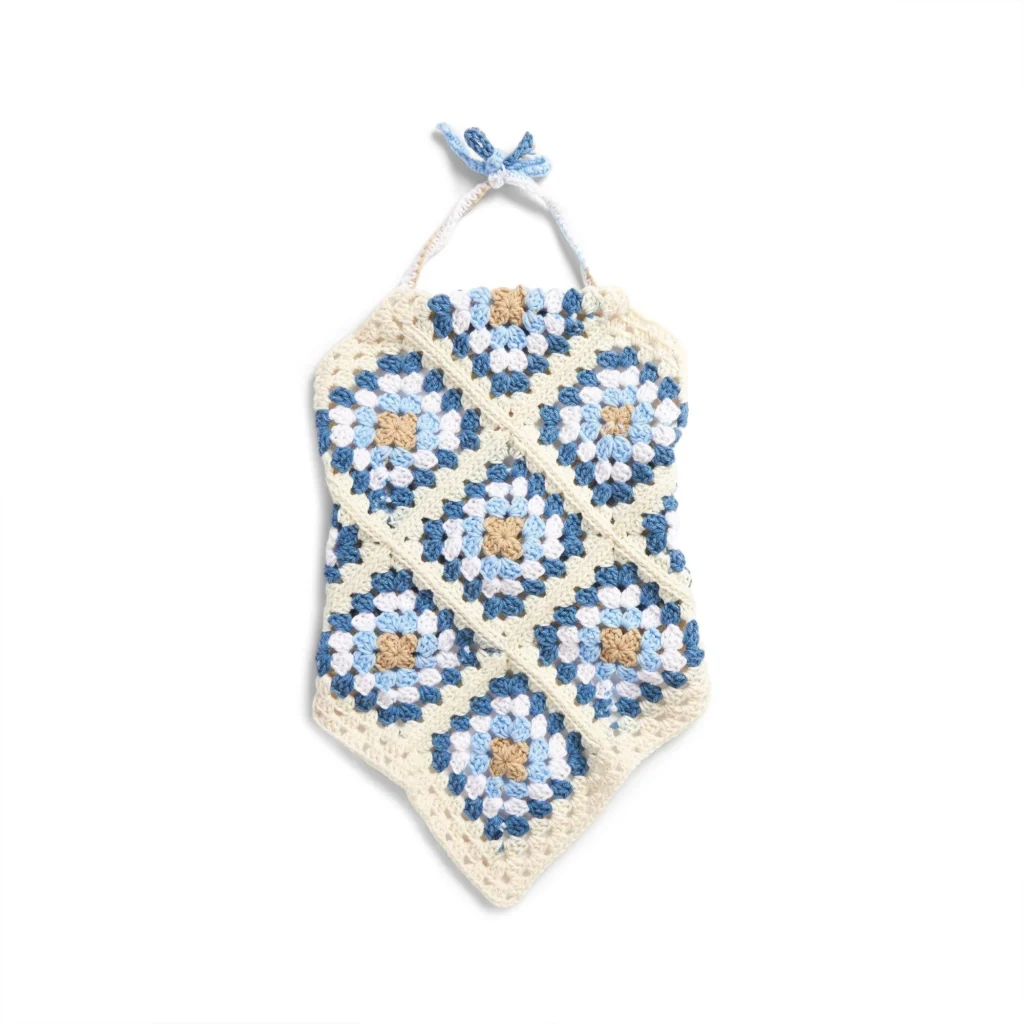
Crochet Coastal Granny Halter Top Pattern
Create a chic and vibrant halter top with this Crochet Coastal Granny Halter Top Pattern! This timeless piece combines the classic granny square motif with a modern twist, making it perfect for warm-weather outings or a beach day. Read on for detailed instructions, materials, and helpful tips!

About the Design
The Crochet Coastal Granny Halter Top is designed to be both stylish and comfortable, featuring lightweight granny squares that provide excellent breathability. The distinctive halter neck design allows for easy wear and an adjustable fit. This pattern is suitable for various body sizes, making it a versatile and fashionable addition to your wardrobe.
Sizes
The top is available in three sizes:
- XS/S/M
- L/XL
- 2/3XL
This pattern will help you achieve a finished garment that has specific diagonal measurements:
- XS/S/M: 8½” [72.5 cm]
- L/XL: 34″ [86 cm]
- 2/3XL: 40″ [101.5 cm]
Materials
To get started on your Crochet Coastal Granny Halter Top, gather the following materials:
Yarn
-
Red Heart® All-in-One Granny Square™ (8.8 oz/250 g; 417 yds/381 m) — Contrast A:
- XS/S/M: 1 ball
- L/XL: 1 ball
- 2/3XL: 1 ball
- Color: Aran – Soft Sky (2011) (Granny Squares)
- Quantity of Granny Squares: 9 for each size
-
Red Heart® Super Saver™ (7 oz/198 g; 364 yds/333 m) — Contrast B:
- XS/S/M: 1 ball
- L/XL: 1 ball
- 2/3XL: 2 ball(s)
- Color: Aran (313)
- Yardage:
- XS/S/M: 77/71 yds/m
- L/XL: 237/217 yds/m
- 2/3XL: 450/411 yds/m
Tools
- Size U.S. I/9 (5.5 mm) Susan Bates® Silvalume® crochet hook or size needed to obtain gauge
- Susan Bates® yarn needle
- Susan Bates® stitch markers
Crochet Abbreviations
Familiarize yourself with some common crochet abbreviations used in this pattern:
- ch: chain
- dc: double crochet
- sl st: slip stitch
- sp: space
- ( ): instructions within parentheses are to be repeated as directed
- [ ]: instructions within brackets are a single repeat
Gauge
It’s essential to obtain the correct gauge for a proper fit. Make sure to check your gauge using the recommended crochet hook and yarn.
Pattern Instructions
TOP — MOTIF
You will need to make 9 granny squares for this top.
Notes for Motif
- With A, starting with color 1, ch 4.
- Join with sl st to first ch to form a ring. (Refer to the diagram on page 3).
Round Instructions
1st rnd: (Right side)
- Ch 6.
- (3 dc, ch 3) 3 times in ring.
- 2 dc in ring.
- Join.
2nd rnd:
- Sl st in ch-3 sp.
- Ch 6.
- 3 dc in same ch-3 sp.
- *Ch 1. (3 dc, ch 3, 3 dc) in next ch-3 sp. Rep from * twice more.
- Ch 1. 2 dc in first ch-3 sp.
- Join.
3rd rnd:
- Sl st in ch-3 sp.
- Ch 6.
- 3 dc in same ch-3 sp.
- *Ch 1. 3 dc in next ch-1 sp. Ch 1. (3 dc, ch 3, 3 dc) in next ch-3 sp. Rep from * twice more.
- Ch 1. 3 dc in last ch-1 sp.
- Ch 1. 2 dc in first ch-3 sp.
- Join.
4th and 5th rnds:
- Sl st in ch-3 sp.
- Ch 6.
- 3 dc in same ch-3 sp.
- (Ch 1. 3 dc) in each ch-1 sp to next ch-3 sp. Ch 1.*
- (3 dc, ch 3, 3 dc) in next ch-3 sp.
- Rep from * twice more, then from * to ** once.
- 2 dc in first ch-3 sp.
- Join.
Finish off the motif after completing these rounds.
Assembly
Seaming with Flat Sl St Join
- Using B, sl st motifs together, working through the back loops only and keeping working yarn to the wrong side (WS) of work to create a flat sl st chain detail on the right side (RS) of work.
- Join motifs into 3 horizontal strips, with 3 motifs in each strip, following the assembly diagram.
- Join the 3 strips together.
Note: Keep working yarn to WS of work so only flat sl st chain is visible on RS.
Edging
1st rnd:
- Join B with sl st to any corner ch-3 sp of Top.
- Ch 3 (counts as 1 dc).
- 2 dc in same ch-3 sp.
- Ch 1. 3 dc in next ch-1 or ch-3 sp. Rep from * to the next corner.
- Ch 1. (3 dc, ch 3, 3 dc) in corner ch-3 sp three times.
- Rep from * to the last corner. (3 dc, ch 3) in corner ch-3 sp.
- Join with sl st to the top of the first ch-3.
2nd rnd:
- Loosely sl st in each of the next 2 dc and ch-1 sp.
- Ch 3.
- 2 dc in same ch-1 sp.
- Ch 1. 3 dc in next ch-1 sp. Rep from * to the next corner.
- Ch 1. (3 dc, ch 3, 3 dc) in corner ch-3 sp four times.
- Ch 1. Join with sl st to the top of the first ch-3.
- Rep 2nd rnd 0 (3-7) times more.
- Finish off.
Neck Tie
- With A, ch 125.
- 1st row: 1 sc in 2nd ch from hook. 1 sc in each ch to end of chain. Fasten off.
Back Ties
- Join A with sl st to any corner ch-3 sp.
- Ch 43 (53-63).
- 1st row: 1 sc in 2nd ch from hook. 1 sc in each ch to end of chain. Join with sl st to same ch-3 sp.
- Fasten off.
- Rep process in ch-3 sp on the opposite side of Top for the 2nd Back Tie.
- Weave in ends.
Final Assembly / Folding & Sewing
- With WS facing and Back Ties on either side, fold the top corner down 5 (7-9)” [12.5 (18-23) cm] to WS.
- Using B, sew folded corner to Top, leaving approximately 1½” [4 cm] open for the neck tie casing.
- Feed Neck Tie through casing, leaving equal amounts of Neck Tie showing on both sides.
Frequently Asked Questions
What crochet hook is used for this pattern?
The pattern calls for a size U.S. I/9 (5.5 mm) Susan Bates® Silvalume® crochet hook or a size needed to obtain gauge.
Is this project worked in rows or rounds?
This project primarily utilizes rounds, especially in the creation of the granny squares.
Does this crochet project require assembly?
Yes, the granny squares are joined together and require specific assembly steps to create the final halter top design.
Conclusion
The Crochet Coastal Granny Halter Top Pattern is an ideal project for those looking to create a stylish, handmade garment. With its vibrant granny squares and easy-to-follow instructions, you can craft a unique piece perfect for any summer outing. Embrace your creativity and enjoy the process of making this beautiful halter top! Happy Crocheting!