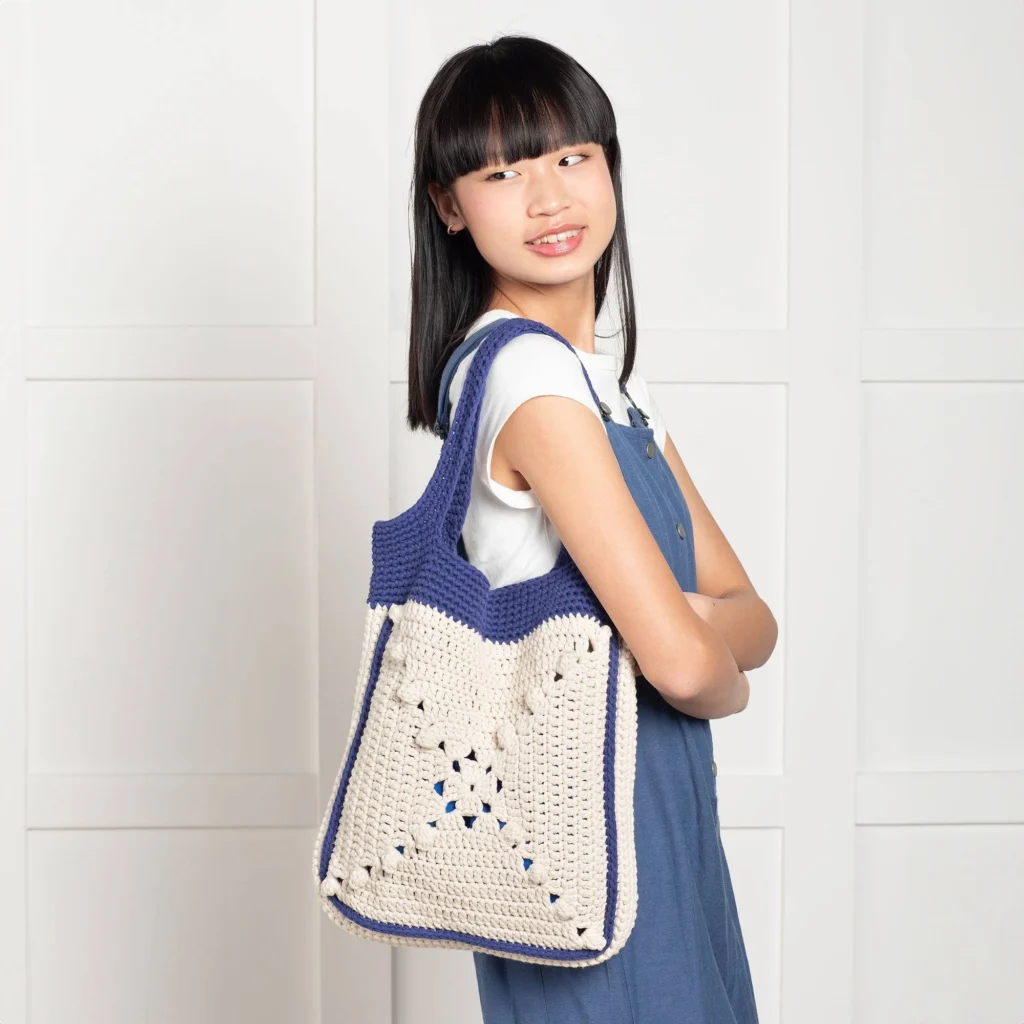
Crochet Carry On Tote Bag Pattern
Are you looking for a stylish and functional tote bag that’s easy to crochet? The Crochet Carry On Tote Bag Pattern is perfect for both beginners and seasoned crafters alike. This practical bag combines beautiful motifs with the durability of Bernat® Maker™ yarn, making it a great accessory for everyday use or weekend getaways.
About the Bag
The Carry On Tote Bag features a unique design with two colorful motifs that add a cheerful flair. The strong and sturdy nature of the Bernat® Maker™ yarn ensures that this bag will hold up well, whether you’re heading to the farmer’s market or the beach. The tote bag is roomy enough to carry essentials, providing both style and functionality.
Materials

To create your Crochet Carry On Tote Bag, you will need the following materials:
Yarn
- Bernat® Maker™ (8.8 oz / 250 g; 317 yds / 290 m)
- Main Color (MC) Cream (06003): 1 ball or 310 yds / 282 m
- Contrast A Navy (06017): 1 ball or 260 yds / 237 m
Tools
- Crochet Hook: Size U.S. J/10 (6 mm) Susan Bates® Silvalume® crochet hook or size needed to obtain gauge.
- Yarn Needle
Crochet Abbreviations
- ch – chain
- dc – double crochet
- sl st – slip stitch
- sc – single crochet
- tr – treble crochet
- hdc – half double crochet
- sp – space
- rep – repeat
- rem – remaining
Skill Level
EASY
Pattern Notes
- The bag is constructed using motifs. You will make two motifs to form the bag’s body.
- Be mindful of strand tension to achieve a consistent finish.
Motif Instructions
Make 2
Refer to the diagram to ensure correct positioning and shape.
Starting the Motif:
- With MC, ch 4. Join with sl st to the first ch to form a ring.
1st rnd:
- Ch 3 (counts as dc throughout).
- 3 dc in the ring.
- (Ch 2, 4 dc in the ring) 3 times.
- Join with hdc to the top of ch 3 (creates the last ch-2 space).
2nd rnd:
- Ch 3. (3 dc, ch 2, 4 dc) all in the ch-2 space just created.
- *Ch 1, (4 dc, ch 1, 4 dc) all in the next ch-2 space. Repeat from * two more times.
- Ch 1.
- Join with sl st to the top of ch 3.
3rd rnd:
- Ch 3.
- 1 dc in each of the next 3 dc.
- *(1 dc, popcorn, 1 dc) all in the next corner ch-1 space.
1 dc in each of the next 4 dc.
1 dc in the next ch-1 space.
1 dc in each of the next 4 dc. Repeat from * two more times. - (1 dc, popcorn, 1 dc) all in the next corner ch-1 space.
- 1 dc in each of the next 4 dc.
- 1 dc in the last ch-1 space.
- Join with sl st to the top of ch 3.
4th rnd:
- Ch 3.
- 1 dc in each of the next 4 dc.
- *(1 dc, 1 tr, ch 1, 1 tr, 1 dc) all in the top of the next popcorn.
1 dc in each of the next 11 dc. Repeat from * twice more. - (1 dc, 1 tr, ch 1, 1 tr, 1 dc) all in the top of the last popcorn.
- 1 dc in each of the last 5 dc.
- Join with sl st to the top of ch 3.
5th rnd:
- Ch 3.
- 1 dc in each dc to the next corner ch-1 space.
- *(2 dc, popcorn, 2 dc) all in the next corner ch-1 space.
1 dc in each dc to the next corner ch-1 space. Repeat from * two more times. - (2 dc, popcorn, 2 dc) all in the last corner ch-1 space.
- 1 dc in each dc to the end of the round.
- Join with sl st to the top of ch 3.
6th rnd:
- Ch 3.
- 1 dc in each dc to the next popcorn.
- *(1 dc, 1 tr, ch 1, 1 tr, 1 dc) all in the top of the next popcorn.
1 dc in each dc to the next popcorn. Repeat from * two more times. - (1 dc, 1 tr, ch 1, 1 tr, 1 dc) all in the top of the last popcorn.
- 1 dc in each dc to the end of the rnd.
- Join with sl st to the top of ch 3.
7th – 8th rnds:
- Repeat the instructions in the 5th and 6th rounds.
9th rnd:
- Repeat the 5th rnd. Fasten off (note: ‘Fasten off’ point will be the bottom edge of the Motif).
Motif Edging
With the right side facing, join A with a sl st to the front loop only of the right corner popcorn in the last round. Working in front loops only, perform the following:
- Work 1 sc in each st down the side to the next corner popcorn.
- 3 sc in the front loop only of the corner popcorn.
- Work 1 sc in each st across the bottom of the Motif (where fastened off occurred) to the next corner popcorn.
- 3 sc in the front loop only of the corner popcorn.
- Work 1 sc up the side of the Motif to the next corner popcorn.
- Work 1 sc in the popcorn.
- Fasten off.
Side Section
1st row:
With the right side of one Motif facing, locate the rem back loops from the Motif Edging round. Join MC with sl st in the first rem loop.
- 1 sc in the same space.
- Work 1 sc in rem back loop of each st along the same row as Motif Edging (this will create a ridge in A).
- Turn.
2nd to 8th rows:
- Ch 1.
- 1 sc in each sc to the end of the row.
- Turn.
Do not fasten off – proceed as follows:
Join Side Section to 2nd Motif:
- Locate the rem back loops from the 2nd Motif Edging round.
- With the right sides of the pieces facing each other, line up the 8th row of Side Section with the rem back loops of the Motif Edging round.
- Working through both thicknesses, join the last row of Side Section with rem back loops of Motif Edging round with 1 row of sl st.
- Fasten off. (This will create a ridge in A).
Top Border and Straps
1st rnd:
With the right side facing, join A with sl st on the upper edge in the top of the A ‘ridge’ on the left corner of Motif.
- Ch 1.
- Work 9 sc across the top of the Side Section.
- Work 1 sc in each st across the top of Motif (37 sc).
- Work 9 sc across the top of the 2nd Side Section.
- Work 1 sc in each st across the top of 2nd Motif (37 sc).
- A total of 92 sc. Join with sl st to the first sc.
2nd to 7th rnds:
- Ch 1.
- 1 sc in each sc around.
- Join with sl st to the first sc.
8th rnd (Place Straps):
- Ch 1.
- 1 sc in each of the first 15 sc.
- Ch 51.
- Skip the next 25 sc.
- 1 sc in each of the next 21 sc.
- Ch 51.
- Skip the next 25 sc.
- 1 sc in each of the last 6 sc.
- Join with sl st to the first sc.
9th rnd:
- Ch 1.
- 1 sc in each sc and ch to the end of the rnd.
- Join with sl st to the first sc.
- A total of 144 sc.
10th to 12th rnds:
- Ch 1.
- 1 sc in each sc around.
- Join with sl st to the first sc.
Fasten off.
Frequently Asked Questions
What yarn is recommended for this pattern?
For this pattern, you will need Bernat® Maker™ yarn. You will primarily use the colors Cream (06003) and Navy (06017).
Is this project worked in rounds or rows?
The Crochet Carry On Tote Bag Pattern is primarily worked in rounds, creating beautiful motifs that form the base of the bag.
How large is the finished tote bag?
The pattern does not specify final dimensions; however, the motifs and construction suggest a spacious design suitable for daily use or trips.
Conclusion
The Crochet Carry On Tote Bag Pattern is not only a fun and engaging project but also results in a practical item that you can use every day. With its stylish motifs and sturdy construction, this tote bag is sure to receive compliments wherever it goes. Happy crocheting!