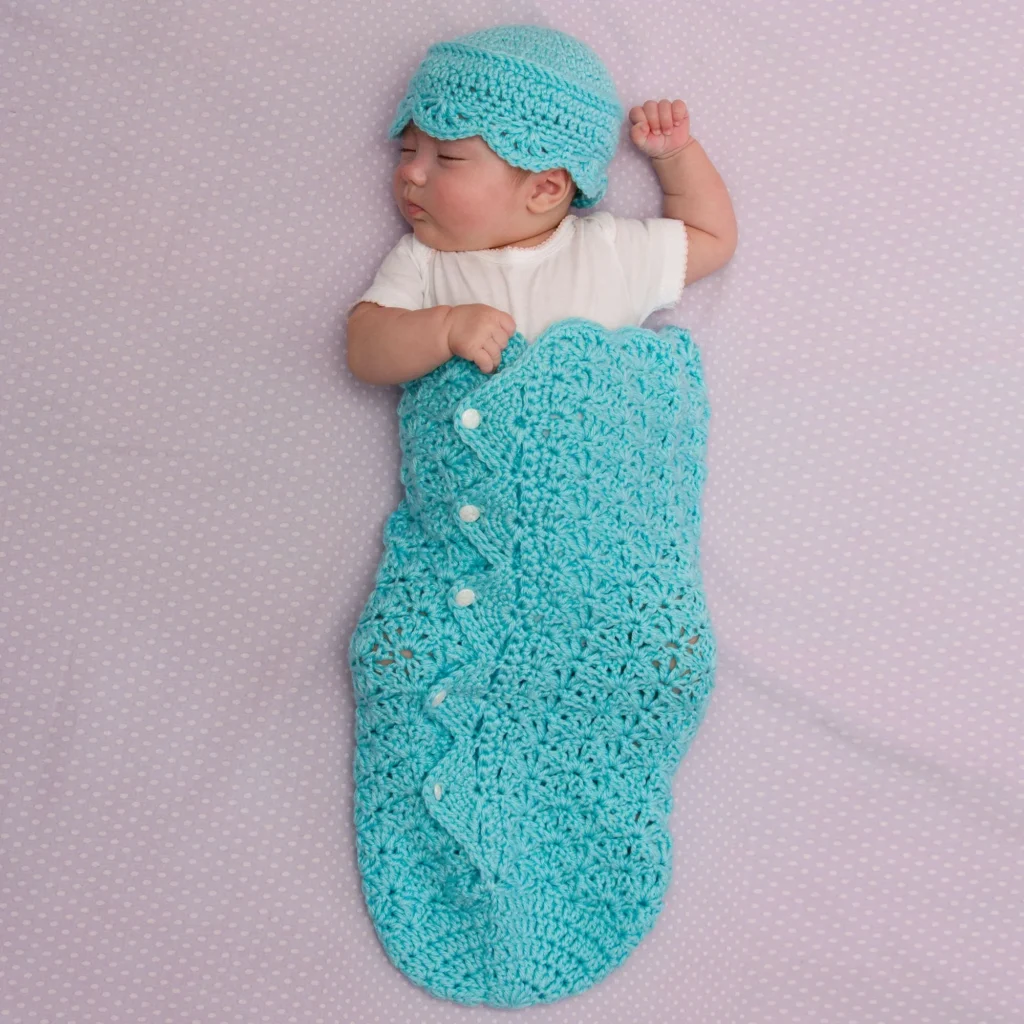
Crochet Button-Up Baby Cocoon and Hat Pattern
Welcome to your next exciting crochet project! In this article, you’ll discover how to create a delightful Baby Cocoon and Hat set that’s perfect for keeping your little one warm and stylish. This cozy duo features a button-up cocoon made in a beautiful aqua shade and a charming hat to complete the look.
About the Crochet Project
The Crochet Button-Up Baby Cocoon and Hat Pattern is designed with both functionality and aesthetics in mind. The cocoon is easy to put on and take off, making it a practical choice for parents. The shell stitch pattern adds a lovely texture, while the buttons serve as a cute decorative element and a functional closure, enhancing usability.
This pattern is suitable for parents looking to create a handmade gift for baby showers or to keep their little ones snug and comfy.
Materials

To create your button-up baby cocoon and hat, you will need the following materials:
Yarn
- RED HEART® Soft Baby Steps®: 2 balls, color 9505 Aqua.
Crochet Hook
- Susan Bates® Crochet Hook: 5.5mm [I-9 US].
Notions
- Yarn needle for weaving in ends.
- Five 12mm buttons for the cocoon.
Crochet Abbreviations
Familiarizing yourself with crochet abbreviations can make following the pattern easier. Below are the key abbreviations used in this pattern:
- ch: chain
- dc: double crochet
- sc: single crochet
- sl st: slip stitch
- ( ): instructions within parentheses are to be repeated as instructed.
- [ ]: instructions within brackets indicate a series of stitches to be repeated.
Technical Notes
- The cocoon is worked from the bottom up in joined rounds while the remainder of the cocoon is worked back and forth in rows in a shell pattern.
- The hat is worked from the top down.
- When working the cocoon, keep the right side facing at all times and do not turn rounds.
Cocoon Instructions
The cocoon is the main feature of this crochet project. Below are the step-by-step instructions to create this stylish baby cocoon.
Beginning at Bottom: Joined Rounds (Bottom)
-
Round 1 (right side): Ch 4 (beginning ch counts as first dc), 11 dc in 4th ch from hook; join with slip st in top of beginning ch—12 dc.
-
Round 2: Ch 3 (counts as first dc here and throughout), dc in same st as join, 2 dc in each dc around; join with slip st in top of beginning ch—24 dc.
-
Round 3: Ch 3, dc in same st as join, dc in next dc, [2 dc in next dc, dc in next dc] 11 times; join with slip st in top of beginning ch—36 dc.
-
Round 4: Ch 3, dc in same st as join, dc in next 2 dc, [2 dc in next dc, dc in next 2 dc] 11 times; join with slip st in top of beginning ch—48 dc.
-
Round 5: Ch 3, dc in same st as join, dc in next 3 dc, [2 dc in next dc, dc in next 3 dc] 11 times; join with slip st in top of beginning ch—60 dc.
-
Round 6: Ch 3, dc in same st as join, dc in next 9 dc, [2 dc in next dc, dc in next 9 dc] 5 times; join with slip st in top of beginning ch—66 dc.
Shell Pattern (Remainder of Cocoon; back and forth in rows)
Note: The remainder of the cocoon is worked back and forth in rows.
-
Row 1 (right side): Ch 1, sc in same st as join, [skip next 2 dc, shell in next dc, skip next 2 dc, sc in next dc] 10 times, skip next 2 dc, shell in next dc, skip next 2 dc, sc in same st as first sc (same st as join), do not join, turn—11 shells.
-
Row 2: Ch 3, (dc, ch 1, dc) in first sc (half shell made), skip next ch-1 space (first ch-1 space of shell), sc in next ch-1 space (center ch-1 space of shell), [shell in next sc, skip next ch-1 space, sc in next ch-1 space] 10 times, (dc, ch 1, 2 dc) in last sc (half shell made), turn—10 shells and one half-shell at each end.
-
Row 3: Ch 1, sc in first dc, [shell in next sc, skip next ch-1 space, sc in next ch-1 space] 10 times, shell in next sc, sc in top of turning ch, turn.
-
Rows 4–31: Repeat last 2 rows 14 times. At the end of Row 31, do not fasten off and do not turn.
Buttonhole Band
-
Row 1 (right side): Working in ends of rows down the side edge, ch 1, sc in side of last sc made (at the end of Row 31, [2 sc in the next ch-3 turning space, sc in side of next sc] 15 times, turn)—46 sc.
-
Row 2: Ch 1, skip first sc, sc in next 44 sc, turn; leave last sc unworked—44 sc.
-
Row 3: Ch 1, sc in first 2 sc, [skip 3 sc, Ltr-shell in next sc, skip next 3 sc, sc in next sc] 5 times, sc in next 2 sc, slip st in side of last sc of Row 1, sc in join of last round of bottom of cocoon. Do not fasten off and do not turn. Note: The ch-2 spaces of the Ltr-shells serve as buttonholes.
Buttonband and Top Edge (right side)
- Working in ends of rows up the opposite side edge, work 2 sc over each dc and sc in the side of each sc at ends of rows to the top edge; working in sts across the top edge, sc in first sc (same sc as last sc made), skipping all of the dc sts, *2 sc in each of the next 3 ch-1 spaces, sc in next sc; repeat from * across the top edge. Do not fasten off and do not turn.
Buttonhole Band Edging (right side)
- Working across buttonband, sc in the end of Row 1 of the buttonhole band, sc in the end of Row 2, sc in the first 2 sc of Row 3, [working in back loops only, sc in next 5 sts, 2 sc in next ch-2 space, sc in next 5 sts, sc in next sc] 5 times, sc in next sc, slip st in next st. Fasten off.
Finishing Cocoon
- Weave in ends and sew one button to the buttonband opposite the ch-2 space of each Ltr-shell.
Hat Instructions
The matching hat is a delightful addition to the baby cocoon. It combines fun and functionality, offering warmth and style.
Beginning at Top of Hat
- Beginning at top of hat: ch 3.
Rounds
-
Round 1 (right side): Work 8 extsc in 3rd ch from hook (the beginning ch does not count as a st); join with a slip st in the first extsc—8 extsc.
-
Round 2: Ch 2 (does not count as a st here and throughout), 2 extsc in each st around; join with slip st in first extsc—16 extsc.
-
Round 3: Ch 2, extsc in the same st as join, 2 extsc in the next st, [extsc in next st, 2 extsc in next st] 7 times; join with a slip st in first extsc—24 extsc.
-
Round 4: Ch 2, extsc in the same st as join, extsc in the next st, 2 extsc in the next st, [extsc in next 2 sts, 2 extsc in next st] 7 times; join with a slip st in first extsc—32 extsc.
-
Round 5: Ch 2, extsc in the same st as join, extsc in the next 2 sts, 2 extsc in the next st, [extsc in next 3 sts, 2 extsc in next st] 7 times; join with a slip st in first extsc—40 extsc.
-
Round 6: Ch 2, extsc in the same st as join, extsc in the next 3 sts, 2 extsc in the next st, [extsc in next 4 sts, 2 extsc in next st] 7 times; join with a slip st in first extsc—48 extsc.
-
Round 7: Ch 2, extsc in the same st as join, extsc in the next 4 sts, 2 extsc in the next st, [extsc in next 5 sts, 2 extsc in next st] 7 times; join with a slip st in first extsc—56 extsc.
-
Round 8: Ch 1, Bpextsc around each extsc; join with a slip st in the first BPextsc—56 sts.
-
Round 9: Ch 2, extsc in each Bpextsc around; join with a slip st in the first extsc.
-
Round 10: Ch 2, extsc in the same st as join, extsc in the next 4 sts, extsc2tog, [extsc in next 5 sts, extsc2tog] 7 times; join with a slip st in first extsc—48 sts.
-
Round 11: Ch 1, sc in the same st as join, sc in the next 5 sts, sc2tog, [sc in next 6 sts, sc2tog] 5 times; join with a slip st in first sc—42 sts.
-
Round 12: Ch 1, sc in the same st as join, sc in each remaining sc around; join with a slip st in first sc.
-
Round 13 (Lg-shell round): Ch 1, sc in the same st as join, [skip next 2 sc, Lg-shell in next sc, skip next 2 sc, sc in next sc] 6 times, skip next 2 sc, Lg-shell in next sc, skip next 2 sc; join with a slip st in first sc—7 Lg-shells.
-
Round 14: Ch 1, sc in the same st as join, skipping all of the dc sts, 2 sc in each of the next 4 ch-1 spaces, *sc in next sc, 2 sc in each of the next 4 ch-1 spaces; repeat from * around; join with a slip st in first sc—63 sc.
-
Fasten off after finishing the hat.
Finishing Hat
- Weave in all ends securely to ensure your hat is ready for wear!
Frequently Asked Questions
What crochet hook is used for this pattern?
The pattern requires a 5.5mm (I-9 US) Susan Bates® Crochet Hook.
Is this project worked in rows or rounds?
The cocoon is worked in two elements: the bottom is constructed in joined rounds, while the body is worked back and forth in rows. The hat is worked in rounds starting from the top down.
How many buttons do I need for the cocoon?
You will need five 12mm buttons to complete the cocoon.
What yarn is recommended for this pattern?
The pattern recommends using RED HEART® Soft Baby Steps®, specifically color 9505 Aqua.
Does this crochet project require assembly?
No additional assembly is required after completing the cocoon and hat since they are each made as complete pieces in their own right.
Conclusion
Creating the Crochet Button-Up Baby Cocoon and Hat is an excellent choice for those wanting to gift or use a beautiful handmade item for a new baby. The blend of texture from the shell stitch and the practicality of the button closure makes this set a perfect addition to any baby’s wardrobe. Happy crocheting, and enjoy making this lovely set!