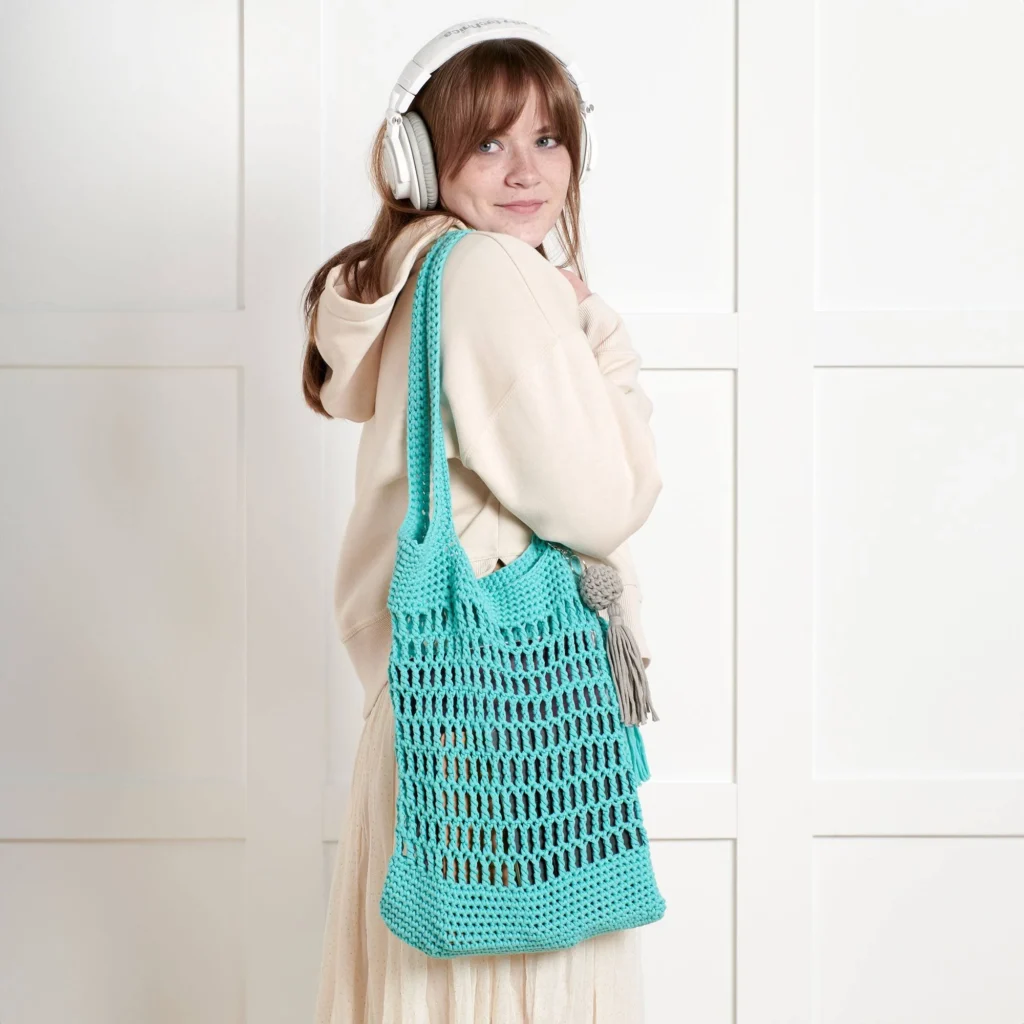
Beginner In the Market Crochet Bag Pattern
Crochet enthusiasts rejoice! The Beginner In the Market Crochet Bag Pattern is here to add a touch of handmade charm to your crochet collection. This versatile bag is perfect for trips to the market, beach days, or as an everyday tote. The combination of stunning mesh patterns and functional design makes it a staple accessory for your outings.
About the Bag
This crochet bag features a beautiful mesh pattern that creates an airy yet sturdy structure, giving it an elegant yet functional flair. The bag is approximately 12″ wide and 14″ long, making it the ideal size for carrying all your essentials. Designed using bulky weight yarn, this bag is not only visually appealing but also quick to crochet, making it suitable for various occasions.
Materials

To get started with this crochet project, you will need the following materials:
Yarn
- Yarn: Bulky weight Bernat® Maker™ yarn
- 1 ball / 8.8 oz (250 g)
- 317 yds (290 m)
- Colors: Aqua (14016) or Clay (11008) — 1 ball (270 yds / 246 m)
Tools
- Crochet Hook: Size U.S. J/10 (6 mm) or size needed to obtain gauge
- Stitch Markers: Susan Bates® stitch markers for tracking your rounds
- Yarn Needle: To weave in ends and finish the project neatly
- Tape Measure: For checking dimensions and ensuring the right size
- Optional: Keychain finding for creating tassel keychains
- Additional Supplies:
- Small amount of polyfill stuffing
- Piece of cardboard 6″ [15 cm] long for making tassels
Finished Measurements
This bag finishes at approximately:
- Width: 12″ [30.5 cm]
- Length: 14″ [35.5 cm] (excluding handles)
Gauge
For this project, your gauge should measure:
- 13 single crochets (sc) and 14 rows = 4″ [10 cm]
Crochet Abbreviations
Here are the key abbreviations used in this pattern:
- Ch: Chain
- Rnd: Round
- Sc: Single Crochet
- Tr: Treble Crochet
- Sl st: Slip Stitch
- Yoh: Yarn Over
- PM: Place Marker
- Inc: Increase
- Rem: Remaining
- WS: Wrong Side
- RS: Right Side
- Sc2tog: Single Crochet Two Together
Pattern Notes
- The bag is worked in rounds without turning, creating a seamless look.
- The mesh portion allows for flexibility in the bag’s design, providing both aesthetic and utility.
- An optional tassel keychain can be added for embellishment.
Construction Overview
This crochet bag is constructed in several stages:
- Bag Base: The foundation is created using single crochet and increases to form the base.
- Mesh Pattern Section: Once the base is established, a beautiful mesh pattern is crocheted for the body of the bag.
- Edging and Handles: The top edging is designed to finish the bag elegantly, and the handles are added for functionality.
Now, let’s dive into the instructions to create your very own Beginner In the Market Crochet Bag.
Instructions
Bag Base
See Diagram 1 on page 7.
- Slip Knot: Make a loop with yarn and fold it on itself to make a pretzel shape. Then pull through to make a slip knot.
- Chain (Ch) 39.
1st Round (Rnd):
- [Right Side (RS)]:
- 2 single crochet (sc) in 2nd ch from hook.
- 1 sc in each of next 36 ch to last ch.
- 3 sc in last ch to create corner turn.
- Now work rotates and you will work sc into opposite side of foundation chain.
(Complete count statement for the 1st rnd)
- Do not turn. Working into remaining (rem) loops of foundation chain, work 1 sc in each ch to last ch.
- 1 sc in last ch (same ch as first 2 sc of round). Do not join. 78 sc.
- Place Marker (PM) on first sc of rnd to indicate beginning (beg) of rnd.
- 1st rnd is complete.
2nd rnd:
- 1 sc in each sc around.
Next Base Shaping (Repeats/Increases)
- Repeat (Rep) last rnd 7 times more, moving marker up to indicate first stitch of rnd.
- Note: After a few rnds have been worked, the Bag Base will naturally curve up to form the bottom of the Bag.
- Note (width consistency): Because the Mesh Pattern pulls in a little, 6 sts will be increased in the next rnd to make sure the Bag’s width is consistent.
Increase (Inc) Rnd
- 2 sc in first sc.
- 1 sc in each of next 12 sc.
- *2 sc in next sc. 1 sc in each of next 12 sc. Rep from * around.
- (Single crochet 2 together (sc2tog) is shown elsewhere in the pattern; the inc rnd uses “2 sc” increases as written here.)
Join to Start Mesh Pattern Section:
- Join with slip stitch (sl st) to first sc. 6 sc have been inc’d. There are now 84 sc in rnd.
Mesh Pattern Section
See Diagrams on page 11.
1st rnd:
- Ch 5 — counts as 1 Treble crochet (Tr) and ch 1.
- Skip next sc.
- 1 treble crochet (Tr) in next sc.
- Treble crochet: Wrap yarn twice around hook – (Yoh) twice.
- *Ch 1. Skip next sc. 1 tr in next sc.
- Rep from * to last sc.
- Ch 1. Skip last sc.
- Join with sl st to 4th ch of beg ch-5. Turn.
1st rnd of Mesh Pattern is complete.
2nd rnd:
- (WS): Ch 5 — counts as 1 tr and ch 1.
- *Skip next ch-1 space (sp). 1 tr in next tr. Ch 1.
- Rep from * to last ch-1 sp. Skip last ch-1 sp.
- Join with sl st to 4th ch of beg ch-5. Turn.
2nd rnd of Mesh Pattern is complete.
3rd rnd:
- (RS): Ch 5 — counts as 1 tr and ch 1.
- *Skip next ch-1 sp. 1 tr in next tr. Ch 1.
- Rep from * to last ch-1 sp. Skip last ch-1 sp.
- Join with sl st to 4th ch of beg ch 5. Turn.
3rd rnd of Mesh Pattern is complete.
Finishing Mesh Rounds Count:
- Rep last 2 rnds of Mesh Pattern 3 times more.
- (Total of 9 rnds worked in Mesh Pattern).
- Do not turn at end of last rnd.
Top Edging and Handles
See Diagram 3 on page 15.
1st rnd (Top Edging):
(RS)
- Ch 1.
- 1 sc in same sp as last sl st.
- *1 sc in next ch-1 sp. 1 sc in next tr. Rep from * around, ending with 1 sc in last ch-1 sp.
- Join with sl st to first sc. 84 sc.
2nd rnd (Decrease Rnd):
- Ch 1.
- Draw up a loop in each of next 2 stitches.
- Yoh and draw through all loops on hook. (Sc2tog).
- *1 sc in each of next 12 sc. Sc2tog. Rep from * to last 12 sc.
- 1 sc in each of last 12 sc.
- Join with sl st to top of first sc. 78 sts.
3rd to 6th rnds:
- Ch 1. 1 sc in each st around.
- Join with sl st to first sc.
Handle Placement
1st rnd (Handle Placement):
- Ch 1.
- 1 sc in each of next 10 sc.
- Ch 68 (First Handle).
- Skip next 19 sc.
- Join with sl st to first sc.
- 1 sc in each of next 20 sc.
- Ch 68 (Second Handle).
- Skip next 19 sc.
- 1 sc in each of last 10 sc.
- Join with sl st to first sc.
2nd rnd:
- Ch 1.
- 1 sc in each of next 10 sc.
- At this point you have reached 68 ch for first Handle.
- 1 sc in each of next 68 ch of first Handle.
- 1 sc in each of next 20 sc.
- At this point you have reached 68 ch of second Handle.
- 1 sc in each of next 68 ch of second Handle.
- Join with sl st to first sc.
Final Sc Rounds + Finishing
9th and 10th rnds:
- Ch 1. 1 sc in each sc around.
- Join with sl st to first sc.
- Fasten off.
- Weave in ends.
Optional: Tassel Keychain
Ball
- Make a slip knot and place on hook. (See instructions on page 4.)
- Ch 2.
1st rnd:
- 8 sc in 2nd ch from hook.
- Join with sl st to first sc. 8 sc.
2nd rnd:
- Ch 1. 2 sc in each sc around.
- Join with sl st to first sc. 16 sc.
3rd rnd:
- Ch 1. 1 sc in each sc around.
- Join with sl st to first sc.
4th and 5th rnds:
- As 3rd rnd.
6th rnd:
- Ch 1. (Sc2tog) 8 times.
- Join with sl st to first st. 8 sts.
- Pull up loop, remove hook temporarily and stuff Ball lightly with polyfill stuffing.
7th rnd:
- Return hook to loop and ch 1.
- (Sc2tog) 4 times.
- Join with sl st to first st. 4 sts.
- Cut yarn, leaving a long end. Thread end onto yarn needle and draw through remaining (rem) sts, pulling up tightly to secure, then draw end into Ball to hide.
Tassel
- Wrap yarn around 6″ [15 cm] piece of cardboard 25 times.
- Thread length of yarn 15″ [38 cm] long through loops at top and tie securely, leaving ends to attach to Ball.
- Cut across the other side of loops.
- Wrap yarn 5 times around Tassel ½” [1.25 cm] down from tied end and fasten securely by threading end behind wrapped yarn and bringing tail into the Tassel.
- Trim end of Tassel evenly.
- Attach Tassel to Ball.
- Using yarn needle, thread long ends from top of Tassel through center of Ball from bottom to top.
- Use yarn ends to tie keychain finding to top, being sure to tie a secure knot.
- Using yarn needle, pull ends into Ball to hide.
Frequently Asked Questions
What crochet hook is used for this pattern?
You will need a Size U.S. J/10 (6 mm) Susan Bates® crochet hook or a size needed to obtain gauge.
Is this project worked in rows or rounds?
The bag is worked in rounds without turning.
What are the finished dimensions of this bag?
The finished bag measures approximately 12″ wide by 14″ long, excluding the handles.
Does this crochet project require assembly?
No assembly is required; it is crocheted in a continuous round.
Can I customize the color of the yarn?
Yes! You can choose between Aqua (14016) or Clay (11008). However, feel free to experiment with any color you like to match your style.
Conclusion
The Beginner In the Market Crochet Bag Pattern is a delightful project that combines creativity with functionality. With its stunning mesh design, it becomes an essential tote for both casual and stylish outings. Whether you are a seasoned crocheter or a passionate beginner, this bag pattern promises to deliver a satisfying crochet experience. Grab your materials and get started on your new favorite accessory!