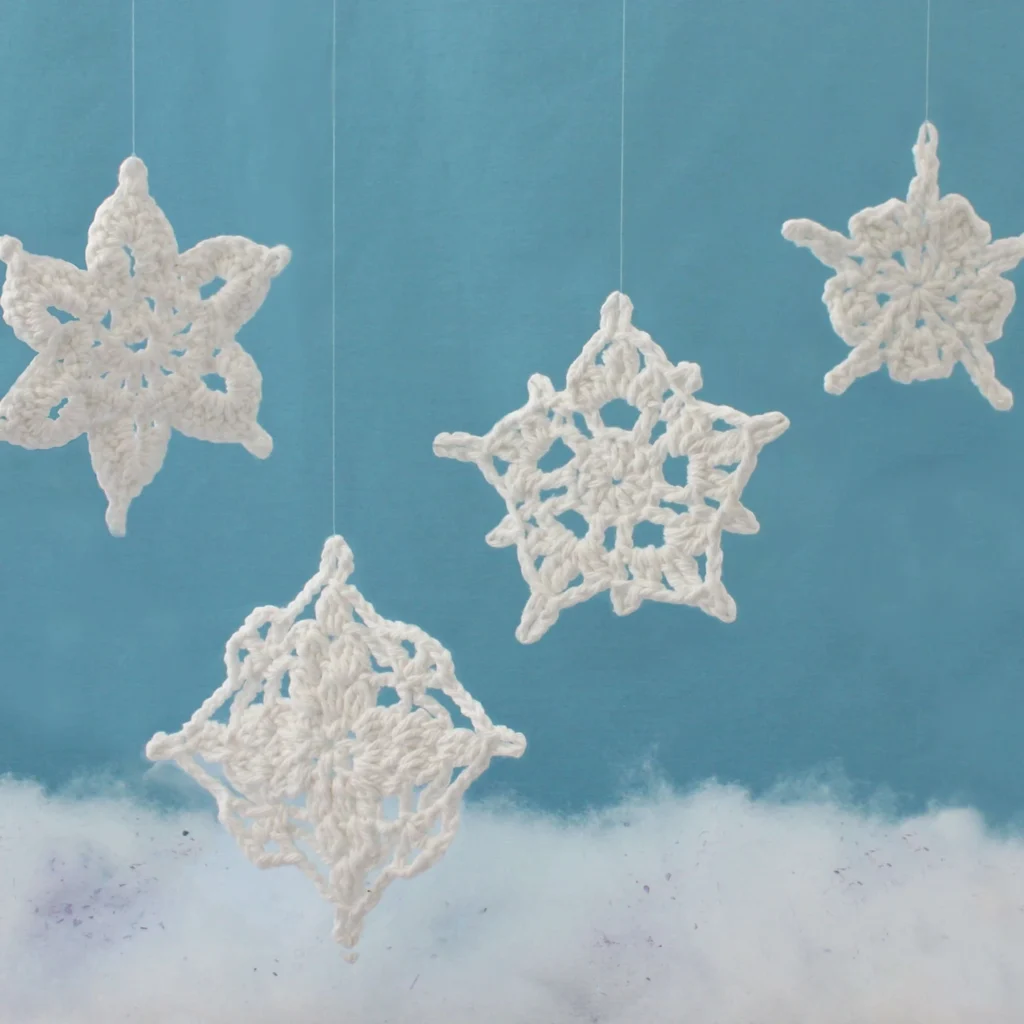
Assorted Snowflakes Pattern
Crochet is a delightful craft that celebrates creativity, patience, and skill. In this article, we will explore a beautiful and intricate Assorted Snowflakes Pattern, perfect for adding a wintery touch to your home decor or gifting handmade charm to loved ones. This versatile crochet pattern enables you to create diverse snowflake designs that are not only lovely for the holiday season but also great for year-round decoration.
About the Crochet Project
The Assorted Snowflakes Pattern features multiple designs with delicate details that mimic the unique patterns found in nature. Each snowflake is intricately constructed using a series of stitches meticulously detailed in the pattern. With the right materials and a bit of patience, you can create up to ten charming snowflakes from a single ball of Lily Sugar’n Cream yarn, empowering you to spread the magic of winter through crochet.

Materials
To get started on your snowflakes, gather the following materials:
-
Yarn:
- Lily® Sugar’n Cream® (70.9 g / 2.5 oz; 109 m / 120 yds), Color: 00001 (White)
- Note: 1 ball makes approximately 10 snowflakes in assorted patterns.
-
Crochet Hook:
- Size 3.5 mm (U.S. E or 4) crochet hook or size needed to obtain gauge.
-
Optional:
- Fabric stiffener for finishing touches to strengthen the flake’s shape.
Crochet Abbreviations
Familiarize yourself with the following abbreviations used in this pattern:
- Approx = Approximately
- Ch = Chain(s)
- Dc = Double crochet
- Rem = Remaining
- Rep = Repeat
- Rnd = Round
- Sc = Single crochet
- Sl st = Slip stitch
- Sp(s) = Space(s)
- St(s) = Stitch(es)
- Yoh = Yarn over hook
Understanding the Pattern
This pattern comprises four distinct snowflake designs: Snowflake A, Snowflake B, Snowflake C, and Snowflake D. Each snowflake offers a unique structure and aesthetic, achieved via different stitch combinations and rounds. Here’s a breakdown of the construction method for each snowflake:
Snowflake A
Instructions:
-
Ch 5.
-
1st rnd:
- 1 dc in 5th ch from hook (counts as 1 dc. Ch 1. 1 dc)
- (Ch 1. 1 dc) 10 times in same sp.
- Ch 1. Join with sl st to 3rd ch.
-
2nd rnd:
- Ch 1. 1 sc in same sp as last sl st.
- Ch 7. Sl st in last sc worked. (1 sc in next ch-1 sp. 1 sc in next dc) twice.
- Rep from * 4 times more.
- Ch 7. Sl st in last sc worked. 1 sc in next ch-1 sp. 1 sc in next dc.
- Do not join. Leave rem st unworked.
-
3rd rnd:
- *(6 dc. Ch 3. Sl st in last dc worked – picot made. 5 dc) in next ch-7 sp. Miss next sc. 1 sc in next sc. Miss next sc. Rep from * 5 times more. Join with sl st to last sc of 2nd rnd. Fasten off.
Snowflake B
Instructions:
-
Ch 5.
-
1st rnd:
- 1 dc in 5th ch from hook (counts as 1 dc. Ch 1. 1 dc)
- (Ch 1. 1 dc) 8 times in same sp.
- Ch 1. Join with sl st to 3rd ch.
-
2nd rnd:
- Ch 1. 1 sc in same sp as last sl st.
- Ch 3. 2 dc in next ch-1 sp. Ch 3. 1 sc in next dc. Ch 6. Sl st in 4th ch from hook. Ch 3. Miss next ch-1 sp. 1 sc in next dc.
- Rep from * 4 times more omitting sc at end of last rep.
- Join with sl st to first sc. Fasten off.
Snowflake C
Instructions:
-
Ch 4.
-
1st rnd:
- 9 dc in 4th ch from hook.
- Join with sl st to top of ch 3.
- 10 dc.
-
2nd rnd:
- Ch 4 (counts as dc and ch 1).
- 1 dc in next dc.
- (Ch 3. 1 dc in next dc. Ch 1. 1 dc in next dc) 4 times.
- Ch 3. Join with sl st to top of ch 3.
-
3rd rnd:
- Sl st in next ch-1 sp.
- Ch 1.
- (1 sc. Ch 3. Sl st in 3rd ch from hook – picot made) in same sp as last sl st.
- In next ch-3 sp:
- *(Yoh and draw up a loop. Yoh and draw through 2 loops on hook) twice.
- Yoh and draw through all loops on hook – dc cluster made.
- Ch 2.
- (Yoh) twice and draw up a loop. (Yoh and draw through 2 loops on hook) twice.
- Rep from * to * once more.
- Yoh and draw through all loops on hook – tr cluster made.
- Ch 5. Sl st in top of tr cluster – long picot made. Ch 2. Dc cluster.
- 1 sc in next ch-1 sp. Picot.
- Rep from ** three times more, then from ** to ** once.
- Join with sl st to first sc. Fasten off.
Snowflake D
Instructions:
-
Ch 5.
-
1st rnd:
- 1 dc in 5th ch from hook (counts as 1 dc. Ch 1. 1 dc).
- (Ch 1. 1 dc) 4 times in same sp.
- Ch 1. Join with sl st to 3rd ch.
- 6 dc and ch-1 sps.
-
2nd rnd:
- Ch 3.
- (Yoh and draw up a loop. Yoh and draw through 2 loops on hook) twice in same sp as last sl st.
- Yoh and draw through all 3 loops on hook – beg cluster made.
- Ch 1.
- (Yoh and draw up a loop. Yoh and draw through 2 loops on hook) 3 times in next ch-1 sp.
- Yoh and draw through all loops on hook – cluster made.
- Ch 1.
- Cluster in next dc.
- *Ch 5. (Cluster in next ch-1 sp or dc. Ch 1) 3 times.
- Rep from * twice more.
- Ch 5. Join with sl st to top of beg cluster.
-
3rd rnd:
- Sl st in next ch-1 sp.
- Beg cluster in same sp. Ch 1.
- Cluster in next ch-1 sp.
- *Ch 5. 1 sc in next ch-5 sp. Ch 5. Cluster in next ch-1 sp. Ch 1. Cluster in next ch-1 sp. Rep from * twice more.
- Ch 5. 1 sc in last ch-5 sp. Ch 5.
- Join with sl st to top of beg cluster.
-
4th rnd:
- Sl st in next ch-1 sp.
- Beg cluster in same sp.
- Ch 5.
- Sl st in top of beg cluster – long picot made.
- *Ch 5. [(1 dc. Ch 3) twice. 1 dc] in next sc. Ch 5.
- Cluster in next ch-1 sp. Long picot in last cluster.
- Rep from * twice more, then from * to ** once.
- Join with sl st to top of beg cluster.
- Fasten off.
Finishing
Upon completion of your snowflakes, you may choose to add an extra touch with fabric stiffener. Following the manufacturer’s instructions, apply stiffener and pin the snowflakes onto a flat surface to dry. This step will ensure your creations hold their lovely shape and add a professional finish to each piece.
Frequently Asked Questions
What crochet hook is used for this pattern?
For this pattern, a size 3.5 mm (U.S. E or 4) crochet hook is recommended or the size needed to obtain gauge.
How long does it take to crochet these snowflakes?
The time to complete each snowflake can vary based on your individual crochet speed and familiarity with the stitches, but each flake is designed to be a quick project that could be completed in an enjoyable sitting.
Do these snowflakes require assembly?
No, the snowflakes are crocheted in one piece. Once you finish the rounds as directed, you can simply stiffen them if desired.
Can I use different colors for the snowflakes?
Absolutely! While the pattern provides a classic white snowflake design, feel free to experiment with any color of Lily® Sugar’n Cream® yarn to suit your decor or personal style.
How can I use these snowflakes once finished?
These beautiful snowflakes can be used as ornaments, table decorations, part of a winter garland, or even gift embellishments. The possibilities are endless!
Conclusion
The Assorted Snowflakes Pattern is a wonderfully simple yet beautiful project that brings a touch of winter magic into your life. Whether you choose to hang them on your tree, use them as coasters, or give them away as heartfelt gifts, these crocheted snowflakes are sure to be cherished. Enjoy the process of creating and sharing your handcrafted decorations!