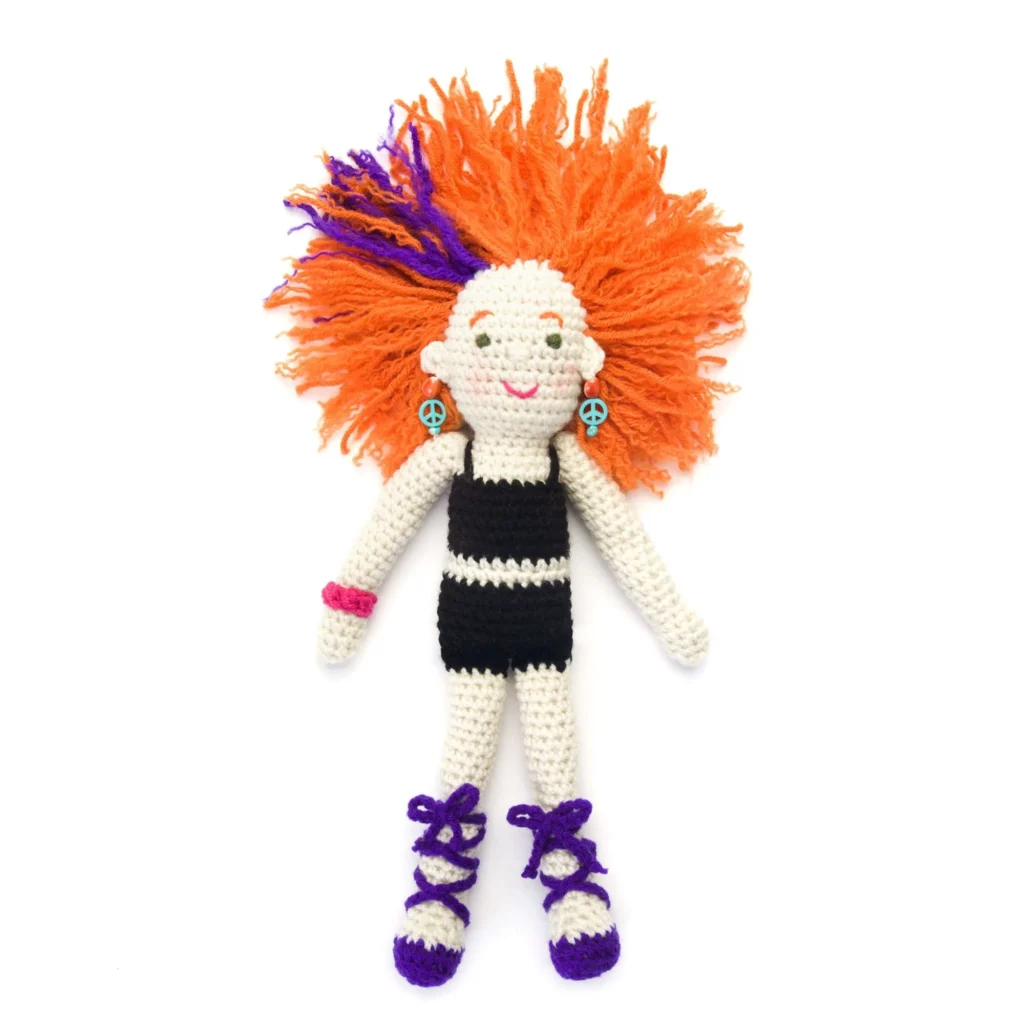
Crochet Artistic Annie Doll Pattern
Crocheting is a delightful and creative way to create unique pieces. If you enjoy making dolls, the Crochet Artistic Annie Doll Pattern is a charming project that combines fun colors and detailed components, perfect for both gifting or adding to your collection.
About the Crochet Artistic Annie Doll
The Crochet Artistic Annie Doll is a whimsical creation that typically features a colorful outfit, unique hairstyle, and cute accessories. This doll is designed to be soft and cuddly, making it an excellent gift for children or a charming decorative piece.
Materials

Yarn
- RED HEART® “Super Saver®”
- Color A: 313 Aran — 1 skein
- Color B: 312 Black — 1 skein
- Color C: 530 Orchid — 1 skein
- Color D: 718 Shocking Pink — 1 skein
- Color E: 356 Amethyst — 1 skein
- Color F: 256 Carrot — 1 skein
- Color G: 406 Medium Thyme — 1 skein
Crochet Hook
- 4 mm [US G-6]
Other Materials
- Yarn needle
- Stuffing
- 7” piece of heavy cardboard
- Four small beads (for earrings)
- Heavy-duty sewing thread
- ¾–1” button (for bag)
- Red crayon (to shade cheeks)
- Cardboard hair wrap size: “Wrap F around 7” piece of heavy cardboard”
Crochet Abbreviations
- sc: single crochet
- ch: chain
- sl st: slip stitch
- dc: double crochet
- sc2tog: single crochet two together (special stitch)
Special Stitch
- sc2tog = [Draw up a loop in next st] twice, yarn over and draw through all 3 loops on hook.
Pattern Instructions
Head and Body
(Beginning at top of head; work in continuous rounds)
With A, ch 2.
Round 1: Work 6 sc in 2nd ch from hook — 6 sc.
Do not join; work in continuous rounds (spirals). Place a marker for beginning of round; move marker up as each round is completed.
Round 2: Work 2 sc in each sc around — 12 sc
Round 3: [Sc in next sc, 2 sc in next sc] 6 times — 18 sc
Round 4: Sc in each sc around
Round 5: [Sc in next 2 sc, 2 sc in next sc] 6 times — 24 sc
Round 6: Sc in each sc around
Round 7: [Sc in next 3 sc, 2 sc in next sc] 6 times — 30 sc
Rounds 8–15: Sc in each sc around
Round 16: [Sc2tog] 15 times — 15 sts
Rounds 17–19: Sc in each sc around
Round 20: [Sc in next sc, 2 sc in next sc] 7 times, sc in last sc — 22 sc
Round 21: [Sc in next 10 sc, 2 sc in next sc] 2 times; change to B in last sc — 24 sc
Undershirt
Rounds 22–27: With B, sc in each sc around; change to A in last sc of Round 27
Waist
Rounds 28 and 29: With A, sc in each sc around; change to B in last sc of Round 29
Begin Knickers / Body Closure
Rounds 30–35: With B, sc in each sc around. Do not fasten off. Stuff body firmly.
Joining Row
Flatten lower edging, matching stitches. Working through both thicknesses, sc across to close lower edge. Fasten off B.
Arm (Make 2)
Beginning at top of arm, with A, ch 2.
Round 1: Work 6 sc in 2nd ch from hook — 6 sc.
Do not join; work in continuous rounds (spirals). Place a marker; move marker up as each round is completed.
Round 2: [Sc in next sc, 2 sc in next sc] 3 times — 9 sc
Rounds 3–19: Sc in each sc, stuffing arm as you go
Round 20: [Sc2tog] 3 times, sc in last 3 sc — 6 sc
Round 21: Work 2 sc in next 3 sc, sc in last 3 sc — 9 sc
Rounds 22–24: Sc in each sc around
Round 25: [Sc2tog] 4 times, sc in last sc — 5 sc
Fasten off, leaving a long tail. Stuff arm. Thread tail through stitches of last round and pull gently to close opening. Draw a strand of A through arm at elbow and pull to form elbow dimple. Sew arms to sides of body. With B, embroider a strap over each shoulder, from top front of undershirt to top back of undershirt.
Ear (Make 2)
With A, ch 2.
Row 1: Work 5 sc in 2nd ch from hook.
Fasten off, leaving a long tail. Sew ears in place.
Earrings (Make 2)
Thread two beads onto heavy-duty sewing thread and sew to ear. Repeat for 2nd earring.
Hair
Wrap F around 7” piece of heavy cardboard 150 times.
Wrap E around same piece of cardboard 2 times. Cut one end of wraps.
*Fold one strand in half, forming a loop at folded end. Insert hook around a stitch on head of doll at hairline. Place loop of folded strands on hook and draw through. Thread ends of strands through loop and pull to tighten; repeat from * around hairline, placing the E-colored strands on top of head on right side.
Continue to repeat from * to fill in over back of head.
Holding head firmly, brush hair with a hairbrush until desired texture is achieved. Trim ends to about shoulder length.
Leg (Make 2)
(Beginning at foot; continuous rounds)
Beginning at foot, with E, ch 6.
Round 1: Sc in 2nd ch from hook, sc in next 3 ch, 3 sc in last ch; working across the opposite side of the foundation ch, sc in next 3 ch, 2 sc in last ch — 12 sc.
Do not join; work in continuous rounds (spirals). Place a marker; move marker up as each round is completed.
Round 2: Work 2 sc in next sc, sc in next 3 sc, 2 sc in each of the next 3 sc, sc in next 3 sc, 2 sc in each of the next 2 sc — 18 sc
Round 3: Working in back loops only, sc in each sc around; change to A in last sc
Round 4: With A, sc in next 6 sc, [sc2tog] 3 times, sc in last 6 sc — 15 sc
Round 5: Sc in next 3 sc, [sc2tog] 3 times, sc in last 6 sc — 12 sc
Round 6: Sc in next 3 sc, [sc2tog] 3 times, sc in last 3 sc — 9 sc
Rounds 7 and 8: Sc in each sc around
Round 9: Work 2 sc in first sc, sc in each remaining sc around — 10 sc
Rounds 10–27: Sc in each sc around, stuffing leg as you go; change to B in last sc
Round 28: With B, sc in each sc around
Fasten off, leaving a long tail for sewing.
Seam Toe (For Each Leg / After Toe Flattening)
Flatten last row, matching stitches and ensuring that toe faces forward, sewing through both thicknesses, sew across.
Shoe Ties (For Each Leg / After Sewing Legs as Needed)
With E, ch 50 (for first tie), slip st in the top of the shoe at center back, ch 50 (for 2nd tie). Fasten off. Criss-cross ties around the leg and tie in a bow at the front.
Sew legs to the bottom of the body.
Mobius Scarf
With C, ch 14.
Row 1: Work (sc, 2 dc) in 2nd ch from hook, *ch 2, skip next 3 ch, (sc, 2 dc) in next ch; repeat from * across, turn — 4 (sc, 2 dc) groups.
Row 2: Ch 1, (sc, 2 dc) in the first dc, *ch 2, skip next ch-2 space, (sc, 2 dc) in next dc; repeat from * across to last 2 sts, skip next dc, dc in last sc, turn.
Repeat the last row until the piece is long enough to wrap very loosely around the doll’s shoulders. Fasten off, leaving a long tail. Place the piece flat, then flip one short edge over. Sew short edges together.
Hat
With B, ch 2.
Round 1: Work 6 sc in 2nd ch from hook; join with slip st in the first sc — 6 sc.
Rounds 2 and 3: Ch 3 (counts as dc here and throughout), dc in same st as join, 2 dc in each remaining st around; join with slip st in top of beginning ch — 24 sc at the end of Round 3.
Round 4: Ch 3, 2 dc in next dc, [dc in next dc, 2 dc in next dc] 11 times; join with slip st in top of beginning ch — 36 sc.
Rounds 5–7: Ch 3, dc in each dc around; join with slip st in top of beginning ch.
First Earflap (Back-and-Forth Rows)
Note: Work now proceeds back and forth in rows.
Row 8: Ch 3, dc in next 7 dc, turn; leave remaining sts unworked — 8 dc
Row 9: Ch 3, dc in each dc across, turn
Row 10: Ch 1, [sc2tog] 4 times, turn — 4 sc
Row 11: Ch 1, [sc2tog] 2 times, turn — 2 sc
Row 12: Ch 1, sc2tog, ch 12 (for tie). Fasten off.
Second Earflap
Row 8: Skip next 8 unworked dc following the first earflap, join B with sl st in next dc, ch 3, dc in next 7 dc, turn — 8 dc
Repeat Rows 9–12 of the first earflap. Fasten off.
Dress
Bodice
With D, ch 10.
Row 1: Sc in 2nd ch from hook and in each remaining ch across, turn — 9 sc
Rows 2–26: Ch 1, working in back loops only, sc in each sc across, turn. Do not turn at end of Row 26. Do not fasten off.
Skirt
Row 1: Working in ends of rows across the side of the bodice, sc in the end of each row across; change to E in the last sc, turn — 26 sc
Row 2: With E, ch 3 (counts as dc here and throughout), dc in the first sc (increase made), 2 dc in each remaining sc across, turn — 52 dc
Rows 3–7: Ch 3, dc in each dc across, turn; change to D in the last st of Row 7
Row 8 (Right Side): With D and working in front loops only, ch 3, dc in the first dc (increase made), 2 dc in each remaining dc across, turn — 104 dc
Row 9: Ch 1, sc in each dc across. Fasten off.
Row 10: Working in free back loops of Row 7 (behind D-colored ruffle), join E with slip st in sc, ch 4 (counts as tr), tr in same sc (increase made), 2 tr in each remaining sc across, turn.
Row 11: Ch 3, dc in each tr across. Fasten off. Sew back seam using matching yarn colors.
Neck Ties
With D, ch 35 (for the first tie), slip st in the center top of the bodice, ch 35 (for the 2nd tie). Fasten off.
Bag
With B, ch 17.
Row 1: Sc in 2nd ch from the hook and in the next 3 ch, *dc in each of the next 2 ch, sc in the next 4 ch; repeat from * across, turn — 16 sts
Row 2: Ch 1, sc in the first 4 sts, *dc in the next 2 sts, sc in the next 4 sts; repeat from * across; change to G in the last st, turn.
Do not fasten off B. Carry color not in use up the side of the piece until next needed.
Rows 3 and 4: With G, ch 3 (counts as dc here and throughout), dc in the next 3 sts, *sc in the next 2 sts, dc in the next 4 sts; repeat from * across, turn; change to B in the last st of Row 4.
Rows 5 and 6: With B, work Row 2 twice; change to G in the last sc of Row 6.
Rows 7–14: Repeat Rows 3–6 two times.
Rows 15–17: Repeat Rows 3–5.
Row 18: With B, ch 1, sc in the first 4 sc, dc in the next 2 dc, sc in the next 2 sc, ch 4 (for button loop), sc in the next 2 sc, dc in the next 2 dc, sc in the last 4 sc. Fasten off.
Fold the bag in half. Working through both thicknesses, join B with sc in one lower corner (at fold), sc evenly spaced up the side edge, ch 30 (for strap); working through both thicknesses, sc down the other side edge. Fasten off. Sew button opposite buttonhole.
Finishing
Weave in Ends
Weave in ends. Place clothing and accessories on doll.
Embroider Face
With G, embroider satin stitch eyes.
With F, embroider couched stitch eyebrows.
With A, embroider satin stitch nose.
With D, embroider a couched stitch smile.
With red crayon, gently rub color onto the face for cheeks.
Bracelet
With D, ch 10, sc in 2nd ch from hook, sc in the next ch, hdc in the next ch, dc in the next 3 ch, hdc in the next ch, sc in the last 2 ch. Fasten off, leaving a long tail. Wrap bracelet around the wrist of the doll and sew ends together. Weave in ends.
Frequently Asked Questions
What crochet hook is used for this pattern?
The pattern utilizes a 4 mm [US G-6] crochet hook.
Is this project worked in rows or rounds?
The project primarily involves working in continuous rounds, especially for the head and body sections.
Does this crochet project require assembly?
Yes, the arms, legs, head, and hair must be assembled together to complete the doll.
How many components are in this project?
This doll comprises several components, including the body, head, arms, legs, hair, dress, and accessories.
What kind of stuffing is needed for this project?
Standard polyester fiberfill or similar stuffing can be used to give the doll a soft and huggable shape.
Conclusion
The Crochet Artistic Annie Doll Pattern offers a delightful opportunity to create a vibrant, artistic doll that can be cherished by anyone. With its intricately designed body, colorful clothing, and distinct features such as earrings and hair, this project allows for both creativity and personal expression. Enjoy crocheting this charming doll and gifting it to a loved one or displaying it as a unique piece in your home!